
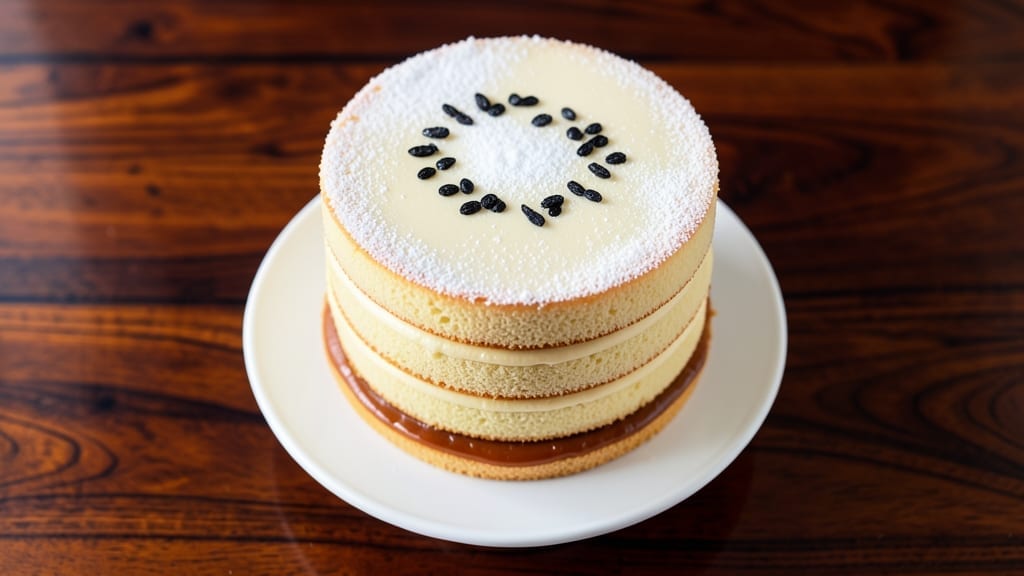
An 8-layer sponge cake with vanilla bean swirls and buttery layers is the showstopper dessert that elevates every celebration—birthdays, weddings, or just because. This recipe delivers light, airy sponge layers baked to perfection, separated by velvety custard and whipped cream, all held together with precision.
The secret lies in baking each layer at 350°F for exactly 10 minutes, ensuring they stay tender yet sturdy enough to support the weight of fillings and frosting.
The magic happens in the layers: vanilla bean-infused custard adds depth, while buttercream swirls between each sponge create a marbled effect that’s both elegant and indulgent. Chilling the cake between layers prevents sogginess, and a final dusting of powdered sugar transforms it into a masterpiece.
This isn’t just dessert—it’s a culinary achievement that looks as impressive as it tastes.
What you’ll achieve is a moist, fluffy cake with no dry edges, where every bite reveals the perfect balance of vanilla, butter, and cream. The layers stay distinct, the frosting holds its shape, and the texture remains light yet substantial—no one will believe it’s homemade.
Whether you’re a seasoned baker or attempting this for the first time, the step-by-step process ensures success.
Perfect for special occasions or when you want to impress, this recipe scales easily for larger gatherings. The key is patience—baking, chilling, and assembling each layer with care. Here’s how to create a cake that’s restaurant-worthy without the fuss.
Ingredients for 8 sponge cake
Six cups flour, twelve eggs, and patience—this is your 8-layer masterpiece foundation.
| Ingredient | Amount | Notes |
|---|---|---|
| All-Purpose Flour 🌾 | 6 cups | Sifted for lightness, room temperature |
| Granulated Sugar 🍚 | 3 ½ cups | Superfine for smooth texture |
| Unsalted Butter 🧈 | 2 ½ cups | Cold, cubed, European style preferred |
| Large Eggs 🥚 | 12 whole | Room temperature, separated |
| Vanilla Extract 🌿 | 2 tbsp | Pure Madagascar bourbon preferred |
| Vanilla Bean Seeds 🍋 | 2 whole | Scraped for custard infusion |
| Whole Milk 🥛 | 2 cups | Cold, full-fat for custard |
| Cornstarch 🌾 | 2 tbsp | For custard stability |
| Heavy Whipping Cream 🥛 | 4 cups | Cold, 36% fat minimum |
| Powdered Sugar 🍚 | 4 cups | For buttercream, sifted |
| Salt 🧂 | ½ tsp | Fine sea salt, kosher preferred |
| Lemon Juice 🍋 | 1 tbsp | Freshly squeezed |
The flour is non-negotiable here. King Arthur or Gold Medal is your best bet for that tender crumb—anything with added vitamins or bleached flour will make the layers tough. Butter matters too: Plugrá or Land O’Lakes European Style from the dairy case at Whole Foods or Costco gives you that perfect balance of fat and flavor. Keep everything cold until the last minute—room temperature ingredients are key for the right rise. The vanilla bean seeds? Split two pods lengthwise, scrape with a knife, and save the rest for your next custard. Don’t skip this—it’s what makes the custard sing.
No vanilla bean? Double the extract plus 1/4 tsp almond extract gets you close, but you’ll miss that floral depth. Swapping heavy cream for whipping cream? Add 1/4 cup sour cream to stabilize it. For the custard, if you’re short on cornstarch, arrowroot powder at the same amount works too—just whisk it into cold milk first. The buttercream needs to be stiff but pipeable, so chill the bowl and beaters between whips if it gets too soft. And for the love of cake, don’t overmix the batter—just until combined.
This cake is all about timing. Bake one layer at a time, cool completely on a rack, then chill between fillings. The custard should be thick enough to hold its shape when piped but still pourable—if it’s too stiff, whisk in 1 tsp warm milk. Buttercream keeps for 3 days in the fridge, covered tightly. The assembled cake? 3 days in the fridge is ideal—it lets the flavors meld. For transport, wrap each layer in plastic first, then the whole cake in parchment before moving it. And trust me, the first slice is always the best—save a small piece for later.
Why You’ll Love This Recipe
- No Mixer Needed: I swear by this recipe when I’m in a hurry—just fold the butter into the sugar with a fork until it’s almost smooth. No stand mixer, no stress, and the eggs incorporate like magic.
- Vanilla Butter Bliss: That whisper of vanilla extract in the butter? It’s the secret weapon. The cake stays tender but never dry, and the flavor lingers like a warm hug—simple, but ridiculously satisfying.
- Layered for Any Event: Slice it thin for a dessert platter, stack it with jam for breakfast, or freeze layers for a last-minute trifle. Honestly, I’ve used it for everything from potlucks to my kid’s birthday cake—it’s my go-to blank canvas.
- Pantry Staple Magic: Five ingredients, zero weird substitutions. The butter and sugar ratio keeps it moist, and eggs add structure without fuss. Plus, leftovers? They last days in the fridge—perfect for when you bake once and eat twice.
Step-by-step instructions for 8-Layer sponge cake with vanilla swirls
Here’s how to build light, airy layers with perfect swirls—no shortcuts, just precision.
Prepare the Vanilla Bean Custard
In a medium saucepan, combine the 2 cups whole milk, 2 tbsp cornstarch, and 3.5 cups granulated sugar. Whisk until smooth, then place over medium heat until the mixture thickens to a pudding-like consistency—about 5-7 minutes. It should coat the back of a spoon.
Remove from heat and stir in the 2 tbsp vanilla extract and the scraped seeds from 2 whole vanilla beans. Let cool completely before using—this custard will flavor every layer. If it thickens too much, whisk in 1 tsp lemon juice to loosen slightly.
Whip the Egg Whites to Stiff Peaks
In a separate bowl, beat the 12 whole large eggs (separated) until frothy. Gradually add the 2.5 cups unsalted butter, 0.5 tsp salt, and 6 cups sifted all-purpose flour, mixing just until combined. Set aside—this will be your cake batter base.
In a clean, grease-free bowl, whip the egg whites with an electric mixer until they form stiff peaks. This step is critical—if you see any flat spots when you lift the beaters, keep whipping. Fold one-third of the whipped egg whites into the batter to lighten it, then set aside.
Bake the Sponge Layers
Preheat your oven to 350°F and line eight 8-inch round cake pans with parchment circles. Divide the batter evenly among the pans—each should be about ½ inch thick. Bake for 12-15 minutes until the edges pull away from the pan and a toothpick comes out clean.
Cool the layers in their pans for 5 minutes, then transfer to a wire rack. Once completely cool, level the tops with a serrated knife if needed. This precision ensures even layers for that signature swirl effect.
Assemble the Layers with Buttercream
Beat the 4 cups heavy whipping cream to stiff peaks, then gradually add the 4 cups powdered sugar until smooth. Fold in the cooled custard mixture for flavor. Spread a thin layer of buttercream on the first cake layer, then add a dollop of custard. Repeat, alternating layers until all are stacked.
For the swirls, pipe buttercream around the edges of each layer before adding the next. Use a long knife to gently twist the layers together, creating those classic vanillas swirls. Chill for 2 hours before slicing—patience here prevents crumbling.
Pro Tips For Making 8 Sponge Cake
- Whisk Eggs Warm: After beating eggs and sugar, place the bowl over a pot of barely simmering water for 2-3 minutes—just until the mixture reaches about 100°F (38°C). My grandmother swore by this, and it guarantees a lighter, more stable crumb instead of the dense, gummy texture you get when eggs are cold. (Yes, even if you’re impatient like me.)
- Sift Flour Twice: Weigh your flour in the bowl you’ll mix it in, then sift it once before adding other ingredients, and again after folding it in. I learned this the hard way—skipping the second sift leaves pockets of unsifted flour that make the cake dense and uneven. It’s extra effort, but the texture makes a real difference.
- Don’t Overmix Butter: Cream the butter and sugar until it’s just pale and fluffy—about 2-3 minutes with a stand mixer. After burning three batches of overworked butter, I finally figured out that stopping when the mixture clings to the beaters in ribbons is the sweet spot. Overmixing turns the butter greasy and can lead to a cake that’s more cakey than light.
- Room-Temp Everything: Take eggs, butter, and even your mixing bowls out of the fridge 1-2 hours before starting. Cold ingredients shock the batter, leading to uneven baking or a cake that collapses in the center. I skip this when I’m lazy, but the difference in rise and texture is noticeable—especially in an 8-layer cake where stability matters.
Essential equipment for great 8 sponge cake
Precision Baking Pans
You’ll need eight 8-inch round cake pans with removable bottoms—I swear by Wilton Perfect Results pans for even baking and easy release. These pans create consistent layers, which is critical for that signature swirl effect.
If you don’t have removable bottoms, line the pans with parchment circles and grease them lightly with flour-infused butter to prevent sticking. 🔥
Stand Mixer Essentials
A KitchenAid Artisan Series stand mixer is my non-negotiable tool for this recipe—its powerful motor handles the 12 egg whites and 4 cups heavy cream without overheating. The flat beater attachment is perfect for whipping egg whites to stiff peaks, while the paddle attachment keeps the buttercream smooth.
If you’re on a budget, the Cuisinart SmartMix Pro is a great alternative with similar performance.
Cake Turning Tools
Invest in a cake turntable (I use the Wilton Cake Turntable) to create those perfect swirls between layers. The 360-degree rotation lets you pipe buttercream evenly around the edges while twisting the layers together.
For leveling cake tops, a serrated cake leveler (like the OXO Good Grips) ensures clean, even slices—no jagged edges here. 💡
Precision Measuring Tools
This recipe demands exact measurements—OXO Good Grips measuring cups and a digital kitchen scale (like the Escali Primo) are my go-tos. For the 6 cups flour, use the spoon-and-level method to avoid packing.
The vanilla bean seeds? Scrape them with a small paring knife—don’t use a fork, or you’ll crush the delicate seeds. Every gram and drop counts in an 8-layer cake.
Chilling Racks & Timers
Cool the baked layers on a wire cooling rack (I love the Amazon Basics ones—they’re sturdy and stackable) to prevent sogginess. For chilling between layers, a large baking sheet with sides works perfectly—I place the assembled cake in the fridge for 2 hours before slicing.
Set a timer (my phone’s works fine) for the 12-15 minutes baking time per layer—overbaking is the fastest way to ruin this cake.
Decorating Extras
For the final touch, a piping bag with a star tip (like the Wilton 1M) lets you create elegant buttercream swirls on top. A fine-mesh sieve dusts powdered sugar evenly, and a small offset spatula (I use Michael Ruhl) helps smooth any uneven edges.
If you’re feeling fancy, a edible gold leaf or fresh berries adds a showstopping finish. 💫
Nutrition facts
Frequently asked questions
Why do I need to bake the sponge layers one at a time?
Baking layers individually ensures each one stays perfectly light and tender. An overcrowded oven causes uneven heat distribution, leading to dry edges or dense centers. The 350°F temperature and 12-15 minute bake time are precise for this recipe—any longer, and the layers lose their signature airiness.
Can I substitute vanilla extract for vanilla bean seeds?
Yes, but you’ll lose that floral depth. Use double the extract (4 tbsp) plus 1/4 tsp almond extract for a close match. The seeds are key for the custard’s rich flavor—if you skip them, the layers will taste more one-dimensional. For a budget option, try vanilla bean paste (1 tsp) instead.
How do I prevent the cake from collapsing between layers?
Chill each layer for 10 minutes before adding fillings, and never skip the buttercream “glue” between sponges. Use a serrated knife to level tops evenly, and pipe buttercream around the edges before stacking. Overfilling with custard or skipping the chilling step are the top causes of collapse.
What’s the best way to store leftover cake?
Wrap the entire cake tightly in plastic wrap, then place in an airtight container. It stays fresh for 3 days at room temperature or up to 5 days refrigerated. For longer storage, freeze individual layers (without filling) for 2 months

- 6 Bean Chili Recipe: Hearty, Smoky Depth That Gets Richer Over Time - September 26, 2026
- 2 Gallon Red Sangria Recipe: Bold Spice and Fruit Fusion for Crowds - September 26, 2026
- 5 Star Apple Bread Recipe: Spiced Apple Swirl With Buttery Crust - September 26, 2026