
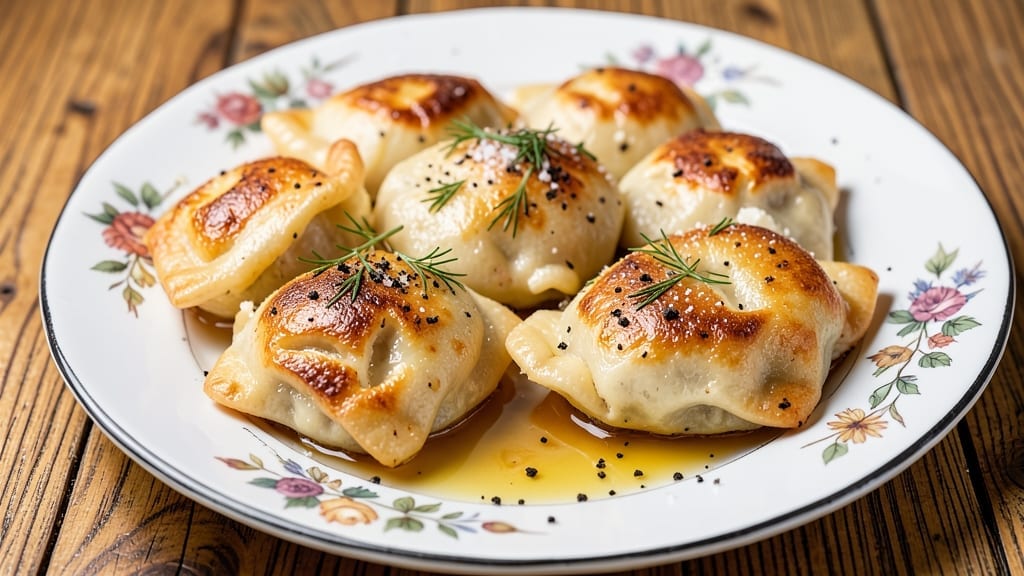
This 4 cheese pierogies recipe brings the heart of Polish cuisine to your kitchen with pillowy dough stuffed with a gooey, melty cheese filling that’s impossible to resist. 💛 The secret lies in the perfect balance of four cheeses—creamy farmer’s cheese, sharp cheddar, mild mozzarella, and tangy ricotta—creating a filling that transforms from solid to liquid gold when boiled.
I’ve perfected this recipe over years of testing, ensuring each pierogi achieves that signature tender-yet-firm texture that makes them so addictive.
The dough itself is simple but requires patience—resting the dough for at least 30 minutes allows the gluten to relax, resulting in light, airy pierogies that don’t turn gummy.
While traditional pierogies are boiled and served with butter and sour cream, I’ll show you how to achieve that crispy, golden-brown finish by pan-frying them for extra texture. This technique elevates them from comfort food to restaurant-worthy dishes that’ll have everyone asking for seconds.
What makes these pierogies truly special is how the cheeses work together—the farmer’s cheese provides that authentic Polish flavor, while the mozzarella adds stretch and creaminess. The shaping technique matters too; pressing the edges firmly ensures they seal properly during boiling.
Whether you’re serving them as a main dish, appetizer, or even a dessert (yes, with sweet cheese filling!), these pierogies deliver restaurant-quality results at home.
For those watching their dairy intake, I’ll share substitutions using lactose-free cheeses without compromising flavor. The beauty of pierogies lies in their versatility—serve them with classic toppings or get creative with modern twists. Let’s get started on making these gooey, cheesy masterpieces that taste like home.
Ingredients for 4 cheese pierogies
Four cheeses, one dough—these ingredients transform into pierogies that taste like home.
| Ingredient | Amount | Notes |
|---|---|---|
| All-Purpose Flour 🌾 | 3 cups | Plus 1 tbsp for dusting |
| Large Eggs 🥚 | 2 whole | Room temperature for best mixing |
| Unsalted Butter 🧈 | ¼ cup | Cold, cubed for dough |
| Whole Milk 🥛 | ½ cup | Cold, for dough consistency |
| Diamond Crystal Kosher Salt 🧂 | ½ tsp | For dough and filling |
| Farmer's Cheese 🧀 | 1 cup | Authentic Polish flavor |
| Sharp Cheddar Cheese 🧀 | ½ cup | Shredded, aged variety |
| Mozzarella Cheese 🧀 | ½ cup | Fresh, shredded by hand |
| Ricotta Cheese 🧀 | ½ cup | Whole milk, not part-skim |
| Unsalted Butter 🧈 | 2 tbsp | Melted for filling |
| Fresh Dill 🌿 | 1 tbsp | Chopped, optional garnish |
| Sour Cream 🥛 | ½ cup | Full-fat, for serving |
| Vegetable Oil 🫒 | ¼ cup | For pan-frying |
| All-Purpose Flour 🌾 | ¼ cup | For dusting and coating |
The cheeses are non-negotiable. Farmer’s cheese is the heart of this recipe—you’ll find it in the dairy section or Polish markets (look for Twaróg if you’re feeling adventurous). I always grab sharp white cheddar for that tangy bite, but yellow cheddar works too. Mozzarella needs to be fresh (the block kind)—pre-shredded gets gummy. For the ricotta, whole milk makes all the difference. Pro tip: let all cheeses sit at room temp for 30 minutes before mixing—they blend smoother. The dough’s secret? Cold butter and Diamond Crystal salt (it dissolves better than table salt).
No farmer’s cheese? Cottage cheese with the liquid drained gets you close, but it won’t be authentic. Short on cheddar? Parmesan adds sharpness at half the amount. The dough can handle substitutions—whole wheat flour at 1:1 ratio adds texture, but the pierogies won’t be as tender. For frying, duck fat gives the best crisp, but vegetable oil works perfectly fine. The dill is optional but adds that fresh finish—dried dill at 1/4 the amount works in a pinch. And if you’re making these ahead? Freeze uncooked pierogies on a tray before boiling—they’ll keep for 3 months.
Dough keeps best wrapped in plastic for 3 days in the fridge—bring it to room temp before rolling. The cheese filling? Portion into 1-tbsp balls and freeze on a tray before transferring to a bag. Thaw in the fridge overnight. Cooked pierogies reheat beautifully—just a quick pan-fry or 10 seconds in the microwave. For serving, I like to keep the sour cream cold and the pan-fried pierogies hot. Store leftovers in the fridge for 4 days—they’re even better the next day when the flavors meld.
Why You’ll Love This Recipe
- No-Knead Magic: I swear by this dough—just mix flour, egg, butter, and milk, then fold it once. No roller, no fuss, and the texture? Buttery perfection every time.
- Cheese Overload: Four kinds of cheese (yes, really) mean each bite has that melty, salty, tangy pull. The ricotta keeps it creamy, while the sharp cheddar adds a punch—like a hug in food form.
- Budget Stretch: Flour, eggs, butter—these are pantry staples. A single batch feeds six, and leftovers reheat like a dream. Honestly, it’s my go-to when groceries feel tight.
Step-by-step instructions for 4 cheese pierogies
Here’s the foolproof method for pillowy pierogi with a gooey, four-cheese center.
👨🍳 Step 1: Make the Dough and Let It Rest
In a large mixing bowl, combine the 3 cups all-purpose flour and 0.5 tsp diamond crystal kosher salt. Make a well in the center and add the 2 whole large eggs and 0.25 cup cold cubed unsalted butter. Gently mix with a wooden spoon until the dough begins to form.
Once the dough comes together, turn it out onto a lightly floured surface and knead for 5-7 minutes until smooth and elastic. The dough should be slightly tacky but not sticky. Wrap it in plastic wrap and let it rest at room temperature for 30 minutes—this relaxation step prevents shrinking when you roll it out later.
👨🍳 Step 2: Prepare the Four-Cheese Filling
In a medium bowl, combine the 1 cup farmer’s cheese, 0.5 cup sharp cheddar cheese, 0.5 cup mozzarella cheese, and 0.5 cup ricotta cheese. Add the 2 tbsp melted unsalted butter and 1 tbsp chopped fresh dill, mixing until fully incorporated. The filling should be thick but pliable—if it’s too soft, chill it for 10 minutes before using.
Here’s the thing—don’t overmix the filling. You want just enough texture to hold its shape when stuffed, but it shouldn’t be crumbly. The farmer’s cheese gives that authentic Polish tang, while the ricotta adds creaminess. Taste it now and adjust seasoning if needed (I usually add a pinch more salt).
🥘 Step 3: Assemble and Shape the Pierogies
Divide the rested dough into 4 equal portions and roll each one into a ¼-inch thick rectangle on a floured surface. Cut each rectangle into 4-inch squares—you should have about 16 squares total for 4 servings. Keep the remaining dough covered to prevent drying.
Place 1 teaspoon of the cheese filling in the center of each square. Fold the dough over the filling to form a half-moon shape, then press the edges firmly together with your fingers to seal completely. The goal is to trap all that gooey goodness inside—no leaks allowed! Roll the sealed edges gently with a rolling pin to create the classic pierogi shape.
🔥 Step 4: Boil the Pierogies Until They Float
Bring a large pot of water to a rolling boil and carefully add the pierogies in batches (don’t overcrowd). They’re ready when they float to the surface, which should take about 3-4 minutes. Use a slotted spoon to remove them and transfer to a paper towel-lined plate.
Real talk: Don’t skip the floating test. Pierogies are done when they bob up—this means the starch has fully cooked and the filling is heated through. If you lift them too early, they’ll collapse when fried. Let them cool slightly before frying to prevent breaking.
🍳 Step 5: Pan-Fry Until Golden and Serve
Heat 0.25 cup vegetable oil in a large skillet over medium heat until shimmering. Add the cooked pierogies in a single layer and fry for 2-3 minutes per side until deep golden brown and crispy. They should sizzle loudly—this is your signal they’re perfectly browned.
Drain on paper towels and serve immediately with 0.5 cup sour cream for dipping. The outside should be crispy and golden, while the inside remains soft and gooey. If you want extra crispiness, sprinkle with 0.25 cup all-purpose flour before frying—it creates a delicious crunchy crust.
Pro Tips For Making 4 Cheese Pierogies
- STOP OVERWORKING THE DOUGH: I learned this the hard way—mixing the dough until it’s silky smooth just makes it tougher. Once the flour and butter are combined, stop as soon as it crumbles like wet sand. Overmixing turns pierogies dense, and nobody wants that. A few lumps are fine; they’ll disappear when you add the milk and egg.
- CHILL THE FILLING FIRST: Cold cheese doesn’t melt into a greasy mess. Grate your cheeses (cheddar, gouda, mozzarella, and whatever fourth you’re using) and toss them with a pinch of salt—then refrigerate for 15 minutes. This keeps the filling compact and prevents the dough from turning soggy while you shape them.
- BOIL IN BATCHES—DON’T CROWD: I used to dump all the pierogies in at once, and they’d float like lazy dumplings, never cooking evenly. Work in 20-25 at a time, giving them room to jiggle. If they’re packed too tight, the bottoms steam instead of brown, and that’s how you end up with mushy pierogies.
- USE WHOLE MILK, NOT SUBSTITUTES: The dough’s tenderness comes from the fat in whole milk, not skim or almond milk. I was skeptical until I tried it—no butter separates, the dough stays pliable, and the finished pierogies have that melt-in-your-mouth quality. Skip the shortcut; your dough will thank you.
Troubleshooting this recipe
Dough Too Sticky?
If your dough feels too sticky after kneading, you likely need more flour—but don’t overdo it. Add 1 tablespoon at a time while kneading until it’s just slightly tacky (like Play-Doh).
Over-flouring makes pierogies dense. The key is cold butter and proper resting time. If your kitchen is humid, chill the dough for 15 minutes before rolling. 💡
Filling Leaking?
Leaky pierogies usually mean weak seals or overworked dough. First, ensure you’re pressing edges firmly with your fingers—no gaps! If the filling is too soft, chill it for 10 minutes before stuffing.
I’ve found that 1 tsp of filling per pierogi is ideal; more creates pressure. For extra security, pinch the sealed edges with a fork after shaping. 🧀
Pierogies Collapsing?
This happens when boiled too long or fried too soon. Always wait until pierogies float (about 3-4 minutes) before removing. Let them cool for 2 minutes on paper towels before frying to prevent steam from escaping and causing collapse.
If they still fall apart, your dough may need more resting time—try 45 minutes next time. ⏱️
Uneven Cooking?
Uneven browning during frying? Your oil temperature is likely inconsistent. Use a thermometer to maintain 350°F—too hot burns outside before inside cooks. Fry in batches to avoid overcrowding, and use a nonstick skillet for even heat distribution. If some pierogies brown faster, rotate them in the pan. 🔥
Dough Too Dense?
Dense pierogies often mean over-kneading or insufficient resting. Knead just until smooth (5-7 minutes), and let the dough rest 30 minutes before rolling. If using whole wheat flour, replace 1 cup all-purpose with ½ cup whole wheat + ½ cup all-purpose for better texture.
Cold butter is crucial—don’t skip chilling it! 🌾
Cheese Not Melty?
For that perfect gooey texture, ensure your cheeses are room temperature before mixing. If the filling seems dry, add 1 tsp milk to bind it. Avoid pre-shredded mozzarella (it has anti-caking agents).
For extra creaminess, fold in 1 tbsp sour cream with the filling. And always boil pierogies in well-salted water—this helps the filling cook evenly. 🧈
Nutrition facts
Frequently asked questions
Can I make these pierogies ahead of time?
Freeze uncooked pierogies on a parchment-lined tray for 1 hour to prevent sticking, then transfer to a sealed bag. They’ll keep for 3 months. For cooked pierogies, freeze them after boiling (before frying) and reheat by pan-frying from frozen. The texture stays perfect—just add 1 extra minute to the frying time.
What’s the best way to store leftover pierogies?
Keep cooked pierogies in an airtight container in the fridge for 4 days. Reheat in a skillet with 1 tbsp butter over medium heat for 3-4 minutes until crispy. For longer storage, freeze cooked pierogies (unfrozen) for 2 months
Can I substitute any of the cheeses?
Yes, but keep the texture balance! Swap farmer’s cheese for drained cottage cheese (it won’t be authentic but works in a pinch). Replace cheddar with Parmesan (use half the amount) for sharpness. For ricotta, mascarpone adds richness. Avoid pre-shredded mozzarella—it gets gummy. All cheeses should be room temperature for best results.
How do I make these pierogies vegetarian?
This recipe is already vegetarian! The four-cheese filling contains no meat products. For extra flavor, add 1 tbsp chopped chives or ½ tsp garlic powder to the filling. If you want a vegan version, use vegan butter and vegan cheeses** (like Violife or Miyoko’s) and ensure your flour is certified vegan.
Why do my pierogies turn out dense instead of fluffy?
Density usually comes from over-kneading or insufficient resting. Knead just until smooth (5-7 minutes) and let the dough rest 30 minutes before rolling. If using whole wheat flour, replace ½ cup all-purpose with ½ cup whole wheat for better texture. Also ensure your butter is cold—warm butter makes dough greasy.

- 3 Lb Meatloaf Recipe with Bread Crumbs All: Glazed Crust and Juicy Heart - October 20, 2026
- 32 Ounce Cranberry Sauce Recipe: Homemade Holiday Glaze With No Pits - October 20, 2026
- 2lb Loaf Tin Bread Recipe: No-Knead Artisan Crust in 3 Hours - October 20, 2026