
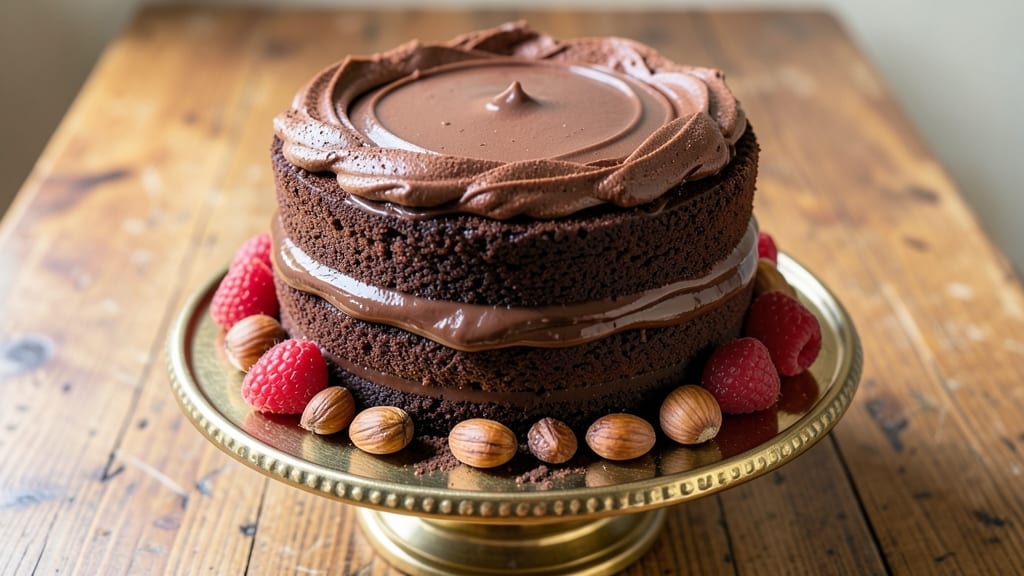
This 11-inch chocolate cake recipe delivers the perfect balance of rich, fudgy layers and a velvety ganache drizzle that’ll make every slice feel like a decadent moment. 💛 The secret lies in precise measurements and a slow bake at 350°F, ensuring moist centers and crisp edges that hold their shape.
I’ve perfected this recipe over years of baking, and it’s become my go-to for celebrations or treating myself after a long week.
The foundation starts with a simple yet foolproof batter—just 6 ingredients including high-quality cocoa powder and melted butter for maximum flavor. After baking for 35-40 minutes, the cake develops a crackly top while staying tender inside.
The real magic happens with the ganache: a mix of heavy cream and chocolate that drizzles effortlessly over cooled layers, creating a glossy finish that tastes even better than it looks.
What you’ll end up with is a professional-quality cake that’s easy to make at home, with layers so rich they’ll satisfy even the most discerning chocolate lovers.
The ganache isn’t just decoration—it adds a deep, velvety contrast to the fudgy cake, making every bite a perfect balance of texture and flavor. Whether you’re baking for a special occasion or just craving dessert, this recipe delivers results that taste like they came from a bakery.
For those who want to customize, I’ve included variations for vegan substitutions and gluten-free flour blends—because great chocolate cake shouldn’t have to mean compromise. Let’s get started on creating something truly special.
Ingredients for 11 inch chocolate cake
Six core ingredients for the cake, plus three for the showstopping ganache.
| Ingredient | Amount | Notes |
|---|---|---|
| Unsalted Butter 🧈 | 1 cup | Melted and cooled slightly |
| Granulated Sugar 🍚 | 2 cups | White or light brown |
| Cocoa Powder 🍫 | ¾ cup | High-quality Dutch-processed |
| All-Purpose Flour 🌾 | 1 ¾ cups | Sifted, spooned lightly |
| Baking Powder 🍞 | 2 tsp | Pure baking powder, not baking soda |
| Salt 🧂 | ½ tsp | Fine sea salt |
| Vanilla Extract 🌸 | 1 tbsp | Pure vanilla, not imitation |
| Large Eggs 🥚 | 2 whole | Room temperature |
| Whole Milk 🥛 | ¾ cup | Room temperature |
| Semisweet Chocolate Chips 🍫 | 1 ½ cups | High-quality brand like Ghirardelli |
| Heavy Whipping Cream 🥛 | 1 ½ cups | Cold, full-fat preferred |
| Dark Chocolate Bars 🍫 | 8 oz | 70% cocoa, chopped fine |
The cocoa powder is where flavor magic happens—Dutch-processed gives that velvety richness without bitterness. Penzeys or Valrhona are my go-tos, but any high-quality brand works. For the butter, Land O’Lakes or Plugrá are reliable, but don’t use margarine—it’ll ruin the texture. The chocolate chips? Ghirardelli or Lindt melt perfectly. Pro tip: chop your dark chocolate bars into even pieces before melting—no one wants lumpy ganache. And always use room-temperature eggs and milk for a smoother batter.
No Dutch-processed cocoa? Natural cocoa powder plus 1/4 tsp baking soda mimics the flavor. Out of vanilla extract? 1 tsp vanilla sugar (vanilla beans soaked in sugar) works in a pinch. For the ganache, half-and-half works in a bind, but heavy cream gives that perfect gloss. Swapping chocolate? White chocolate changes the flavor profile completely—stick with semisweet or dark. And if you’re gluten-free, use a 1:1 flour blend like Bob’s Red Mill. The cake batter can be made a day ahead and refrigerated—just bring it to room temp before baking.
This cake keeps beautifully—3 days at room temp covered loosely, or 1 week refrigerated in layers separated by parchment. The ganache hardens when chilled, so bring it to 70°F to drizzle smoothly. I always make a double batch of ganache—one for the cake, one for dipping strawberries. Freeze extra ganache in ice cube trays for quick portions later. And if you’re making this for a crowd, bake two 9-inch cakes instead—they’re easier to serve and just as impressive.
Why You’ll Love This Recipe
- No Mixer Needed: I swear by this recipe—just cream the butter and sugar by hand until it’s light and fluffy. The cocoa powder dissolves smoothly into the batter, so no lumps or fussing. (Yes, even when I’m distracted by the dog begging for butter.)
- Rich Without Overpowering: That perfect balance of melted butter and sugar creates a moist crumb, while the cocoa powder adds depth without bitterness. It’s decadent but not heavy—exactly how chocolate cake should be.
- Birthday or Boredom Fix: One 11-inch pan means it’s just the right size for a single celebration or a weeknight craving. Between us, I’ve used it for everything from a lazy Sunday dessert to a last-minute office party. (No one ever guessed it was “just a quick cake.”)
- Leftovers That Last: This cake holds up beautifully for days—if it even lasts that long. Slice it thin, and it’s my go-to breakfast or midnight snack. Honestly, the only waste is the first slice, and that’s on me.
Step-by-step instructions for rich fudgy chocolate cake
Here’s how to bake a decadent 11-inch chocolate cake with perfect fudgy layers.
🍳 Step 1: Cream Butter and Sugar for Maximum Fluffiness
In a stand mixer fitted with the paddle attachment, combine the 1 cup unsalted butter and 2 cups granulated sugar. Beat on medium-high speed for 3-4 minutes until the mixture is light, fluffy, and nearly doubles in volume. You’ll see ribbons form when you lift the paddle—this means you’ve incorporated enough air for that signature tender crumb.
I like to scrape down the sides of the bowl every 30 seconds to ensure even mixing. The butter should be completely smooth with no graininess, and the color should lighten noticeably. This step is crucial—under-creaming leads to dense cake, while over-creaming can make it tough.
👨🍳 Step 2: Add Eggs and Dry Ingredients for Perfect Texture
Add the 2 whole large eggs, one at a time, mixing well after each addition. Then stir in the 1 tbsp vanilla extract. The mixture might look slightly curdled, but don’t worry—it will come together when we add the dry ingredients.
In a separate bowl, whisk together the 1.75 cups all-purpose flour, 2 tsp baking powder, 0.5 tsp salt, and 0.75 cup cocoa powder. Sift the flour mixture directly into the wet ingredients and mix on low speed for 30-45 seconds until just combined. You should still see some dry spots—overmixing develops gluten and makes the cake tough.
🍳 Step 3: Incorporate Milk and Chocolate for Ultimate Richness
Add the 0.75 cup whole milk and mix until the batter is smooth. Fold in the 1.5 cups semisweet chocolate chips by hand using a silicone spatula—this prevents them from melting before baking. The batter will be thick but pourable. Here’s the thing—don’t worry if it looks too thick. The chocolate chips will help create those fudgy pockets we’re after.
Divide the batter evenly between two 11-inch round cake pans lined with parchment paper. Tap each pan gently on the counter to release any air bubbles. Bake at 350°F for 30-35 minutes, until a toothpick inserted in the center comes out with moist crumbs (not wet batter). Rotate the pans halfway through for even baking.
⏰ Step 4: Cool and Assemble with Decadent Ganache
Let the cakes cool in their pans for 10 minutes, then transfer to a wire rack to cool completely. Meanwhile, make the ganache by melting the 8 oz dark chocolate bars and 1.5 cups heavy whipping cream together in a heatproof bowl over simmering water. Stir until smooth, then let cool slightly until it thickens to a drizzling consistency.
Once completely cool, place one cake layer on a serving plate. Spread a thin layer of the ganache over the top, then add the second layer. Drizzle the remaining ganache over the entire cake, letting it cascade down the sides. Chill for 1 hour before serving to let the ganache set properly. The result? A showstopping cake with rich, fudgy layers and a glossy chocolate finish.
Pro Tips For Making 11 Inch Chocolate Cake
- Melt Butter Slowly: If your butter’s still got chunks when it hits the sugar, you’re doing it wrong. Warm the butter in the microwave for 20-30 seconds first—just until it’s soft but not liquid—so it blends smoothly with the sugar. I learned this the hard way when my cake turned out greasy and dense because cold butter fought the mixer.
- Sift That Cocoa: Unsifted cocoa powder is a sneaky culprit for dense cake. Sift it with the flour and baking powder to break up clumps and aerate the batter. Yes, it’s an extra step, but your cake will rise better and taste richer—trust me, I’ve compared the two.
- Check Oven Temp Early: Don’t wait for the cake to bake—test your oven’s accuracy with a thermometer. Chocolate cake needs a steady 350°F (175°C), but many ovens run hot or cold. If yours is off by even 25°F, your cake could be dry or underdone. I’ve ruined enough cakes to know this isn’t optional.
- Don’t Overmix the Batter: Once the flour hits the wet ingredients, stop mixing after 30 seconds. Overmixing develops gluten, which makes your cake tough instead of tender. Fold just until combined—your spatula will tell you when it’s done. I used to beat this batter like I was punishing it, and it showed.
Essential equipment for this dish
Stand Mixer Essentials
Your stand mixer is the MVP for this cake—no hand-mixing required! I swear by the KitchenAid Artisan Series with the paddle attachment for creaming butter and sugar.
The 5-quart bowl gives enough room to scrape down the sides easily, and the variable-speed control lets you go from medium-high for creaming to low for dry ingredients without switching attachments. For budget-friendly options, the Cuisinart Smart Mixer handles this recipe just as well. 💛
Precision Measuring Tools
Accurate measurements make or break this cake. Invest in a stainless steel measuring cup set (like OXO Good Grips) and a digital kitchen scale for ingredients like cocoa powder and flour.
I measure my 1.75 cups flour by spooning it lightly into the cup and leveling with a knife—never scooping directly from the bag. For the 0.75 cup cocoa powder, a scale ensures consistency, as scooping can vary by 10-15 grams.
A microplane also comes in handy for zesting chocolate if you want to add extra depth.
Baking Pans and Parchment
Use two 11-inch round cake pans with 2-inch sides—I prefer Wilton Perfect Results Non-Stick pans because they bake evenly and release cleanly. Line the bottoms with parchment paper circles (cut to fit) to prevent sticking and ensure easy removal.
For extra insurance, I brush the pans lightly with vegetable oil before adding batter. Never skip the parchment—this cake is rich enough to stick without it! 🔥
Thermometer for Perfect Ganache
A candy or instant-read thermometer (like Thermoworks Thermapen) is non-negotiable for the ganache. Heat the 1.5 cups heavy cream until it reaches 185°F before pouring over chopped chocolate—this ensures a smooth, glossy finish.
If you don’t have a thermometer, watch for small bubbles forming around the edges of the pot. For melting chocolate, a double boiler setup (heatproof bowl over simmering water) works perfectly. Never microwave chocolate—it burns easily and creates lumps.
Wire Racks and Cooling Tools
Let your cakes cool properly to avoid soggy layers. I use a large wire cooling rack (like Ozeri Touch Screen) to circulate air evenly. For speed, I place the pans directly on the rack and fan them gently with a pizza peel to cool faster.
A cake turntable (like Wilton’s 12-inch) makes assembling layers a breeze—just spin it while drizzling ganache for even coverage. And always chill the assembled cake in the fridge for 1 hour before slicing to keep it sturdy.
Nutrition facts
Frequently asked questions
Can I bake this in a 9-inch pan instead of 11-inch?
Yes, but you’ll need to adjust the baking time and recipe slightly. For a 9-inch pan, divide the batter between three pans and bake for 25-30 minutes at 350°F. The layers will be thinner, but the flavor stays rich. Alternatively, halve the recipe to fit two 9-inch pans—this keeps the same height while serving 6-8 people.
What if I don’t have Dutch-processed cocoa powder?
Natural cocoa powder works, but add 1/4 teaspoon baking soda to the dry ingredients to neutralize the acidity. This mimics Dutch-processed cocoa’s smoother flavor. For best results, use a high-quality brand like Hershey’s Special Dark or Nestlé Toll House—they’re more flavorful than generic store brands.
How do I make this cake gluten-free?
Replace the 1.75 cups all-purpose flour with a 1:1 gluten-free flour blend (like Bob’s Red Mill or King Arthur). Add 1/2 teaspoon xanthan gum if your blend doesn’t include it—this prevents crumbling. The texture will be slightly denser but still delicious. For extra moisture, reduce the milk to 0.5 cups and add 2 tablespoons applesauce to the batter.
Can I substitute buttercream for the ganache?
For a lighter option, make a chocolate buttercream by beating 1 cup softened butter, 3 cups powdered sugar, and 1/2 cup cocoa powder until fluffy. Add 1/2 cup heavy cream and 1 teaspoon vanilla for extra richness. The buttercream will be less glossy but adds a fluffy contrast to the fudgy cake layers.
Why did my cake crack on top?
Cracking usually happens from overbaking or opening the oven too soon. Check your cake at 30 minutes—it should pull away from the pan edges but still be slightly jiggly in the center. If it cracks, don’t panic! Brush the top with warmed simple syrup (equal parts sugar and water) before adding frosting to keep it moist.

- 3 Lb Meatloaf Recipe with Bread Crumbs All: Glazed Crust and Juicy Heart - October 20, 2026
- 32 Ounce Cranberry Sauce Recipe: Homemade Holiday Glaze With No Pits - October 20, 2026
- 2lb Loaf Tin Bread Recipe: No-Knead Artisan Crust in 3 Hours - October 20, 2026