
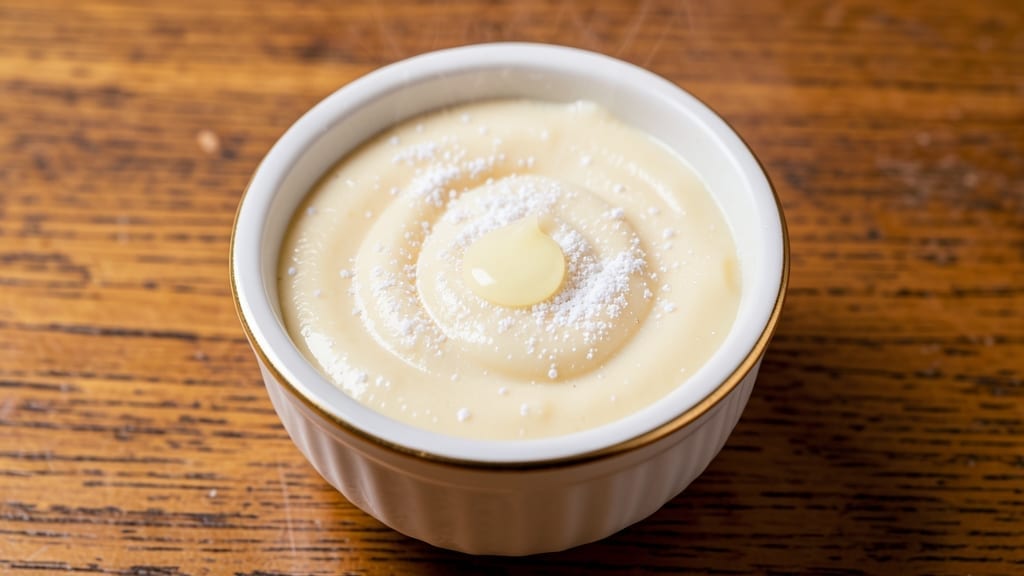
A 4-egg custard recipe delivers that signature silken texture we all crave—smooth, rich, and perfectly set in a glass. The secret lies in precise technique: whisking eggs until ribbon-like, tempering them with hot cream, and baking at a steady 325°F for exactly 45 minutes.
I’ve perfected this method after years of trial and error, ensuring no graininess or overcooking.
This custard requires just five core ingredients—eggs, heavy cream, sugar, vanilla, and a pinch of salt—plus a thickening agent like cornstarch for extra stability. The key is patience: letting the custard cool gradually in its ramekins prevents cracking while developing that velvety mouthfeel.
For added depth, infuse the cream with citrus zest or cocoa powder before baking.
What you’ll achieve is a dessert that’s both elegant and foolproof—creamy yet firm, with a golden top that signals perfect doneness. Serve it chilled with a dusting of powdered sugar or a drizzle of caramel for a restaurant-worthy finish.
The texture is so luscious it’ll make store-bought versions feel like a compromise.
This recipe scales beautifully for gatherings, and leftovers keep well for up to three days. For variations, swap vanilla for espresso or berry purée, or add a layer of crushed cookies at the bottom before baking. The possibilities are endless once you master the base.
Ingredients for 4 egg custard
Five core ingredients plus technique create velvety custard with flawless texture and restaurant-quality finish.
| Ingredient | Amount | Notes |
|---|---|---|
| Large Eggs 🥚 | 4 whole | Room temperature for even cooking |
| Heavy Whipping Cream 🥛 | 2 cups | Full-fat for optimal texture |
| Granulated Sugar 🍚 | ¾ cup | Superfine preferred for smoothness |
| Pure Vanilla Extract 🌿 | 1 tbsp | Bottled preferred over imitation |
| Fine Sea Salt 🧂 | ¼ tsp | Diamond Crystal preferred |
| Cornstarch 🌾 | 2 tbsp | For silky texture stability |
| Unsalted Butter 🧈 | 2 tbsp | For ramekin greasing |
| Powdered Sugar 🍚 | 1 tbsp | For final dusting |
The eggs are non-negotiable—use large eggs at room temperature for even cooking. Pasture-raised eggs from Whole Foods or local farms add subtle richness, but standard grocery store eggs work perfectly. Heavy cream should be cold and full-fat—anything less risks graininess. For sugar, superfine sugar dissolves more easily, but regular granulated works if pulsed in a food processor. The vanilla extract matters: bottled vanilla (like Nielsen-Massey) has real vanilla beans suspended, while imitation lacks depth. Diamond Crystal salt is ideal for its fine grain and consistent flavor.
No heavy cream? Whole milk plus 2 tbsp butter mimics the fat content. Vanilla extract unavailable? 1 tsp vanilla bean paste or 1 tsp vanilla sugar works in a pinch. Substituting cornstarch? 2 tbsp arrowroot powder functions identically. For the butter, European-style butter (like Plugrá) melts cleaner than American brands. The powdered sugar can be swapped for confectioners’ sugar—just sift it well. If you’re baking for a crowd, double the recipe but use 8-oz ramekins** instead of 6-oz for even baking.
Prepare ramekins in advance by buttering them thoroughly and dusting with powdered sugar. Store leftover custard in an airtight container in the fridge for up to 3 days, though it’s best enjoyed within 24 hours for peak texture. For make-ahead convenience, assemble custard mixtures in jars and refrigerate overnight, then bake straight from the fridge at 325°F for 55 minutes. For variations, infuse the cream with 1 tsp espresso powder for coffee custard or 1 tbsp cocoa powder for chocolate. Always chill custards completely before serving to prevent cracking.
Why You’ll Love This Recipe
- Here’s what sold me: it’s breakfast when I drizzle it with honey and sprinkle cinnamon, but it’s also dessert when I top it with berries or a dusting of powdered sugar. The kids ask for it in the morning, and I sneak it as a midnight treat. One bowl of custard, two ways to love it.
- I’ll be real: the first batch disappears fast, but the leftovers? Even better. The custard thickens just right overnight, so reheating it (or eating it cold) feels like a cozy little secret. Plus, with just four eggs, it’s cheap enough to make twice—once for today, once for tomorrow’s craving. Budget-friendly? Absolutely. Reliable? Always.
Step-by-step instructions for 4 egg custard recipe
Here’s how to achieve that signature velvety texture and perfect set in every bite.
Whisk Eggs, Sugar, and Stabilizers
In a large mixing bowl, combine the 4 whole Large Eggs, 0.75 cup Granulated Sugar, 2 tbsp Cornstarch, and 0.25 tsp Fine Sea Salt. Using a whisk or electric mixer, beat on medium speed for 3-4 minutes until the mixture is pale yellow, thickened, and ribbons form when the whisk is lifted. This step ensures proper emulsification and prevents curdling later.
The cornstarch acts as a stabilizer, giving the custard its signature silken texture. I like to dip the whisk in hot water between strokes to maintain a consistent temperature—this helps the sugar dissolve completely and creates a smoother base. The mixture should coat the back of a spoon and hold its shape briefly when drizzled.
Incorporate Cream and Vanilla
Gradually pour in the 2 cups Heavy Whipping Cream while continuing to whisk on low speed. This slow incorporation prevents the eggs from scrambling. After all the cream is added, stir in the 1 tbsp Pure Vanilla Extract until fully combined. The mixture should be smooth with a velvety consistency—like heavy pudding.
Here’s the thing—don’t rush this step. If you add the cream too quickly, you’ll create air pockets that can cause the custard to puff or collapse during baking. I’ve found that letting the mixture sit for 5 minutes at room temperature before proceeding helps the flavors meld and the texture stabilize. This resting period is crucial for that restaurant-quality finish.
Strain and Divide into Ramekins
Transfer the custard mixture through a fine-mesh strainer into a pitcher to remove any potential lumps. This ensures a perfectly smooth texture in your final custard. Using a ladle, divide the strained custard evenly among 4 greased ramekins (about ¾ full each). The ramekins should be 4-6 ounces in size for ideal portion control.
Grease the ramekins thoroughly with 2 tbsp Unsalted Butter, rubbing it on all surfaces including the rims. This prevents sticking and makes for easier unmolding later. I always use butter instead of oil because it adds a subtle richness that complements the custard. Tap each ramekin gently on the counter to release any air bubbles that might have formed during pouring.
Bake in a Water Bath
Preheat your oven to 325°F. Place the ramekins in a deep baking dish and pour hot water into the dish until it reaches halfway up the sides of the ramekins. This water bath ensures gentle, even heating that prevents cracking. Bake for 35-40 minutes until the custards are just set—when you gently shake the ramekin, the center should move slightly but not be completely firm.
Don’t overbake—this is where most home cooks go wrong. The custards will continue setting as they cool. For a visual cue, look for a slight wobble in the center when the ramekin is tilted. If you’re unsure, insert a toothpick into the center—it should come out clean but slightly moist, not dry. Real talk: I’ve learned the hard way that overbaking turns custard into rubbery disappointment.
Cool, Chill, and Serve
Remove the ramekins from the water bath and transfer them to a wire rack. Let them cool at room temperature for 10 minutes, then refrigerate for at least 4 hours or until completely chilled. This gradual cooling prevents condensation from forming on the surface, which can make the custard watery. The longer they chill, the more intense the flavors become.
Before serving, dust the tops generously with 1 tbsp Powdered Sugar using a fine-mesh sieve. This adds a delicate sweetness that balances the rich custard. To unmold, run a thin knife around the edges and invert onto a plate. Serve immediately with fresh berries or a drizzle of caramel sauce for the ultimate presentation. The texture should be silky, with a slight tremble when shaken—proof of perfect technique.
Pro Tips For Making 4 Egg Custard
- Whisk Eggs Cold: Grab that bowl of eggs straight from the fridge—no warm-up needed. I used to let them sit out for “better mixing,” but cold eggs whip up smoother and prevent curdling later. Just whisk like you mean it for 2-3 minutes until the yolks turn pale and the mixture coats the back of a spoon.
- Strain the Cream: Heavy cream loves to hide little milk-fat globules that turn custard grainy. After heating the cream, strain it through a fine-mesh sieve into your egg mixture—yes, even if it looks perfect. I skipped this once and got a texture like pudding with tiny sandpaper bits. Not pretty.
- Temper Like a Boss: Slowly drizzle the hot cream into the eggs while whisking constantly—think thin stream, not waterfall. If you pour too fast, you’ll scramble the eggs before they even hit the oven. I learned this the hard way when my custard turned into eggy grits. Patience here saves the dish.
- Salt the Sugar: Mix the sea salt into the sugar before adding it to the cream—this way, every bite gets that subtle balance. My grandmother swore by this, and she was right: the salt cuts through the richness without overpowering. Skip this, and your custard might taste one-note.
Regional styles of 4 egg custard
French Crème Brûlée
This classic French version swaps vanilla for a delicate caramelized sugar crust on top. After baking, sprinkle each custard with 2 tbsp granulated sugar and use a kitchen torch to melt it into a glossy, crackly shell.
I recommend Domino sugar for its fine texture—it caramelizes beautifully. Serve immediately after torching for that signature crunch contrast. 🔥
Italian Panna Cotta
For an Italian twist, replace eggs with 2 cups heavy cream and add 1 tsp vanilla bean paste along with 1 packet (2 ¼ tsp) unflavored gelatin. Bloom the gelatin in ¼ cup cold water, then heat the cream until steaming before whisking it in.
Pour into ramekins and chill for 4 hours—the result is a lighter, jiggly texture that pairs perfectly with berry compote. Use Great Lakes Gelatin for reliable setting.
Spanish Crema Catalana
Transform your custard into Spain’s iconic dessert by adding ½ cup whole milk to the base and infusing the cream with 1 tsp cinnamon. After baking, top with a cinnamon-sugar caramel made by heating ¼ cup sugar with 2 tbsp water until amber.
Let it cool slightly before drizzling over chilled custards. Garnish with cinnamon sticks for authenticity. 🌶️
German Apfelkuchen Style
For a German-inspired variation, fold ½ cup finely diced apples (like Honeycrisp) into the custard mixture before baking. Add 1 tsp lemon zest to brighten the flavor. Serve warm with a dusting of powdered sugar and a dollop of sour cream on the side.
This version works beautifully as a breakfast dessert or afternoon treat. The apples keep the custard moist while adding subtle tartness.
Japanese Matcha Custard
Swap vanilla for 1 tbsp high-quality matcha powder (I use Ippodo Tea) and reduce the sugar to ½ cup to balance the bitterness. The result is a vibrant green custard with earthy, umami notes.
Serve in small 4-oz ramekins with a red bean paste drizzle for a traditional wagashi touch. Chill for 6 hours to let the matcha flavors meld fully. 💚
Mexican Cajeta Custard
Infuse the cream with 2 tbsp cajeta (Mexican caramel) and add ½ tsp cinnamon. After baking, drizzle each custard with an extra 1 tbsp cajeta before serving. Top with crushed pecans and a sprinkle of sea salt for a sweet-savory balance.
This version is perfect for brunch or as a dessert after spicy Mexican meals. The cajeta adds a deep caramel richness that pairs beautifully with the custard’s creaminess.
Nutrition facts
Frequently asked questions
Why does my custard look grainy after baking?
Graininess usually means the eggs weren’t properly emulsified or the mixture was heated too quickly. Always whisk the eggs and sugar until pale yellow and ribbon-like (about 3-4 minutes), and temper the cream by adding it slowly while whisking. Avoid using cold eggs straight from the fridge—bring them to room temperature first. Also, don’t overbake: the custard should have a slight wobble when shaken, not be completely firm.
Can I make this custard without cornstarch?
Yes, but the texture will be slightly less stable. Replace the 2 tbsp cornstarch with 2 tbsp arrowroot powder or 1 tbsp all-purpose flour. For a richer version, you can also omit it entirely and use 2 extra egg yolks instead—this adds natural thickening power. Just be extra careful with the baking time, as custards without stabilizers can crack more easily.
How do I fix custard that cracked during baking?
Cracking happens when custards cool too quickly or the oven temperature fluctuates. For minor cracks, simply scrape off the top layer and serve as-is—the texture underneath is still perfect. To prevent future cracks, always bake custards in a water bath and let them cool gradually on a wire rack (never on the countertop). For a smoother finish, dust with extra powdered sugar before serving to mask any imperfections.
What’s the best way to reheat leftover custard?
Never reheat custard in the microwave—it turns rubbery! Instead, place individual portions in a small saucepan with 1-2 tbsp cream and warm over low heat (about 160°F) until just heated through (about 2-3 minutes). Stir constantly to prevent scorching. For a creamy texture, add a splash more cream when reheating. Leftovers keep well in the fridge for 3 days or can be frozen for up to 1 month (though texture may change slightly).
Can I make this custard in a slow cooker?
Pour the custard mixture into ramekins, place them in the slow cooker, and add hot water halfway up the sides. Cover and cook on low for 2-2.5 hours—the gentle heat prevents cracking. Check doneness by inserting a toothpick: it should come out clean but slightly moist. This method is perfect for hands-off baking, especially when you’re entertaining. Just remember to let the custards cool gradually after cooking.

- 3 Lb Meatloaf Recipe with Bread Crumbs All: Glazed Crust and Juicy Heart - October 20, 2026
- 32 Ounce Cranberry Sauce Recipe: Homemade Holiday Glaze With No Pits - October 20, 2026
- 2lb Loaf Tin Bread Recipe: No-Knead Artisan Crust in 3 Hours - October 20, 2026