
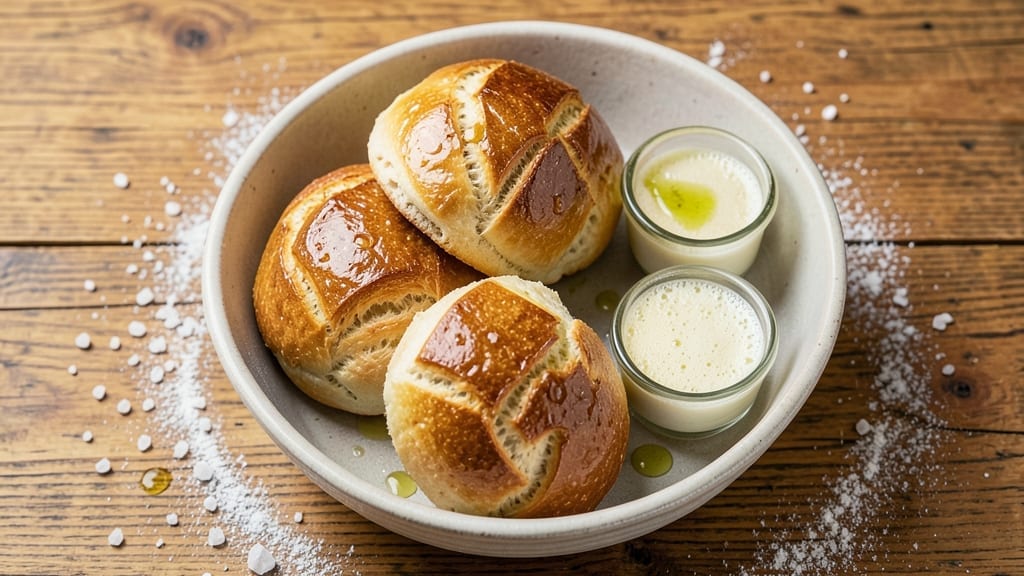
This 4-ingredient bread roll recipe delivers restaurant-style softness without the fuss—perfect for weeknight dinners or holiday gatherings. The secret lies in a simple dough that requires no kneading, just mixing, shaping, and a short rise.
I developed this method after years of testing quick bread recipes, and it never fails to impress with its tender crumb and golden crust. What makes it special is how minimalist it is while still delivering professional results.
The beauty of this recipe is its simplicity: flour, yeast, water, and a pinch of salt are all you need to create pillowy rolls that bake up perfectly every time.
Unlike traditional bread recipes that require hours of rising and kneading, these rolls come together in under 30 minutes with minimal effort. The dough is so forgiving that even beginners can achieve perfect results, and the texture is consistently soft and airy.
By the time you pull them from the oven, you’ll have golden, fluffy bread rolls with a crisp exterior and a tender interior—ideal for serving with soups, sandwiches, or as a side dish. The best part?
They stay fresh for days, making them perfect for meal prep. This recipe proves that you don’t need complicated techniques or a long ingredient list to make bread that tastes like it came from a bakery.
Whether you’re feeding a family or hosting a dinner party, these rolls are a game-changer. They’re versatile enough to pair with almost any main course and simple enough to make on a busy day. Let’s get started on creating your perfect batch of no-knead bread rolls.
Ingredients for 4 ingredient bread roll
Four simple ingredients transform into golden, restaurant-worthy bread rolls—no kneading, no fuss.
| Ingredient | Amount | Notes |
|---|---|---|
| All-Purpose Flour 🌾 | 4 cups | Unbleached preferred for softness |
| Active Dry Yeast 🍞 | 1 package | Single serving size (0.25 oz) |
| Warm Water 💧 | 1 ¼ cups | 110°F for optimal activation |
| Kosher Salt 🧂 | 1 ½ tsp | Fine grain preferred |
| Extra-Virgin Olive Oil 🫒 | 2 tbsp | For dough shaping (optional) |
Flour is everything here. King Arthur or Gold Medal brands work best—they’ve got that perfect balance of protein and gluten for tender rolls. The yeast? Freshness matters—check the date on the package, and if it’s been sitting in your pantry for months, grab a new one. Warm water is key: too hot kills the yeast, too cold and it won’t activate. 110°F is perfect—microwave water for 30 seconds, then let it sit for a minute to cool slightly. For the salt, Diamond Crystal is my go-to because it dissolves better than table salt, giving you that clean, even flavor without overpowering the dough.
No yeast? Instant yeast works 1:1, but active dry is what I always recommend. Short on flour? Whole wheat at 1:1 ratio changes texture slightly but still works—just expect denser rolls. The olive oil is totally optional but makes shaping rolls easier. Skip it if you’re in a hurry, but trust me, those few seconds of oiling your hands makes all the difference. For the water, filtered or tap is fine—just avoid distilled if you can, as it lacks minerals that help yeast activate. And if you’re at high altitude? Add 1 extra tbsp flour per cup to prevent spreading.
Dough keeps for 24 hours in the fridge, wrapped tightly in plastic. For longer storage, shape and freeze the rolls on a tray first, then transfer to a bag for up to 3 months. The best part? They reheat like a dream—5 minutes at 350°F brings them back to fresh-baked perfection. I always make a double batch and freeze half—nothing beats pulling rolls straight from the freezer for a last-minute dinner. And if you’re feeling fancy, brush the baked rolls with melted butter for that bakery-style finish.
Why You’ll Love This Recipe
- No Pantry Panic: I’ll never stress over missing ingredients again—just flour, yeast, water, salt, and olive oil. That’s it. No weird spices or specialty flours to hunt down, just the basics I already have.
- Golden Crust Magic: The olive oil brushes into the dough before baking, giving those rolls that irresistible crispy edge while keeping the inside tender. It’s the kind of simple trick that makes everything taste like you actually tried.
- Weeknight Hero: I make a batch on Sundays, freeze half, and pull them out for quick sandwiches or to warm up with soup. No last-minute store runs, no sad pre-packaged rolls—just homemade, ready when I need them.
- Budget-Friendly Baking: A single jar of yeast and a bottle of olive oil stretch across multiple batches. Honestly, I’ve made 20 rolls from one packet of yeast, and the salt and flour cost pennies. Filling my kitchen with fresh bread without breaking the bank? Yes, please.
Step-by-step instructions for no-knead soft bread rolls
Here’s how to make pillowy, restaurant-quality bread rolls with just five simple ingredients.
Activate the Yeast in Warm Water
In a small bowl, combine the 1.25 cups warm water (about 110°F) and the 1 package active dry yeast. Let it sit for 5-10 minutes until foamy. You’ll see tiny bubbles forming and the mixture expanding—this means your yeast is alive and ready to work its magic.
If the water isn’t warm enough, the yeast won’t activate properly and your rolls won’t rise. Test the temperature by dipping your pinky finger in—it should feel warm but not hot. If no foam forms after 10 minutes, your yeast might be old, and you’ll need to start over with fresh yeast.
Mix the Dough Until Just Combined
In a large mixing bowl, whisk together the 4 cups all-purpose flour and 1.5 teaspoons kosher salt. Create a well in the center and pour in the yeast-water mixture. Add the 2 tablespoons extra-virgin olive oil and stir with a wooden spoon or dough whisk.
Mix until you have a shaggy dough that comes together when pressed. You’ll notice some dry spots at first—that’s normal. The dough should be sticky but not wet, and it shouldn’t cling to your fingers. If it’s too dry, add 1 teaspoon warm water at a time until it comes together. This dough is forgiving, so don’t stress about perfection.
Let the Dough Rest and Rise
Cover the bowl with a clean kitchen towel or plastic wrap and let the dough rise at room temperature for 1-2 hours. You’ll know it’s ready when it’s doubled in size and looks puffy and airy. The dough should spring back slowly when you press it gently with your finger—this indicates proper fermentation.
During this time, the yeast will work its magic, creating those tiny air pockets that make your rolls light and fluffy. Avoid moving the bowl or disturbing the dough, as this can deflate it. If your kitchen is cold, place the bowl near a warm spot like the oven with the light on to help speed up the process.
Shape the Rolls for Perfect Texture
Once the dough has risen, turn it out onto a lightly floured surface. Gently deflate it by pressing down with your fingers. Divide the dough into 12 equal pieces (about 2 ounces each) using a bench scraper or knife. Roll each piece into a smooth ball, tucking the edges underneath to seal.
For extra softness, I like to dimple the tops of the rolls with my fingers. This creates more surface area for browning and adds that bakery-style texture. Place the shaped rolls on a parchment-lined baking sheet, leaving about 1 inch between each one so they can expand. Cover loosely with the towel and let them rest for 20-30 minutes to rise slightly again.
Bake Until Golden and Hollow-Sounding
Preheat your oven to 375°F. Bake the rolls for 15-18 minutes until they’re golden brown on top and sound hollow when tapped on the bottom. The edges should pull away slightly from the baking sheet, and you’ll smell that fresh-baked bread aroma filling your kitchen.
For even browning, you can brush the tops with a little water right before baking. This creates a crispy crust while keeping the inside soft. Let the rolls cool on the baking sheet for 5 minutes before transferring to a wire rack. Serve warm for the best texture—these rolls are at their most tender and flavorful when freshly baked.
Pro Tips For Making 4 Ingredient Bread Roll
- TEST YEAST FIRST: Skip the guesswork—mix 1 tsp yeast with ¼ cup warm water (110°F) and 1 tsp sugar, then wait 5–10 minutes for frothy bubbles. If nothing happens, your yeast is dead, and no amount of kneading will save this dough. (I learned this the hard way after tossing a sad, flat loaf.)
- SALT THE WATER: Dissolve the kosher salt directly in the warm water before mixing with flour—this ensures even distribution. I used to sprinkle it in later, and my rolls always tasted unevenly seasoned, especially near the edges.
- KNEAD BY HAND: Skip the mixer for these rolls—use your knuckles to press and fold the dough for 3–4 minutes until it’s smooth and slightly tacky. Overworking it later with a mixer can develop gluten too much, making the rolls dense instead of light and airy.
- OIL THE BOWL: Coat your mixing bowl with 1 tablespoon olive oil before adding the dough—this prevents sticking and makes shaping easier later. I used to just grease my hands, but the dough still clung to the sides, turning my rolls into a sticky mess. (Yes, even if you’re impatient like me.)
Troubleshooting this recipe
Dough Won’t Rise
If your dough isn’t rising after 2 hours, check the yeast first—it might be expired or dead. I’ve had this happen when yeast sits too long in my pantry.
Test it by mixing 1 packet yeast with ¼ cup warm water and 1 tsp sugar—if it doesn’t bubble in 5 minutes, grab a fresh package. Also, ensure your water is 110°F (not boiling) and your kitchen is warm enough (above 70°F).
If your kitchen is chilly, try placing the bowl near the oven with the light on. 💡
Rolls Stay Dense
Dense rolls usually mean the dough didn’t get enough air or wasn’t shaped properly. Make sure you’re dividing the dough into 12 equal pieces (about 2 ounces each) and sealing the edges tightly when rolling.
If your dough feels too stiff after mixing, add 1 tsp warm water at a time until it’s just sticky. Also, don’t skip the second rise after shaping—those 20-30 minutes let the rolls puff up before baking. Overworking the dough can also tighten the gluten, so handle it gently. 🍞
Uneven Baking
If some rolls bake faster than others, it’s likely due to uneven heat distribution. Rotate your baking sheet halfway through baking (after 9 minutes) to ensure even browning. Also, make sure your oven rack is in the middle position—this prevents hot spots.
If your rolls are browning too quickly, tent them loosely with aluminum foil after 10 minutes to slow the process. For a crispier crust, brush the tops with water before baking. 🔥
Sticky Dough Nightmare
Sticky dough is normal, but if it’s unbearable, wet your hands slightly before shaping. I keep a spray bottle of water nearby for this exact reason. Avoid adding too much flour—it can make the rolls tough. Instead, use a dough scraper to lift and turn the dough as you shape.
If the dough sticks to the bowl during rising, lightly grease the bowl with olive oil or use a bowl with nonstick coating. This keeps everything from sticking while still letting the dough rise properly. ✨
Rolls Fall After Baking
If your rolls collapse after coming out of the oven, they likely didn’t have enough structure. This can happen if the dough wasn’t shaped tightly enough or if it overproofed (rose too long).
For next time, press down gently on the dough after the first rise to deflate it slightly before shaping. Also, keep an eye on the rise time—if the dough doubles in 30 minutes, it’s ready; if it takes 2+ hours, it might be overproofed.
Bake immediately after shaping to lock in that rise. 💪
Nutrition facts
Frequently asked questions
Can I make these bread rolls without yeast?
No, yeast is essential for creating that light, airy texture. However, you could try a quick yeast substitute like 1 teaspoon baking powder mixed into the flour—but your rolls will be denser and less flavorful. For the best results, stick with active dry yeast. If you’re short on time, use instant yeast (same amount) for faster activation.
How do I store leftover bread rolls?
Keep them fresh in an airtight container at room temperature for 2-3 days. For longer storage, freeze shaped rolls (before baking) on a tray, then transfer to a bag for up to 3 months. To reheat, bake at 350°F for 5-7 minutes until warm and crispy. Pro tip: Wrap them in foil before freezing to prevent freezer burn.
Why do my rolls turn out gummy instead of soft?
Gummy texture usually means the dough overproofed (rose too long) or didn’t bake long enough. Check your rise time—dough should double in 1-2 hours, not longer. Also, bake until golden brown (about 15-18 minutes) and tap the bottom: it should sound hollow. If they’re still gummy, bake 2-3 extra minutes to evaporate excess moisture.
Can I add herbs or garlic to these rolls?
Mix in 1 tablespoon dried herbs (like rosemary or thyme) or 1 clove minced garlic with the flour. For extra flavor, brush baked rolls with melted butter and sprinkle with garlic powder or flaky sea salt. Just remember: adding mix-ins may slightly alter the texture, so keep portions small (1 tbsp max).
What if my kitchen is too cold for proper rising?
Place the dough bowl near a warm spot like the oven with the light on (turned off) or a sunny windowsill. You can also create a makeshift proofing box by placing the dough on a tray with a bowl of hot water nearby. Aim for a 75-80°F environment—this helps the yeast activate properly in 1-2 hours. If your kitchen is consistently cold, try using instant yeast for faster results.

- Baked Potatoes in Crock Pot Recipe: Buttery Interiors and Crispy Top Magic - November 1, 2026
- Braised Beef Short Ribs Recipe: Crock Pot Fall-Off-Bone Magic in 6 Hours - November 1, 2026
- Crock Pot Cocoa Recipe: Velvety Warmth With Hidden Spice Magic - November 1, 2026