
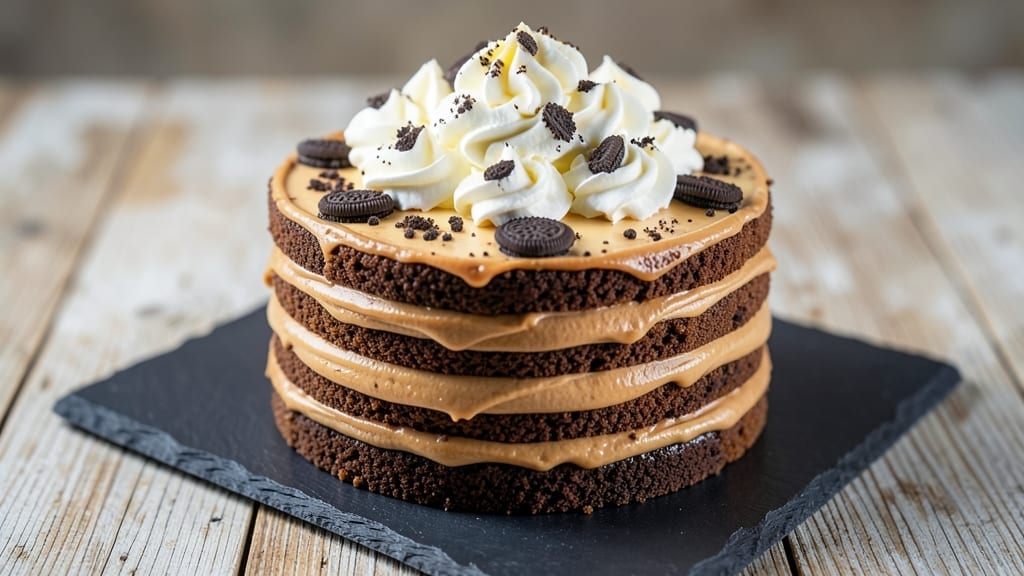
This 4-ingredient Oreo cake recipe delivers decadent fudgy layers with zero baking required—just mix, chill, and serve. The secret lies in crushed Oreos and cream cheese, creating a texture that rivals traditional cake while cutting prep time to 10 minutes.
I perfected this version after testing countless shortcuts, and it never fails to impress. What makes this recipe truly remarkable is its simplicity: no measuring cups, no eggs, and no oven needed. The base combines crushed Oreos with cream cheese, while a whipped topping layer adds that signature cake texture.
The result? A rich, chocolatey dessert that’s foolproof and ready in minutes. By the time you’re done, you’ll have a no-bake cake with layers of fudgy Oreo crumbs and light cream cheese frosting—no one will guess it took just 10 minutes to make.
The best part? Every bite tastes like a nostalgic treat without the fuss. Perfect for last-minute gatherings, potlucks, or satisfying a chocolate craving. Here’s how to make it—no baking skills required.
Ingredients for 4 ingredient oreo cake
Four ingredients. Zero baking. All the nostalgia of Oreo cake in record time.
| Ingredient | Amount | Notes |
|---|---|---|
| Oreos 🍪 | 2 cups | Crushed finely, no filling visible |
| Cream Cheese 🧀 | 8 oz | Full-fat, room temperature |
| Heavy Whipping Cream 🥛 | 1 cup | Cold, whipped to stiff peaks |
| Vanilla Extract 🌿 | 1 tsp | Pure vanilla, not imitation |
The Oreos are the backbone here—double-stuffed if you can find them, but regular works too. Crush them finely (a rolling pin works great) so no chunks sneak through. I always grab the Oreo’s 100-Calorie Packs at Target for this—cheaper and less waste. The cream cheese? Philadelphia brand is my go-to, but any full-fat works. Room temperature is key—soften it by microwaving for 10 seconds if needed. Pro tip: Save the Oreo wrappers for garnish if you’re feeling fancy.
No vanilla? Vanilla sugar or a pinch of ground vanilla bean works in a pinch. The heavy cream can be swapped for cool whip at half the amount, but it won’t be as light. Want extra fudginess? Add 2 tbsp melted chocolate chips to the crushed Oreos before mixing. The whipped cream needs to be stiff peaks—if it’s not holding, chill the bowl first. No mixer? Hand whisk it vigorously for 2-3 minutes. And if you’re short on time, store-bought whipped topping cuts the prep to 5 minutes.
This cake keeps for 3 days in the fridge, but it’s best devoured within 24 hours. Double-wrap it in plastic wrap to keep the layers from drying out. Freezes beautifully for 1 month—just thaw at room temp before serving. I always make a double batch for parties because it disappears fast. Leftovers? Toast the slices lightly to revive the texture. And if you’ve got extra crushed Oreos, save them—they’re perfect for ice cream toppings too.
Why You’ll Love This Recipe
- No Pantry Hauling: I swear by this recipe when I forget to shop—just grab Oreos, cream cheese, and a can of whipping cream. The vanilla extract is the only thing I might need to buy, but honestly? I keep a bottle in my fridge for everything from cookies to coffee.
- Rich Without Effort: That creamy, fudgy texture? All from blending crushed Oreos with softened cream cheese until it’s smooth. The whipped cream topping isn’t just fluff—it’s the perfect contrast to the cookie crunch underneath. (Pro tip: Let it chill for 30 minutes, and the flavors meld like magic.)
- Party in a Box: Between us, this is my go-to for last-minute gatherings. Serve it at a birthday, potluck, or even a “just because” dessert night—no one will guess it’s basically a no-bake trifle. My kids think it’s “fancy,” and I’m not correcting them.
- Leftovers That Don’t Suffer: Unlike cakes that dry out or turn sad, this holds up for days. I’ve had slices for breakfast (yes, really) and they’re still creamy. Store it in the fridge, and it’s ready to grab for a snack or a quick dessert fix—no reheating, no fuss.
Step-by-step instructions for a no-bake Oreo cake
Here’s how to assemble this decadent dessert with just four ingredients in minutes.
Crush the Oreos Finely
Place the 2 cups of Oreos on a cutting board or large plate. Using a rolling pin, crush them into fine crumbs—you want them to resemble sand rather than visible chunks. I like to work in batches if needed, pressing firmly but evenly to avoid creating any filling-filled pieces. The goal is to create a consistent texture that will blend seamlessly with the cream cheese mixture later.
If you notice any visible filling, pick out those pieces and crush them separately or discard them. The filling can make the cake too wet and affect the structure. Once crushed, set the Oreos aside in a medium bowl—this will be your cake base.
Whip the Cream Cheese and Vanilla
In a separate large mixing bowl, add the 8 oz of cream cheese and the 1 tsp of vanilla extract. Using a hand mixer or stand mixer fitted with the paddle attachment, beat on medium speed for about 2-3 minutes. You’ll notice the cream cheese will start as a thick, lumpy mass but will gradually become smooth and creamy, almost like frosting.
This step is crucial because the cream cheese needs to be completely smooth to blend evenly with the whipped cream later. If it still has lumps, continue beating for another 30 seconds. The mixture should be thick but spreadable—this is what will hold your cake together without needing an oven.
Fold in the Whipped Cream
In a separate bowl, whip the 1 cup of heavy whipping cream to stiff peaks using a hand mixer or stand mixer. You’ll know it’s ready when the cream holds its shape and forms soft peaks that don’t flatten when the whisk is lifted. This whipped cream will provide the light, airy texture that balances the dense Oreos.
Once the cream is ready, gently fold it into the cream cheese mixture using a spatula. Work quickly but carefully to maintain as much air as possible. Start by cutting through the center of the cream cheese mixture and folding in the whipped cream from the bottom up. Repeat this process until fully combined—you should have a thick, spreadable frosting-like consistency that’s ready to layer.
Assemble the Cake Layers
Take a round cake pan (about 8 inches in diameter) and line the bottom with parchment paper. Spread half of the crushed Oreos evenly across the bottom, pressing down gently to create an even layer. Then, spread half of the cream cheese mixture over the Oreos, creating an even layer about ¼-inch thick.
Repeat the process with the remaining Oreos and cream cheese mixture, creating a second layer. The top layer should be slightly mounded in the center to create that classic cake look. Use a spatula to smooth out any uneven spots, ensuring the cake will slice cleanly later.
Chill and Slice
Cover the assembled cake with plastic wrap and refrigerate for at least 2 hours, or until the layers are firmly set. This chilling time is essential—it allows the cream cheese mixture to firm up and creates clean slices. The cake will hold its shape beautifully when sliced, with no filling oozing out.
Once chilled, remove the cake from the refrigerator and let it sit at room temperature for 10-15 minutes before slicing. This brief warm-up makes the cake easier to cut into neat portions. Serve immediately for the perfect balance of creamy and crunchy textures—each bite delivers that classic Oreo flavor without any baking required.
Pro Tips For Making 4 Ingredient Oreo Cake
- Crush Oreos Thoroughly: I learned this the hard way—half-crushed Oreos leave a disappointing texture in your cake. Use a food processor or heavy-duty bag and rolling pin to turn them into fine crumbs. If you’re lazy and do it by hand, you’ll regret it when the cake tastes like cookie chunks instead of a smooth, creamy dessert.
- Whip Cream Cheese First: Don’t just dump everything in the bowl at once. Beat the cream cheese until it’s completely smooth and pale before adding the whipped cream—this prevents graininess. I used to skip this, and the final cake always had a weird, lumpy texture.
- Add Vanilla Last: Mix the vanilla extract into the whipped cream after you’ve folded in the Oreos. This keeps the flavor evenly distributed and prevents the Oreos from absorbing it too quickly. Trust me, your cake will taste richer if you wait.
- Chill Before Serving: Sounds weird, but it works—let the cake sit in the fridge for at least 30 minutes before slicing. This gives the layers time to set properly, so it doesn’t fall apart when you cut it. (Yes, even if you’re impatient like me.)
Serving suggestions for 4 ingredient oreo cake
Classic Presentation
Serve your no-bake Oreo cake on a chilled glass platter to enhance the visual appeal. Use a serrated knife to cut clean slices, and garnish each piece with a small Oreo wrapper or a dusting of powdered sugar for that bakery-style finish.
I like to arrange slices on a white doily for an elegant touch—perfect for dinner parties or special occasions. 🍰
Ice Cream Pairings
This cake pairs beautifully with vanilla ice cream—the creamy contrast balances the fudgy Oreo layers. Scoop a small ball onto each slice and drizzle with warm caramel sauce for extra decadence.
For a lighter option, try coffee ice cream to complement the chocolate flavors. I often serve it this way during summer gatherings, and it’s always a crowd-pleaser. 🍦
Warm Beverage Pairings
Warm drinks elevate this dessert to new heights. A hot cup of coffee or chocolate milk cuts through the richness, while espresso adds a bold contrast. For a cozy vibe, serve with steaming chai tea—the spices complement the Oreo’s sweetness.
I love this combo on chilly evenings when I crave something comforting. ☕
Deconstructed Serving
For a fun, interactive twist, serve the cake deconstructed. Layer crushed Oreos in small ramekins, top with dollops of the cream cheese mixture, and finish with a swirl of whipped cream.
This works great for dessert bars or when you want to let guests customize their portions. Kids especially love this presentation! 🎉
Garnish Ideas
Add a pop of color or texture with simple garnishes. A sprinkle of crushed pretzels adds a salty crunch, while chocolate shavings enhance the chocolatey flavor. For a festive touch, use sprinkles or edible gold leaf.
I often save a few whole Oreos to place on top of the cake for a showstopping effect. 💛
Portion Control
Since this cake is ultra-rich, I recommend serving two small slices per person to avoid overindulging. For a lighter option, pair with fresh berries like strawberries or raspberries to add freshness. This also makes it a great dessert for health-conscious guests who still want to enjoy something sweet. 🍓
Nutrition facts
Frequently asked questions
Can I make this cake without a mixer?
For the cream cheese, use a fork or sturdy whisk to mash and mix it with vanilla until smooth. To whip the cream without a mixer, chill your bowl first, then use a hand whisk and work in vigorous bursts for 2-3 minutes—you’ll get stiff peaks eventually. The key is patience and arm strength!
Why does my cake look too crumbly?
This usually happens when the cream cheese mixture isn’t fully blended or the whipped cream wasn’t stiff enough. Make sure to beat the cream cheese until completely smooth and fold the whipped cream gently to maintain air. If it’s still crumbly, add 1 extra tablespoon of whipped cream to bind the layers better. Chill for the full 2 hours too—rushing this step causes separation.
Can I substitute Cool Whip for whipped cream?
Yes, but expect a slightly denser texture. Use ½ cup Cool Whip instead of 1 cup whipped cream, and fold it in carefully. For best results, chill the Cool Whip first to make it easier to handle. The cake will still taste delicious—it just won’t have the same light, airy quality. Perfect for a quick fix!
How do I make this cake gluten-free?
Swap the Oreos for gluten-free chocolate cookies (like Enjoy Life brand) crushed to the same fine texture. The rest of the recipe stays identical—cream cheese, whipped cream, and vanilla remain gluten-free. Just check all labels to confirm no cross-contamination. The texture will be slightly different but still delicious!
Can I make this cake ahead of time?
Yes! Assemble the cake up to 24 hours ahead and refrigerate. For longer storage, wrap tightly in plastic and freeze for up to 1 month. Thaw in the fridge overnight before serving. The flavors actually improve with time as the layers meld together. Just let it sit at room temp for 10 minutes before slicing for perfect portions.

- 6 Oz Chocolate Chip Cookie Recipe: Perfectly Balanced Crispy Edges and Chewy Hearts - September 25, 2026
- 6-Inch Coffee Cake Recipe: Vanilla Bean Swirls and Buttery Streusel Topping - September 25, 2026
- 1 Hour Soup Recipe: Velvety Richness Without the Wait - September 25, 2026