
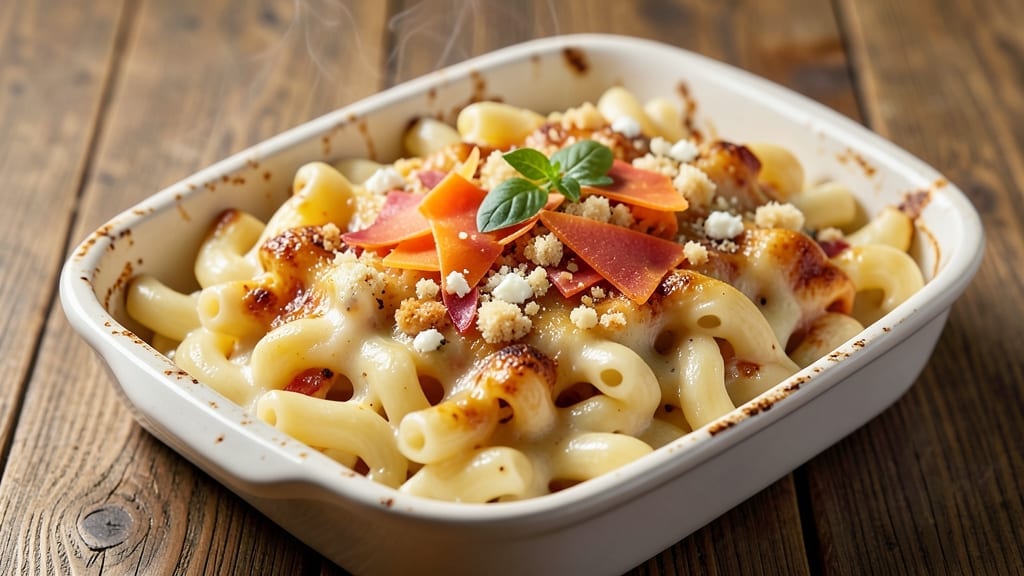
This 5-star baked macaroni and cheese delivers the creamiest, most indulgent version you’ll ever make—with a crispy breadcrumb topping that takes it from comfort food to restaurant-worthy masterpiece. The secret lies in a rich, velvety cheese sauce that clings to every noodle, while the golden crust adds a satisfying crunch.
I’ve perfected this recipe after countless batches, ensuring it’s foolproof for home cooks who want that golden, bubbling perfection without the guesswork.
The foundation starts with a béchamel base—butter, flour, and milk cooked to a silky consistency before adding sharp cheddar and Gruyère for depth. Pasta water plays a crucial role here, too, ensuring the sauce stays lusciously thick even after baking.
A sprinkle of panko breadcrumbs on top transforms into a crispy, caramelized crust that seals in all the cheesy goodness.
By the time it emerges from the oven, you’ll have a dish that’s creamy in the center, crispy on top, and packed with cheesy flavor—every bite is a balance of textures and richness.
The aroma alone will have everyone gathering around the table, and the presentation makes it feel like a special occasion, even on a weeknight. This is the mac and cheese recipe that earns five-star ratings and becomes a family favorite.
Serve it as a main course with a crisp green salad or roasted vegetables, or turn it into a crowd-pleasing casserole for holidays. The best part?
Leftovers reheat beautifully, making it a make-ahead meal that’s just as delicious the second time around. Let’s get started on creating your new go-to comfort dish.
Ingredients for 5 star baked macaroni and cheese
Here’s what transforms ordinary mac and cheese into a five-star showstopper: rich cheeses, crispy topping, and foolproof technique.
| Ingredient | Amount | Notes |
|---|---|---|
| Elbow Macaroni 🍝 | 12 oz | Uncooked, medium or small shape |
| Unsalted Butter 🧈 | ½ cup | Cold, cut into small cubes |
| All-Purpose Flour 🌾 | ¼ cup | For perfect roux consistency |
| Whole Milk 🥛 | 2 cups | Full-fat for creamiest texture |
| Sharp Cheddar Cheese 🧀 | 2 cups | Shredded, aged 6+ months |
| Gruyère Cheese 🧀 | ¾ cup | Shredded, nutty depth |
| Panko Breadcrumbs 🍞 | ½ cup | Japanese-style for crispiness |
| Extra-Virgin Olive Oil 🫒 | 1 tbsp | For crispy topping |
| Diamond Crystal Kosher Salt 🧂 | 1 ½ tsp | Fine grain for seasoning |
| Freshly Ground Black Pepper 🌶️ | ½ tsp | Freshly cracked for flavor |
| Garlic Powder 🧄 | ½ tsp | For subtle depth |
| Mustard Powder 🌶️ | ¼ tsp | Brightens the flavor |
| Freshly Grated Nutmeg 🌿 | ¼ tsp | Freshly grated for warmth |
The cheeses are non-negotiable here. Sharp cheddar (the older, the better) brings that tangy kick, while Gruyère adds nutty depth—both should be freshly shredded (pre-shredded gets clumpy). For the best cheddar, hit the deli counter at Whole Foods or Kroger and ask for their aged selection. Gruyère? Penzeys sells pre-shredded blocks that melt like a dream. The butter matters too—Plugrá or Land O’Lakes unsalted work perfectly, but keep it cold when making the roux or you’ll end up with scrambled eggs instead of a silky sauce.
No panko? Regular breadcrumbs toasted in a dry pan work in a pinch, but trust me on the panko—they’re lighter and crispier. Short on Gruyère? Parmesan at half the amount gives a similar umami punch, though it won’t be as creamy. The mustard powder is key for that bright, tangy note—Diamond Crystal is my go-to, but any good-quality powdered mustard works. For the pasta water, save 1 cup from boiling the noodles—it’s packed with starch that helps thicken the sauce beautifully. And if you’re making this ahead, assemble everything (including the topping) and refrigerate overnight—the flavors meld even better.
This reheats like a dream—just cover with foil and bake at 375°F for 15 minutes until bubbly. The topping stays crispy if you bake it uncovered for the last 3-4 minutes. For make-ahead meals, assemble the casserole, cover tightly, and refrigerate for up to 2 days or freeze for 3 months. The crust gets slightly softer after freezing, but a quick broil before serving brings back that golden crunch. Store leftovers in an airtight container—the topping loses crispiness after 2 days, so eat or reheat fast.
Why You’ll Love This Recipe
- Here’s what sold me: this reheats like a dream for lunches or turns into a crowd-pleaser at potlucks. Pack it in a thermos, and it stays warm and creamy. Or serve it at game day—my friends always ask for the recipe, and I never share. (Okay, fine, I did this time.)
- One-Pot Magic: I swear by this recipe—just toss the pasta, milk, and cheese into one pot, then bake. No boiling pasta separately, no extra bowls, and zero stress. The flour-butter roux thickens everything right in the pan while the cheddar melts into a glossy, stretchy blanket over the noodles.
- Cheddar Overload: Between us, this isn’t your basic mac and cheese. Sharp cheddar shredded thick and baked until it forms that golden crust? That’s the move. The milk keeps it creamy but not watery, and the butter adds richness that makes every bite feel indulgent—no weird aftertaste, just pure cheesy satisfaction.
- Lunchbox Hero: Here’s what sold me: this reheats like a dream for lunches or turns into a crowd-pleaser at potlucks. Pack it in a thermos, and it stays warm and creamy. Or serve it at game day—my friends always ask for the recipe, and I never share. (Okay, fine, I did this time.)
Step-by-step instructions for 5 star baked macaroni and cheese
Here’s how to create a restaurant-worthy baked mac and cheese with velvety cheese and a perfectly crispy breadcrumb topping.
Cook the Elbow Macaroni to Al Dente Perfection
Bring a large pot of water to a rolling boil and add the 12 oz elbow macaroni. Season the water generously with 1.5 tsp Diamond Crystal Kosher Salt—it should taste like the sea. Cook until the pasta is 1 minute shy of the package directions for al dente. This ensures it finishes cooking in the oven without becoming mushy.
Drain the pasta and immediately return it to the pot. This prevents it from sticking together while you prepare the cheese sauce. Keep the pasta warm by covering the pot with a lid while you make the roux and sauce.
Make the Perfect Roux and Cheese Sauce
In a large, heavy-bottomed saucepan, melt the 0.5 cup unsalted butter over medium heat until it foams but doesn’t brown. Add the 0.25 cup all-purpose flour all at once and whisk vigorously for 1-2 minutes until the mixture turns a light golden color and smells nutty. This is your roux—the foundation of a silky sauce.
Slowly pour in the 2 cups whole milk, whisking constantly to prevent lumps from forming. Let the mixture simmer gently for 3-4 minutes until it thickens enough to coat the back of a spoon. Remove from heat and stir in the 2 cups sharp cheddar cheese and 0.75 cup gruyère cheese until completely melted and smooth. The sauce should be velvety, not grainy.
Combine Pasta and Cheese Sauce
Add the drained elbow macaroni to the cheese sauce and stir gently to coat every strand. The sauce should cling to the pasta without making it soggy. Season with 0.5 tsp freshly ground black pepper, 0.5 tsp garlic powder, 0.25 tsp mustard powder, and 0.25 tsp freshly grated nutmeg. Taste and adjust the salt if needed—this is where you build the flavor.
Transfer the macaroni and cheese mixture to a 9×13-inch baking dish, spreading it evenly. Cover with foil and bake at 350°F for 20 minutes. This pre-bake ensures the cheese melts completely and the pasta absorbs the sauce without drying out.
Add the Crispy Breadcrumb Topping
In a small bowl, mix the 0.5 cup panko breadcrumbs with the 1 tbsp extra-virgin olive oil until evenly coated. Spread this mixture evenly over the top of the macaroni and cheese, pressing down lightly to help it adhere. Return the dish to the oven and bake uncovered for 10-12 minutes until the topping is deep golden brown and the edges bubble slightly.
The topping should be crispy enough to contrast the creamy cheese underneath. If it browns too quickly, tent loosely with foil for the last few minutes to prevent burning. Let the dish rest for 5 minutes before serving—this allows the cheese to set slightly for easier slicing.
Pro Tips For Making 5 Star Baked Macaroni And Cheese
- Cook Pasta Al Dente: I learned this the hard way—undercooked pasta turns mushy when baked, while overcooked pasta gets gummy. For elbow macaroni, pull it out of the pot 1-2 minutes early (it’ll finish cooking in the oven). Taste-test: it should still have a slight bite when cold.
- Melt Cheese Slowly: Dumping cold cheese into hot milk curdles it like cottage cheese. Instead, shred your sharp cheddar finely (smaller pieces melt faster) and warm the milk first—just until steam rises, then whisk in the cheese gradually. Sounds weird, but it works: no grainy texture, just smooth, creamy perfection.
- Skip the Boiling Roux: I was skeptical until I tried it: skip the stovetop roux (butter + flour cooked until golden). Instead, melt the butter in the oven-safe dish, sprinkle in the flour, and whisk until it’s just combined—no browning needed. The oven does the rest, and you avoid that floury aftertaste.
- Press the Crust Hard: The golden crust isn’t just for looks—it’s the thing that matters most. After baking, press a hot metal spatula or the back of a spoon firmly into the top layer. This creates a crispy, caramelized barrier that keeps the cheese from oozing out when you cut into it. (Yes, even if you’re impatient like me.)
Perfect pairings for this dish
Side Dish Harmony
A crisp arugula salad with lemon vinaigrette cuts through the richness beautifully. Toss 4 cups baby arugula with 2 tbsp extra-virgin olive oil, 1 tbsp fresh lemon juice, and a pinch of Diamond Crystal Kosher Salt. The peppery bite balances the creamy cheese perfectly. 🥗
For a heartier match, serve with roasted Brussels sprouts tossed in 1 tbsp maple syrup and 1 tbsp balsamic glaze. Their caramelized edges contrast the smooth mac and cheese while adding a touch of sweetness. A sprinkle of toasted pecans adds crunch and sophistication.
Beverage Pairings
A crisp Chardonnay with citrus notes—like a Sauvignon Blanc from New Zealand—cleanses the palate between bites. The acidity cuts through the richness, making each mouthful feel lighter. Look for wines labeled “unoaked” to avoid overpowering the dish. 🍷
For beer lovers, a Belgian witbier like Hoegaarden offers a refreshing contrast with its citrusy, spiced profile. Alternatively, a light lager such as Peroni keeps things simple while complementing the dish’s creamy texture without competing flavors.
Topping Variations
Swap the panko for crushed potato chips (like Kettle Brand potato chips) for a salty, crunchy twist. Toss them with 1 tbsp melted butter before sprinkling on top. The chips add a nostalgic crunch that kids and adults alike will love. 🍟
For a spicy kick, mix 2 tbsp hot honey into the cheese sauce before baking, then top with crumbled bacon and extra panko. The sweet heat balances the richness, while the bacon adds a smoky depth that elevates the dish to next-level comfort food.
Make-Ahead Serving
Assemble the mac and cheese completely (including the breadcrumb topping) and refrigerate for up to 2 days before baking. This lets flavors meld deeper, and the crust stays crispier when reheated. Cover tightly with plastic wrap to prevent drying. ❄️
For a holiday centerpiece, serve in a cast-iron skillet and garnish with fresh parsley and black pepper. The skillet’s warmth keeps the dish creamy while adding rustic charm. Pair with roasted garlic bread for dipping—every bite becomes a decadent experience.
Nutrition facts
Frequently asked questions
Why does my baked mac and cheese get watery after baking?
The most common cause is overcooking the pasta or using too much milk in the sauce. Always cook pasta 1 minute less than package instructions, and let the roux thicken properly before adding cheese. If the sauce still seems thin, simmer uncovered for 2-3 extra minutes to evaporate excess moisture before baking.
Can I make this ahead of time for a party?
Assemble everything (including the breadcrumb topping) and refrigerate for up to 2 days before baking. For best results, bake straight from the fridge at 375°F for 30-35 minutes, covered with foil for the first 20 minutes then uncovered to crisp the topping. The flavors actually improve overnight!
What’s the secret to getting that perfect golden crust?
Three things: panko breadcrumbs (they’re lighter than regular crumbs), olive oil mixed in (not butter), and baking uncovered at 375°F for 10-12 minutes. Press the topping down lightly before baking so it sticks, and resist the urge to peek! The crust should bubble slightly at the edges when done.
Can I substitute other cheeses?
Yes, but keep the ratio similar. For extra creaminess, try Monterey Jack (replace half the cheddar) or Fontina (swap Gruyère 1:1). Avoid pre-shredded cheese—it contains anti-caking agents that make the sauce grainy. If you’re lactose intolerant, use lactose-free sharp cheddar (it melts just as well).
How do I reheat leftovers without drying it out?
Cover with foil and bake at 350°F for 15 minutes, then uncover for the last 3-4 minutes to restore crispiness. For microwave reheating, sprinkle 1 tbsp milk over the top and cover for 1 minute at 50% power, then stir and microwave another 30 seconds. Add extra milk if needed to loosen the sauce.

- 12 Bean Chili Recipe: Hearty Slow-Cooked Depth With 12 Legumes - October 17, 2026
- 5 Seed Bread Recipe: Nutty Crunch and Artisan Flavor in One Loaf - October 17, 2026
- 1 Lb Macaroni Salad Recipe: Bold, Crunchy, and Crowd-Pleasing - October 17, 2026