
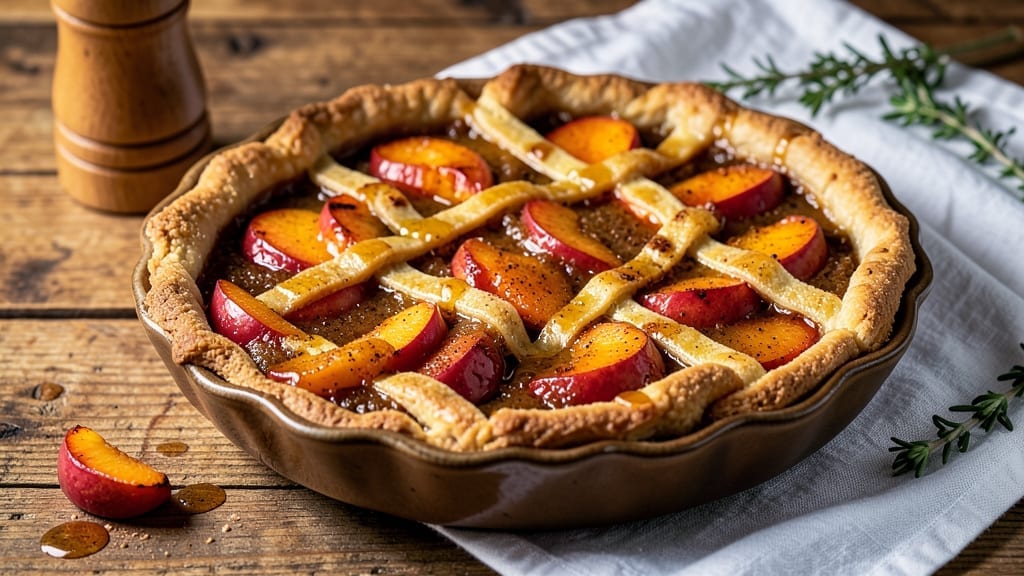
This 5-star peach pie recipe delivers the perfect balance of buttery crust and golden lattice topping over a luscious peach filling that tastes like summer in every bite. 🌟 After years of perfecting my technique—from the ideal sugar-to-peach ratio to the secret of a crisp yet tender crust—I’ve finally cracked the code for restaurant-quality results at home.
The key lies in a foolproof filling that thickens just enough to coat the peaches without turning gummy, paired with a lattice design that adds both visual elegance and a delightful crunch.
The foundation of this recipe is a homemade pie crust that’s flaky yet sturdy enough to hold its shape, but I’ll also share how to adapt it for store-bought crusts without sacrificing quality.
The filling uses a mix of fresh and canned peaches for consistency, with just the right amount of cornstarch to achieve that velvety texture. A touch of vanilla and cinnamon deepens the flavor, while lemon juice brightens the natural sweetness of the fruit—trust me, this is where the magic happens.
By the time it emerges from the oven, you’ll have a pie with a golden lattice crust, tender peaches glistening under a glossy glaze, and a crust that’s crisp enough to cut through the filling without turning soggy.
The aroma alone will have everyone gathered around your table, and the first bite will silence any skepticism. This isn’t just dessert—it’s a showstopper that deserves its five-star rating.
Ready to impress? I’ll walk you through every step, from prepping the crust to creating that perfect lattice pattern, so you can achieve the same results. Let’s get started—your kitchen (and taste buds) will thank you.
Ingredients for 5 star peach pie
Buttery crust, velvety filling, golden lattice—here’s what makes this peach pie shine.
| Ingredient | Amount | Notes |
|---|---|---|
| All-Purpose Flour 🌾 | 3 ½ cups | Sifted for flaky crust |
| Unsalted Butter 🧈 | 1 ¼ cups | Cold, cubed for crust |
| Granulated Sugar 🍚 | 1 ½ cups | For crust and filling |
| Peaches 🍑 | 4 cups | Fresh or canned, pitted |
| Cornstarch 🌾 | ¼ cup | For thickening filling |
| Vanilla Extract 🌿 | 1 tbsp | Pure vanilla preferred |
| Ground Cinnamon 🌶️ | 1 ½ tsp | Freshly ground ideal |
| Lemon Juice 🍋 | 1 tbsp | Freshly squeezed |
| Salt 🧂 | 1 tsp | Kosher or sea salt |
| Large Eggs 🥚 | 1 whole | For egg wash |
| Heavy Cream 🥛 | ¼ cup | For glaze (optional) |
| Powdered Sugar 🍚 | ¼ cup | For glaze (optional) |
The crust is where it all starts. Cold butter is non-negotiable—cut it into tiny cubes and freeze them 15 minutes before mixing with flour. I always use King Arthur flour for its consistency, but any all-purpose works. For the filling, peaches should be ripe but firm—local farmers markets have the best summer varieties. Canned peaches? Del Monte or Libby’s in juice, drained well. The cornstarch is your secret weapon—it thickens without turning the filling gluey. Toast your cinnamon in a dry pan for 30 seconds first to deepen the flavor (trust me, it makes a difference).
No fresh peaches? Frozen peaches work too—just thaw and drain them well. Short on cornstarch? Arrowroot powder at the same amount works just as well. The vanilla extract should say ‘pure vanilla’ on the bottle—imitation won’t cut it here. For the lattice, cut strips 1/2-inch wide and weave them carefully. If you mess up, no one will notice—it’s still delicious. The optional glaze? Worth it for that restaurant-worthy finish, but skip it if you’re in a hurry.
Butter for the crust keeps best in the fridge, wrapped tightly in parchment. Use within 2 weeks for peak flakiness. Peaches? Store fresh ones in the fridge for 3-4 days or freeze them for up to 6 months. The pie itself reheats beautifully—just warm it at 350°F for 10 minutes. Leftovers? Slice and freeze portions for up to 3 months. I always make a double batch—this pie disappears faster than you can say ‘five-star rating.’
Why You’ll Love This Recipe
- No Peel, No Stress: The cornstarch trick thickens those peaches instantly—no peeling, no pitting, no mess. Just slice, simmer, and pour. My lazy summer afternoons thank me every time.
- Butter-Sugar Crust Magic: That flaky, golden crust? Just butter, flour, and a splash of ice water. The sugar in the filling caramelizes into a glossy top—crisp edges, tender bite. Honestly, it’s the kind of pie that makes you pause mid-slice to sigh.
- Weekend Crowd-Pleaser: Perfect for potlucks, picnics, or when your in-laws show up unannounced. The peaches shine brightest in summer, but the pie keeps well for days—slices reheat beautifully for breakfast or dessert.
- Budget-Friendly Luxury: Fresh peaches in season? Cheap. Canned peaches in winter? Still cheap. Butter and flour stretch far, and the cornstarch ensures every bite is just thick enough—no wasted filling. My wallet and guests win.
Step-by-step instructions for 5 star peach pie
Here’s how to create a showstopping peach pie with a flaky crust and lattice perfection.
👨🍳 Step 1: Make the Perfect Buttery Crust
In a large bowl, combine the 3.5 cups all-purpose flour and 1 tsp salt. Cut in the 1.25 cups unsalted butter (cold from the fridge) using a pastry cutter or your fingers until the mixture resembles coarse crumbs with pea-sized butter pieces. This texture is crucial—it ensures flaky layers when baked.
Add ½ cup of the 1.5 cups granulated sugar and mix until just combined. Press half of the dough into a 9-inch pie dish, spreading it evenly to the edges. Chill while you prepare the filling. I like to use a rolling pin to gently press the dough—don’t overwork it or you’ll develop gluten and lose that flaky magic.
🍳 Step 2: Prepare the Juicy Peach Filling
In a large bowl, combine the 4 cups peaches (peeled, pitted, and sliced if fresh), 1.5 tsp ground cinnamon, 1 tbsp vanilla extract, and 1 tbsp lemon juice. The lemon juice brightens the peaches while the cinnamon adds warmth—trust me, this combo makes all the difference. Toss gently to coat the fruit evenly.
In a separate bowl, whisk together 0.25 cup cornstarch and the remaining 1 cup granulated sugar. Sprinkle this mixture over the peaches and toss again until everything is thoroughly coated. Let the mixture sit for 10 minutes—this allows the cornstarch to absorb some of the fruit’s juices, creating a thicker, more stable filling when baked.
🥘 Step 3: Assemble the Pie with Lattice Topping
Pour the peach mixture into the chilled pie crust, mounding it slightly in the center. Roll out the remaining dough to about ⅛-inch thickness. Cut the dough into strips about ½-inch wide, alternating between 2-inch and 1-inch strips for the classic lattice pattern.
Arrange the strips in a herringbone pattern over the filling, starting with a 2-inch strip along one side. Weave the strips over and under each other, pressing lightly at the intersections to seal. This creates beautiful visual contrast while allowing steam to escape during baking. Brush the lattice with the beaten 1 whole large egg for a golden finish.
🔥 Step 4: Bake to Golden Perfection
Preheat your oven to 375°F. Place the pie on a baking sheet (to catch any drips) and bake for 45-50 minutes until the crust is deep golden brown and the filling is bubbling. The edges should be set but the center should still have a slight jiggle—this indicates the filling is thickened properly.
For that restaurant-quality finish, let the pie cool completely on a wire rack before slicing. The filling will set as it cools, creating that perfect balance of firm yet juicy texture. If you’re feeling fancy, whisk together the 0.25 cup heavy cream and 0.25 cup powdered sugar for a silky glaze to drizzle over the cooled pie.
Pro Tips For Making 5 Star Peach Pie
- Prep Peaches Like a Pro: Pit, halve, and slice the peaches right before adding them to the pie—no waiting. I learned this after making a batch where the peaches released too much juice overnight, turning the filling into soup. Work in batches if needed, but keep them submerged in cold water until you’re ready to use them.
- Blind-Bake the Crust: Chill the pie crust, then prick it all over with a fork before adding the filling. Weigh it down with dried beans or pie weights, then bake at 375°F (190°C) for 15 minutes before filling. This stops soggy bottoms—my first attempt without this step had a sad, limp crust after 30 minutes in the oven.
- Skip the Overmixing: When combining the cornstarch, sugar, and peach juice for the thickener, stir just until dissolved—no need to whip it into oblivion. Overmixing introduces air, which can make the filling bubble up like a volcano when it bakes. A smooth, quick stir is all you need.
- Use Cold Butter in Dough: Cut the unsalted butter into the flour mixture in small chunks and work fast—keep everything cold. Warm butter makes the dough greasy and hard to roll, leading to a tough crust. I was skeptical until I tried it; the result is a flaky, melt-in-your-mouth layer that holds up to the juicy filling.
Essential equipment for this recipe
Pie Dish Essentials
Start with a 9-inch glass or ceramic pie dish—it distributes heat evenly and prevents burning. I use Pyrex because it’s durable and handles temperature shifts beautifully. For a deeper flavor, preheat your dish in the oven for 10 minutes before adding the crust.
Avoid metal dishes—they can react with acidic fillings over time. 🔥
Rolling Pin & Dough Tools
A wooden rolling pin (like OXO Good Grips) is my go-to for pie crusts—it prevents sticking and gives you better control. For shaping the dough, use a pie crust shaper or even a mason jar to press it into the dish without stretching.
Keep your tools chilled in the fridge while working with dough to maintain that perfect flaky texture. ❄️
Lattice Cutter & Pastry Brush
Create clean lattice strips with a pastry wheel or sharp chef’s knife—I prefer the precision of a West Bend pastry wheel. Brush the lattice with a silicon pastry brush (like OXO Good Grips) for an even egg wash.
Avoid metal brushes—they can leave streaks. For extra shine, brush again after 20 minutes in the oven. ✨
Pie Weights or Dried Beans
Prevent a soggy bottom by lining the crust with pie weights or dried beans before baking. I use Ceramic Pie Crust Weights because they’re reusable and easy to clean.
If you don’t have weights, fill the bottom crust with uncooked rice or dry lentils—just remove them before adding the filling. This step is non-negotiable for a crisp crust. 💡
Thermometer for Precision
An instant-read thermometer (like Thermoworks Smoke) ensures your pie reaches the perfect 375°F without guesswork. Check the filling’s internal temp at 45 minutes—it should be 200°F for a thick, set texture. Overbaking dries out the crust, so trust your thermometer over visual cues alone. 🌡️
Cooling Rack & Serving Tools
Let your pie cool on a wire cooling rack to avoid sogginess from residual heat. For serving, use a sharp serrated knife (like Mercer Culinary) to slice cleanly through the lattice.
Wipe the blade between cuts to keep slices looking fresh. A pie server with a forked edge prevents crumbs from falling into the filling. 🍴
Nutrition facts
Frequently asked questions
Can I use store-bought crust for this 5-star peach pie?
A high-quality store-bought crust (like Pillsbury’s pie crust) works perfectly if you blind-bake it for 10 minutes at 375°F before adding the filling. For extra flakiness, brush the bottom with melted butter before baking. Just avoid pre-made crusts with too much oil—they can make the final pie greasy.
What’s the best way to handle underripe peaches?
Place underripe peaches in a paper bag with a banana or apple for 2-3 days at room temperature. The ethylene gas will ripen them perfectly. If they’re too soft, toss them in ice water for 10 minutes to firm up before using. For canned peaches, choose “packed in juice” (not syrup) for the best flavor balance.
How do I fix a soggy bottom crust?
Prevent soggy bottoms by pre-baking the crust for 15 minutes with pie weights, then adding the filling. For an already-baked pie, try this trick: Place the pie on a baking sheet, cover the filling with foil, and bake at 350°F for 15 minutes. The heat will crisp the bottom without overcooking the top.
Can I make this pie ahead of time?
This pie actually tastes better the next day! Assemble it completely (unbaked) and refrigerate for up to 24 hours. Bake straight from the fridge—just add 5-10 minutes to your baking time. For make-ahead filling, prepare it up to 2 days ahead and store in the fridge (it thickens more as it sits).
What’s the secret to perfect lattice?
Chill your dough strips for 10 minutes before weaving to prevent shrinking. Use a ruler to keep strips perfectly straight—½-inch width is ideal. For extra stability, brush strips with egg wash before assembling. If your lattice collapses during baking, it’s likely because the filling wasn’t thickened enough.

- 2 Large Banana Bread Recipe: Double Batch With Moist Crumb and Walnut Streusel - September 30, 2026
- 7 Organ Soup Recipe: Hearty Immune-Boosting Elixir in One Pot - September 30, 2026
- 321 Sauce Recipe: Smoky Tomato Base With Spice-Layered Depth - September 30, 2026