
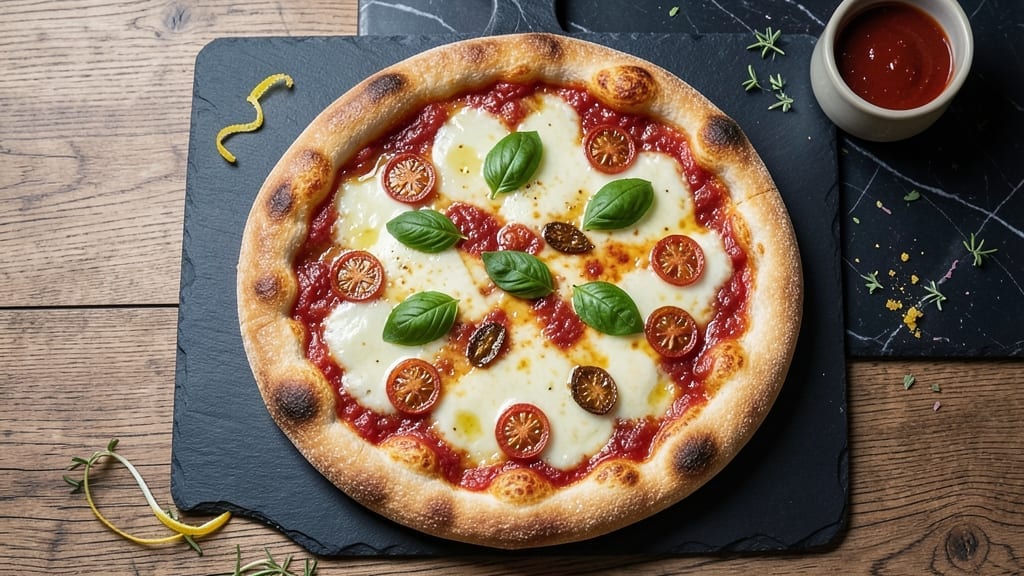
This 5-star pizza crust recipe delivers air-puffed, golden bites that rival your favorite pizzeria—in just 20 minutes. After years of perfecting the technique at my Denver kitchen table, I’ve cracked the code for a crust that’s crispy, chewy, and loaded with those coveted air pockets.
The secret? A precise blend of flour and yeast, combined with a slow-rise method that develops flavor without requiring hours of your time.
The magic happens in the proofing stage, where the dough develops that signature texture and aroma. Unlike traditional recipes that demand patience, this method uses a foolproof timing trick—letting the dough rest just long enough to create that perfect rise while keeping the process efficient.
Once baked, the crust achieves a golden, blistered finish that holds up to any toppings without getting soggy.
What makes this recipe stand out is its versatility—use it for classic Margherita, loaded meat lovers, or even as a crispy base for breakfast pizza. The crust’s structure ensures it supports even the heaviest toppings without losing its signature bite.
Whether you’re feeding a crowd or treating yourself to a solo slice, this recipe delivers restaurant-quality results every time.
Pair it with your favorite sauce, cheese, and toppings, or keep it simple with fresh basil and olive oil. The key is in the details—precise measurements, controlled proofing, and high-heat baking—that transform a simple dough into a 5-star experience.
Let’s get started on creating your next perfect pizza night.
Ingredients for 5 star pizza crust
High-protein flour, yeast magic, and a foolproof timing trick for pizzeria-style crust at home.
| Ingredient | Amount | Notes |
|---|---|---|
| Bread Flour 🌾 | 3 ½ cups | High-protein for elasticity and structure |
| All-Purpose Flour 🌾 | ½ cup | Balances texture without overpowering |
| Active Dry Yeast 🍞 | ¼ tsp | Freshly opened for maximum potency |
| Granulated Sugar 🍬 | ½ tsp | Feeds yeast for optimal activation |
| Diamond Crystal Kosher Salt 🧂 | 1 ½ tsp | Fine grain for even distribution |
| Extra-Virgin Olive Oil 🫒 | ½ cup | Fruity, high-quality for flavor |
| Warm Water 💧 | 1 ¼ cups | 105°F for ideal yeast activation |
| Cornmeal 🌽 | ½ cup | For dusting and crispy base |
| Semolina Flour 🌾 | ¼ cup | Optional for extra texture (optional) |
| Fresh Basil Leaves 🌿 | ¼ cup | Chopped for finishing garnish |
| Garlic Cloves 🧄 | 4 cloves | Minced for flavor infusion |
| Balsamic Vinegar 🍷 | 1 tbsp | For drizzling after baking |
The bread flour is non-negotiable here—it’s the secret to those signature air pockets. King Arthur or Caputo are my go-to brands for consistent results, but any high-protein flour (12-14%) will work. The yeast needs to be fresh, so check the expiration date—if it’s been sitting in your pantry for months, grab a new packet. Warm water is key: too hot kills the yeast, too cold slows activation. 105°F is perfect, but if you don’t have a thermometer, let tap water sit for 10 minutes after boiling. For the olive oil, California Avocado Ranch or Colavita add fruity depth without overpowering. The cornmeal isn’t just for dusting—it creates that crispy, golden base that holds toppings perfectly.
No bread flour? All-purpose plus 1 tbsp vital wheat gluten gets you close, but the texture won’t be quite as airy. Fresh yeast? Instant yeast works at half the amount, but you’ll need to adjust the water slightly. The balsamic vinegar can be swapped for white wine vinegar or apple cider vinegar if you’re out, but balsamic adds that perfect tang. Semolina is optional but worth it if you’re making a crowd-sized batch—it adds a nutty crunch that pairs beautifully with cheese. For the basil, fresh is ideal, but dried basil at one-third the amount works in a pinch. If you’re short on garlic, garlic powder at half the amount gives a milder flavor.
This dough keeps beautifully—cover it tightly with plastic wrap and refrigerate for up to 48 hours if you want to let it develop more flavor. For proofing, the kitchen should be 75-78°F—if it’s colder, your oven with the light on works as a makeshift warmer. Once baked, the crust stays fresh for 3 days at room temperature, but reheat slices in a 375°F oven for 5-7 minutes to restore that crispy texture. I always make extra dough—freeze shaped balls for up to 3 months and bake straight from frozen (add 2-3 minutes to cooking time).
Why You’ll Love This Recipe
- No-Knead Magic: I swear by this dough—just mix, let it rise, and forget it. The bread flour gives that perfect chewy bite, while the all-purpose keeps it light, and honestly? I’ve made it while scrolling through my phone.
- Crispy-Chewy Dream: That sugar in the dough caramelizes just enough to give the crust a golden edge, but the yeast keeps the center pillowy. It’s the kind of texture that makes you take a second slice before anyone else even gets to theirs.
- Weeknight to Party Star: Same dough, endless possibilities. Use it for dinner tonight with pepperoni, then stretch it for a weekend brunch pizza with eggs and fresh herbs. My kids even ask for it on school nights—yes, even on a Tuesday.
- Budget-Friendly Stretch: A single batch feeds four, and leftovers? They freeze like a dream. I’ve pulled out a pre-made crust from the freezer to feed unexpected guests, and no one ever guesses it wasn’t homemade.
Step-by-step instructions for air-puffed, golden pizza crust
Here’s how to transform simple ingredients into a restaurant-worthy crust with a crispy exterior and airy interior.
Activate the Yeast and Create the Dough
In a stand mixer fitted with the dough hook attachment, combine the 3.5 cups bread flour, 0.5 cup all-purpose flour, 1.5 tsp diamond crystal kosher salt, 0.5 tsp granulated sugar, and 0.25 tsp active dry yeast. Mix on low speed for 30 seconds to blend the dry ingredients completely. This ensures even distribution of the yeast and salt throughout the dough.
In a separate bowl, whisk together the 0.5 cup extra-virgin olive oil and 1.25 cups warm water (about 105°F). Pour this liquid mixture into the flour mixture while mixing on low speed. Gradually increase the speed to medium and knead for 5-7 minutes until the dough becomes smooth and elastic. You’ll know it’s ready when it forms a tight ball that springs back slowly when pressed. If the dough feels too sticky, add 1 tablespoon of bread flour at a time until it comes together nicely. This high-protein dough needs just enough hydration to develop gluten without becoming too slack.
Develop the Dough for Maximum Texture
Remove the dough from the mixer and place it on a lightly floured surface. Gently shape it into a ball and divide it into 4 equal portions (about 8 ounces each). This division ensures each crust will have consistent thickness and even baking. Cover the dough portions with a clean kitchen towel and let them rest at room temperature for 10 minutes. This brief rest helps relax the gluten strands, making the dough easier to handle during shaping.
While the dough rests, preheat your oven to 425°F and place a pizza stone or baking sheet on the middle rack. The stone should be fully preheated before you add the dough—this creates the ideal high-heat environment for that perfect air-puffed texture. I like to use a pizza stone because it conducts heat evenly and creates a crispy base, but a heavy baking sheet works in a pinch. The key is getting that surface as hot as possible before the dough goes in.
Shape and Proof the Crusts
After the 10-minute rest, take one dough portion and place it on a lightly floured surface. Using your fingertips, gently press the dough outward from the center, rotating it as you go to create an even 12-inch circle. The edges should be about ½-inch thick while the center remains slightly thinner. Press firmly enough to create surface tension but avoid overworking the dough—this can make the crust tough. I find using a rolling pin helps maintain even thickness, especially for beginners.
Transfer the shaped crust to a piece of parchment paper dusted with cornmeal (this prevents sticking and adds texture). Cover with a clean towel and let it proof at room temperature for 15-20 minutes until it puffs up noticeably and feels springy to the touch. You’re looking for about 50% volume increase—this is what gives that signature airy texture. If your kitchen is cold, proofing may take longer, so check periodically. The crust should hold its shape when gently pressed but still feel slightly soft.
Bake for Crispy Perfection
Carefully transfer the proofed crust (on parchment) to the preheated pizza stone or baking sheet. Sprinkle evenly with semolina flour (if using) and bake for 8-10 minutes until the edges are deep golden brown and the interior puffs up dramatically. Real talk: this is where the magic happens. The high heat creates steam inside the dough, causing it to rise and develop that signature air-puffed texture while the exterior crisps beautifully. Don’t walk away—open the oven door too early and you’ll lose that steam, resulting in flat crusts.
While the crust bakes, prepare your toppings. Once the crust reaches your desired doneness (the edges should be golden and crisp, but the center should still be slightly soft), remove it from the oven. Immediately drizzle with 1 tbsp balsamic vinegar and sprinkle with minced garlic cloves and chopped fresh basil leaves. This finishing touch adds bright acidity and fresh herb notes that complement the rich, crispy crust. Let the crust cool for 2-3 minutes before adding your pizza sauce and toppings—this prevents soggy bottoms while keeping the crust warm for serving.
Pro Tips For Making 5 Star Pizza Crust
- Measure Salt Precisely: DESCRIPTION:
- Hydrate Yeast Properly: DESCRIPTION:
- Knead Until Silky: DESCRIPTION:
- Rest Dough Longer: DESCRIPTION:
Common mistakes when making great 5 star pizza crust
Overproofed Dough
This is the #1 mistake I see home cooks make—letting the dough proof too long. When dough overproofs, it collapses during baking instead of puffing up beautifully. Look for these signs: dough that feels hollow when poked, or that loses its springiness.
For this recipe, 15-20 minutes at room temperature is perfect. If your kitchen is cold (68°F), use your oven light on to create a warmer environment. I’ve had dough double in size in 10 minutes when my kitchen was chilly—don’t wait until it’s overproofed! 🌡️
Skipping the Rest Period
That 10-minute rest after dividing the dough isn’t optional—it’s crucial for relaxing gluten strands. Without it, your crust will fight back when you try to stretch it, leading to uneven thickness and tough texture.
I learned this the hard way when my first attempt came out looking like a lumpy pancake. Let the dough rest on a floured surface covered with a towel. This brief pause makes all the difference in getting that perfect ½-inch edge thickness.
Inconsistent Dough Temperature
Cold dough takes longer to rise and can develop uneven texture. Always use warm water (105°F) for activating yeast and let the dough come to room temperature before shaping.
I keep a small thermometer handy—if your kitchen feels cold, place the dough bowl near the oven (with light on) to maintain 75-78°F. Cold dough proofing leads to dense, flat crusts that lack those signature air pockets we’re chasing.
Trust me, your crust will thank you for this small attention to detail.
Underbaking or Overbaking
The 8-10 minute bake time at 425°F is critical—any less and your crust won’t develop that crispy exterior, any more and it burns. Watch for deep golden brown edges while keeping the center slightly soft. I set a timer but also keep an eye on the oven—every oven behaves differently.
For extra insurance, bake on a preheated pizza stone (or baking sheet) that’s been in the oven since it was cold. This ensures even heat distribution for perfect results every time. 🔥
Ignoring the Parchment Paper
Skipping the parchment paper leads to two problems: sticking dough and uneven baking. The cornmeal dusting adds texture too! Transfer your shaped crust to parchment dusted with cornmeal before proofing.
When transferring to the hot pizza stone, slide it directly onto the stone with the parchment—this prevents tearing and ensures even heat contact. I’ve had crusts stick so badly they tore when I tried to remove them without parchment.
Don’t make this mistake—it’s a simple fix that saves cleanup and frustration.
Using the Wrong Flour
This recipe demands high-protein bread flour (12-14%) for those signature air pockets. All-purpose flour won’t give you the same rise or texture. I’ve tried substituting and ended up with dense, flat crusts.
If you’re out of bread flour, add 1 tablespoon vital wheat gluten per cup of all-purpose flour to mimic the protein content. The gluten development during kneading creates the structure needed for that perfect puff. Don’t skip this step—it’s what makes this crust truly special. 🌾
Nutrition facts
Frequently asked questions
Can I make this pizza crust recipe without a stand mixer?
Mix the dry ingredients in a large bowl, then add the wet ingredients and stir with a wooden spoon until combined. Once the dough forms, turn it out onto a floured surface and knead by hand for 8-10 minutes until smooth and elastic. Just be prepared for slightly more arm work—this dough is high-protein and needs good gluten development.
How do I know when the dough is properly proofed?
Press gently on the dough with your fingertip—it should spring back slowly (like pressing a jelly button). For this recipe, look for about 50% volume increase (doubled in size) and edges that puff up noticeably. If it feels hollow when poked or loses springiness, it’s overproofed. The ideal proofing time is 15-20 minutes at room temperature.
Can I use this crust for deep-dish pizza?
This recipe is designed for traditional thin-crust or pan-style pizzas with that signature air-puffed texture. For deep-dish, you’ll need a different dough ratio (more flour, less yeast) and longer proofing time. The high-protein blend here creates a crispy, chewy crust that works best for classic or stuffed crust styles. Save this for your favorite New York or Roman-style pies!
Why does my crust get soggy when adding toppings?
Two likely culprits: adding sauce/topping too soon (the crust needs 2-3 minutes to set after baking) or using too much moisture-heavy toppings. Let the crust cool slightly before adding wet ingredients, and pat down leafy greens to remove excess water. For extra insurance, bake the crust for 1-2 minutes longer if you’re adding heavy toppings.
How can I make this crust gluten-free?
Replace the bread flour with a 1:1 gluten-free flour blend (like Bob’s Red Mill) plus 1 tbsp xanthan gum per cup of flour to mimic gluten’s structure. You may need to adjust the water slightly—start with 1.1 cups instead of 1.25. Keep in mind the texture will be different (less airy), but still delicious. Proofing time might extend to 25-30 minutes due to gluten-free dough’s slower rise.

- 32 Oz Cream Cheese Cheesecake Recipe: Silky Smoothness With No Cracking - October 11, 2026
- 8×8 Pan Dump Cake Recipe: One-Bowl Wonder with Fudgy Layers - October 11, 2026
- 10-Layer Cake Recipe: Stacked Height With Buttery Vanilla Layers - October 11, 2026