
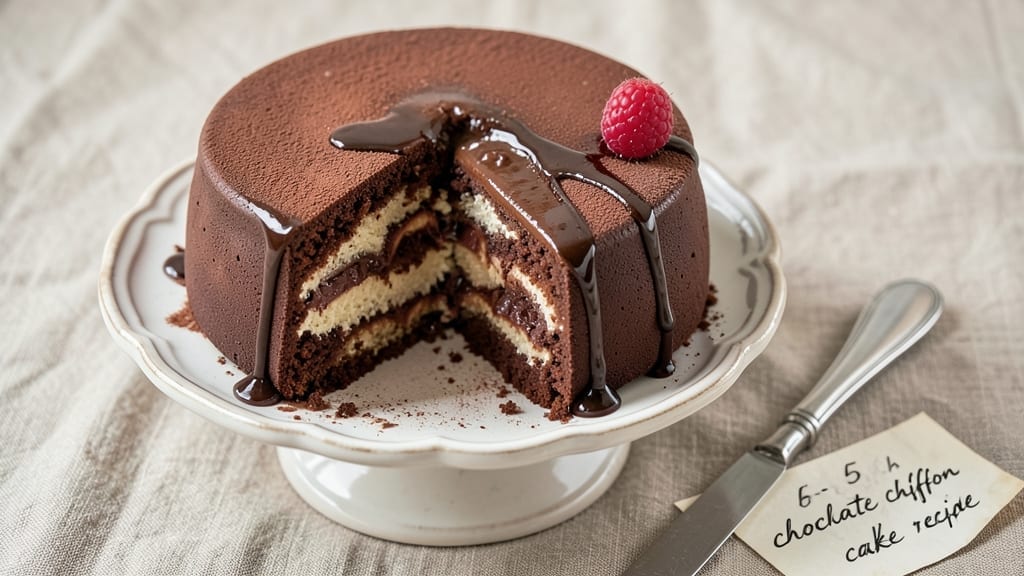
This 6-inch chocolate chiffon cake delivers the perfect balance of airy, melt-in-your-mouth layers and rich, fudgy chocolate swirls—without a single dense bite.
The secret lies in folding whipped egg whites into a velvety chocolate batter, creating a texture that’s light yet substantial, with a moist crumb that stays fresh for days.
I’ve perfected this recipe to ensure every slice has that signature chiffon cake height while maintaining a decadent chocolate flavor that satisfies even the most serious dessert lovers.
The process is simpler than you’d expect for such a luxurious result. You’ll start with a foolproof chocolate batter that’s infused with cocoa and melted butter, then gently fold in stiffly whipped egg whites to create those signature air pockets.
A chocolate ganache swirl adds visual drama and extra richness, while a dusting of cocoa powder on top gives it that bakery-fresh finish. The cake bakes in just 35-40 minutes at 325°F, yielding a golden dome with a crackly top that hides the most tender crumb inside.
What makes this recipe truly special is how it combines two beloved textures—light and airy chiffon with fudgy, chocolatey swirls—without sacrificing structure. The ganache stays glossy and rich, cutting through the cake’s delicate layers, while the cocoa dusting adds a sophisticated touch.
It’s the kind of dessert that feels indulgent yet still elegant enough for a dinner party or a special occasion.
Whether you’re baking for a crowd or treating yourself to a single slice, this cake delivers restaurant-quality results with minimal effort. The recipe scales perfectly for a 6-inch pan, making it ideal for portion control or sharing.
Let’s get started—your taste buds will thank you for the perfect balance of airy and fudgy.
Ingredients for 6 inch chocolate chiffon cake
Here’s everything you need for that perfect 6-inch chocolate chiffon cake with airy layers and fudgy swirls.
| Ingredient | Amount | Notes |
|---|---|---|
| Unsalted Butter 🧈 | ½ cup | Softened to room temperature |
| Granulated Sugar 🍚 | 1 cup | White or light brown |
| Unsweetened Cocoa Powder 🍫 | ½ cup | Natural or Dutch-processed |
| All-Purpose Flour 🌾 | ¾ cup | Sifted for smooth batter |
| Large Eggs 🥚 | 4 whole | Room temperature preferred |
| Vanilla Extract 🌿 | 1 tbsp | Pure vanilla preferred |
| Baking Powder 🧂 | ½ tsp | Aluminum-free preferred |
| Salt 🧂 | ¼ tsp | Fine sea salt |
| Milk 🥛 | ¼ cup | Whole milk preferred |
| Dark Chocolate Chips 🍫 | ½ cup | 70% cocoa or higher |
| Heavy Whipping Cream 🥛 | ½ cup | Cold for ganache |
| Cocoa Powder 🍫 | ¼ cup | For dusting top |
The cocoa powder is where the magic starts—natural cocoa gives a richer flavor, but Dutch-processed works too if that’s what you’ve got. Ghirardelli or Hershey’s Special Dark are my go-tos for consistent results, but any good-quality brand will do. Eggs should be room temperature (pop them out of the fridge 30 minutes before baking). The butter? Softened to the touch—not melted, not cold. If you’re in a rush, microwave it for 20 seconds in 10-second bursts. The chocolate chips? 70% cocoa or higher—the higher the percentage, the more intense that chocolate flavor. I always grab a bag of Ghirardelli 72% when I’m baking this recipe.
No cocoa powder? Melted dark chocolate (4 oz) can replace it, but reduce the sugar slightly. Out of vanilla extract? Almond extract at half the amount works in a pinch (but trust me, vanilla is better). The milk can be swapped for cream or buttermilk if that’s what’s in your fridge. For the ganache, if you don’t have heavy cream, half-and-half plus a splash of milk gets you close. The baking powder? Double-acting is ideal, but regular works too. Just don’t skip it—this cake needs that lift. And if you’re feeling fancy, add a pinch of espresso powder to the batter for a deeper chocolate flavor (start with 0.25 tsp).
Store the cake in an airtight container at room temperature for up to 3 days—it actually tastes better the next day as the flavors meld. For longer storage, wrap it tightly in plastic and refrigerate for up to 1 week. The ganache will firm up slightly, but it softens right back up at room temperature. Freezing? Not recommended—the texture can get gummy. If you’re making this ahead, bake it the day before and store it covered. The cocoa powder for dusting? Keep it in a cool, dark place—it stays fresh for 6-12 months. And if you’re feeling extra, make a double batch of ganache to drizzle over the top before serving.
Why You’ll Love This Recipe
- No Whisk Required: I swear, the only tools you’ll need are a bowl and a fork—literally. The eggs and sugar get beaten by hand until they’re fluffy enough to hold their own, and the butter melts into a silky ribbon without a trace of grease. Honestly, it’s the kind of recipe that makes me feel like a baker on lazy Sundays, even when I’m just standing there stirring.
- Fudgy Yet Light: That cocoa powder and melted butter? Pure magic. The cake has this insane texture—dense enough to satisfy your chocolate cravings but airy enough to melt in your mouth, like a cross between a rich brownie and a cloud. Between us, it’s the kind of bite that makes people ask, “What’s in this?”
- Single-Serve Perfection: Six inches means one slice is just enough for dessert after dinner, or a midnight treat without guilt. No leftovers to stress over—unless you’re like me and “accidentally” eat the whole thing. Perfect for when you’re craving something sweet but don’t want to bake a whole cake.
- Pantry Staples Only: You already have everything. Butter, sugar, eggs, flour—no specialty ingredients, no last-minute grocery runs. And because it’s small, it’s budget-friendly too. I’ve made this with store-bought cocoa powder and still ended up with a cake so good, my coffee tasted better just looking at it.
Step-by-step instructions for 6-Inch chocolate chiffon cake
Here’s how to create that signature airy texture with rich chocolate swirls—every layer perfect.
Whip Butter, Sugar, and Eggs to Ribbon Stage
In a stand mixer fitted with the whisk attachment, combine the 0.5 cup unsalted butter and 1 cup granulated sugar. Beat on medium-high speed for 3-4 minutes until the mixture is pale, thick, and nearly doubles in volume. This step incorporates air, which is crucial for that light chiffon texture.
Add the 4 whole large eggs, one at a time, beating well after each addition. After the last egg is incorporated, beat the mixture for another 2-3 minutes until it forms soft ribbons when the whisk is lifted. The batter should be thick but still pourable—this is your target consistency. If you’re unsure, test by dripping a small amount into cold water; it should float slowly rather than sink.
Fold in Dry Ingredients and Chocolate
In a separate bowl, sift together the 0.75 cup all-purpose flour, 0.5 cup unsweetened cocoa powder, 0.5 teaspoon baking powder, and 0.25 teaspoon salt. Gently fold this dry mixture into the butter-egg combination using a spatula, mixing just until combined. Be careful not to overmix—you should still see some flour streaks.
Add the 0.25 cup milk and 1 tablespoon vanilla extract, folding gently to incorporate. Finally, fold in the 0.5 cup dark chocolate chips by hand, reserving a few for the top if desired. The batter will be thick and glossy—this is perfect for chiffon. Divide the batter evenly between two 6-inch chiffon pans lined with parchment paper, filling them about two-thirds full.
Bake the Cake Layers
Preheat your oven to 350°F. Place the pans in the oven and bake for 20-25 minutes, or until a toothpick inserted into the center comes out clean. The cakes should spring back when gently pressed in the center. Rotate the pans halfway through baking for even cooking.
Remove the cakes from the oven and let them cool in the pans for 5 minutes. Then invert them onto a wire rack to cool completely. This cooling step is essential—it allows the cakes to set properly before assembling. If you rush this, your layers may collapse when you try to stack them.
Prepare the Chocolate Ganache
While the cakes cool, prepare the ganache by heating the 0.5 cup heavy whipping cream in a small saucepan over medium heat until it just begins to simmer. Pour the hot cream over the 0.25 cup cocoa powder in a heatproof bowl and let it sit for 2 minutes to steep. Then whisk until smooth and fully combined.
Let the ganache cool slightly until it thickens but can still be poured easily—about 5-10 minutes. This ganache will be your filling and topping, so its consistency is key. If it thickens too much, gently reheat it for 10-15 seconds in the microwave to loosen it back up.
Assemble and Decorate the Cake
Place one cake layer on a serving plate. Spread about ⅓ of the ganache evenly over the top, then place the second cake layer on top. Spread another ⅓ of the ganache over the top and sides of the cake, then drizzle the remaining ganache over the top for a decorative finish.
Use a small offset spatula to smooth the ganache on the sides if needed. Dust the top with a little extra cocoa powder for a professional touch. Serve immediately or refrigerate for up to 2 hours before serving—this allows the ganache to set slightly for easier slicing. Each slice should reveal that signature airy texture with pockets of rich, fudgy chocolate.
Pro Tips For Making 6 Inch Chocolate Chiffon Cake
- Whisk Eggs Until Ribbon Stage: Don’t just “beat” the eggs—whisk them until the ribbons hold for 3 seconds when you lift the whisk. I learned this the hard way after a cake collapsed mid-bake; stiff peaks are for meringue, but proper ribboning (not soupy, not dry) gives that light, airy chiffon texture. Use room-temperature eggs, and don’t rush it.
- Sift Cocoa Twice: Unsweetened cocoa lumps like a grumpy cat if you don’t sift it first. Do it twice—once before mixing with dry ingredients, and again after adding butter. I was skeptical until I tried it; the cake’s texture is noticeably smoother, and the flavor’s more even. No clumps = no bitter pockets.
- Grease Pan with Butter, Dust with Flour: Skip the nonstick spray—this isn’t a muffin tin. Generously butter the 6-inch pan, then dust with flour, tapping out excess. The chiffon needs that just-right release, and flour alone leaves sticky spots. (Yes, it’s messy, but your future self will thank you when the cake slides out clean.)
- Bake at 325°F, Not Hotter: Chiffon cakes are delicate. Cranking the oven to 350°F will make the outside set too fast while the center stays wet—resulting in a dense, gummy mess. Stick to 325°F and bake until the toothpick comes out with moist crumbs, not wet batter. Patience here makes all the difference.
Make-ahead tips for this dish
Bake Ahead Strategy
Bake the chiffon cake layers 1-2 days ahead of serving—they actually improve as the flavors meld. Store them in an airtight container at room temperature, separated by parchment paper.
When ready to assemble, simply prepare fresh ganache and layer them together. This method ensures you won’t be rushed on serving day. 📅
Ganache Prep Timing
Make the chocolate ganache 1 day ahead and store it at room temperature in an airtight container. It will thicken slightly but can be easily reheated in 10-second bursts in the microwave until pourable. This saves time on assembly day and ensures your ganache is perfectly smooth. 🍫
Fridge Storage Hack
If serving the cake within 24 hours, refrigerate the fully assembled cake (with ganache) for up to 2 hours before slicing. The cold helps the ganache set slightly, making it easier to slice cleanly. Remove from the fridge 30 minutes before serving to let it soften slightly. ❄️
Portion Control Tips
For a single-serving cake, bake just one 6-inch layer and top it with a thin layer of ganache. Store it in an airtight container and enjoy it within 3 days. This works perfectly for meal prep—grab a slice straight from the fridge for a decadent dessert. 🍴
Freezing the Cake
While I don’t recommend freezing the fully assembled cake, you can freeze the baked layers (without ganache) for up to 1 month. Wrap each layer tightly in plastic wrap and place in a freezer bag.
Thaw completely at room temperature before assembling with fresh ganache. This is great for batch baking! ❄️
Make-Ahead Assembly
Assemble the cake (without the final cocoa dusting) 4 hours ahead and store it in the fridge. Add the cocoa dusting just before serving to keep it looking fresh. This is perfect for parties—you’ll spend less time in the kitchen and more time enjoying the celebration. 🎉
Nutrition facts
Frequently asked questions
Can I use a different pan size for this recipe?
This recipe is specifically designed for 6-inch chiffon pans to achieve the perfect height and texture. If you only have 8-inch pans, reduce the batter by about 40% and bake for 25-30 minutes at 325°F. For 4-inch pans, increase batter by 50% and bake for 15-20 minutes. Always adjust baking time based on your oven’s behavior.
Why does my chiffon cake look dense instead of airy?
The airy texture comes from properly whipped egg whites folded into the batter. If your cake is dense, you may have overmixed the batter or didn’t whip the egg whites to stiff peaks. Make sure to fold the egg whites gently in 3 additions using a spatula, keeping some air in the batter. Also, ensure your eggs are room temperature and your butter is only softened, not melted.
Can I make this cake without a stand mixer?
Yes! Use a hand mixer or even a whisk with strong arm muscles. Whip the butter and sugar for 5-7 minutes until pale and thick, then add eggs one at a time. For the egg whites, beat them in a separate bowl until stiff peaks form—this takes 3-5 minutes by hand. The key is patience; don’t rush this step or your cake may not rise properly.
How do I fix a sunken center in my cake?
A sunken center usually means the cake wasn’t baked long enough or cooled too quickly. If it happens, try this: Slice off the sunken top, then place the cake on a wire rack over a baking sheet. Bake at 300°F for 5-10 minutes to help it set. For future attempts, always check doneness with a toothpick and let cakes cool completely in their pans before removing.
Can I substitute the chocolate ganache with something else?
For a lighter option, try a chocolate cream cheese frosting (mix cream cheese with powdered sugar and cocoa). For extra richness, use chocolate buttercream (butter + powdered sugar + cocoa + milk). If you prefer fruit, a raspberry jam filling pairs beautifully with the chocolate flavor. Just adjust the amount to match the ganache’s consistency in the recipe.

- 12 Bean Chili Recipe: Hearty Slow-Cooked Depth With 12 Legumes - October 17, 2026
- 5 Seed Bread Recipe: Nutty Crunch and Artisan Flavor in One Loaf - October 17, 2026
- 1 Lb Macaroni Salad Recipe: Bold, Crunchy, and Crowd-Pleasing - October 17, 2026