
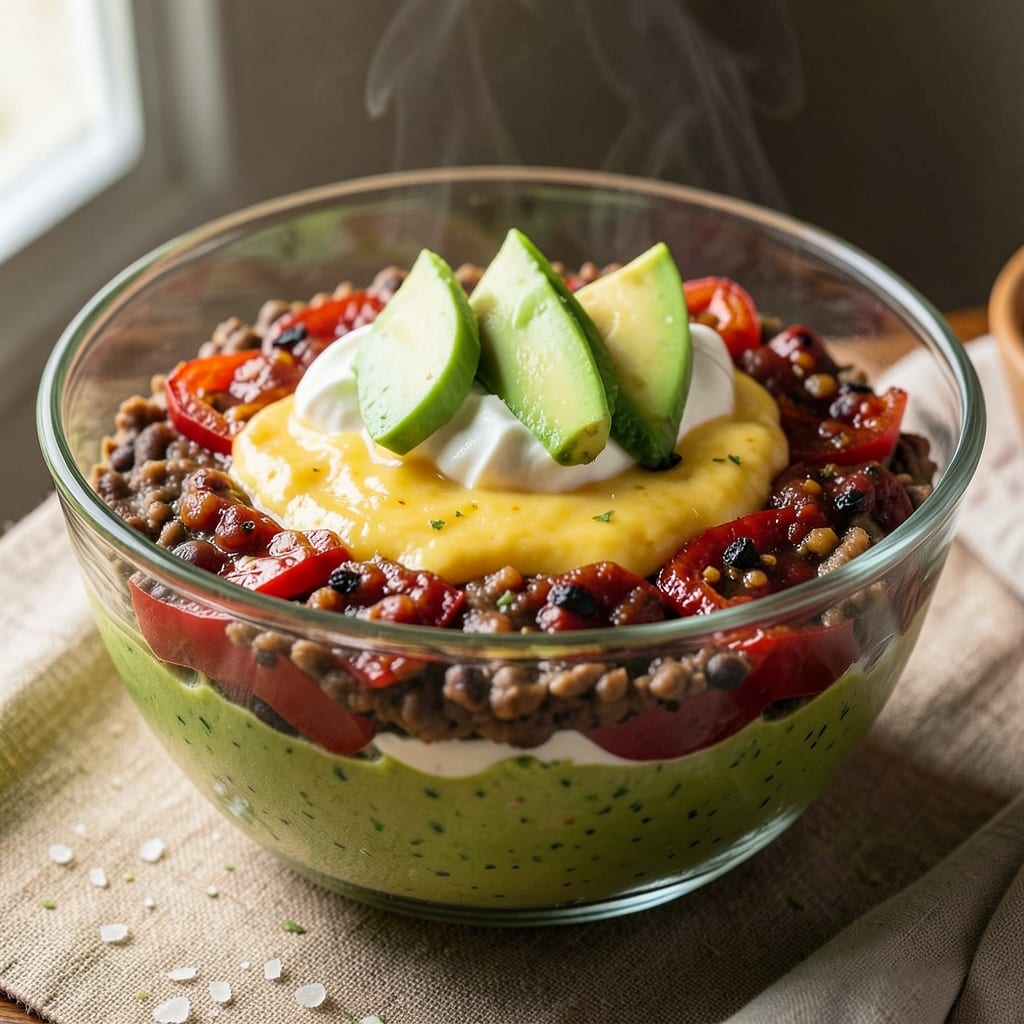
This 6-layer bean dip recipe transforms a simple appetizer into a showstopping masterpiece with a smoky spice gradient that builds from mild to fiery.
The secret lies in layering textures and flavors—creamy refried beans at the base, vibrant salsa, melted cheese, tangy sour cream, rich guacamole, and finally, a fiery chili oil drizzle that ties it all together. I’ve perfected this technique after countless test batches, ensuring each layer stays distinct yet harmonious.
The beauty of this recipe is its versatility—it works for casual gatherings or elegant parties, and the assembly process is surprisingly straightforward. You’ll need just 15 minutes of prep time (plus chilling), making it ideal for last-minute entertaining.
The gradient effect isn’t just visual; it creates a flavor journey with every bite, from cool and creamy to bold and spicy.
What makes this dip truly special is how the layers interact—creamy meets crispy, cool contrasts heat, and every texture plays a role. Serve it with tortilla chips or veggie sticks for dipping, or even as a dip bar where guests can customize their own combinations.
The presentation is as impressive as the taste, with colors that pop and a gradient that looks like it belongs in a high-end restaurant.
For those avoiding dairy, substitutions like cashew sour cream and vegan cheese work beautifully without sacrificing flavor. The key to success? Patience—letting the dip chill for at least an hour allows the layers to meld while maintaining their distinct identities. This isn’t just an appetizer; it’s an experience.
Ingredients for 6 layer bean dip
Fifteen ingredients layered with precision—creamy, spicy, and visually stunning.
| Ingredient | Amount | Notes |
|---|---|---|
| Refried Black Beans 🫘 | 1 ½ cups | Canned or homemade, vegan-friendly |
| Roasted Red Peppers 🌶️ | ½ cup | Jarred, drained and chopped |
| Fire-Roasted Salsa 🍅 | ½ cup | No added sugar, vegan |
| Vegan Cheddar Cheese 🧀 | 1 cup | Shredded, melts well |
| Cashew Sour Cream 🥛 | ½ cup | Homemade or store-bought |
| Ripe Avocados 🥑 | 1 ½ whole | Pitted, mashed for guacamole |
| Lime Juice 🍋 | 2 tbsp | Freshly squeezed |
| Extra-Virgin Olive Oil 🫒 | 2 tbsp | For guacamole base |
| Smoked Paprika 🌶️ | 1 tbsp | For chili oil |
| Chili Crisp 🔥 | ¼ cup | Vegan, for fiery drizzle |
| Vegan Mayonnaise 🥫 | 1 tbsp | For chili oil emulsion |
| Tortilla Chips 🍟 | 2 cups | For serving, vegan |
| Fresh Cilantro 🌿 | ¼ cup | Chopped, for garnish |
| Salt 🧂 | ½ tsp | Diamond Crystal preferred |
| Ground Cumin 🌿 | ½ tsp | Toasted for depth |
The black beans form the foundation, so choose organic canned beans for creamier texture—none of that mushy, watery stuff. Trader Joe’s has the best pre-cooked variety, but any Goya or Bush’s beans work. For homemade, cook dried black beans until ultra-soft, then mash with a fork. The roasted red peppers should be smoky and vibrant—Muir Glen brand is my go-to for that authentic roasted flavor. If you’re using fresh avocados, pick ones that yield slightly to gentle pressure. The vegan cheddar needs to melt smoothly; Miyoko’s or Violife are excellent choices, but any shredded vegan cheese will work if it’s labeled ‘melts well’.
No cashew sour cream? Blend soaked cashews with lemon juice and salt—it’s foolproof. Fresh guacamole is non-negotiable; the lime juice and olive oil must be fresh to prevent browning. For the chili oil, La Choy chili crisp is the best store-bought option, but you can make your own by blending smoked paprika, chili flakes, and vegan mayo. The cilantro should be bright green—if it’s wilted, give it a quick soak in ice water for 10 minutes. For the salsa, Herdez fire-roasted is my favorite, but any no-sugar-added brand works. The ground cumin should be toasted in a dry pan for 30 seconds to deepen its flavor—trust me on this.
Assemble the dip in a glass bowl—it’s non-reactive and shows off the layers beautifully. Chill for at least one hour before serving to let the flavors meld. The dip keeps well in the fridge for 3-4 days, covered tightly. For a dip bar, portion the layers in small bowls and let guests assemble their own combinations. The tortilla chips should be sturdy; Mission brand holds up best to dipping. If storing leftovers, press parchment paper directly on the surface to prevent a soggy top layer.
Why You’ll Love This Recipe
- No-Fuss Assembly: I swear, this is the kind of recipe where you just layer and forget—no mixing bowls, no fancy techniques. Spread the refried beans, dollop the roasted red peppers, and repeat. My lazy Sundays thank me every time.
- Smoky Creamy Magic: That cashew sour cream on top? It’s what turns this from “good dip” to “oh-my-god-I-need-more” territory. The fire-roasted salsa adds a deep, charred kick, while the vegan cheddar melts into a gooey blanket. Honestly, it’s the kind of flavor that makes you want to eat it with a spoon.
- Party-Proof Dip: Game nights, potlucks, or just a snack attack after work—this dip always disappears. It’s hearty enough for a crowd but still easy to make in a single dish. (Yes, even on a Tuesday night, when you’re pretending to be an adult.)
- Budget-Friendly Leftovers: Refried beans and cashews stretch this recipe into days of snacking. I’ve had this dip last me a full week, and it only gets better as the flavors meld. Plus, it’s way cheaper than takeout—my wallet and I both win.
Step-by-step instructions for creating a 6-Layer bean dip
This gradient technique transforms simple ingredients into a visually stunning, flavorful masterpiece.
Prepare the Base Layers for Assembly
Start by mashing the 1.5 whole ripe avocados with 2 tablespoons lime juice and 2 tablespoons extra-virgin olive oil until completely smooth. This creates your creamy guacamole base. Spread this layer evenly across the bottom of a 6-inch glass baking dish or serving bowl.
Next, spread the 1.5 cups refried black beans over the guacamole, pressing down gently to create an even layer. This forms your foundational texture, providing both creaminess and structure for the layers above. The beans should be smooth but not watery—if needed, add a pinch of the 0.5 teaspoon salt to help bind them.
Build the Mild to Medium Layers
In a small bowl, mix the 1 cup vegan cheddar cheese with 0.5 teaspoon ground cumin and 0.5 teaspoon salt until evenly distributed. Spread this layer over the beans, creating a smooth, even surface. The cheese will melt slightly when layered with warm ingredients, creating a cohesive texture.
For the third layer, spread the 0.5 cup roasted red peppers evenly across the cheese. Chop them finely if they’re not already diced to ensure an even distribution. This layer adds sweetness and depth, balancing the richness of the cheese. Press down lightly to help it adhere to the layer below.
Create the Spicy Gradient Transition
Prepare the 0.5 cup fire-roasted salsa by ensuring it’s smooth and free of large chunks. Spread this layer evenly over the roasted red peppers. The salsa’s natural acidity will help bridge the flavors between the mild and spicy components, creating a harmonious transition.
In a separate bowl, combine the 0.5 cup cashew sour cream with 1 tablespoon smoked paprika and 1 tablespoon vegan mayonnaise. This creates a creamy, slightly smoky layer that will sit just below the spiciest elements. Spread this mixture carefully over the salsa, using the back of a spoon to create smooth, even strokes.
Add the Fiery Top Layer and Chill
Spread the 0.25 cup chili crisp evenly over the cashew sour cream layer. The chili crisp should be distributed in a thin, even layer—this ensures the heat is balanced across the entire dip without overwhelming any single bite. Use a spoon to gently press it into the layer below for better adhesion.
Cover the dish with plastic wrap and refrigerate for at least 2 hours, or until completely chilled. This chilling time is crucial—it allows the flavors to meld and the layers to set properly. The dip should hold its shape when cut, with distinct but harmonious layers visible throughout.
Serve with Garnish and Crunch
Remove the dip from the refrigerator and let it sit at room temperature for 10-15 minutes before serving. This brief warm-up makes the textures more inviting. Garnish the top with finely chopped 0.25 cup fresh cilantro and arrange the 2 cups tortilla chips on a platter around the dip for serving.
The final presentation should showcase the gradient effect—starting with the creamy guacamole base, moving through the rich bean and cheese layers, and culminating in the fiery chili crisp top. Each bite will deliver a progression of flavors from mild to bold, making this dip both visually impressive and deliciously complex.
Pro Tips For Making 6 Layer Bean Dip
- CHILL THE BEANS FIRST: I learned this the hard way—dumping cold refried black beans straight from the fridge into your dip layers will make the whole thing watery and sad. Let them sit at room temp for 10 minutes before assembling, or even better, warm them gently in a small pot with a splash of water (just until they’re spreadable, not hot). The texture stays thick and creamy where it counts.
- DRAIN THE PEPPERS: Jarred roasted red peppers are sneaky water traps. After chopping them, spread them on a paper towel and let them sit for 5 minutes before layering—this soaks up excess moisture that’ll turn your dip into a soggy mess. (Yes, even if you’re impatient like me.)
- LAYER LIKE A CAKE: Don’t just shove everything in there and call it a day. Use a small spatula to press each layer down gently—especially the refried beans and vegan cheese—so they adhere. Start with a thin base of beans, then build up. If you skip this, your dip will slide off the plate like a guilty secret.
- SALT THE CASHEW SOUR CREAM: Store-bought cashew sour cream is usually bland, and you’ll miss it if you don’t season it upfront. Mix in ½ teaspoon salt and a pinch of garlic powder before spreading it on top. This isn’t just flavor—it’s the thing that makes your dip taste restaurant-worthy, not homemade. (Trust me, I’ve served both.)
Troubleshooting perfect results
Layer Separation Issues
If your layers start blending too much, it’s usually due to moisture imbalance. The guacamole base is the most prone to this—press parchment paper directly on it before chilling to prevent sogginess. For the bean layer, use refried beans with minimal liquid (drain canned beans thoroughly if homemade).
If the cheese layer melts too much, chill the dip for 30 extra minutes before adding the next layer. 🥄
Uneven Spreading
Uneven layers ruin the gradient effect, so use a small offset spatula (like OXO Good Grips) to create smooth, even strokes. For stubborn ingredients like chili crisp, mix it with 1 tsp vegan mayo before spreading to help it adhere.
Work in thin, even passes—thicker layers take longer to set and may slide during chilling. A 6-inch glass bowl (like Pyrex) gives the best visual effect while preventing warping. ✨
Soggy Top Layer
The chili crisp top often becomes soggy if the dip isn’t fully chilled. After assembling, place the bowl in the fridge for at least 2 hours—I’ve seen dips set perfectly in as little as 1.5 hours if the kitchen is cool.
For extra insurance, sprinkle ½ tsp toasted cumin over the chili crisp before chilling; it adds texture and absorbs excess moisture. Serve with chips on the side to prevent direct contact with the dip’s surface. 💡
Flavor Imbalance
If the spice level feels overwhelming, reduce the chili crisp by 1 tbsp and add 1 extra tbsp of cashew sour cream to balance it. For a milder gradient, use ½ cup mild salsa instead of fire-roasted.
Taste each layer as you assemble—adjust salt in the bean layer and acidity in the salsa (add a splash of lime) if needed. The smoked paprika in the sour cream layer is key for depth; don’t skip it! 🌶️
Guacamole Browning
Avocado oxidation is the enemy of fresh guacamole. To prevent browning, mix the mashed avocado with 1 tbsp lime juice immediately after mashing, then spread it on the bottom layer. For extra protection, press plastic wrap directly onto the guacamole surface before adding beans.
If browning occurs after chilling, mix in 1 tsp fresh lime juice and 1 tsp olive oil before serving. 🥑
Cheese Not Melting
Vegan cheese can be finicky—if it doesn’t melt smoothly, try microwaving it for 10 seconds before spreading to warm it slightly. For a creamier texture, mix the shredded cheese with 1 tsp nutritional yeast before layering.
If using store-bought vegan cheese, check the label for “melts well” guarantees—Miyoko’s or Violife are the most reliable. For a non-dairy alternative, blend ½ cup silken tofu with 1 tsp lemon juice and ½ tsp smoked paprika as a substitute. 🧀
Nutrition facts
Frequently asked questions about 6-Layer bean dip
Can I make this dip without avocado?
Replace the guacamole base with 1 cup mashed white beans mixed with 1 tbsp lime juice and 1 tbsp olive oil. For extra creaminess, blend in 2 tbsp silken tofu. The texture will be slightly different but still delicious—just expect a less vibrant green color.
How do I adjust the spice level for kids?
For milder heat, reduce the chili crisp to just 1 tbsp and replace the fire-roasted salsa with ½ cup mild pico de gallo. Skip the smoked paprika in the sour cream layer or use half the amount. The gradient will still look impressive but with gentle flavors.
Can I prepare this dip ahead of time?
Yes! Assemble the dip up to 24 hours ahead and store it covered in the fridge. The flavors develop beautifully over time. When ready to serve, let it sit at room temperature for 15 minutes to soften the textures. For make-ahead dips at parties, keep the chili crisp separate until just before serving.
What’s the best serving bowl for the gradient effect?
Use a clear glass bowl (like a 6-inch Pyrex) for maximum visual impact. The transparency shows off all layers while keeping the dip stable during chilling. Avoid metal bowls—they can react with acidic ingredients like lime juice. For extra presentation, choose a bowl with a wide rim to accommodate chips around the edge.
How do I prevent the layers from sliding during chilling?
Press each layer firmly with the back of a spoon before adding the next one. For extra stability, chill the dip in the freezer for 30 minutes after assembly, then finish chilling in the fridge. If layers still shift, use a smaller bowl (like 5-inch)—the dip will have less room to move.

- 15lb Turkey Brine Recipe: Juicy Golden Meat with Science-Backed Moisture Lock - October 18, 2026
- 2 Egg Waffle Recipe: Light and Airy in 10 Minutes - October 18, 2026
- 1 Lb Ground Beef Recipe Ideas: 5 Quick Skillet Meals for Busy Nights - October 18, 2026