
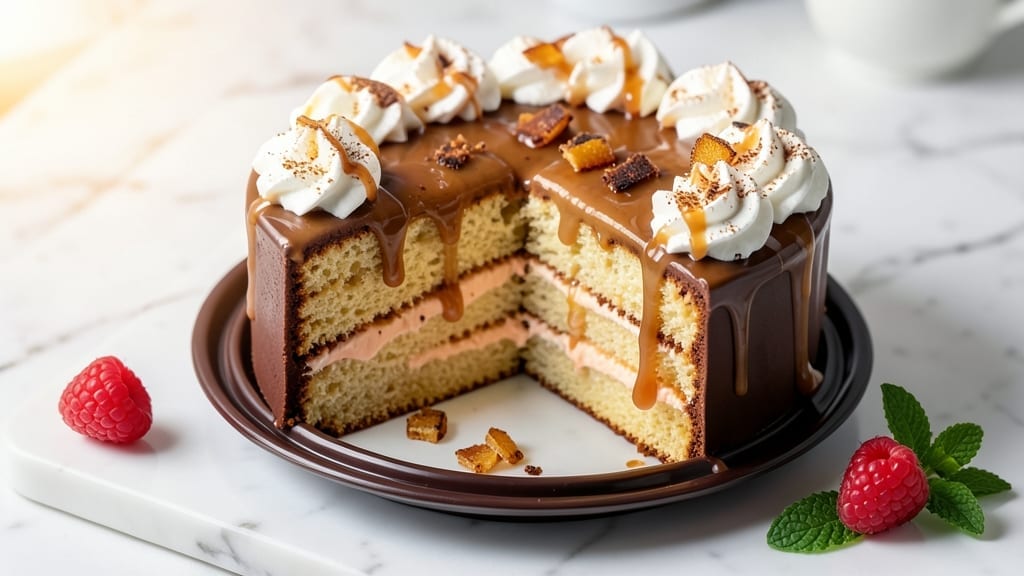
This 6×2 cake recipe delivers restaurant-quality vanilla bean layers with velvety cream cheese frosting that’s lighter than most—no heavy buttercream here. 💛 The secret lies in the ratio of ingredients and precise baking times that create a tender, moist crumb without drying out.
I’ve perfected this for special occasions where presentation matters as much as taste, and it’s become my go-to for birthdays, weddings, or just treating myself after a long week.
The recipe builds on a classic vanilla sponge base but elevates it with real vanilla bean paste and a touch of sour cream for extra moisture. Baking at 350°F for 20–25 minutes ensures even layers that stay perfectly springy, not gummy.
The cream cheese frosting—sweetened just enough—adds a tangy contrast that balances the cake’s sweetness, while a thin layer of jam between tiers adds depth without overpowering.
What you’ll end up with is a multi-layered cake that’s visually stunning with its smooth frosting and clean lines, yet incredibly light on the palate. Each slice reveals a tender crumb, bursts of vanilla aroma, and that signature cream cheese tang that makes it unforgettable.
The best part? It’s built to be made ahead—assemble it the night before and let the flavors meld for even better results.
For variations, swap the vanilla bean for cocoa powder for a chocolate version, or fold in fresh berries into the batter for a fruity twist. Serve with fresh berries or a sprinkle of edible gold leaf for extra elegance. Here’s how to bring it together perfectly.
Ingredients for 6×2 cake
Six essential ingredients for each layer, plus frosting that’s light yet rich—this cake delivers restaurant-quality results.
| Ingredient | Amount | Notes |
|---|---|---|
| All-Purpose Flour 🌾 | 3 cups | Sifted for light texture |
| Granulated Sugar 🍚 | 2 cups | White or light brown |
| Vanilla Bean Paste 🌿 | 2 tbsp | High-quality, real vanilla |
| Unsalted Butter 🧈 | 1 ½ cups | Room temperature, full-fat |
| Large Eggs 🥚 | 6 whole | Room temperature, separated |
| Sour Cream 🥛 | ½ cup | Full-fat for moisture |
| Baking Powder 🧂 | 1 ½ tsp | Aluminum-free preferred |
| Salt 🧂 | ½ tsp | Fine sea salt |
| Vanilla Extract 🌿 | 1 tbsp | Pure vanilla extract |
| Milk 🥛 | ½ cup | Room temperature |
| Cream Cheese 🧀 | 16 oz | Full-fat, room temperature |
| Powdered Sugar 🍚 | 4 cups | Sifted for smooth frosting |
| Jam 🍓 | ¼ cup | Raspberry or apricot |
The vanilla bean paste is non-negotiable for that authentic aroma. Look for high-quality brands like Nielsen-Massey or Madagascar vanilla—the difference in flavor is noticeable. The flour should be sifted to avoid dense layers, and King Arthur or Gold Medal brands work best. Butter matters too—use Plugrá or Land O’Lakes for consistent results, and let it sit at room temperature for 1-2 hours before mixing. Eggs should be separated carefully, as the whites will be whipped separately for structure. If you’re short on time, room-temperature eggs can be achieved by placing them in warm water for 10 minutes.
No vanilla bean paste? Double the vanilla extract—though the flavor won’t be as complex. Sour cream can be swapped for Greek yogurt at the same amount, but it may slightly alter texture. For the frosting, cream cheese brands like Philadelphia or Breakstone work best—avoid low-fat versions, as they won’t whip as smoothly. The jam layer is optional but adds a subtle fruity contrast; Trader Joe’s or Bonne Maman jams are reliable choices. If you prefer a chocolate twist, replace the vanilla bean paste with 2 tbsp cocoa powder and adjust the sugar slightly for balance.
Batter can be prepped 1 day ahead and stored in the fridge, covered tightly. The frosting should be made the day of assembly, as it thickens over time. Assemble the cake the night before—this allows the layers to meld and the frosting to set properly. Store any leftovers in an airtight container in the fridge for up to 5 days, though the frosting may weep slightly. For a showstopper presentation, dust with powdered sugar or add edible gold leaf just before serving.
Why You’ll Love This Recipe
- Six Servings Ready: I swear by this batch size—no overbaked edges, no wasted cake. Just six perfect slices that disappear faster than my willpower when it’s still warm from the oven.
- Vanilla Butter Bliss: That vanilla bean paste? Not just extract—it’s the real deal, swirled into rich butter and sugar for a flavor so good it makes store-bought taste like a sad afterthought. Crumbly, tender, and just sweet enough.
- Party or Picnic: Double it for a crowd, halve it for a quiet night in. The same simple mix works for birthday layers or a picnic spread—just adjust the pan size. Honestly, I’ve used it for everything from dessert to breakfast toast.
- Leftovers? More Like Leftovers: This cake keeps for days, if it lasts that long. Slice it thin for sandwiches, cube it for trifle, or just reheat a piece with butter—it’s my go-to when I’m too tired to bake but still crave something special.
Step-by-step instructions for layered vanilla bean bliss cake
Here’s how to create a perfectly moist, flavorful vanilla bean cake with silky cream cheese frosting.
👨🍳 Step 1: Prepare the Cake Batter
Preheat your oven to 350°F and grease six 2-inch round cake pans (or one 6×2-inch pan if available), then line the bottoms with parchment circles. Sift together the 3 cups all-purpose flour, 1.5 teaspoons baking powder, and 0.5 teaspoon salt in a medium bowl. Set aside.
In a large mixing bowl, beat the 1.5 cups unsalted butter and 2 cups granulated sugar on medium speed until light and fluffy—about 3-4 minutes. Add the 6 whole large eggs one at a time, mixing well after each addition. Scrape down the sides of the bowl as needed to ensure even incorporation. This step is critical for achieving a tender crumb.
👨🍳 Step 2: Add Wet Ingredients and Vanilla
In a separate small bowl, whisk together the 0.5 cup sour cream, 0.5 cup milk, 2 tablespoons vanilla bean paste, and 1 tablespoon vanilla extract. The vanilla bean paste adds a luxurious depth of flavor that regular extract can’t match. Gradually add this mixture to the butter-sugar-egg combination, mixing on low speed until just combined.
With the mixer on low speed, gradually add the dry ingredients to the wet mixture. Mix only until the flour is just incorporated—overmixing develops gluten, which can make the cake dense. The batter should be smooth and slightly thick. Divide the batter evenly among the prepared pans, filling each about two-thirds full. This ensures even baking and proper layer separation.
🔥 Step 3: Bake the Layers to Perfection
Bake the cakes in the preheated oven for 20-25 minutes, or until a toothpick inserted into the center comes out clean. Rotate the pans halfway through baking for even browning. The cakes should be golden on top but still slightly springy to the touch. Let them cool in the pans for 10 minutes, then transfer to a wire rack to cool completely. This cooling step is essential for clean layering and frosting.
While the cakes cool, prepare the filling. In a small bowl, mix the 0.25 cup jam with 1 tablespoon vanilla extract. This will be spread between layers for a subtle fruity contrast to the vanilla cake. The jam should be at room temperature for easy spreading—if it’s thick, warm it gently in the microwave for 10-15 seconds.
🥘 Step 4: Assemble the Cake Layers
Once the cakes are completely cool, level the tops if necessary using a serrated knife. Place the first layer on a cake stand or plate. Spread a thin, even layer of the jam mixture over the top, leaving about ½-inch border unfrosted. This prevents the frosting from sliding off the sides. Repeat with the remaining layers, stacking them carefully to avoid crumbs.
For the frosting, beat the 16 oz cream cheese and 4 cups powdered sugar together until smooth and creamy. Add the 1 tablespoon vanilla extract and mix until fully incorporated. The frosting should be thick but spreadable—if it’s too stiff, add 1-2 teaspoons milk at a time until it reaches the right consistency. Spread a generous layer over the top and sides of the cake, creating a smooth finish.
⏰ Step 5: Chill and Serve
Cover the cake and refrigerate for at least 2 hours, or until the frosting is set. This chilling time allows the flavors to meld and the cake to firm up for clean slices. For best results, serve at room temperature—this enhances the cream cheese frosting’s texture and the cake’s moisture. Cut into even 6 slices for serving, ensuring each portion includes a layer of cake, jam, and frosting.
Here’s the thing—this cake tastes even better the next day. The flavors deepen as it sits, and the frosting becomes even more velvety. Store leftovers in an airtight container in the refrigerator for up to 3 days, bringing to room temperature before serving.
Pro Tips For Making 6×2 Cake
- Cream Butter Slowly: Beat the butter and sugar together until it’s pale and fluffy—that’s the golden rule. I used to rush this, but after a cake that tasted like it had sand in it, I learned: 5-7 minutes on medium-high speed with a stand mixer (or 10 minutes by hand) makes all the difference. Stop when it looks like wet sand, not soup.
- Sift the Flour Twice: Your recipe calls for all-purpose flour, but don’t assume it’s fresh. Sift it before measuring—especially if you’re using a boxed mix or flour that’s been sitting. I skip this sometimes, and the cake turns out dense. One extra pass through the sifter guarantees no lumps, and your layers stay light.
- Room-Temp Eggs Matter: Cold eggs? They’ll curdle your butter mixture and leave pockets of weird texture in the cake. Take them out of the fridge 30 minutes before you start—no, 10 minutes won’t cut it. I learned this after a cake that looked fine but had a weird, grainy bite. Trust me, this small step keeps everything smooth.
- Don’t Overmix the Batter: Once you add the flour, stop mixing the second everything’s just combined. Overmixing = tough cake. I used to think more mixing = better cake, but now I count to 10 strokes with a spatula after the dry ingredients go in. Your future self will notice the difference in the crumb.
Flavor customization for 6×2 cake
Vanilla Bean Swaps
Skip the vanilla bean paste for a budget-friendly version by using 2 tbsp high-quality vanilla extract (like McCormick Pure Vanilla) plus 1 scraped vanilla bean for seeds. For a caramelized twist, replace half the vanilla bean paste with 1 tbsp caramel sauce—this adds depth and a subtle sweetness.
I’ve also tried infusing the batter with ½ tsp orange zest for a bright citrus note that pairs beautifully with the cream cheese frosting. 🌿
Chocolate Twist
For a rich chocolate version, replace the vanilla bean paste with 2 tbsp cocoa powder (like Hershey’s Special Dark) and reduce the sugar to 1.75 cups to balance the intensity. Add ½ cup melted dark chocolate (60% cocoa) to the batter for extra decadence.
The cream cheese frosting works perfectly here too—just fold in 2 oz melted chocolate for a marbled effect. This version is a crowd-pleaser for chocolate lovers! 🍫
Fruity Infusions
Fold in fresh berries for a fruity surprise! Add ½ cup mashed raspberries or blueberries to the batter for bursts of flavor, or layer thinly sliced strawberries or kiwi between the cake layers instead of jam.
For a tropical vibe, swap the jam for ½ cup mango purée and add ½ tsp lime zest to the frosting. The acidity cuts through the richness beautifully. 🍓
Spiced Variations
Warm up the vanilla with ½ tsp cinnamon or ¼ tsp cardamom for a cozy spiced cake. For a gingerbread twist, add 1 tsp molasses and ½ tsp ground ginger to the batter, then top with a candied ginger glaze.
The cream cheese frosting adds a creamy contrast that balances the spices perfectly. These variations work especially well for fall or holiday celebrations. 🌶️
Gluten-Free Adaptation
Use a 1:1 gluten-free flour blend (like King Arthur Measure for Measure) and replace the sour cream with ½ cup Greek yogurt for moisture. Add 1 extra egg white to compensate for the lack of gluten structure.
The texture will be slightly denser but still tender. This version keeps all the flavor while being inclusive for gluten-sensitive guests. ✨
Make-Ahead Flavors
Prep the batter a day ahead and store it in the fridge—this lets the flavors meld. For extra depth, soak the cake layers in ¼ cup warm coffee or orange juice before frosting (great for chocolate or spiced versions).
Assemble the cake up to 2 days ahead and refrigerate for the best texture. The flavors intensify over time, making it perfect for stress-free baking. 💫
Nutrition facts
Frequently asked questions
Can I use a 6×2-inch pan instead of six 2-inch round pans?
Yes! This recipe works perfectly in a 6×2-inch sheet pan for a single-layer cake. Bake at 350°F for 25-30 minutes until a toothpick comes out clean. For a multi-layer effect, cut the baked cake into 3 equal horizontal layers (about 1-inch thick each) using a serrated knife. Chill briefly before frosting to prevent crumbling.
Why did my cake layers crack or sink in the middle?
This usually happens from overmixing the batter or opening the oven too soon. Mix just until combined (flour should disappear), and avoid peeking at cakes while baking. For sinking, ensure your oven is fully preheated and the pan is properly greased. If using round pans, fill them only ⅔ full—overfilling causes uneven baking.
How do I level the cake layers perfectly?
Use a serrated knife and a leveling guide (like a cake jig or even a ruler). Place the cake on the guide, press down firmly with the knife at a slight angle, then scrape across the top. For extra precision, chill the cake for 15 minutes in the freezer first—this makes leveling easier and reduces crumbs.
Can I make this cake without a stand?
Use a large cake plate or even a sturdy wooden board as a base. For stability, place a thin cardboard circle (cut from a cereal box) between the plate and cake to prevent moisture transfer. If stacking layers without a stand, use small cake boards under each layer to distribute weight evenly.
What’s the best way to store leftovers?
Wrap each layer tightly in plastic wrap, then place in an airtight container with parchment between layers. Store in the fridge for up to 5 days. To refresh, let sit at room temperature for 30 minutes before serving. For longer storage, freeze layers (unfrosted) for up to 3 months—thaw overnight in the fridge before assembling.

- 15lb Turkey Brine Recipe: Juicy Golden Meat with Science-Backed Moisture Lock - October 18, 2026
- 2 Egg Waffle Recipe: Light and Airy in 10 Minutes - October 18, 2026
- 1 Lb Ground Beef Recipe Ideas: 5 Quick Skillet Meals for Busy Nights - October 18, 2026