
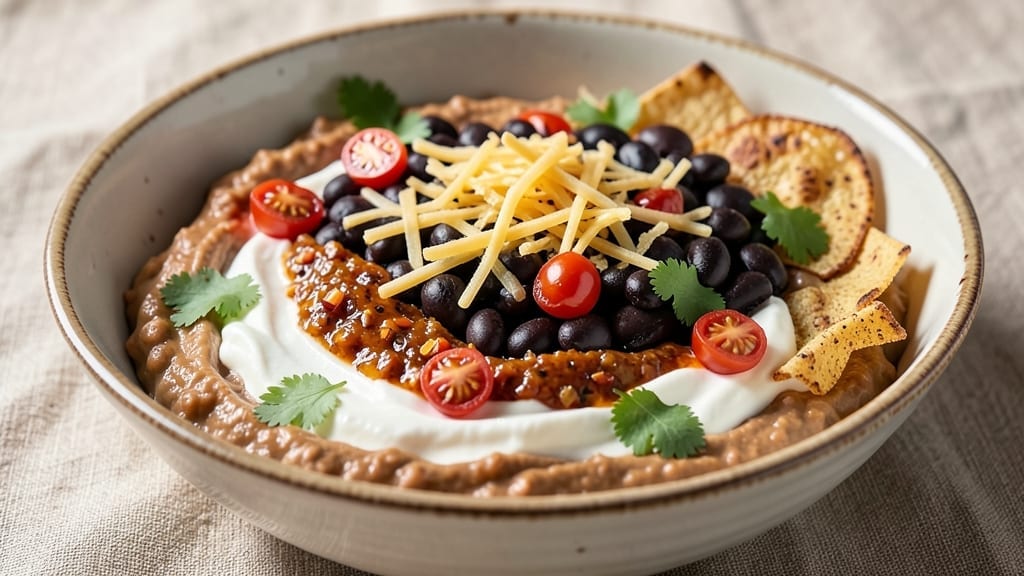
This 7-layer bean dip recipe with cream cheese delivers the ultimate fiesta appetizer—creamy, crunchy, and packed with bold flavors that disappear faster than you can say “tortilla chips.”
The secret lies in layering textures and temperatures: warm refried beans, cool cream cheese, and zesty salsa all work together to create a dip that’s restaurant-quality at home. I’ve perfected this recipe over years of game days and gatherings, where it consistently earns rave reviews and empty bowls.
The beauty of this dip is in its balance—creamy layers of sour cream and cream cheese contrast perfectly with the hearty texture of black beans and refried beans. Each layer builds on the last, creating a harmonious blend of smoky, tangy, and slightly sweet flavors.
The key to success? Chilling the dip for at least 2 hours before serving—this allows the flavors to meld and the layers to set just right, ensuring that first bite is as impressive as the last.
What you’ll end up with is a vibrant, layered masterpiece that’s equal parts satisfying and visually stunning. The creamy base of cream cheese and sour cream provides a rich foundation, while the black beans and refried beans add depth and substance.
Topped with a dollop of salsa and a sprinkle of cheese, it’s a dip that feels indulgent yet remains light enough for any occasion.
Perfect for game days, parties, or even a cozy night in, this recipe scales beautifully to feed a crowd. Serve with tortilla chips, fresh veggies, or warm tortillas for dipping. The best part? It’s vegetarian, easy to prepare ahead of time, and guaranteed to disappear quickly. Let’s get started!
Ingredients for 7 layer bean dip recipe with cream cheese
Creamy layers, bold flavors—this fiesta favorite brings the party with every dip.
| Ingredient | Amount | Notes |
|---|---|---|
| Cream Cheese 🧀 | 8 oz | Full-fat, room temperature |
| Sour Cream 🥛 | 1 cup | Full-fat preferred |
| Refried Beans 🥫 | 1 can | 15 oz can, warmed |
| Black Beans 🥫 | 1 can | 15 oz can, drained |
| Salsa 🍅 | ½ cup | Medium or pico de gallo |
| Shredded Monterey Jack Cheese 🧀 | 1 cup | Freshly shredded |
| Tortilla Chips 🥔 | 4 cups | Crushed for topping |
| Red Bell Pepper 🌶️ | 1 whole | Thinly sliced, for garnish |
| Green Onion 🧅 | 3 whole | Sliced, for garnish |
| Salt 🧂 | ½ tsp | Kosher or sea salt |
| Ground Black Pepper 🌶️ | ¼ tsp | Freshly ground preferred |
| Lime Juice 🍋 | 1 tbsp | Freshly squeezed |
The cream cheese is non-negotiable here—Philadelphia brand is my go-to, but any full-fat works. Grab a block of Monterey Jack cheese from the deli counter and shred it yourself (pre-shredded gets clumpy). For the beans, Goya or Bush’s are my pantry staples—they hold their shape perfectly. The refried beans should be warm but not hot when you layer them, so microwave them for 30 seconds before assembling. Pro tip: Warm the sour cream slightly too—it blends smoother with the cream cheese.
No refried beans? Mash canned pinto beans with a fork and a splash of olive oil, then warm through. Ran out of Monterey Jack? Cheddar or pepper jack work in a pinch. The tortilla chips can be any kind—Fritos or Doritos both crush up nicely. Need extra crunch? Toast the chips in a dry skillet for 2 minutes before crushing. The lime juice is optional but adds a bright pop—Mexican Key lime juice if you can find it, or regular lime works fine. And if you’re short on salsa, hot sauce plus diced tomatoes makes a decent substitute.
This dip tastes even better after chilling for 2-4 hours, so make it ahead—it’s perfect for parties. Store leftovers in the fridge for up to 5 days, covered tightly. The layers might shift slightly, but just stir it all together before serving. For serving, I like to use a glass bowl with wide sides—it shows off all those vibrant layers. And trust me, the tortilla chips will disappear faster than you think, so have extras on hand!
Why You’ll Love This Recipe
- No Fuss Assembly: I swear, this dip comes together faster than you can say “game night.” Just layer the refried beans, black beans, and sour cream—no chopping, no blending, just a quick spread. The cream cheese ties everything together like magic.
- Creamy Spice Bomb: Between us, the cream cheese and sour cream combo is chef’s kiss—rich but not heavy, with that tangy bite. Add the salsa on top? Instant flavor explosion. It’s the kind of dip that disappears in minutes.
- Party Crowd-Pleaser: Honestly, this is my go-to for gatherings—no one leaves hungry. Serve it with chips, tortilla crisps, or even as a taco filling. (Yes, even my picky uncle asks for seconds.)
- Budget-Friendly Staple: Black beans, refried beans, and a block of cream cheese stretch for days. I make a big batch, store it for a week, and still have leftovers. Plus, it’s cheaper than takeout—without the guilt.
Step-by-step instructions for 7 layer bean dip recipe with cream cheese
Let’s build this showstopping dip layer by layer—creamy, crunchy, and packed with fiesta flavors.
Mix the Cream Cheese Base
In a large mixing bowl, combine the 8 oz cream cheese and 1 cup sour cream. Use an electric mixer on medium speed until completely smooth and creamy—this should take about 2 minutes. You’re looking for a uniform, lump-free texture that’s thick enough to hold its shape when spread.
Here’s where the magic happens: add the 0.5 tsp salt and 0.25 tsp ground black pepper now. Mix these into the cream cheese base so every layer gets that perfect seasoning. If you notice the mixture starting to curdle, reduce the mixer speed to low and keep going—it’ll come together. I always let this base sit at room temperature for 5 minutes while I prep the other ingredients, which helps everything blend even better later.
Layer the Refried and Black Beans
Spread the cream cheese mixture evenly into a 9×13-inch baking dish (about ½-inch thick). Use a spatula to create a smooth, level base. This first layer sets the foundation for all the flavors to come.
Next, spread 1 can refried beans evenly over the cream cheese layer. Press down gently with the spatula to create a smooth surface. Then add the 1 can black beans (drained and rinsed) on top, spreading them out to cover completely. The beans should form an even layer—no thick spots that might make serving difficult later. This is where the texture contrast begins: creamy base meets hearty beans.
Add the Salsa and Cheese Layers
Spread the 0.5 cup salsa evenly over the black beans. Don’t worry if it looks like too much—it’ll settle and blend beautifully with the other layers. The salsa adds that essential tangy kick that makes this dip irresistible.
Now for the cheese layer: sprinkle 1 cup shredded Monterey Jack cheese evenly over the salsa. Use your hands to distribute it uniformly—this prevents any dry spots from forming. Press down very lightly with your fingers to help the cheese adhere to the layers below. The cheese will melt slightly when you serve it warm, creating that perfect gooey texture.
Top with Crunch and Garnish
Crush the 4 cups tortilla chips by placing them in a resealable bag and using a rolling pin or heavy pan. Sprinkle the crushed chips evenly over the cheese layer—this creates that essential crunch that makes every bite exciting. Press down gently with the back of a spoon to help them stick.
Finally, arrange the thinly sliced red bell pepper and sliced green onion on top in an attractive pattern. Drizzle with 1 tbsp lime juice and gently press it into the top layer. The lime juice brightens all the flavors and prevents the dip from drying out. Let the dip sit at room temperature for 15-20 minutes before serving—this allows all the layers to meld together and the flavors to develop fully.
Chill and Serve (Optional)
For best texture, refrigerate the dip for at least 1 hour before serving. This chilling time lets all the layers set properly, making it easier to slice and serve. When ready to serve, run a knife around the edges to loosen, then slice into 12 equal pieces (about 2×2 inches each). The layers should hold together beautifully, with each bite delivering creamy, crunchy, and tangy flavors in perfect harmony.
Serve immediately with tortilla chips, veggies, or as part of a fiesta spread. The contrast of warm, gooey layers with crispy chips on top is what makes this dip legendary. Don’t forget to taste as you go—adjust seasoning if needed, but this recipe is already perfectly balanced.
Pro Tips For Making 7 Layer Bean Dip Recipe With Cream Cheese
- CHILL THE CREAM CHEESE: DESCRIPTION: Take the cream cheese out of the fridge 30 minutes before mixing—it should be soft enough to spread with a butter knife, not melt into a puddle. I learned this the hard way when my first batch turned into a runny disaster because I used it straight from the fridge.
- DRAIN AND RINSE BEANS: DESCRIPTION: Give those canned black beans a quick drain and rinse—even if they’re “low-sodium.” The extra starch clings to the beans, and when layered, it makes the dip gummy instead of clean. A quick cold-water rinse (5 seconds max) fixes it.
- LAYER BY WEIGHT, NOT EYEBALLS: DESCRIPTION: Use a kitchen scale for the cream cheese-sour cream mix—aim for about 16 oz total (two 8-oz blocks of cream cheese + ½ cup sour cream). Eyeballing leads to uneven layers, and the top layers will slide off when you cut into it. Trust me, it’s worth the 10 seconds.
- PRESS DOWN EACH LAYER: DESCRIPTION: Don’t just dump and hope. After spreading each layer (especially the refried beans and black beans), press down firmly with a spatula or the back of a spoon. This keeps the dip from collapsing when you slice it—no one wants a messy dip tower.
Dietary considerations for this dish
Vegetarian-Friendly Base
This recipe is naturally vegetarian but packed with protein from the black beans and refried beans, delivering about 15 grams of plant-based protein per serving. The cream cheese and sour cream add richness without meat, making it a satisfying option for plant-based diets.
I always reassure friends with dietary restrictions that this dip is hearty enough to keep everyone full and happy. 🌱
Dairy Considerations
The cream cheese and sour cream are the main dairy components, so if you’re avoiding lactose, you can substitute with dairy-free cream cheese (like Kite Hill or Miyoko’s) and coconut yogurt for the sour cream.
The Monterey Jack cheese can also be swapped for dairy-free shreds (look for brands like Violife or Daiya). Just be aware the texture may be slightly different—dairy-free cheeses often melt more dramatically.
Gluten-Free Adaptations
This dip is naturally gluten-free as long as you use gluten-free tortilla chips for the topping. I recommend Siete brand or Late July for a crunchy, gluten-free option. The rest of the ingredients—beans, cheese, and salsa—are typically gluten-free, but always double-check labels, especially on salsa brands that might contain additives.
The crushed chips add the only potential gluten risk, so keep that in mind when selecting. 🥔
Allergen Awareness
This recipe contains dairy (cream cheese, sour cream, cheese) and soy (if using store-bought refried beans). For soy-free versions, opt for homemade refried beans made with pinto beans and olive oil. If nut allergies are a concern, ensure your salsa and chips are processed in nut-free facilities—some brands cross-contaminate.
I always check labels carefully when hosting guests with allergies to avoid any surprises.
Meal Prep Tips
Assemble the dip 24 hours ahead and store it in an airtight container in the refrigerator. The flavors meld beautifully over time, and the layers hold together well when chilled. When ready to serve, let it sit at room temperature for 15-20 minutes to bring out the best textures.
I’ve found that prepping this ahead of time cuts down on last-minute stress—just slice and serve when guests arrive. ⏰
Serving Flexibility
This dip works for vegan, vegetarian, and omnivorous gatherings when adapted correctly. For a vegan version, replace all dairy with plant-based alternatives and use nutritional yeast for a cheesy flavor. The dip remains naturally gluten-free with the right chips, making it a crowd-pleaser for many dietary needs.
I love how versatile it is—it’s my go-to for game days, potlucks, or even a simple snack with fresh veggies. 💫
Nutrition facts
Frequently asked questions
Can I make this dip without cream cheese?
The cream cheese is what gives this dip its signature creamy texture, but you can substitute it with 8 oz mashed avocado or 1 cup Greek yogurt (full-fat for best results). Both options will change the flavor slightly—avocado adds richness while yogurt keeps it tangy. The layers might be slightly softer, but the texture contrast will still shine through!
How do I keep the layers from mixing together?
Chilling the dip for at least 2 hours before serving is key—this lets the layers set properly. Use a 9×13-inch baking dish for maximum surface area, and spread each layer evenly with a spatula. Press down lightly on each layer (especially beans and cheese) to help them adhere. When ready to serve, run a knife around the edges first to loosen the layers before slicing.
What’s the best way to reheat leftovers?
This dip isn’t meant to be reheated—it’s best enjoyed fresh from the fridge! If you have leftovers, serve them cold or at room temperature. To revive texture, let it sit out for 15-20 minutes before serving. If the top layer gets dry, sprinkle a little extra salsa or sour cream on top to restore moisture. The flavors actually improve after chilling, so leftovers often taste even better the next day!
Can I make this dip spicier?
Add ½ teaspoon cayenne pepper or 1 tablespoon hot sauce to the cream cheese base for extra heat. For a smoky kick, mix 1 teaspoon smoked paprika into the refried beans before layering. You can also top with pickled jalapeños or diced serrano peppers for added spice. Adjust to taste—this dip handles heat beautifully!
How do I make this dip ahead for a party?
Assemble the dip completely 24 hours ahead and refrigerate in an airtight container. The flavors meld beautifully overnight! When ready to serve, let it sit at room temperature for 15-20 minutes to bring out the textures. Slice just before serving to maintain those perfect layers. Pro tip: Use a glass baking dish for easy transport and presentation.

- 6 Oz Chocolate Chip Cookie Recipe: Perfectly Balanced Crispy Edges and Chewy Hearts - September 25, 2026
- 6-Inch Coffee Cake Recipe: Vanilla Bean Swirls and Buttery Streusel Topping - September 25, 2026
- 1 Hour Soup Recipe: Velvety Richness Without the Wait - September 25, 2026