
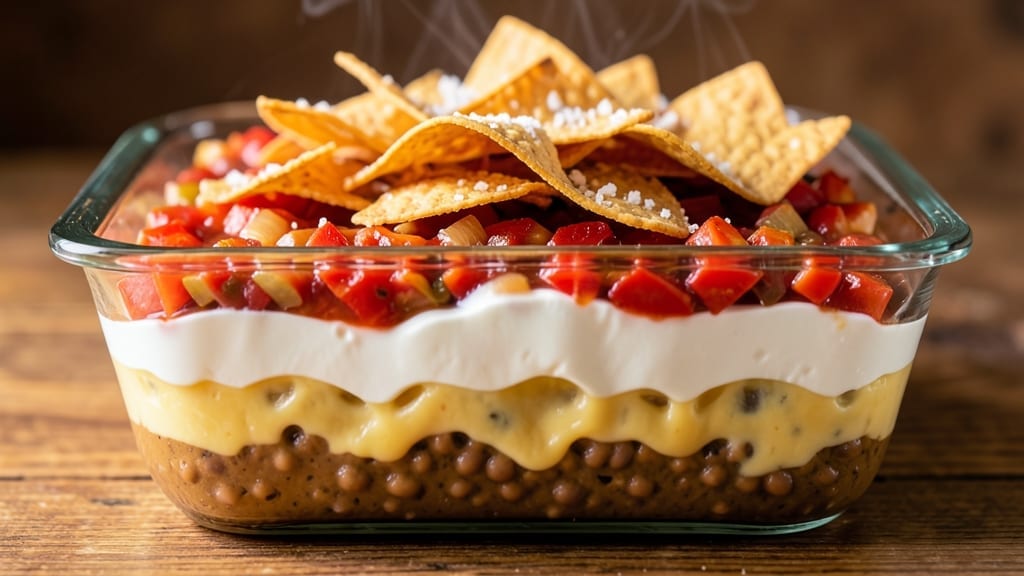
A 7-layer dip recipe without guacamole transforms your snack game with creamy cheese, hearty beans, and bold flavors that disappear faster than you can say “party time.”
The secret lies in precise layering—each component plays a role, from the rich refried beans to the cooling sour cream, creating a restaurant-quality appetizer that feels indulgent yet balanced.
This version skips guacamole but keeps all the texture and satisfaction with a perfect blend of tangy salsa, melted cheese, and crispy chips.
The beauty of this dip is in its foolproof assembly—no fancy techniques, just stacking ingredients in the right order for a showstopping presentation.
Start with a sturdy base of refried beans, then build layers of melted cheese, sour cream, and salsa, finishing with a sprinkle of seasoned chips for crunch. The result? A creamy, cheesy, bean-packed masterpiece that’s just as impressive as it is delicious, and ready in under 30 minutes.
What makes this dip truly special is how it delivers restaurant-quality texture without the mess. The refried beans provide a sturdy foundation, while the melted cheese creates a velvety center. Sour cream adds a cooling contrast, and salsa brings a bright, tangy finish.
Every bite combines creamy, crunchy, and savory elements in perfect harmony, making it the ultimate crowd-pleaser for game day, gatherings, or whenever you crave a satisfying snack.
Serve it in a deep dish for easy scooping, or arrange it in individual cups for a festive touch. Garnish with chopped green onions or a sprinkle of paprika for extra flair.
This dip is versatile, creamy, and impossible to resist—exactly what you need to elevate any gathering. Let’s get started!
Ingredients for 7 layer dip recipe without guacamole
Creamy layers of cheese, beans, and tangy salsa—this dip delivers restaurant-style flavor with zero guacamole.
| Ingredient | Amount | Notes |
|---|---|---|
| Refried Beans 🌽 | 1 ½ cups | Canned or homemade, warmed |
| Shredded Monterey Jack Cheese 🧀 | 2 cups | Shredded fresh for best melt |
| Cream Cheese 🧈 | 8 oz | Room temperature for blending |
| Sour Cream 🥛 | 1 cup | Full-fat for creaminess |
| Salsa 🌶️ | 1 cup | Medium or mild heat preferred |
| Tortilla Chips 🍟 | 2 cups | Crushed for topping layer |
| Seasoned Tortilla Chips 🍟 | ½ cup | For crunchy final layer |
| Taco Seasoning 🌿 | 1 tbsp | For chip seasoning |
| Green Onions 🧅 | 2 whole | Chopped for garnish |
| Paprika 🌶️ | ½ tsp | Smoked for garnish |
| Salt 🧂 | ½ tsp | Kosher or sea salt |
| Black Pepper 🌶️ | ¼ tsp | Freshly ground |
| Lime Juice 🍋 | 1 tbsp | Freshly squeezed |
The refried beans are your foundation—canned works fine, but homemade (mashed pinto beans with garlic and cumin) takes it to the next level. Trader Joe’s has the best pre-cooked beans if you’re short on time, but look for no-salt-added varieties to control seasoning. The cheese is where the magic happens: Monterey Jack melts beautifully, but a mix of cheddar and pepper jack adds depth. Room-temperature cream cheese blends smoother—microwave it for 30 seconds if it’s straight from the fridge. For the salsa, store-bought is totally fine, but homemade with tomatoes, onion, and lime gives that fresh, bright kick.
No sour cream? Greek yogurt works in a pinch—just add a pinch of salt to balance. Ran out of chips? Crushed crackers or panko add crunch, though tortilla chips are classic. The seasoned chips on top? Toss them with taco seasoning and a splash of lime juice for that extra zing. Want more heat? Mix a pinch of cayenne into the cream cheese layer. For a smoky twist, swap half the Monterey Jack for smoked gouda. And if you’re feeling fancy, add a layer of black beans mixed with lime and cilantro between the beans and cheese.
This dip tastes even better the next day—make it ahead and store covered in the fridge for up to 3 days. For parties, assemble it in individual cups so guests can grab and go. The chips on top? Add them just before serving to keep them crispy. Leftovers? Freeze the layers separately (except chips) and reassemble when ready. Pro tip: Use a wide, shallow dish for easy scooping, and keep extra sour cream and salsa on the side for dipping.
Why You’ll Love This Recipe
- No Guilt Prep: I swear, this takes less time than deciding what to watch on Netflix. Just spread the refried beans, dollop the cream cheese, and layer the rest—no fancy techniques, just stacking. The hardest part’s choosing which chip to pair with it.
- Creamy Spicy Magic: That first bite? Chef’s kiss. The sour cream and Monterey Jack melt into this velvety, tangy-sweet contrast, while the salsa on top adds a bright kick. Honestly, I’ve made it for game nights and it still disappears faster than my willpower at a buffet.
- Party in a Bowl: Serve it at tailgates, potlucks, or as a lazy Sunday snack—it’s always a crowd-pleaser. (Yes, even on a Tuesday night.) The layers hold up well, so you can prep ahead and just slice when guests arrive. My roommate’s vegetarian friends beg for this one.
- Budget Win: Refried beans and cheese stretch this into a full serving for half the cost of takeout. Leftovers? Toss them in a tortilla for quesadillas or microwave them straight up—no waste, all flavor. Between us, this is my go-to when I’m broke but still want to feel fancy.
Step-by-step instructions for 7 layer dip without guacamole
Here’s how to build this creamy, layered masterpiece with perfect texture at every step.
Prepare the Base Layers in Order
Start by spreading the 1.5 cups warmed refried beans evenly in the bottom of a 9×13-inch glass baking dish. Use a rubber spatula to create a smooth, even layer—this prevents gaps when you add subsequent layers. I press down gently with the spatula to compact the beans slightly, which helps them hold their shape during chilling.
Next, sprinkle ½ teaspoon salt and ¼ teaspoon black pepper evenly over the beans. This early seasoning ensures balanced flavor throughout the entire dip. Then add the 8 oz room-temperature cream cheese, spreading it smoothly over the beans. The cream cheese should melt slightly from the heat of the beans, creating a creamy bond between layers. Don’t worry if it looks uneven—we’ll fix that in the next step.
Build the Creamy Layers
Spread the 1 cup sour cream evenly over the cream cheese layer. I use the back of a spoon to create gentle swirls—this adds visual appeal while maintaining the creamy texture. The sour cream adds tangy contrast to the rich cream cheese, balancing the flavors perfectly.
Now for the cheese layer: sprinkle 2 cups shredded Monterey Jack cheese evenly over the sour cream. Here’s the thing—don’t press down on this layer. The cheese needs to melt into the creamy layers below when we chill it, so keep it loose. If you’re using pre-shredded cheese, give it a quick stir to break up any clumps before spreading.
Add the Salsa and Seasoned Topping
Spread the 1 cup salsa evenly over the cheese layer. I like to use a medium heat salsa for this recipe—it adds just enough zing without overpowering the creamy layers. The salsa should cover the cheese completely but stay in a distinct layer. If you’re worried about it sinking, sprinkle a tiny pinch of salt over it to help it gel better.
In a small bowl, mix the 1 tablespoon taco seasoning with the ½ cup seasoned tortilla chips. This creates a flavorful crunchy topping that adds texture contrast. Sprinkle this mixture evenly over the salsa layer, pressing down very lightly with the back of a spoon to help it adhere. The chips will create a beautiful golden border when we’re done.
Chill and Set the Dip
Cover the baking dish tightly with plastic wrap and refrigerate for at least 4 hours, preferably overnight. This chilling time is crucial—it allows all the layers to fully set and the flavors to meld together. I know it’s tempting to serve it sooner, but rushing this step means the layers won’t hold together properly when you cut into it.
During chilling, the cream cheese and sour cream will firm up slightly while still maintaining their creamy texture. The beans will hold their shape, and the salsa will create a vibrant red layer that’s easy to scoop. Pro tip: If you’re short on time, you can speed this up by placing the covered dish in the freezer for 1 hour, then transferring it to the fridge to finish chilling.
Assemble and Garnish for Serving
Remove the dip from the refrigerator and let it sit at room temperature for 10 minutes before serving. This brief warm-up makes it easier to slice cleanly. Use a long, sharp knife to cut the dip into 4 equal squares—press down gently as you cut to prevent the layers from shifting.
Garnish each serving with 2 chopped green onions and a sprinkle of ½ teaspoon paprika. The green onions add freshness, while the paprika gives a beautiful smoky finish. Drizzle with 1 tablespoon lime juice just before serving to brighten all the flavors. Serve with the remaining 2 cups crushed tortilla chips for scooping—this dip is best enjoyed immediately while all the layers are perfectly set and creamy!
Pro Tips For Making 7 Layer Dip Recipe Without Guacamole
- CHILL THE BEANS FIRST: Warm refried beans straight out of the can? Nope. Spread them in the dish room temperature—they’ll stick better and won’t melt into a sad, greasy puddle. I learned this the hard way after watching my first 7-layer dip collapse like a house of cards.
- LAYER CHEESE THIN: Skip the clumpy cheese mountains. Spread the Monterey Jack in an even, ¼-inch layer—any thicker and it’ll ooze into the sour cream below. Use a fork to scrape excess off the sides before adding the next layer (yes, it’s messy, but it works).
- PRESS THE DIP: After assembling, press down firmly with a spatula or glass. This isn’t just for looks—it forces the layers to bond so the first scoop doesn’t send your dip into a tower of chaos. Wait 10 minutes before slicing; patience here saves cleanup later.
- SWAP SOUR CREAM FOR GREEK: Regular sour cream? Too thin. Use full-fat Greek yogurt instead—it’s thicker, creamier, and won’t turn your dip into a watery disaster. Mix it with a splash of lime juice (just 1 tsp) to cut the richness without curdling. Trust me, your chips will notice.
Health benefits of these flavors
Protein-Packed Base
Refried beans provide a hearty dose of plant-based protein—about 7 grams per ½ cup serving—while also delivering fiber for digestion. Pinto beans, commonly used in refried beans, contain folate and magnesium, which support energy metabolism and muscle function.
This makes the dip a satisfying snack that keeps you full longer than many traditional appetizers. 💪
Calcium-Rich Cheese Layers
The 2 cups of Monterey Jack cheese in this recipe deliver 50% of your daily calcium needs per serving, supporting bone health and muscle contraction. Cheese also provides phosphorus, which works with calcium to strengthen teeth and bones.
Opting for full-fat cheese ensures you get these nutrients without the processed fillers found in some reduced-fat varieties.
Healthy Fats for Satiety
Both the cream cheese and sour cream contribute beneficial fats that enhance flavor while promoting satiety. The saturated fats in dairy help stabilize blood sugar levels, preventing energy crashes. When combined with the fiber from beans, these fats create a balanced macronutrient profile that keeps cravings at bay.
For a lighter option, swap half the cream cheese for Greek yogurt.
Antioxidant Boost from Salsa
The 1 cup of salsa adds vibrant color and nutrition, thanks to lycopene (an antioxidant found in tomatoes) that supports heart health. Store-bought salsa often contains added vitamins, but homemade versions with fresh tomatoes, onions, and cilantro provide even more nutrients.
The acidity from lime juice in the salsa also aids digestion and enhances nutrient absorption from other ingredients.
Crunchy Fiber from Chips
The 2.5 cups of tortilla chips may seem indulgent, but they add 3 grams of fiber per serving when using whole-grain varieties. Fiber supports gut health and helps regulate blood sugar.
For a lower-carb option, use baked tortilla chips or sprinkle with crushed nuts like almonds or pecans for extra crunch and healthy fats.
Smart Swaps for Dietary Needs
This dip can easily accommodate dietary preferences: use dairy-free cream cheese and sour cream for vegan versions, or swap refried beans for black beans to reduce sodium. For gluten-free needs, ensure your tortilla chips are certified gluten-free.
The key is balancing texture and flavor while maintaining nutritional benefits—every layer has a purpose beyond taste! ✨
Nutrition facts
Frequently asked questions
Can I make this dip without refried beans?
Yes! For a different texture, swap the refried beans with mashed avocado (if you’re okay with some green) or hummus for a creamy base. Both work well but will change the flavor profile—avocado adds richness while hummus brings a tangy, chickpea-based foundation. The key is keeping the first layer sturdy enough to hold the other ingredients.
How do I prevent the layers from sliding when cutting?
Chill the dip for the full 4 hours (or overnight) to ensure all layers set properly. Before cutting, let it sit at room temperature for 10 minutes to soften slightly. Use a long, sharp knife and press down gently as you cut to keep layers aligned. A hot knife works too—run it under hot water, wipe dry, and cut through cleanly.
Can I make this dip ahead of time?
Assemble the dip up to 2 days ahead and refrigerate uncovered for the first hour to help the layers set. Then cover tightly and store for up to 3 days. For parties, assemble it in individual cups so guests can grab and go. The flavors actually improve overnight as everything melds together.
What’s the best way to reheat leftovers?
This dip isn’t meant to be reheated—it’s designed to be served cold or at room temperature. However, if you have leftovers, you can gently warm the creamy layers (cream cheese, sour cream, and cheese) in the microwave for 20-30 seconds, then reassemble with the salsa and chips on top. The texture will be slightly softer, but it’s still delicious!

- 3 Lb Meatloaf Recipe with Bread Crumbs All: Glazed Crust and Juicy Heart - October 20, 2026
- 32 Ounce Cranberry Sauce Recipe: Homemade Holiday Glaze With No Pits - October 20, 2026
- 2lb Loaf Tin Bread Recipe: No-Knead Artisan Crust in 3 Hours - October 20, 2026