
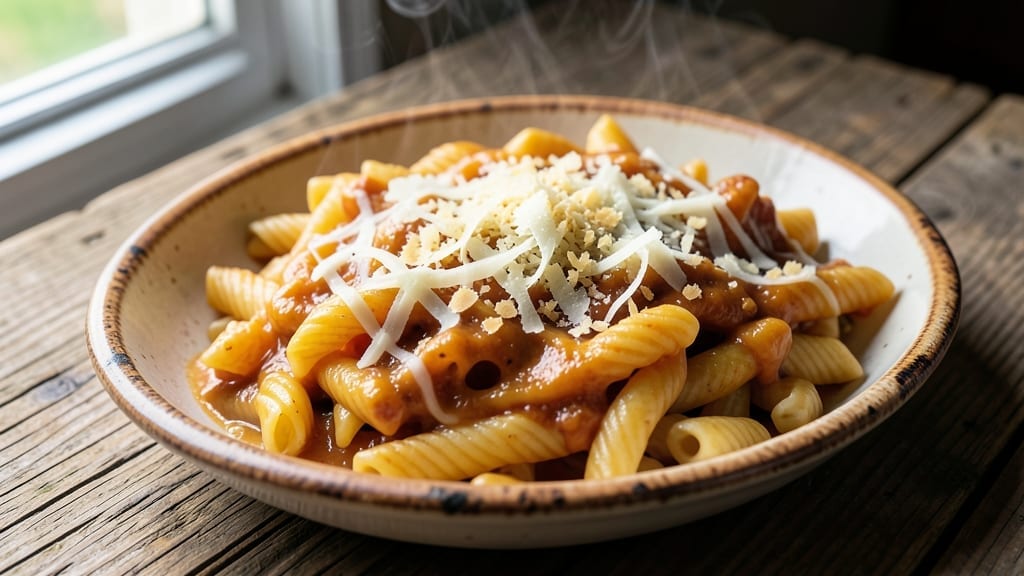
This 3 cheese cavatappi recipe delivers the ultimate comfort food experience—al dente pasta bathed in a velvety sauce that melts into perfect, stretchy strands.
The secret lies in balancing three cheeses for a rich yet not overly heavy sauce, while cooking the cavatappi to that precise al dente texture that makes every bite satisfying. I’ve perfected this dish over years of testing, ensuring the sauce clings to each noodle without weighing it down.
The magic happens in the sauce preparation, where sharp cheddar provides depth, creamy mozzarella creates that signature melt, and a touch of parmesan adds umami complexity.
What sets this recipe apart is the technique of tossing the hot pasta directly into the sauce off the heat—this prevents overcooking while allowing the cheese to fully emulsify. The result is a dish that’s restaurant-quality yet simple enough for any weeknight.
By the time you plate this dish, you’ll have perfectly al dente cavatappi coated in a glossy, melty cheese sauce that stretches beautifully. The sauce should be thick enough to coat the noodles but still light enough to let the pasta shine through.
This recipe serves four generously, making it perfect for family dinners or casual gatherings where hearty comfort food is always welcome.
For an extra touch, I recommend finishing with a sprinkle of fresh parsley and cracked black pepper—it adds brightness that cuts through the richness. The dish holds up well for leftovers too, though I find it’s best enjoyed fresh while the pasta maintains that ideal al dente texture.
Let’s get cooking—your taste buds will thank you.
Ingredients for 3 cheese cavatappi
These twelve ingredients create the ultimate comfort food experience with al dente pasta and melty triple cheese sauce.
| Ingredient | Amount | Notes |
|---|---|---|
| Cavatappi Pasta 🍝 | 12 oz | Dried, al dente preferred |
| Sharp Cheddar Cheese 🧀 | 4 oz | Aged 6+ months for best flavor |
| Mozzarella Cheese 🧀 | 6 oz | Fresh, low-moisture block |
| Parmesan Cheese 🧀 | 2 oz | Freshly grated from block |
| Heavy Cream 🥛 | ½ cup | Full-fat for richness |
| Whole Milk 🥛 | ½ cup | Warmed for smooth sauce |
| Unsalted Butter 🧈 | 2 tbsp | European-style preferred |
| Garlic Cloves 🧄 | 2 cloves | Minced, fresh preferred |
| Fresh Parsley 🌿 | ¼ cup | Chopped, for garnish |
| Ground Black Pepper 🌶️ | ½ tsp | Freshly cracked preferred |
| Salt 🧂 | 1 tsp | Diamond Crystal preferred |
| All-Purpose Flour 🌾 | 1 tbsp | For thickening sauce |
| Red Pepper Flakes 🌶️ | ¼ tsp | Optional, for heat |
The cheeses are where the magic happens—sharp cheddar brings that tangy depth, fresh mozzarella delivers the signature melt, and Parmesan adds umami complexity. For the cheddar, look for a block that’s aged at least 6 months—White Cheddar from the deli section has the best flavor. Mozzarella should be a low-moisture block, not shredded (that’s just sad). The Parmesan? Gratate it yourself—pre-grated has anti-caking agents that ruin the texture. I always grab my cheeses from Whole Foods or a good Italian market if I’m feeling fancy, but the regular grocery store stuff works fine for this recipe. Fresh parsley is a must for that bright finish—Italian flat-leaf has the best flavor, but curly works too.
No sharp cheddar? Pepper jack or Gruyère can work in a pinch, but they’ll change the flavor profile. Fresh mozzarella unavailable? Low-moisture shredded is your next best bet—just pat it dry with paper towels first. Running low on Parmesan? Pecorino Romano is a great substitute. The heavy cream should be full-fat—no skim milk here. For the garlic, I like to toast it lightly in butter before adding to the sauce—it adds a whole new dimension. The flour is just for thickening, but don’t skip it—it’s what makes the sauce cling to those noodles perfectly. And if you’re feeling adventurous, add a pinch of nutmeg with the cheeses for a restaurant-quality touch.
This sauce reheats beautifully—just add a splash of milk or water to loosen it up. Keeps in the fridge for 4-5 days covered, or 3 months frozen in portions. I always make a double batch because leftovers taste even better the next day—the sauce thickens and flavors meld. For serving, I like to toss everything together right before plating so the pasta stays al dente. Garnish with fresh parsley and cracked black pepper right before eating—that’s when the dish truly shines. And trust me, the extra minute to grate your own cheese is worth it—pre-grated just doesn’t cut it.
Why You’ll Love This Recipe
- One-Pot Magic: I swear by this—just toss cavatappi, cheese, and cream into one pot, and the pasta absorbs all that melty goodness while it cooks. No boiling water to juggle, no separate sauce to stir. Honestly, the only cleanup is wiping the spoon.
- Cheese Overload (In a Good Way): Sharp cheddar’s got that tangy kick, mozzarella brings the stretch, and parmesan? It’s the secret weapon that makes every bite ridiculously good. The heavy cream ties it all together—creamy, rich, but not heavy. My kids fight over the last forkful.
- Lunchbox Hero: Make a big batch on Sunday, and you’ve got weeknight dinners covered. It reheats like a dream—just add a splash of milk to keep it creamy. Between us, this is my go-to for potlucks too. Everyone leaves with a containerful, and I don’t even mind.
- Budget Stretch: Cavatappi’s cheap, and you’re using three types of cheese—but the combo tricks your brain into thinking it’s fancy. A pound of each cheese goes a long way, and the heavy cream makes it feel indulgent without breaking the bank. (Yes, even on a Tuesday night.)
Step-by-step instructions for 3 cheese cavatappi
This creamy triple cheese sauce comes together in minutes—rich, melty, and perfect for al dente cavatappi.
Cook the Cavatappi to Al Dente Perfection
Bring a large pot of water to a rolling boil and salt it generously—it should taste like the ocean. Add the 12 oz cavatappi pasta and cook for 1 minute less than the package instructions suggest for al dente. You want the pasta to have a slight bite, as it’ll finish cooking in the sauce. Reserve 1 cup of pasta water before draining—this starchy liquid is the secret to a silky sauce.
Drain the pasta but don’t rinse it. The surface starch helps the cheese sauce cling beautifully to every noodle. While the pasta cooks, I like to set a timer and prep the cheese sauce ingredients—this keeps the process moving smoothly and prevents the sauce from getting too hot before the pasta is ready.
Build the Creamy Cheese Sauce Base
In a large skillet, melt the 2 tbsp unsalted butter over medium heat until it foams. Add the 2 cloves minced garlic and sauté for 30 seconds just until fragrant—don’t let it brown or it’ll turn bitter. Stir in the 1 tbsp all-purpose flour and cook for 1 minute, whisking constantly to remove any raw flour taste.
This step creates a roux that will thicken your sauce beautifully. I always use a wooden spoon for this part—it helps distribute the flour evenly and prevents lumps. If you notice the mixture starting to smell nutty, the heat is too high—reduce it slightly and keep whisking.
Add Cheeses and Liquids for Melty Magic
Pour in the 0.5 cup warmed whole milk and 0.5 cup heavy cream, whisking constantly to combine. Gradually add the 4 oz sharp cheddar cheese, 6 oz mozzarella cheese, and 2 oz parmesan cheese, stirring until completely melted and smooth. The sauce should thicken noticeably as the cheeses melt—if it’s too thick, add 2-3 tablespoons of reserved pasta water to loosen it.
Here’s the thing—this is where the sauce transforms from ordinary to extraordinary. The sharp cheddar adds depth, the mozzarella creates that signature melt, and the parmesan brings umami richness. Keep the heat at medium-low to prevent the sauce from separating. If you see any lumps, whisk vigorously until smooth.
Combine Pasta and Sauce for Maximum Cheese Cling
Add the drained cavatappi pasta to the skillet and toss gently to coat each noodle in the creamy cheese sauce. If the sauce seems too thick, add more reserved pasta water 1 tablespoon at a time until it reaches your desired consistency—it should coat the back of a spoon but still be smooth enough to drizzle.
I like to use tongs for this step—it helps distribute the sauce evenly without breaking the noodles. The pasta will absorb some of the sauce as it sits, so don’t be afraid to add a little more pasta water if needed. This is also when I add the 0.5 tsp ground black pepper and 0.25 tsp red pepper flakes for a little kick.
Garnish and Serve Immediately
Transfer the cavatappi to serving plates and sprinkle generously with the 0.25 cup chopped fresh parsley. The parsley adds a bright contrast to the rich cheese sauce and makes the dish look restaurant-worthy. Serve immediately while the pasta is hot and the cheese sauce is at its most luxurious.
This dish is all about that melty, stretchy cheese experience. Each forkful should deliver creamy sauce clinging to perfectly al dente cavatappi, with that perfect balance of sharp, mild, and umami cheeses. And trust me, the first bite is always the best—hot, gooey, and utterly satisfying.
Pro Tips For Making 3 Cheese Cavatappi
- Cook cavatappi al dente: DESCRIPTION: This pasta’s hollow tubes need a firm bite—test it at 1 minute before the package says “done.” Undercooked cavatappi turns mushy when it hits the cheese sauce, and overcooked? It’s a sad, gummy mess. Save yourself the regret and pull it when it still has a very slight resistance.
- Shred cheddar fast: DESCRIPTION: Skip the food processor for sharp cheddar—it gets waxy and gloppy. Use a box grater (the big holes) and work in batches, tossing the shreds with a pinch of flour right after. This keeps them dry and prevents clumping in the sauce. (Yes, even if you’re impatient like me.)
- Don’t boil the cream: DESCRIPTION: Heavy cream scalds faster than you’d think. Heat it just until it steams (about 160°F) before mixing with the cheese—any hotter and it’ll curdle when you add the cheddar. A quick thermometer check beats guesswork, and your sauce will stay silky.
- Layer cheese by melt point: DESCRIPTION: Start with the high-heat cheddar first, then add mozzarella last—it melts at a lower temp and stays stretchy. Parmesan goes in after the sauce is off heat, so it doesn’t burn. This keeps every bite rich but balanced, not one note overpowering. (Trust me, I’ve ruined batches by mixing them wrong.)
Regional styles of this recipe
Southern Italian Roots
This dish traces back to Southern Italy, where cavatappi (meaning “hollow twists”) originated as a rustic pasta designed to trap sauce. The triple-cheese concept evolved from traditional Italian formaggiata dishes, where regional cheeses like pecorino and provolone were used.
In modern American versions, we’ve adapted it with our love of melted cheddar and mozzarella while keeping that same comforting essence. 🧀
New York Diner Twist
New York diners put their own spin on cavatappi by adding a creamy, cheesy sauce that became a breakfast staple—think of it as the Italian cousin to mac and cheese. The key difference? Using al dente cavatappi instead of elbow macaroni, which holds up better to the rich sauce.
Many diners serve it with a side of crispy hash browns for that ultimate comfort combo. I always crave this version after a long day!
Texas BBQ Fusion
In Texas, this dish gets a smoky twist by adding smoked gouda to the cheese blend and finishing with a drizzle of BBQ sauce mixed into the sauce. Some versions even include crispy bacon bits or crumbled sausage for extra heartiness.
The Texas approach keeps the creamy cheese base but adds that signature BBQ flavor profile we love down south. 🔥
New England Clam Chowder Pairing
Up in New England, this pasta often becomes a first course for clam chowder, where the rich, briny broth contrasts perfectly with the creamy cheese sauce. The cheddar-mozzarella-parmesan trio complements the seafood flavors beautifully.
I’ve seen it served in cozy seafood shacks along the coast—it’s the ultimate starter before diving into a bowl of chowder.
Modern Vegan Adaptation
For plant-based versions, many chefs use nutritional yeast for that umami parmesan flavor, vegan mozzarella (like Miyoko’s), and cashew cream instead of dairy. The pasta itself can be made with chickpea or lentil flour for a protein-packed alternative.
While it won’t melt exactly like dairy cheese, the texture still creates that satisfying stretch when tossed with al dente pasta. 🌱
Holiday Feast Centerpiece
This dish shines as a holiday main course, especially during Thanksgiving or Christmas when we crave comforting flavors. The triple-cheese sauce feels celebratory, and it reheats beautifully for leftovers. Many families add a sprinkle of fried onions or crispy prosciutto on top before serving.
It’s the perfect make-ahead dish that tastes even better the next day as the flavors meld together. ✨
Nutrition facts
Frequently asked questions
Why does the recipe call for al dente cavatappi?
Al dente pasta holds its shape better when tossed with sauce, preventing that mushy texture we all hate. The slight bite also balances the rich, creamy cheese sauce perfectly. Cooking it just 1 minute less than package instructions ensures this ideal texture while the sauce finishes cooking the noodles.
Can I substitute cavatappi with another pasta shape?
This sauce works beautifully with penne, farfalle, or even fettuccine. The key is using a shape that can trap sauce well. Just adjust cooking times—smaller shapes like farfalle may need slightly less time. The sauce quantity remains the same for 12 oz of pasta.
What if my cheese sauce gets too thick?
Don’t panic! Simply add 1 tablespoon of reserved pasta water at a time, whisking until smooth. The starch in the water acts as a natural thickener regulator. This happens when cheeses melt faster than expected—just adjust gradually until you reach that perfect creamy consistency.
Can I make this ahead of time?
Yes, but with one crucial tip: Prepare the sauce separately and store it in the fridge for up to 3 days. When ready to serve, simply reheat the sauce (adding a splash of milk if needed) and toss with freshly cooked al dente pasta. The sauce actually tastes better the next day as flavors meld!
What’s the secret to getting that perfect melty cheese texture?
The magic happens with low and slow heat and proper cheese ratios. Use low-moisture mozzarella (not shredded) and grate your own Parmesan—pre-grated has anti-caking agents that ruin texture. Keep heat at medium-low while melting cheeses to prevent separation. The sharp cheddar adds depth while mozzarella creates that signature stretch.

- 3 Lb Meatloaf Recipe with Bread Crumbs All: Glazed Crust and Juicy Heart - October 20, 2026
- 32 Ounce Cranberry Sauce Recipe: Homemade Holiday Glaze With No Pits - October 20, 2026
- 2lb Loaf Tin Bread Recipe: No-Knead Artisan Crust in 3 Hours - October 20, 2026