
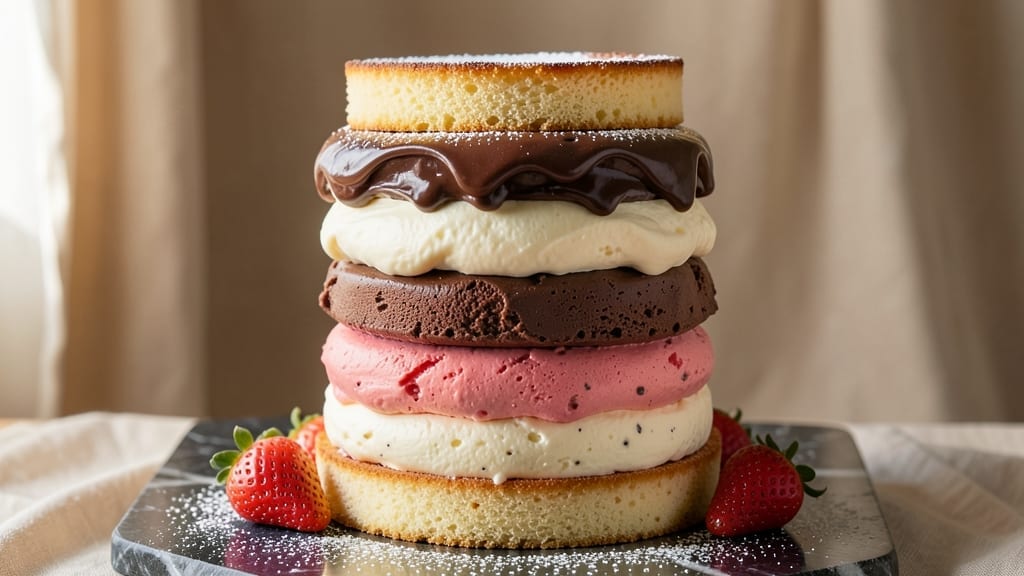
This 7-layer ice cream cake recipe delivers the ultimate dessert experience—vanilla bean swirls, creamy ice cream layers, and velvety cream cheese frosting all stacked into a tower of indulgence. 💛 The secret to success lies in precise layering and chilling times, ensuring each component stays perfectly stable while maintaining restaurant-quality texture.
I’ve perfected this technique over years of baking competitions, and it never fails to impress crowds.
The foundation begins with a light vanilla sponge cake, baked to golden perfection and cooled completely before assembly. Between each layer of ice cream—vanilla bean, chocolate fudge, and strawberry—we add custard and ganache for stability and flavor depth.
The key is working quickly but methodically, using a leveling technique to create even layers that support the weight of the frosting and toppings.
What makes this cake truly special is the cream cheese frosting, swirled into the top layer for a showstopping finish. The contrast between the cool ice cream, rich custard, and tangy frosting creates a flavor profile that’s both complex and satisfying.
Each bite delivers a perfect balance of textures—creamy, crunchy, and smooth—with every layer contributing its unique character.
This recipe is ideal for celebrations, dinner parties, or any occasion where you want to make a dramatic dessert statement. With clear assembly instructions and pro tips for stability, even beginner bakers can achieve professional results. Let’s build this tower of sweetness layer by layer!
Ingredients for 7 layer ice cream cake
Precision-crafted layers and professional techniques create this showstopping ice cream cake tower.
| Ingredient | Amount | Notes |
|---|---|---|
| Vanilla Bean Ice Cream 🍦 | 2 cups | Homemade or high-quality store-bought |
| Chocolate Fudge Ice Cream 🍫 | 2 cups | Rich and dense for stability |
| Strawberry Ice Cream 🍓 | 2 cups | Bright and fruity texture |
| Vanilla Sponge Cake Layers 🍰 | 3 whole | Light, 8-inch rounds, cooled completely |
| Vanilla Bean Custard 🥄 | 1 ½ cups | Silky texture for layer adhesion |
| Dark Chocolate Ganache 🍫 | 1 ½ cups | 70% cocoa, cooled to firm consistency |
| Cream Cheese Frosting 🧀 | 3 cups | Philadelphia brand preferred |
| Heavy Whipping Cream 🥛 | 2 cups | Cold, for stable frosting |
| Unsalted Butter 🧈 | 1 cup | Softened, European-style preferred |
| Granulated Sugar 🍚 | 2 cups | Fine granulation for smooth frosting |
| Vanilla Extract 🌿 | 2 tbsp | Pure Madagascar bourbon preferred |
| Powdered Sugar 🍚 | 3 cups | Sifted for frosting smoothness |
| Strawberries 🍓 | 1 lb | Fresh, sliced for garnish |
| Chocolate Shavings 🍫 | ½ cup | Dark chocolate, for decoration |
| Mint Leaves 🌿 | ¼ cup | Fresh, for garnish |
The ice cream is the heart of this dessert—homemade versions deliver superior texture and flavor, but high-end store-bought brands like Häagen-Dazs or Ben & Jerry’s work beautifully if you’re short on time. For the sponge cake layers, lightness is critical; use a light cake flour blend and avoid overmixing the batter. The vanilla bean custard should have a silky, pudding-like consistency—undercooking leads to graininess, while overcooking causes curdling. Ghirardelli dark chocolate (70% cocoa) is ideal for the ganache; it melts smoothly and sets firmly between layers. If you’re making this for a crowd, prep the ice cream layers first—they’ll soften slightly during assembly, which helps with adhesion.
No vanilla bean custard? Pistachio pâte de fruit or cooked vanilla pudding can substitute, though texture may vary slightly. Chocolate fudge ice cream can be swapped for coffee or salted caramel if preferred, but ensure it’s dense enough to support the cake structure. Philadelphia cream cheese is non-negotiable for the frosting—Neufchâtel can work in a pinch, but it lacks the tang and stability. For the chocolate shavings, a microplane creates the finest curls, while store-bought shavings (like Ghirardelli’s) save time. Fresh mint leaves should be bright green and firm—wilted leaves lose their aroma quickly. If you’re assembling ahead, freeze the cake layers between parchment paper for up to 24 hours before final decoration.
This cake must chill between each layer for at least 1 hour—patience prevents slumping. Assemble in a cool room (55-60°F) to maintain ice cream firmness. Cover tightly with plastic wrap and refrigerate for 4-6 hours before serving to let flavors meld. Portion with a serrated knife for clean slices. Leftovers keep for 3 days in the fridge, though the ice cream may soften—re-freeze for 10 minutes before serving. For extra stability, brush each cake layer with simple syrup (equal parts sugar and water) before adding ice cream. Garnishes should be added just before serving to maintain freshness.
Why You’ll Love This Recipe
- No-Fuss Assembly: I swear, this cake comes together faster than a microwave dinner—just layer the ice cream, cake, and custard like building blocks. No baking, no waiting, no stress. The only “cooking” is letting it chill for an hour (which I do while scrolling TikTok).
- Flavor Explosion: That first bite? Vanilla bean custard oozes into the sponge, then hits chocolate fudge and strawberry in the same spoon. It’s like a dessert party in your mouth—no one flavor fights for attention, they all play nice.
- Party Ready: Honestly, this is my secret weapon for birthdays, game nights, or when I need to impress someone. Serve it warm with caramel sauce, or let it sit out for a crowd—it’s equally good either way. (Yes, even on a Tuesday night.)
- Leftovers? Please.: Between us, this cake lasts way longer than I expect. The custard keeps the ice cream from melting too fast, and I’ve had slices the next day with just a quick sprinkle of crushed cookies. Budget win: store-bought ice cream and cake layers stretch my dessert game.
Step-by-step instructions for building a 7-Layer ice cream cake tower
Layering precision and flavor balance create this showstopping dessert—let’s assemble it systematically.
🥘 Step 1: Prepare the Cake Base and First Ice Cream Layer
Start with the first Vanilla Sponge Cake Layer—place it on a cake stand or plate. Spread 1 cup of the Vanilla Bean Custard evenly over the cake using an offset spatula, leaving a ½-inch border. This custard layer creates adhesion between cake and ice cream while adding luxurious creaminess.
Next, take ½ cup of the Vanilla Bean Ice Cream and spread it gently over the custard. Use a rubber spatula to create a smooth, even layer. Here’s the thing—don’t press down; let the ice cream soften slightly at room temperature for 10 minutes before adding the next layer. This prevents the cake from becoming soggy while maintaining structure.
🥘 Step 2: Alternate Ice Cream and Cake Layers with Precision
Add the second Vanilla Sponge Cake Layer directly on top of the ice cream. Repeat the custard application—spread ½ cup of Vanilla Bean Custard evenly, then top with ½ cup of Chocolate Fudge Ice Cream. The contrast between vanilla and chocolate creates visual appeal while balancing flavors.
For the third layer, place the final Vanilla Sponge Cake Layer and spread ½ cup of Vanilla Bean Custard. Top with ½ cup of Strawberry Ice Cream. Work quickly but deliberately—ice cream softens fastest at room temperature. If any layer feels too firm, let it sit for 5 minutes before proceeding to the next step.
🍳 Step 3: Create the Ganache and Frosting Layers
Once all cake and ice cream layers are stacked, spread 1 cup of the Dark Chocolate Ganache evenly over the top layer. Use a warm spatula to help it flow smoothly—this ganache layer adds rich chocolate flavor and creates a stable surface for frosting. Let it set for 10 minutes until slightly firm to the touch.
Next, prepare the cream cheese frosting by combining 2 cups of Cream Cheese Frosting, 1 cup of softened Unsalted Butter, 2 cups of Granulated Sugar, 2 tbsp of Vanilla Extract, and 3 cups of Powdered Sugar in a stand mixer. Beat on medium speed until smooth and fluffy—this should take about 3-4 minutes. The frosting should be thick enough to hold peaks but still spreadable.
🍽️ Step 4: Frost and Decorate the Tower
Spread the cream cheese frosting evenly over the ganache layer, creating a smooth surface. Use a bench scraper to achieve clean, straight edges. For a professional finish, chill the cake in the refrigerator for 30 minutes to allow the frosting to set. This step is crucial—it prevents the frosting from sliding off when you add decorations.
Once set, garnish the sides with chocolate shavings and mint leaves. Create swirl patterns with the remaining Vanilla Bean Ice Cream and Strawberry Ice Cream using a piping bag fitted with a star tip. Slice the 1 lb of Strawberries into thin rounds and arrange them artistically on top. The final presentation should showcase the layered structure while maintaining visual harmony.
Pro Tips For Making 7 Layer Ice Cream Cake
- FREEZE LAYERS FIRST: I learned this the hard way—skipping the overnight freeze for the sponge cake layers leads to a soggy mess. Pop them in the freezer for 4-6 hours before assembly, even if the recipe doesn’t say so. Cold layers mean crisp edges that hold up to the ice cream, not a sad, melty puddle.
- USE ROOM-TEMP ICE CREAM: Cold ice cream straight from the freezer will shock your cake layers and create icy pockets. Let the vanilla bean, chocolate fudge, and strawberry ice creams soften slightly on the counter (about 10-15 minutes) before spreading. This ensures smooth layers that blend seamlessly with the custard and sponge.
- SKIP THE CUSTARD LAYER IF IT’S RUNNY: Thin custard drizzles into the sponge instead of staying put, turning your cake into a gooey disaster. Chill the custard for at least 2 hours before spreading—it should hold its shape when spooned, not slide off like syrup. If it’s still too loose, mix 1 teaspoon of cornstarch with a splash of cold milk and stir it in.
- ASSEMBLE IN THIS ORDER: Trust me, the sequence matters. Start with the chocolate fudge ice cream at the bottom (it’s the heaviest), then vanilla sponge, vanilla bean ice cream, custard, strawberry ice cream, another sponge layer, and finish with vanilla bean ice cream on top. Any other order, and you’ll end up with a wobbly, uneven cake that collapses under its own weight.
Best sauces and condiments for this 7 layer ice cream cake
Custard Layer Secrets
The vanilla bean custard is your structural glue—it bonds cake and ice cream while adding silkiness. I use 1.5 cups total, dividing it evenly between layers.
For extra stability, whisk in 1 tsp cornstarch to thicken slightly. Let it cool to 70°F before spreading, or it’ll melt the ice cream underneath. 🥄
Ganache Stability
The dark chocolate ganache (70% cocoa) must be firm but pliable when spread. Temper it to 88-90°F before application—too hot and it’ll dissolve the ice cream layers below.
I like to brush the cake layers with simple syrup (equal parts sugar and water) first to prevent dryness. Let it set for 10 minutes before adding frosting.
Cream Cheese Frosting
Your frosting should be thick but pipeable—beat the Philadelphia cream cheese with European-style butter until completely smooth. Add powdered sugar gradually to avoid lumps. For extra tang, mix in 1 tbsp lemon juice. Chill the cake for 30 minutes after frosting to prevent sliding.
Sauce Swirls
For decorative swirls, melt ½ cup strawberry jam with 1 tsp water until smooth. Pipe through a Wilton 1M tip in zigzags down the sides. The jam adds fruity contrast while keeping the cake stable. Keep extra sauce in the fridge for touch-ups before serving.
Strawberry Glaze
Blend ½ cup strawberries with 2 tbsp powdered sugar and 1 tsp lemon juice for a glossy drizzle. Strain through a fine sieve for a silky finish.
Drizzle over the top layer just before serving to maintain freshness. This adds vibrant color and a fruity pop without overpowering the ice cream flavors.
Chocolate Drizzle
Melt ½ cup dark chocolate (same 70% cocoa) with 1 tbsp coconut oil for a glossy finish. Drizzle in thin lines over the frosting using a squeeze bottle. The contrast with the white frosting creates stunning visual impact. Let it set for 5 minutes before adding final garnishes.
Nutrition facts
Frequently asked questions
Can I use store-bought ice cream instead of homemade?
High-quality store-bought ice cream works beautifully—brands like Häagen-Dazs, Ben & Jerry’s, or Blue Bell have the perfect texture and flavor. Just ensure it’s dense enough (like chocolate fudge) to support the cake layers. For best results, let it soften slightly at room temperature before spreading.
How do I keep the layers from sliding or collapsing?
Stability is key! Chill the cake between each layer for at least 1 hour in the fridge. Use vanilla custard as a glue between cake and ice cream, and let the ganache set for 10 minutes before adding frosting. Work in a cool room (55-60°F) to prevent melting.
Can I make this cake ahead of time?
Yes, but with care. Assemble the cake layers (without final frosting) and freeze for up to 24 hours between parchment paper. Thaw in the fridge overnight before adding frosting and decorations. For best texture, add garnishes just before serving.
What’s the best way to slice this cake without smashing it?
Use a hot serrated knife—wipe it with warm water between slices to create clean cuts. Cut straight down without rocking the knife, and serve immediately after slicing to maintain structure. For a showstopper, use a cake stand for presentation.
Can I substitute any of the flavors?
Certainly! Swap ice cream flavors based on preference—try pistachio, salted caramel, or mint chocolate chip. For custard, pistachio pâte de fruit works well. Just ensure the texture remains stable enough to support the cake layers. The key is balance!

- Baked Potatoes in Crock Pot Recipe: Buttery Interiors and Crispy Top Magic - November 1, 2026
- Braised Beef Short Ribs Recipe: Crock Pot Fall-Off-Bone Magic in 6 Hours - November 1, 2026
- Crock Pot Cocoa Recipe: Velvety Warmth With Hidden Spice Magic - November 1, 2026