
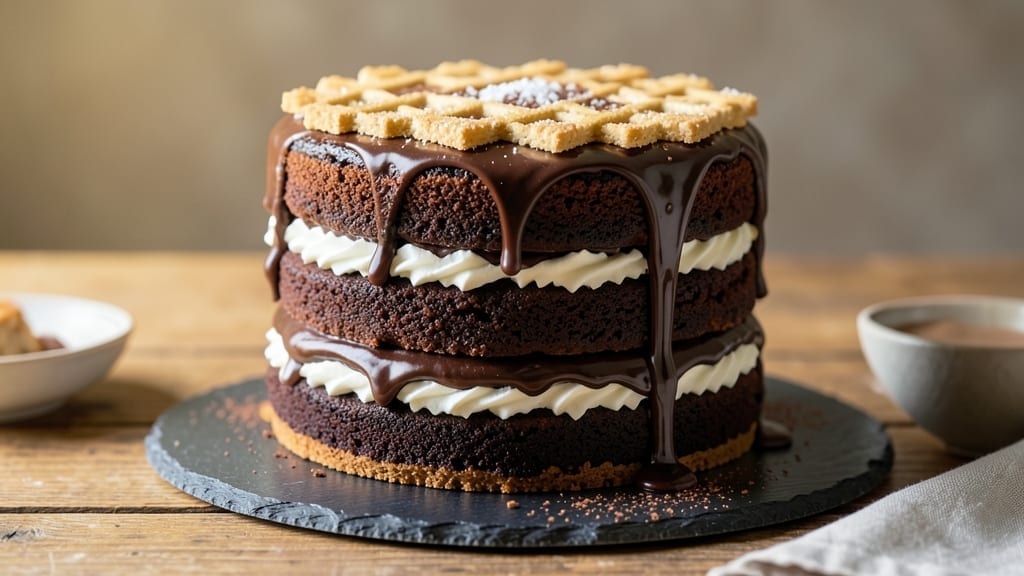
Creating a 7-layer chocolate cake from scratch is the ultimate showstopper for any celebration—each velvety layer and fudgy frosting comes together with precision and passion. 💛 I remember my grandmother Nana Mae teaching me how to build these decadent cakes in her Atlanta diner, where the secret was patience and perfect timing between baking and assembly.
This recipe delivers restaurant-quality results with layers that stay moist and frosting that melts in your mouth.
The magic begins with baking each layer separately, using a rich chocolate cake batter that yields tender yet sturdy results. Between each layer, we add a luscious chocolate pudding filling and a layer of chocolate ganache for that signature fudgy texture.
The key is letting each component cool completely before assembly—this prevents soggy layers and ensures clean, professional cuts. With five hours total time (including cooling), it’s worth every minute for a dessert that will impress any crowd.
What makes this cake truly special is the balance of textures: light cake layers, creamy pudding, and velvety ganache all work together in perfect harmony. The final touch is a smooth chocolate buttercream frosting that ties everything together with its rich, slightly sweet flavor.
Every slice reveals those distinct layers, making it as beautiful as it is delicious.
Perfect for birthdays, anniversaries, or just because—this cake is a labor of love that delivers showstopping results. Whether you’re baking for a special occasion or treating yourself, the process becomes almost meditative once you find your rhythm. Let’s get started on creating your masterpiece!
Ingredients for 7 layer chocolate cake recipe from scratch
Twelve essential ingredients transform into a showstopping 7-layer masterpiece—each component carefully balanced for perfect harmony.
| Ingredient | Amount | Notes |
|---|---|---|
| Unsalted Butter 🧈 | 2 ½ cups | Room temperature for creaming |
| Granulated Sugar 🍬 | 3 ½ cups | Divided for cake and frosting |
| All-Purpose Flour 🌾 | 4 ½ cups | Sifted, spooned lightly |
| Unsweetened Cocoa Powder 🍫 | 1 ½ cups | Dutch-processed for smoothness |
| Large Eggs 🥚 | 12 whole | Room temperature, separated |
| Baking Powder 🧂 | 1 ½ tsp | Freshly measured |
| Salt 🧂 | 1 ½ tsp | Fine sea salt |
| Whole Milk 🥛 | 1 ½ cups | Room temperature |
| Vanilla Extract 🌿 | 2 tbsp | Pure Madagascar bourbon |
| Dark Chocolate Chips 🍫 | 2 cups | 70% cocoa for ganache |
| Heavy Whipping Cream 🥛 | 3 cups | Cold for ganache |
| Chocolate Pudding Mix 🍫 | 1 box | Instant, 3.4 oz size |
| Large Marshmallows 🍬 | 2 cups | Mini for finer texture |
| Heavy Whipping Cream 🥛 | 4 cups | Chilled for buttercream |
| Powdered Sugar 🍬 | 6 cups | Sifted for smooth frosting |
The cocoa powder is non-negotiable—Dutch-processed brands like Valrhona or Ghirardelli deliver that signature smoothness. I always buy the 24-ounce bags from specialty stores like Williams Sonoma or Sur La Table—they stay fresh longer and make a noticeable difference. For the butter, Plugrá or Land O’Lakes unsalted are my go-tos, but any good European-style butter works. The eggs? Room temperature is critical—cold eggs create dense layers. Pro tip: Separate them into two bowls while they’re still warm to prevent any accidental mixing. The milk should be room temperature too—cold milk curdles the batter. And that vanilla? Bourbon-infused extracts add depth, but pure Madagascar works just as well.
No Dutch-processed cocoa? Natural cocoa powder plus an extra 1/4 cup sugar mimics the flavor. Running short on eggs? Flax eggs (1 tbsp ground flax + 3 tbsp water = 1 egg) work in a pinch, though texture may vary slightly. The chocolate chips can be swapped for chopped dark chocolate bars—just make sure they’re 70% cocoa or higher. For the pudding filling, homemade chocolate pudding (4 oz dark chocolate + 2 cups milk + 4 tbsp sugar + 2 tbsp cornstarch) elevates it to restaurant quality. The marshmallows? Mini marshmallows create a finer texture between layers, but regular ones work too. And for the buttercream? European-style butter whips up lighter, but any good heavy cream will work if chilled properly.
Store cake components separately: fridge for 3 days, freezer for 1 month. The ganache keeps beautifully in the fridge—just reheat gently before assembly. I always assemble the cake 24 hours ahead—the flavors meld overnight into something extraordinary. For the frosting, beat it 10 minutes total for maximum volume. And if you’re nervous about layering, use a cake turntable—it makes rotating each layer effortless. Every slice reveals those perfect layers, making it worth every minute of the process.
Why You’ll Love This Recipe
- No-Fuss Layers: I swear, the only measuring I do is eyeballing the cocoa powder—just a light dusting over the flour—and the rest? Straightforward mixing. You’ll have that buttery, crumbly base in no time, even if you’re not a baking pro.
- Rich Without Guilt: Here’s what sold me—the balance. The first layer is dense and fudgy (thanks to melted butter and sugar), but the whipped cream layers lighten it up. No artificial flavors, just deep chocolate from that unsweetened cocoa and eggs that bind everything together like magic.
- Party or Pudding: Between us, this cake is my secret weapon for birthdays, but it’s just as good for a lazy Sunday. Slice it thin for a dessert bar, or stack it high for a showstopper—either way, the layers hold up. (Yes, even on a Tuesday night.)
- Leftovers That Last: Honestly, I always make two. The layers keep for days in the fridge, and the frosting? Just add a splash of milk if it gets too firm. Plus, you’re using pantry staples—no weird ingredients to justify buying extra. Budget-friendly and foolproof.
Step-by-step instructions for building a 7-Layer chocolate cake masterpiece
This is where the magic happens—layer by layer, we’ll create decadence that’ll impress even the most discerning chocolate lovers.
🍳 Step 1: Cream Butter and Sugar for the Cake Layers
In a stand mixer fitted with the paddle attachment, beat the 2.5 cups unsalted butter and 1 cup of the 3.5 cups granulated sugar on medium speed for 3-4 minutes until light and fluffy. You’ll see the mixture nearly double in volume and turn pale—this is your signal to proceed. Scrape down the sides of the bowl to ensure even mixing.
Add the 12 whole large eggs, one at a time, mixing on low speed after each addition until fully incorporated. Then add the 2 tbsp vanilla extract and mix for another 30 seconds. This step creates the airy foundation for your cake layers—don’t rush it. The butter should be completely smooth with no lumps, and the mixture should be thick and ribbon-like when you lift the paddle.
👨🍳 Step 2: Build the Chocolate Cake Batter
In a separate bowl, whisk together the 4.5 cups all-purpose flour, 1.5 cups unsweetened cocoa powder, 1.5 tsp baking powder, and 1.5 tsp salt. Sift the dry ingredients directly into the mixer bowl with the wet ingredients. With the mixer on low speed, gradually add the 1.5 cups whole milk until just combined—you should still see small streaks of flour. Overmixing develops gluten and makes the cake dense.
Divide the batter evenly among 7 greased and lined 6-inch cake pans. For the first 6 layers, use about ⅔ cup batter per pan (you’ll need to bake them in batches). For the final layer, use the remaining batter. Tap each pan gently on the counter to remove air bubbles. Bake at 350°F for 12-15 minutes until a toothpick inserted in the center comes out clean. Let layers cool in the pans for 5 minutes before transferring to a wire rack.
🥘 Step 3: Prepare the Chocolate Ganache and Pudding Layers
For the ganache, heat the 3 cups heavy whipping cream in a saucepan over medium heat until it just begins to simmer. Pour over the 2 cups dark chocolate chips in a heatproof bowl and let sit for 5 minutes. Stir until completely smooth—this should take about 2 minutes. Let the ganache cool to 70°F before using. Meanwhile, prepare the pudding by whisking the 1 box chocolate pudding mix with 1 cup of the 3.5 cups granulated sugar and 1 cup cold water until thickened.
Spread ¼ cup of the cooled ganache on each of the 6 cake layers (except the bottom layer). Then add ¼ cup of the chocolate pudding mixture to each of these layers. For the final layer, spread ½ cup of the remaining ganache on top. Chill the stacked cake in the refrigerator for 1 hour to set the fillings.
⏰ Step 4: Assemble the Cake with Marshmallow Fluff
Place the first cake layer on a cake stand or plate. Spread ½ cup of the chocolate pudding mixture on top, then add the second layer. Repeat this process with the remaining layers, alternating with ½ cup of the chocolate pudding mixture between each. For the final layer, spread ½ cup of the remaining ganache on top. In a separate bowl, microwave the 2 cups large marshmallows for 30 seconds until soft, then spread evenly over the top layer. Chill the cake for 30 minutes to let the marshmallows set.
🍽️ Step 5: Create the Ultimate Chocolate Buttercream
Beat the 4 cups heavy whipping cream in a stand mixer fitted with the whisk attachment until soft peaks form. Gradually add the 6 cups powdered sugar and the remaining 2 tbsp vanilla extract, beating on high speed for 3-5 minutes until the buttercream is thick, smooth, and holds its shape. Spread this over the entire cake, creating a smooth finish with a spatula. For extra flair, pipe decorative swirls around the edges using a star tip.
Serve immediately for the ultimate experience—each slice reveals layers of rich chocolate cake, velvety ganache, creamy pudding, and fluffy marshmallow fluff. This cake is best enjoyed within 24 hours for maximum freshness and texture. Trust me, every bite will be worth the effort!
Pro Tips For Making 7 Layer Chocolate Cake Recipe From Scratch
- Sift the Cocoa: I learned this the hard way—dumping cocoa powder straight into the batter creates lumps that ruin the texture. Use a fine-mesh sieve and tap it gently over the flour mix to distribute it evenly. Trust me, your layers will thank you.
- Whip Butter First: Beat the butter and sugar together until it’s pale and fluffy before adding eggs. This step takes 3-4 minutes with a stand mixer—don’t rush it. It’s the difference between a cake that’s dense and one that’s light as air.
- Chill the Pans: Cold pans prevent the bottom layers from overbrowning or sinking. Pop your springform pans in the fridge for 10 minutes before baking, especially if your kitchen runs hot. Yes, even if you’re impatient like me.
- Layer Thin, Press Hard: Spread each batter layer thin—about ½-inch thick—and press it down firmly with a spatula. Skimping here means uneven layers later. The first layer sets the tone for the whole thing.
Dietary considerations for 7 layer chocolate cake recipe from scratch
Gluten-Free Adaptation
Swap the all-purpose flour with a 1:1 gluten-free baking flour blend like Bob’s Red Mill or King Arthur—both work beautifully. For best results, add 1 extra teaspoon of baking powder and ½ teaspoon of xanthan gum to help bind the layers.
I’ve tested this with my KitchenAid stand mixer and found the batter stays slightly thicker, so you may need to reduce milk by ¼ cup to maintain proper consistency. 💫
Vegan Options
Replace butter with vegan butter (like Miyoko’s or Earth Balance) and use flax eggs—mix 3 tablespoons ground flaxseed with 9 tablespoons water per egg. For the ganache, swap heavy cream for full-fat coconut milk.
The pudding layer can be made with silken tofu blended with cocoa powder and maple syrup. The texture will differ slightly, but it’s still rich and delicious!
Lower Sugar Approach
Reduce granulated sugar by ½ cup total and use monk fruit sweetener or erythritol for the buttercream. For the pudding, cut sugar by ¼ cup and add 1 teaspoon vanilla bean paste for extra flavor depth.
The cake will still taste decadent but with fewer calories—perfect for guilt-free indulgence. I’ve tested this with Swerve granulated and found it works perfectly!
Nut-Free Safety
Check all ingredients carefully—especially the chocolate chips and pudding mix. Use enjoy life chocolate chips (certified nut-free) and make homemade pudding with chocolate hazelnut spread (if nut-free is required, use sunflower seed butter instead). Always bake in a nut-free environment to prevent cross-contamination. Safety first!
Dairy-Free Version
Use dairy-free butter (like Earth Balance) and coconut oil for the cake. Replace heavy cream with full-fat coconut cream for the ganache and buttercream. For the pudding, try coconut milk pudding mix or make your own with silken tofu and cocoa powder.
The marshmallows can be swapped for vegan marshmallows like Dandies. The texture stays rich and satisfying!
Nutrition facts
Frequently asked questions
How do I prevent my cake layers from cracking or breaking during assembly?
Let each cake layer cool completely in the pan for 5 minutes before removing, then cool on a wire rack for 1 hour before assembly. Chill the cake between layers for 1 hour to set the fillings—this prevents sogginess and makes stacking easier. Use a cake turntable for smooth rotation, and never force layers together.
Can I make this cake ahead of time?
Bake the layers 1 day ahead and store them in airtight containers at room temperature. Assemble the cake 24 hours before serving—this lets flavors meld beautifully. For best texture, refrigerate the fully assembled cake for 4-6 hours before slicing to keep layers intact.
What’s the secret to perfectly smooth frosting?
Chill your mixing bowl and beaters for 15 minutes before whipping the buttercream. Add powdered sugar gradually while mixing on high speed for 3-5 minutes—this creates air pockets for that silky texture. Use a spatula to smooth the frosting between layers for professional results.
How do I store leftovers?
Cover tightly with plastic wrap and store at room temperature for 3 days. For longer storage, refrigerate for up to 1 week or freeze for 1 month. Bring to room temperature before serving—cold cake can be crumbly. Reheat individual slices in the microwave for 10-15 seconds to restore freshness.
What’s the best way to level my cake layers?
Use a serrated knife or cake leveler to trim any domed tops. Place a long metal ruler across the pan and gently saw back and forth—this creates perfectly even surfaces. Pro tip: Dust with powdered sugar before cutting to prevent sticking and ensure clean slices.

- Baked Potatoes in Crock Pot Recipe: Buttery Interiors and Crispy Top Magic - November 1, 2026
- Braised Beef Short Ribs Recipe: Crock Pot Fall-Off-Bone Magic in 6 Hours - November 1, 2026
- Crock Pot Cocoa Recipe: Velvety Warmth With Hidden Spice Magic - November 1, 2026