
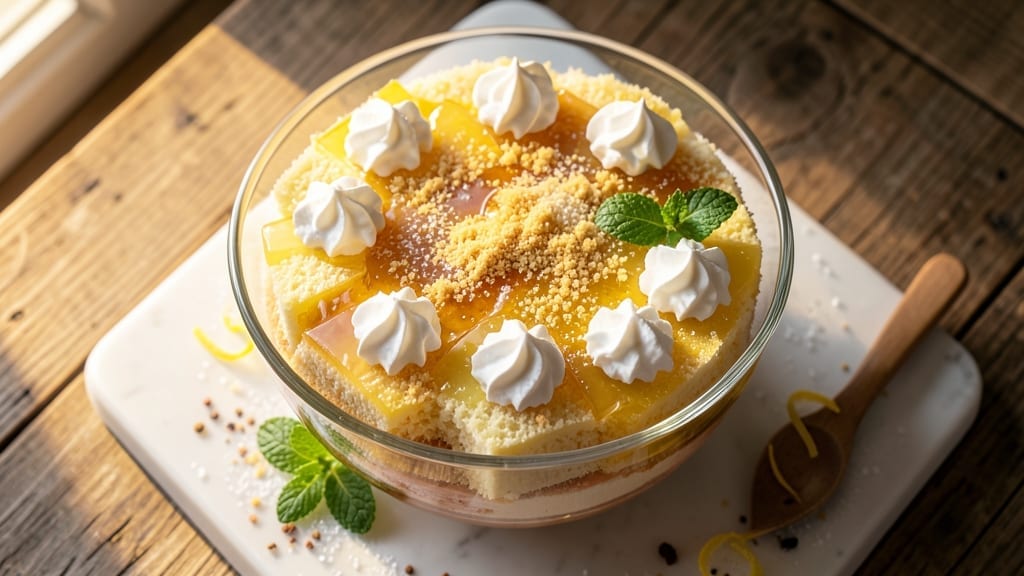
This 7-Up jello cake recipe delivers the nostalgic citrusy layers that make it a dessert legend—bright, tangy, and perfectly balanced between cake and jello. The secret lies in baking two simple cake layers and sandwiching them with 7-Up-infused jello, creating a texture that’s both creamy and firm.
I’ve perfected this recipe over years of baking, ensuring each slice delivers that signature 7-Up flavor without being overly sweet.
The beauty of this recipe is its simplicity: just five ingredients for the cake and three for the jello filling, yet the result is a dessert that rivals classic pies.
Baking the cake layers takes about 20 minutes, while the jello mixture requires just 10 minutes of chilling time between layers. The combination of tender cake and vibrant jello creates a dessert that’s both elegant and fun.
What you’ll end up with is a cake that’s moist, citrusy, and visually stunning—each slice revealing layers of golden cake and bright yellow jello. The 7-Up flavor shines through without overpowering, making this a dessert that’s perfect for celebrations or just because.
The chilling process ensures clean slices every time, so you can serve it with confidence.
This recipe works beautifully for birthdays, potlucks, or as a special treat. The layers hold together well, making it easy to slice and serve. Let’s get started on creating this timeless dessert that brings back childhood memories with every bite.
Ingredients for 7 up jello cake
Five cake ingredients plus three for the jello—simple layers for a nostalgic dessert classic.
| Ingredient | Amount | Notes |
|---|---|---|
| All-Purpose Flour 🌾 | 2 cups | Sifted for even texture |
| Granulated Sugar 🍚 | 1 ½ cups | White or light brown |
| Unsalted Butter 🧈 | 1 cup | Room temperature, full-fat |
| 7-Up Soda 🥤 | 1 cup | Chilled for jello infusion |
| Unflavored Gelatin 🍬 | 2 tbsp | Plus 2 tbsp cold water |
| Granulated Sugar 🍚 | 1 cup | For jello layer |
| Large Eggs 🥚 | 2 whole | Room temperature |
| Baking Powder 🧂 | 1 ½ tsp | Aluminum-free preferred |
| Vanilla Extract 🌸 | 1 tsp | Pure extract preferred |
| Salt 🧂 | ½ tsp | Kosher or sea salt |
| Milk 🥛 | ½ cup | Whole milk preferred |
| Lemon Juice 🍋 | 1 tbsp | Freshly squeezed |
| Vegetable Oil 🫒 | ¼ cup | For greasing pans |
The 7-Up is non-negotiable here—it’s the star of the show. Grab a 2-liter bottle from Costco for the best price, or any store-brand version works. For the gelatin, Knox brand is my go-to because it dissolves perfectly. The flour should be sifted before measuring to avoid dense layers. If you’re short on time, King Arthur flour is pre-sifted and saves steps. The butter should be room temperature—press it gently, and if it leaves a dent, it’s ready. For the jello layer, chill your 7-Up before mixing to prevent condensation from diluting the flavor.
No 7-Up? Sprite or lemon-lime soda works in a pinch, but the flavor won’t be identical. Short on gelatin? Agar-agar powder can substitute at half the amount, but the texture will be firmer. The cake layers can handle substituting applesauce for half the butter if you’re watching fat, but the jello layer will still need the full butter for richness. For the milk, whole milk gives the best texture, but 2% works fine if that’s what you have. The lemon juice should be freshly squeezed—bottled juice lacks the bright acidity that cuts through the sweetness. If you’re baking ahead, make the jello layer last to avoid soggy cake.
Store the cake layers in an airtight container at room temperature for up to 2 days, but the jello layer should be made fresh before assembling. Once fully chilled, the cake keeps for 3 days in the fridge. For freezing, wrap each layer individually in plastic wrap before placing in a freezer bag—this prevents freezer burn and keeps the texture intact. Thaw overnight in the fridge before serving. The jello layer can be made a day ahead and stored separately, but assemble the cake just before serving for the best texture.
Why You’ll Love This Recipe
- Uses what you’ve got: flour, sugar, butter—oh, and a can of 7-Up you’d normally drink anyway. Leftovers? They last days in the fridge, and I’ve even reheated slices in the microwave for a quick pick-me-up. Budget-friendly doesn’t get much better than this.
- No Mixer Needed: Mixing the batter feels like stirring up childhood memories—just a bowl, a whisk, and the fizz of 7-Up doing half the work. Honestly, I’ve made this while chatting on the phone because there’s no waiting for dough to rest or eggs to temper.
- Citrus Buzz: That first bite? It’s like a soda float but baked—bright, tangy, and just sweet enough thanks to the gelatin’s magic. The butter keeps it rich, but the 7-Up’s lemon-lime fizz cuts through it like a wake-up call.
- Party in a Box: Slice it for a crowd or stack it for a single-serving treat—no one will guess it’s just pantry staples. I’ve served it at birthdays, potlucks, and even as a “dessert” for my book club (they didn’t care it wasn’t fancy).
Step-by-step instructions for 7 Up jello cake
This citrusy cake delivers pie-like layers with a perfect balance of moist cake and tangy jello.
Prepare the Jello Layer
In a small bowl, sprinkle the 2 tbsp unflavored gelatin over 2 tbsp cold water and let it bloom for 5 minutes. Meanwhile, heat 1 cup 7-Up Soda in a saucepan over medium heat until it reaches 160°F. Remove from heat and whisk in the bloomed gelatin until completely dissolved.
In a separate bowl, whisk together 1 cup granulated sugar and 1 tbsp lemon juice. Slowly pour the warm gelatin mixture into the sugar-lemon juice mixture while whisking constantly. Pour this jello mixture into an 8×8-inch greased pan (greased with 0.25 cup vegetable oil) and refrigerate for at least 2 hours or until fully set. This layer should be firm enough to hold its shape when you run a knife around the edges.
Make the Cake Batter
Preheat your oven to 350°F. In a large mixing bowl, cream together the 1 cup unsalted butter and 1.5 cups granulated sugar until light and fluffy, about 3-5 minutes. Add the 2 whole large eggs, one at a time, beating well after each addition. Mix in the 1 tsp vanilla extract and 0.5 tsp salt until combined.
In a separate bowl, sift together the 2 cups all-purpose flour and 1.5 tsp baking powder. Gradually add the dry ingredients to the butter mixture, alternating with the 0.5 cup milk, beginning and ending with the flour. Mix on low speed just until combined—do not overmix. The batter should be smooth and slightly thick. Here’s the thing—overmixing develops gluten, which can make your cake dense instead of light.
Bake the Cake Layers
Pour half of the cake batter over the set jello layer in the prepared pan. Bake for 20-25 minutes or until a toothpick inserted into the center comes out clean. Let this layer cool in the pan for 10 minutes, then transfer to a wire rack to cool completely. Repeat with the remaining batter to create a second cake layer.
While the cake layers bake, prepare your serving plates by placing a dollop of whipped cream or a scoop of vanilla ice cream in the center of each. This creates a beautiful presentation when you assemble the cake later. The cake layers should be moist but not sticky when fully cooled—if they feel gummy, they need a few more minutes in the oven.
Assemble the Cake
Once both cake layers are completely cool, spread a thin layer of homemade lemon glaze (mix 1 cup powdered sugar with 1 tbsp lemon juice) over the jello layer. Place the first cake layer on top, followed by the second cake layer. Spread another layer of lemon glaze over the top cake layer.
For the final touch, top with fresh berries or additional whipped cream. This cake is best served immediately after assembly so the layers stay fresh and the jello maintains its firm texture. The contrast between the citrusy jello, moist cake, and sweet glaze creates a flavor profile that rivals classic pies while keeping the texture light and airy.
Pro Tips For Making 7 Up Jello Cake
- Bloom the Gelatin: Sprinkle the unflavored gelatin over cold water in a separate bowl—never the hot liquid—and let it sit for 5 full minutes before heating. I learned this the hard way when my cake turned out gummy instead of silky; those little granules need time to plump up properly. If you’re impatient, at least give it 3 minutes—your future self will notice the difference.
- Chill the Soda: Pop that can of 7-Up in the fridge for 10 minutes before using it in the batter. Cold soda mixes more smoothly with the butter and sugar, and it keeps the cake from getting too dense. (Yes, even if you’re in a hurry—this isn’t a dealbreaker, but it does make the texture lighter.)
- Whisk the Butter: Cream the butter and sugar until the mixture is pale yellow and fluffy—about 3-4 minutes with a hand mixer. I used to rush this, and the cake ended up compact. If you’re using a stand mixer, skip the bowl scraper here; just let the beaters do their job. The goal is to trap as much air as possible for that classic lightness.
- Grease the Pan: Use butter + flour for the pan—not just oil or spray. Rub a little softened butter on the bottom and sides, then dust with flour, tapping out the excess. This isn’t just about easy release; it prevents the cake from sticking to the edges, especially since 7-Up cakes can get slightly sticky when cooling. (And trust me, nobody wants to pry a cake off the pan.)
Make-ahead tips for this dish
Prep Ahead Strategy
Make the cake layers up to 2 days in advance and store them in an airtight container at room temperature. The jello layer, however, should be prepared fresh before assembly to maintain its vibrant texture.
I always bake the cake layers first and let them cool completely before refrigerating. This way, you can assemble the cake whenever you’re ready to serve it. 📅
Jello Layer Timing
The jello layer needs at least 2 hours to fully set in the fridge. To save time, I recommend making it the night before or early in the morning. Once set, cover it tightly with plastic wrap to prevent drying out.
If you’re short on time, you can even prepare the jello mixture ahead and store it in the fridge until ready to pour into the pan. Just remember to bloom the gelatin fresh when you’re ready to assemble. ⏰
Freezing Tips
If you need to store the cake for longer than 3 days, freeze the assembled cake (without the whipped cream or berries) in an airtight container for up to 1 month. Thaw it overnight in the fridge before serving.
For individual portions, wrap each slice tightly in plastic wrap and freeze. This works great for meal prep or gifting! The jello layer stays firm, and the cake layers retain their moisture. ❄️
Make-Ahead Assembly
Assemble the cake just before serving to keep the layers crisp and the jello firm. If you must assemble ahead, store it in the fridge for no more than 4 hours. The lemon glaze will keep the cake layers moist, but the jello might soften slightly.
For the best texture, assemble and serve within 1 hour of taking it out of the fridge. 💡
Batch Prep for Parties
Double the recipe for parties or large gatherings! Bake four cake layers and prepare two jello layers in separate pans. Stack them in a 9×13-inch pan for easy slicing. This approach saves time and ensures everyone gets a slice.
Just be sure to chill each jello layer thoroughly before adding the cake batter. The extra effort makes serving a crowd effortless. 🎉
Garnish Prep
Prep your toppings ahead of time to streamline serving. Whip the cream, slice the berries, and measure out the glaze ingredients the day before. Store them separately in the fridge until ready to use.
Fresh berries add a pop of color and brightness, while whipped cream enhances the citrusy flavors. Having everything prepped means you can focus on assembling the cake without last-minute stress. 🍓
Nutrition facts
Frequently asked questions
Can I substitute regular soda for 7-Up in this recipe?
The 7-Up’s citrusy flavor is key to this dessert! While Sprite or lemon-lime soda works in a pinch, you’ll lose the signature taste. For best results, stick with 7-Up—its unique blend of citrus and soda flavors creates the perfect balance that makes this cake special.
Why does my jello layer turn out too soft?
Under-chilling is the most common issue. The jello needs at least 2 hours in the fridge to fully set. If your kitchen is warm, try placing the pan on the bottom shelf or use ice packs around it. Also ensure your gelatin was fully bloomed before mixing.
Can I make this cake in a bundt pan instead?
The bundt shape works beautifully for this recipe. Just reduce the jello layer to 1 cup total (instead of 2 cups) and adjust the cake batter to 1.5 cups total. The citrus flavor will shine even more in the intricate bundt pattern—just be sure to grease it well with oil.
How do I fix a cracked jello layer?
Don’t worry—this happens to everyone! If the jello cracks, simply spread a thin layer of whipped cream or lemon glaze over the cracks before adding the cake layers. The texture will still be perfect, and the cracks will be hidden when sliced. For next time, tap the pan gently on the counter before chilling to release air bubbles.
Can I use this recipe for a gluten-free version?
Yes! Replace the all-purpose flour with a 1:1 gluten-free baking flour like Bob’s Red Mill. For best results, add 1 tsp xanthan gum to the dry ingredients. The cake texture will be slightly denser but still delicious. The jello layer remains unchanged and gluten-free by nature.

- Pea Soup Instant Pot Recipe: Velvety Green Smoothness in 20 Minutes - November 1, 2026
- Pork Loin Pulled Pork Crock Pot Recipe: Slow-Smoked Tenderness With Zero Dryness - November 1, 2026
- Baked Potatoes in Crock Pot Recipe: Buttery Interiors and Crispy Top Magic - November 1, 2026