
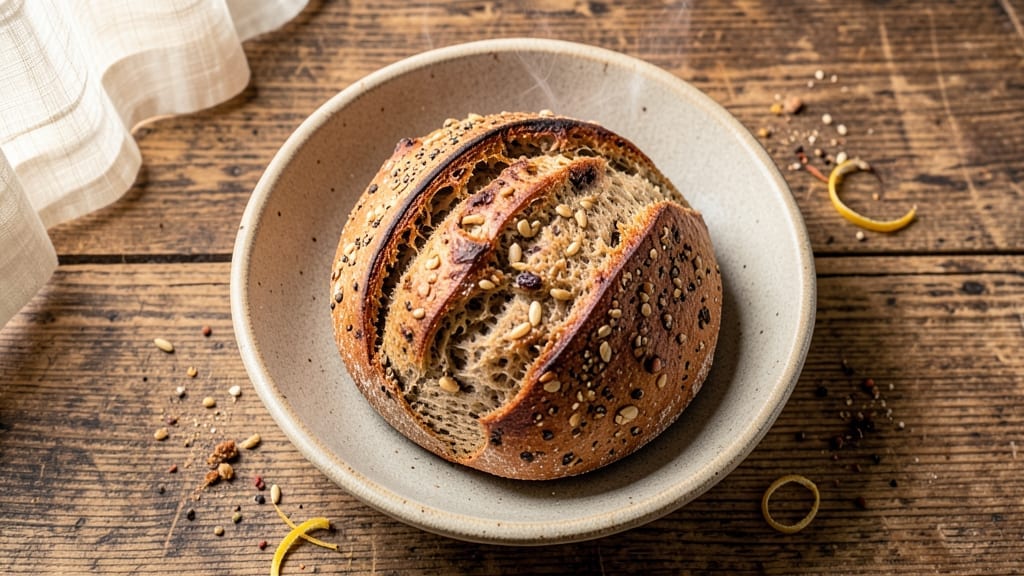
This 9-grain sourdough bread recipe delivers a loaf with crusty crunch and nutty depth that rivals artisanal bakeries. The blend of whole wheat, rye, barley, and six other grains creates a complex flavor profile and satisfying chew—perfect for sandwiches or toast.
What sets this recipe apart is the slow fermentation process, which develops rich, tangy notes while the grains soften the crumb just enough to stay tender.
The key to success lies in proper starter maintenance and precise dough handling. You’ll need an active sourdough starter (or instructions to create one) and a patient 24-hour cold proof to maximize flavor. The dough requires minimal kneading—just a few stretches and folds—but careful shaping ensures an even bake.
Baking at 425°F with steam creates that signature oven spring and crispy crust, while a sharp razor score prevents tearing.
What you’ll end up with is a golden-brown loaf with a shatteringly crisp crust and a crumb speckled with flecks of toasted grains. Each slice offers a mix of textures—crunchy on the outside, tender yet substantial in the middle—with a warm, earthy sweetness from the grains.
The tangy sourdough flavor balances the nuttiness, making every bite satisfying.
This recipe yields a full loaf that keeps well for 5-7 days at room temperature or frozen for up to 3 months. Perfect for daily bread, gifting, or sharing with fellow sourdough enthusiasts. Let’s get started on your next homemade masterpiece.
Ingredients for 9 grain sourdough bread
Nine distinct flours, one perfect loaf—this is your grain-powered sourdough masterpiece.
| Ingredient | Amount | Notes |
|---|---|---|
| Active Sourdough Starter 🍞 | ½ cup | 100% hydration, bubbly and active |
| All-Purpose Flour 🌾 | 2 cups | For structure and elasticity |
| Whole Wheat Flour 🌾 | 1 ½ cups | For nutty depth and texture |
| Rye Flour 🌾 | 1 cup | Dark rye for robust flavor |
| Barley Flour 🌾 | ½ cup | For chewiness and malt sweetness |
| Spelt Flour 🌾 | ½ cup | Lightly toasted for complexity |
| Buckwheat Flour 🌾 | ¼ cup | Rich, earthy flavor profile |
| Oat Flour 🌾 | ¼ cup | For tender crumb texture |
| Cornmeal 🌽 | ¼ cup | Fine grind for crust crunch |
| Amaranth Flour 🌾 | ¼ cup | For subtle nutty undertones |
| Granulated Sugar 🍚 | ¼ cup | Feeds starter and caramelizes |
| Diamond Crystal Kosher Salt 🧂 | 1 ½ tsp | Fine grain for even distribution |
| Cold Water 💧 | 3 ½ cups | Room temperature preferred |
| Cornstarch 🌽 | 1 tbsp | For dusting and scoring |
| Ice Cubes ❄️ | 1 cup | For cold proofing |
The grains are the heart of this recipe, so source them carefully. Bob’s Red Mill carries excellent whole-grain flours, but check the expiration dates—older flours lose their vitality. For rye and spelt, King Arthur Flour offers high-quality options that make a noticeable difference in flavor. Toast your whole grains lightly in a dry pan before grinding if possible—this enhances their nutty aromas. The buckwheat and amaranth flours are non-negotiable for that authentic artisanal depth, though you can substitute quinoa flour in a pinch if absolutely necessary. Store all flours in airtight containers away from light to preserve freshness.
No rye flour? Substitute with extra whole wheat plus 1 tsp caraway seeds for a similar depth. Running low on buckwheat? Increase the amaranth by 0.125 cup—it has a comparable earthiness. The cornmeal can be swapped for semolina if you prefer a finer texture, though it won’t toast as dramatically. For the starter, if yours isn’t active, feed it 1:1:1 (starter:flour:water) 4-6 hours before use. The sugar amount is crucial—too little and fermentation stalls; too much and the bread tastes sweet. Use turbinado sugar if you want additional crunch in the crumb.
Freshly milled flours yield the best results, but store-bought lasts 6-12 months in a cool, dark place. The cold proof is non-negotiable for flavor development—24 hours in the fridge is ideal, though you can extend to 48 hours for deeper tang. Wrap the shaped loaf in a floured cotton towel before baking to prevent drying. Leftovers keep 5-7 days at room temperature, though the crust stays crispest for the first 2 days. For longer storage, freeze the loaf fully cooled and toast directly from frozen.
Why You’ll Love This Recipe
- No-Fuss Mix-In: The rye and barley flours do all the work—just toss them in with the all-purpose and whole wheat, and your starter handles the rest. No fancy kneading, no waiting for hours; the dough comes together in a bowl while you sip your coffee.
- Earthy Crunch Magic: That rye flour? It’s the secret weapon—gives you a chewy, slightly nutty bite that’s way more interesting than plain white bread. Honestly, the first time I bit into a slice still warm, I nearly forgot to butter it.
- Weeknight Meal Savior: Toss a few slices in the toaster for breakfast, pack them for lunch, or use them to soak up soup broth—this bread does it all. My kids even ask for it plain (yes, really) because it’s that universally good.
- Pantry Stretch: You already have flour? Boom—this recipe uses what’s sitting there, no specialty ingredients needed. A single batch feeds my family for days, and the leftovers? Perfect for croutons or breadcrumbs when I’m too tired to bake.
Step-by-step instructions for 9-Grain sourdough bread
Mastering this complex dough requires patience and precision—here’s how to transform nine distinct flours into a bread with both structural integrity and unmatched depth.
Mix the Base Dough with Precision
In a large mixing bowl, combine the 0.5 cup active sourdough starter, 2 cups all-purpose flour, 1.5 cups whole wheat flour, 1 cup rye flour, 0.5 cup barley flour, 0.5 cup spelt flour, 0.25 cup buckwheat flour, 0.25 cup oat flour, 0.25 cup cornmeal, 0.25 cup amaranth flour, 0.25 cup granulated sugar, and 1.5 tsp diamond crystal kosher salt. The combination of these flours creates a complex flavor profile while maintaining structural balance.
Gradually add 3.5 cups cold water while mixing with a dough whisk or wooden spoon until you achieve a shaggy, sticky dough. The hydration level is intentionally high to develop maximum flavor and open crumb structure. You’ll notice the dough is much stickier than traditional sourdough—this is normal due to the high whole grain content. Mix until all dry ingredients are fully incorporated and no flour pockets remain.
Cold Proof for Optimal Fermentation
Transfer the dough to a lightly oiled bowl and cover tightly with plastic wrap. Place the bowl in the refrigerator and let it cold proof for 12-16 hours. This extended cold fermentation period allows the complex flours to fully hydrate and develop their distinct flavors while developing gluten structure gradually. The cold temperature slows fermentation, giving you more control over the final texture.
During this time, the dough will rise slowly and develop a slightly domed shape. You’ll notice bubbles forming on the surface and a subtle sour aroma developing. This is when the unique characteristics of each grain begin to emerge—rye’s malty notes, buckwheat’s earthiness, and amaranth’s nutty undertones. The cold proof creates a more open crumb structure and enhances the bread’s keeping qualities.
Shape and Final Proof at Room Temperature
Remove the dough from the refrigerator and turn it onto a lightly floured surface. Gently shape it into a round boule or oval batard, keeping the tension even throughout. The dough will be quite sticky, so use wet hands and additional flour only as needed. The shaping helps develop gluten structure and creates the signature sourdough shape. Handle the dough gently to avoid over-developing the gluten, which could make the crumb too tight.
Place the shaped dough seam-side up in a lightly oiled proofing basket or bowl. Cover with a damp towel and let it proof at room temperature for 2-3 hours until it has risen by about 50%. You’ll know it’s ready when the dough springs back slowly when poked and has developed a slightly jiggly surface. The combination of cold and warm fermentation creates the perfect balance between open crumb and chewy texture.
Score and Bake for Maximum Crust Development
Preheat your oven to 450°F with a Dutch oven inside for at least 45 minutes. The Dutch oven creates a steam environment that’s crucial for developing the bread’s signature crust and open crumb. While the oven preheats, lightly dust the dough with 1 tbsp cornstarch and use a sharp razor blade to score the top in a decorative pattern. This not only looks beautiful but also controls where the dough expands during baking.
Carefully transfer the scored dough to the hot Dutch oven using a peel or parchment paper. Bake covered for 20 minutes, then remove the lid and bake uncovered for an additional 20-25 minutes until the bread reaches an internal temperature of 205-210°F and develops a deep golden brown crust. The bread should sound hollow when tapped on the bottom. The complex grain blend creates a beautiful contrast between the crisp crust and open, airy crumb.
Cool and Slice for Optimal Texture
Remove the bread from the Dutch oven and transfer it to a wire rack to cool completely. This cooling process is crucial—rushing it will result in a gummy crumb. The bread will continue to develop its final texture and flavor as it cools. The crust should be crisp and shatterable, while the interior should have an open, irregular crumb with pockets of air created by the diverse grain combination.
Once completely cool, slice the bread with a serrated knife. The complex grain blend creates a beautiful marbled appearance in each slice, with visible specks of whole grains throughout. The flavor should be a harmonious blend of sweet, nutty, malty, and slightly earthy notes, with a satisfying chewiness that comes from the combination of whole grains. Store any leftovers wrapped in a bread bag at room temperature for up to 3 days, or freeze for longer storage.
Pro Tips For Making 9 Grain Sourdough Bread
- Mix the Flours First: Mix your all-purpose, whole wheat, rye, and barley flours together before adding the starter. I learned this the hard way—when I tossed in the starter first, the rye and barley clumped like concrete, making the dough impossible to handle. A quick 5-minute mix with your hands (or a fork) ensures everything blends evenly.
- Weigh Your Starter Precisely: Use a scale for your active sourdough starter—no eyeballing. That 10% starter-to-flour ratio matters, especially with dense flours like rye and barley. I once added too much starter by guesswork, and the bread turned out gummy and underproofed. A little extra effort here saves a lot of frustration later.
- Autolyse for 30 Minutes: Let the flour and water sit alone for 30 minutes before adding salt and starter. This step hydrates the flours thoroughly, making the final dough smoother and easier to shape. I skipped it early on, and the dough felt like glue—now I never do.
- Steam the Oven Properly: Place a metal tray on the oven rack before preheating, then add a handful of ice cubes or spray water when loading the loaf. The steam mimics a bakery environment, giving you that crackly crust without burning the bread. I tried baking it dry once—big mistake. The crust came out hard and pale.
Troubleshooting your 9 grain sourdough bread
Sticky Dough Solutions
That ultra-sticky dough is normal with nine whole grains, but don’t let it frustrate you! Wet your hands thoroughly and use a dough scraper to handle it—this prevents sticking better than extra flour.
I keep a spray bottle of water nearby to dampen surfaces as needed. The key is working quickly but gently to maintain gluten structure without tearing. 💧
Uneven Rise Fixes
If your dough rises unevenly during cold proof, try this: divide it into two bowls and proof separately. The high whole grain content can cause uneven fermentation. Also, ensure your starter is at peak activity—it should float in water before mixing.
For stubborn cases, extend the cold proof to 24 hours to let flavors develop fully.
Dense Crumb Prevention
A dense crumb often means over-kneading or under-proofing. Handle the dough minimally—just a few stretch-and-folds during the cold proof. If your loaf still feels heavy after baking, try increasing the warm proof time by 30 minutes or adding 1 tbsp vital wheat gluten to strengthen the structure.Scoring Problems
Scoring too late or with a dull blade causes uneven expansion. Always score when the oven is fully preheated and just before baking. Use a sharp X-Acto knife or new razor blade—dull tools tear the dough instead of cleanly cutting.
For extra crispness, brush the scored dough with water before baking to enhance steam development. ✨
Pale Crust Troubles
If your crust stays pale, increase oven temperature to 475°F for the final 10 minutes of baking. The steam from the Dutch oven might be too intense—try baking uncovered for the last 15 minutes instead. For extra color, sprinkle 1 tsp cornmeal on the scored dough before baking.
Storage Solutions
This bread dries out faster due to the whole grains. Store wrapped in a beeswax wrap or inside a bread box to maintain moisture. For longer freshness, freeze slices in a ziplock bag with parchment paper between layers. Toast frozen slices directly from the freezer for maximum crispness. 🌾
Nutrition facts
Frequently asked questions
Can I substitute any of the grains in this 9-grain sourdough?
Yes, but with care! The rye and buckwheat are most critical for flavor—substitute rye with extra whole wheat plus 1 tsp caraway seeds for depth. For buckwheat, use quinoa flour in equal amounts. The oat and cornmeal can be swapped for semolina or rice flour if needed. Always maintain the total 4.5 cups of flour to keep hydration balanced.
How do I know when my sourdough starter is ready for this recipe?
Your starter should be bubbly, domed, and pass the float test—drop a spoonful in water and it should float within 5-10 minutes. If it’s sluggish, feed it 1:1:1 (starter:flour:water) 4-6 hours before mixing. The 0.5 cup called for is 100% hydration, so adjust if yours is different (e.g., for 70% hydration, use 0.35 cup instead).
Why is my dough so sticky? Can I add more flour?
The high whole grain content creates natural stickiness—this is normal! Avoid adding extra flour as it weakens gluten structure. Instead, wet your hands and use a dough scraper to handle it. Keep a spray bottle nearby to dampen surfaces. The dough should be sticky but manageable—if it’s too wet, add 1 tbsp vital wheat gluten to strengthen it.
Can I bake this without a Dutch oven?
Yes, but expect a denser crumb and less crispy crust. Use a baking steel or place the dough on a preheated baking sheet lined with parchment. Create steam by spraying the oven walls with water when loading the dough, then bake at 425°F for 5-10 minutes covered with foil before uncovering. The crust won’t be as shatterable, but the flavor will still be excellent.
How do I store leftovers to keep them fresh?
Wrap cooled slices in beeswax wrap or store in a bread box at room temperature for 2-3 days. For longer storage, freeze slices in a ziplock bag with parchment between layers. Toast directly from frozen for maximum crispness. The whole grains dry out faster, so avoid plastic bags which trap moisture and cause sogginess.

- Baked Potatoes in Crock Pot Recipe: Buttery Interiors and Crispy Top Magic - November 1, 2026
- Braised Beef Short Ribs Recipe: Crock Pot Fall-Off-Bone Magic in 6 Hours - November 1, 2026
- Crock Pot Cocoa Recipe: Velvety Warmth With Hidden Spice Magic - November 1, 2026