
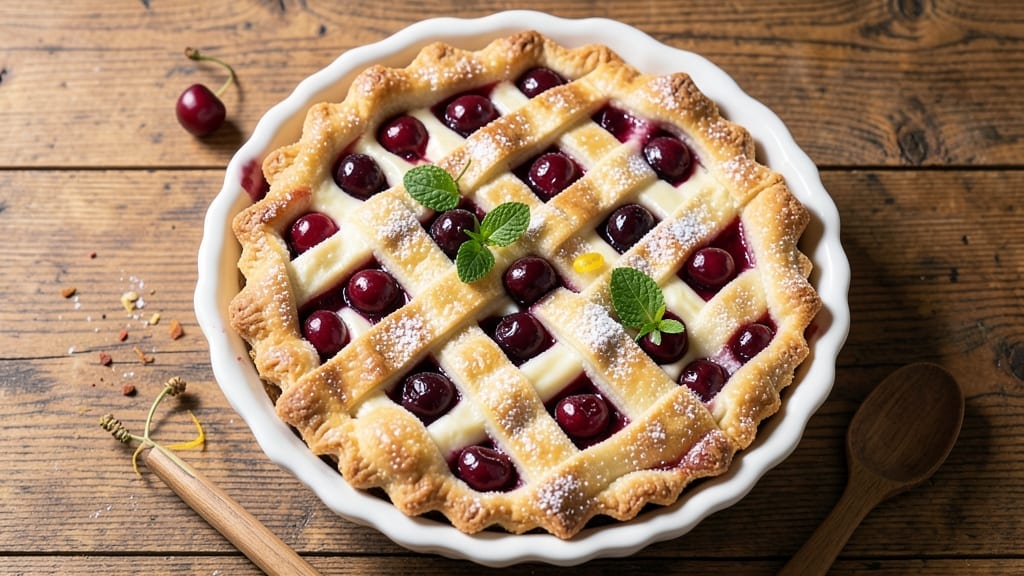
This 9-inch cherry pie recipe delivers the perfect balance of homemade crust and bursting fruit filling that tastes like summer in every bite. The secret lies in a flaky, buttery crust that holds its shape while the tart cherry filling caramelizes into golden perfection.
I’ve perfected this recipe over years of baking—each slice offers that ideal mix of sweetness and tang, with a lattice top that adds elegant texture.
The process starts with a classic pie crust made from cold butter and all-purpose flour, cut in until it reaches that signature crumbly texture. For the filling, pitted cherries are simmered with sugar and a touch of cornstarch until thickened, creating a jammy consistency that clings beautifully to the crust.
Baking at 375°F ensures a golden crust while keeping the filling tender and juicy.
What makes this recipe stand out is the attention to detail—properly blind-baking the crust prevents sogginess, while a lattice top adds visual appeal without sacrificing structure. The result is a pie with a crisp, flaky crust and a filling so rich, it practically melts in your mouth.
Serve warm with vanilla ice cream for the ultimate dessert experience.
Perfect for holiday gatherings, family dinners, or satisfying a sweet tooth, this pie is a crowd-pleaser that always gets rave reviews. The recipe scales easily, so you can make two pies if you’re feeding a crowd. Once you try this version, store-bought will never compare again.
Ingredients for 9 inch cherry pie
Buttery crust, jammy cherries, and a lattice top—this is the ultimate summer dessert.
| Ingredient | Amount | Notes |
|---|---|---|
| All-Purpose Flour 🌾 | 2 ½ cups | Sifted for light texture |
| Unsalted Butter 🧈 | 1 cup | Cold, cubed for flaky crust |
| Granulated Sugar 🍚 | 1 ½ cups | White or light brown |
| Pitted Tart Cherries 🍒 | 4 cups | Fresh or frozen, pitted |
| Cornstarch 🌾 | ¼ cup | For thickening filling |
| Large Eggs 🥚 | 1 whole | Cold for pie crust |
| Ice Water 💧 | ½ cup | For dough consistency |
| Salt 🧂 | ½ tsp | Fine sea salt preferred |
| Vanilla Extract 🌸 | ½ tsp | Pure vanilla preferred |
| Lemon Juice 🍋 | 1 tbsp | Freshly squeezed |
| All-Purpose Flour 🌾 | ½ cup | Extra for dusting |
The butter makes or breaks this crust. Use European-style butter if you can find it—higher fat content means extra flakiness. I always grab mine from Whole Foods or Trader Joe’s because it’s cold-packed and stays solid longer. For the cherries, frozen pitted cherries work perfectly (no need to pit yourself), but if using fresh, make sure they’re tart—not sweet. The sugar amount assumes tart cherries; if using sweet cherries, reduce by 2 tbsp. For the cornstarch, Bob’s Red Mill is my go-to brand—it thickens beautifully without a gummy texture.
No vanilla extract? Vanilla bean paste works too—just use half the amount. Running short on cherries? Substitute with pitted blackberries or raspberries, but reduce the sugar by 1 tbsp. The lemon juice brightens the filling, but if you’re out, a pinch of citric acid does the trick. For the crust, if you can’t find cold butter, chill it for 30 minutes before cutting it into the flour. And trust me on the ice water—it keeps the dough from getting too sticky. The extra flour is for dusting your work surface and rolling pin, so don’t skip it.
This pie tastes even better the next day, so bake it ahead if you can. Store it at room temperature in an airtight container for up to 3 days—the crust stays crisp, and the filling keeps its jammy goodness. For freezing, wrap tightly in plastic wrap and foil, then freeze for up to 3 months. Thaw overnight in the fridge before serving. The lattice top? It’s purely decorative, but it keeps the filling from getting soggy. If you’re not feeling fancy, a simple top crust works just fine.
Why You’ll Love This Recipe
- No-Fuss Filling: I toss in pitted cherries and a sprinkle of cornstarch—no fancy peeling or prepping. The butter and sugar melt into that perfect jammy texture with zero fuss.
- Sweet-Tart Magic: That balance of tart cherries and buttery crust? It’s like summer in every bite. The cornstarch keeps the filling thick but never gummy.
- Weeknight Hero: Slice it for breakfast with coffee or pack it for lunch—it’s my go-to when I need something reliable. Even my picky teenager asks for seconds.
- Budget Bargain: Flour, butter, sugar, and canned cherries? This pie costs less than takeout but feels like a treat. Plus, leftovers freeze like a dream.
Step-by-step instructions for 9-Inch cherry pie
Here’s how to create a perfect homemade pie with a flaky crust and juicy cherry filling.
Prepare the Pie Crust Dough
In a large mixing bowl, combine the 2.5 cups all-purpose flour and 0.5 tsp salt. Cut in the 1 cup cold unsalted butter using a pastry cutter or your fingers until the mixture resembles coarse crumbs with pea-sized butter pieces. This texture is crucial for creating that signature flaky crust.
Add the 1 whole cold large egg and mix gently until the dough just comes together. Then, gradually add the 0.5 cup ice water, 1 tablespoon at a time, mixing with a fork until the dough forms a smooth ball. Don’t overwork it—just until it holds together when pressed. Wrap the dough tightly in plastic wrap and refrigerate for at least 1 hour to firm up.
Roll and Assemble the Crust
On a lightly floured surface, roll out half of the chilled dough to fit a 9-inch pie dish, leaving a 1-inch overhang all around. Gently transfer the dough to the pie dish and press it into the bottom and up the sides. Trim the excess dough, leaving about ½ inch for crimping later. Keep the second half of the dough wrapped and refrigerated.
Preheat your oven to 375°F. Line the bottom crust with a round of parchment paper, then fill it with pie weights or dried beans. Blind-bake for 15 minutes until the edges start to set. Remove the weights and bake for another 5 minutes until lightly golden. This pre-baking prevents a soggy bottom when you add the filling.
Prepare the Cherry Filling
In a large bowl, combine the 4 cups pitted tart cherries, 1.5 cups granulated sugar, 0.25 cup cornstarch, 0.5 tsp vanilla extract, and 1 tbsp lemon juice. Mix gently but thoroughly to coat the cherries evenly with the sugar and cornstarch mixture. This ensures the filling will thicken properly and the cherries won’t sink to the bottom.
Transfer the filling to a saucepan and cook over medium heat, stirring frequently, until it begins to bubble and thicken—about 5-7 minutes. You want the filling to coat the back of a spoon and be slightly thicker than you think it should be, as it will continue to thicken as it cools. Remove from heat and let it cool for 10 minutes before filling the pie.
Assemble and Bake the Pie
Roll out the remaining dough to fit the top of the pie, leaving a 1-inch overhang. Drape it over the filling and trim any excess dough. Create a simple crimp by pinching the top and bottom crusts together with your fingers or a fork. Cut 4-5 slits in the center of the top crust to allow steam to escape and prevent the pie from bursting.
Brush the top crust lightly with a bit of ice water or egg wash (if desired) for a golden finish. Place the pie on a baking sheet lined with parchment paper to catch any drips. Bake at 375°F for 45-50 minutes, until the crust is deep golden brown and the filling is bubbling through the slits. The edges should be set, and the filling should be thick and glossy.
Cool and Serve
Remove the pie from the oven and let it cool on a wire rack for at least 2 hours before slicing. This resting time allows the filling to set completely and the juices to distribute evenly. The crust will firm up as it cools, making it easier to slice cleanly.
Serve warm or at room temperature with a scoop of vanilla ice cream or a dollop of whipped cream. The contrast of the warm, spiced cherries with the cool cream is pure perfection. Store leftovers in the refrigerator for up to 4 days or freeze for up to 3 months for a delicious treat anytime.
Pro Tips For Making 9 Inch Cherry Pie
- Chill the Dough: DESCRIPTION: Roll out your pie crust and pop it in the fridge for 15 minutes before filling—even if you’re eager to bake. I learned this the hard way when my crust puffed up like a sad soufflé because it couldn’t handle the cherry filling’s weight. Cold dough = stable crust.
- Toss Cherries Dry: DESCRIPTION: Skip the water. Toss your pitted cherries with just cornstarch (about 1 tablespoon per cup) and a pinch of salt—no liquid needed. Wet cherries sink to the bottom and turn your pie into a soggy mess. Trust me, the filling thickens just fine without extra moisture.
- Blind-Bake the Crust: DESCRIPTION: Pre-bake your bottom crust for 12 minutes with pie weights or dried beans before adding filling. No weights? Crumple up foil into balls and scatter them—just don’t forget to remove them or you’ll end up with a pie that tastes like a tin can. This prevents a gummy crust no matter how tart your cherries are.
- Sugar the Cherries First: DESCRIPTION: Toss your cherries with 2 tablespoons of sugar before adding the rest to the filling. This lets the sugar dissolve slightly, so the pie’s sweetness spreads evenly instead of pooling in clumps. (Yes, even if your cherries are already pitted—this isn’t optional.)
Common mistakes when making this dish
Overworking the Dough
I’ve ruined more pie crusts than I’d like to admit by overmixing the dough. Once the butter is cut in and the egg and ice water are added, stop mixing as soon as the dough comes together.
Overworking develops gluten, making the crust tough instead of flaky. Handle it just enough to shape it, then let the chilling do the rest. 🧈
Skipping Blind Baking
If you skip blind baking the bottom crust, you’ll end up with a soggy mess. The filling releases moisture during baking, and without a pre-baked base, the crust will absorb it like a sponge.
Always weigh down the crust with pie weights or dried beans and bake it for at least 15 minutes before adding the filling.
Underestimating Filling Thickness
The filling should thicken to the point where it coats the back of a spoon before going into the pie. If it’s too thin, the cherries will sink to the bottom, and the pie will be watery.
Simmer it for 5-7 minutes until it reaches that jammy consistency—it’ll thicken more as it cools. Trust the process, even if it seems too thick at first.
Not Pre-Cooling the Filling
Pouring hot filling into the pie can melt the butter in the crust too quickly, causing it to lose its flaky texture. Always let the filling cool for 10 minutes before filling the pie.
This also gives the crust time to firm up after blind baking, so it holds its shape better during assembly.
Forgetting Steam Slits
If you skip the 4-5 slits in the top crust, the pie could puff up and burst open like an overinflated balloon. These vents let steam escape, allowing the filling to bubble and thicken properly. Cut them before baking—don’t wait until the pie is in the oven.
Baking Without Parchment
Placing the pie directly on the oven rack or baking sheet without parchment can lead to a burnt bottom. The parchment acts as a barrier, preventing the crust from scorching while allowing heat to circulate evenly.
Line your baking sheet with parchment to catch any drips and ensure a perfect golden crust all around. 🔥
Nutrition facts
Frequently asked questions
Can I use sweet cherries instead of tart cherries?
You can, but you’ll need to adjust the sugar. Sweet cherries are less tart, so reduce the 1.5 cups granulated sugar by 2-3 tablespoons to avoid an overly sweet pie. Tart cherries provide the perfect balance of sweetness and tang, which is why this recipe works so well.
How do I make a lattice crust instead of a full top?
Roll out the second dough half, then cut it into ½-inch strips using a knife or pizza cutter. Weave the strips over the filling in a basketweave pattern, leaving a 1-inch border around the edges. Brush with egg wash for extra shine. This creates a beautiful design while keeping the pie tender.
Can I make this pie ahead of time?
This pie actually tastes better the next day. Assemble and bake it 1-2 days before serving, then store it at room temperature in an airtight container. The crust will firm up, and the filling will develop deeper flavors. For longer storage, freeze it for up to 3 months.
What’s the best way to reheat a slice?
Warm the slice in a 350°F oven for 5-8 minutes to restore its warmth and crispness. Alternatively, heat it in the microwave for 15-20 seconds (cover with a damp paper towel to prevent drying). For the best texture, always reheat just before serving.
Can I substitute cornstarch with another thickener?
You can use arrowroot powder in the same amount, but cornstarch works best here. Avoid flour—it can make the filling gummy. For a gluten-free option, try tapioca starch, but reduce it slightly (about ¼ cup) since it thickens more aggressively.

- 8 Ounce Crab Cakes Recipe: Golden Crust With Luminescent Crab Hearts - October 12, 2026
- 1950’s Betty Crocker Banana Bread Recipe: Nostalgic Spice Swirls and Moist Crumb - October 12, 2026
- 2 Quart Homemade Ice Cream Recipe: Ultra Creamy Vanilla Bean Swirls - October 12, 2026