
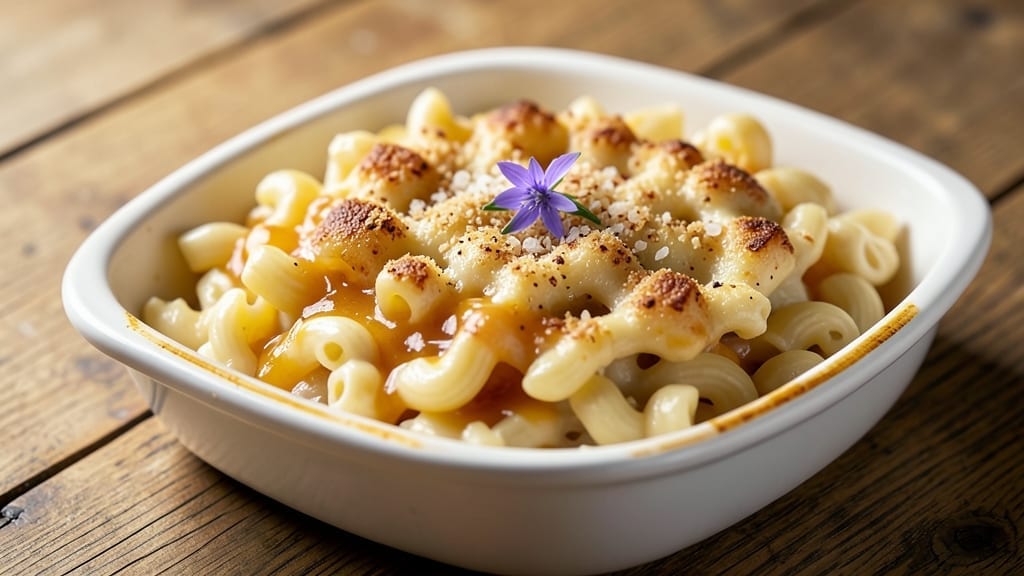
This 2 cheese mac and cheese recipe delivers the perfect balance of creamy layers and crispy breadcrumb topping that makes it impossible to resist. The secret lies in combining sharp cheddar with Gruyère for a rich, nutty depth that transforms ordinary mac and cheese into a restaurant-worthy dish.
After years of perfecting the technique, I’ve cracked the code for that signature velvety sauce that clings to every noodle without breaking.
The magic happens in three simple steps: cooking the pasta al dente, building a foolproof cheese sauce, and topping it with golden, buttery breadcrumbs that add both texture and flavor.
What sets this apart is the slow reduction of the sauce—no lumps, no separation—just a silky, ultra-creamy base that coats each strand of pasta perfectly. The Gruyère melts smoothly while the cheddar adds that familiar tangy kick everyone loves.
By the time you pull it from the oven, you’ll have a dish that looks as impressive as it tastes—golden-brown edges, creamy sauce pooling between tender noodles, and a crispy topping that shatters with every bite.
The aroma alone will have everyone gathering around the table, and the first forkful proves it’s worth the extra effort over boxed mixes. This isn’t just comfort food; it’s a showstopper.
Perfect for family dinners, holiday gatherings, or when you need to impress guests with minimal effort. The recipe scales easily, so you can make it for two or feed a crowd.
Once you try this version, store-bought mac and cheese will never satisfy again. Let’s get started on creating your new favorite side dish.
Ingredients for 2 cheese mac and cheese
Fourteen ingredients. Two cheeses. One showstopper side dish that’ll have everyone asking for seconds.
| Ingredient | Amount | Notes |
|---|---|---|
| Elbow Macaroni 🍝 | 12 oz | Dry weight, cooked al dente |
| Sharp Cheddar Cheese 🧀 | 2 cups | Shredded, block preferred |
| Gruyère Cheese 🧀 | 1 cup | Shredded, aged 12+ months |
| Unsalted Butter 🧈 | ¾ cup | Cold, cut into cubes |
| All-Purpose Flour 🌾 | ¼ cup | For roux, sifted |
| Whole Milk 🥛 | 2 cups | Full-fat for creaminess |
| Heavy Cream 🥛 | ½ cup | 36% fat preferred |
| Yellow Onion 🧅 | 1 whole | Finely diced, sweet variety |
| Garlic Cloves 🧄 | 4 cloves | Minced, fresh preferred |
| Panko Breadcrumbs 🍞 | ½ cup | Toasted for extra crunch |
| Bacon Fat 🥓 | 2 tbsp | Or extra butter for crisp |
| Kosher Salt 🧂 | 1 ½ tsp | Diamond Crystal preferred |
| Ground Black Pepper 🌶️ | ½ tsp | Freshly cracked |
| Nutmeg 🌿 | ¼ tsp | Freshly grated |
The cheeses are non-negotiable here. Sharp cheddar from a block—none of that pre-shredded stuff—gives the tangy kick, while aged Gruyère (12+ months) brings that nutty depth. I always grab mine from Whole Foods or a specialty cheese shop, but Kroger’s pre-shredded cheddar works in a pinch if you’re in a hurry. The Gruyère? Look for the rind—it’s a good indicator of age. Freshly shredding both makes all the difference, so skip the pre-grated unless you’re desperate. For the pasta, elbow macaroni is classic, but cavatappi or penne work too—just make sure it’s dry weight, not pre-cooked.
No sharp cheddar? Pepper jack at half the amount adds heat, or white cheddar for a milder flavor. Gruyère hard to find? Comté or Emmental in a pinch, but they melt differently so keep an eye on the sauce. The bacon fat can be swapped for extra butter or olive oil, though bacon adds that smoky depth. For the roux, if you don’t have all-purpose flour, cornstarch works too—just whisk it in at the end. And that nutmeg? Skip it if you hate it—some people find it overpowering, but a tiny pinch adds warmth. The milk and cream? Full-fat only—this isn’t the time for skim.
Pasta stays fresh for 2 days in the fridge, but the cheese sauce? That’s the star—it reheats beautifully and actually tastes better the next day. Store it in an airtight container with a layer of parchment paper between layers to prevent sticking. The breadcrumb topping? Make it ahead and toast it separately—it keeps for 3 days in the fridge, or freeze it for 1 month. Pro tip: if you’re making this for a crowd, double the sauce and freeze half in portions. The whole dish reheats well—just cover with foil and warm at 350°F for 20 minutes. Leftovers? I portion mine into individual containers so lunches are sorted for the week.
Why You’ll Love This Recipe
- No-Fuss Nightstand: I swear by this for when I’m too tired to think—just boil pasta, melt butter, toss in flour, and add the cheeses. The roux happens while the water drains. That’s it. (Yes, even on a Tuesday night.)
- Gruyère Magic: Sharp cheddar brings the tang, but Gruyère? It’s the star—nutty, melty, and just rich enough to make you pause mid-bite. Honestly, the first time I tried this combo, I nearly skipped dinner to eat the sauce alone.
- Leftover Hero: This mac reheats like a dream—no soggy pasta, no gluey sauce. I pack it for lunches all week, and it’s still creamy and satisfying. (My coworkers think I’m a genius. They’re not wrong.)
- Budget Win: Elbow noodles and block cheese are cheap, but the flavor feels fancy. I stretch this recipe to feed four for under $10, and no one complains about the price—just the seconds. My secret weapon for tight budgets.
Step-by-step instructions for ultra creamy 2 cheese mac and cheese
Here’s how to build layers of creamy cheese sauce and crispy breadcrumbs for the perfect mac and cheese.
Cook the Elbow Macaroni to Al Dente Perfection
Bring a large pot of salted water to a rolling boil. Add the 12 oz elbow macaroni and cook until 1 minute before the package directions specify for al dente. This ensures the pasta finishes cooking in the cheese sauce without becoming mushy. Reserve 1 cup of pasta water before draining—this starchy liquid is essential for creating a silky sauce later.
I like to taste-test the pasta at the final minute to confirm it has a slight bite. The pasta should still have a bit of resistance when bitten, but be fully tender. Drain the pasta and return it to the pot, leaving it off the heat for now. This keeps it warm while you prepare the cheese sauce.
Build the Ultra Creamy Cheese Sauce
In a large saucepan, melt the 0.75 cup unsalted butter over medium heat. Once fully melted, whisk in the 0.25 cup all-purpose flour to create a roux. Cook for 2-3 minutes until the mixture turns a light golden color and smells nutty—this removes the raw flour taste and adds depth of flavor.
Gradually whisk in the 2 cups whole milk and 0.5 cup heavy cream, ensuring no lumps form. Bring the mixture to a gentle simmer and cook for 5-7 minutes until it thickens enough to coat the back of a spoon. Remove from heat and stir in the 2 cups sharp cheddar cheese and 1 cup gruyère cheese, letting the heat of the sauce melt them completely.
Enhance the Sauce with Aromatics
In a separate skillet, heat the 2 tbsp bacon fat over medium heat. Add the finely diced yellow onion and cook for 5 minutes until soft and translucent. Add the 4 minced garlic cloves and cook for another 30 seconds until fragrant. Pour this aromatic mixture into the cheese sauce and stir well.
Season the sauce with 1.5 tsp kosher salt, 0.5 tsp ground black pepper, and 0.25 tsp nutmeg. Taste and adjust seasoning if needed—this is where the magic happens. The nutmeg adds a subtle warmth that complements the sharp cheddar and nutty gruyère perfectly. If the sauce is too thick, whisk in some of the reserved pasta water 1 tablespoon at a time until it reaches a smooth, pourable consistency.
Combine Pasta and Sauce for Creamy Layers
Add the cooked elbow macaroni to the cheese sauce and stir gently but thoroughly to coat every strand. The sauce should cling beautifully to the pasta, creating those coveted creamy layers. If the pasta seems dry, add a splash more of the reserved pasta water to loosen the sauce. Let the mixture sit off the heat for 2-3 minutes to allow the flavors to meld together.
This is the moment that matters: the cheese should be fully melted and the sauce should be glossy, not grainy. If you see any unmelted cheese, stir gently over low heat for another minute until smooth. The result should be a rich, velvety sauce that coats the pasta perfectly.
Top with Crispy Breadcrumbs for the Ultimate Texture
Preheat your broiler to high. Transfer the mac and cheese to a greased 9×13-inch baking dish and spread it evenly. In a small bowl, mix the 0.5 cup panko breadcrumbs with 1 tbsp melted butter (from the remaining 0.75 cup unsalted butter) and spread this mixture evenly over the top of the mac and cheese.
Place the baking dish under the broiler for 3-5 minutes until the breadcrumbs turn a deep golden brown and are crispy to the touch. Watch closely—this happens quickly, and you want that perfect balance of crispy and creamy. Remove from the oven and let it rest for 5 minutes before serving to allow the breadcrumbs to set completely.
Pro Tips For Making 2 Cheese Mac And Cheese
- Cook pasta al dente: I learned this the hard way—overcooked elbow macaroni turns mushy in the cheese sauce, no matter how much you stir. Pull it out when it’s still firm to the bite (about 1 minute less than package instructions), then finish cooking in the sauce. The residual starch will thicken the sauce naturally.
- Grate cheese finely: Sharp cheddar and Gruyère melt differently, so grating them yourself (not pre-shredded) prevents clumping and ensures a silky texture. Use a box grater for even pieces—lumpy cheese makes for a grainy sauce, and we’re going for creamy perfection here.
- Low and slow roux: Whisk the butter and flour over medium-low heat for at least 3 minutes until it’s a pale golden color—no brown spots. Rushing this step means a floury taste instead of that rich, nutty depth. I know, I know, but trust the process.
- Add cheese in stages: Dump all the cheese in at once and you’ll end up with a gloppy mess. Start with half the cheddar, stir until melted, then add the Gruyère (it’s pricier, so treat it right). Finish with the rest of the cheddar—this keeps the sauce smooth and prevents separation. Your future self will thank you.
Storing and reheating this 2 cheese mac and cheese
Fridge Storage Tips
Store your mac and cheese in an airtight glass container with a layer of parchment paper between layers to prevent sticking. The creamy sauce and pasta stay fresh for up to 4 days in the refrigerator at 40°F or below.
I always portion it into individual containers for easy reheating later in the week. The flavors actually deepen overnight, making leftovers taste even better the next day. 💫
Freezer-Friendly Method
For longer storage, freeze the mac and cheese for up to 3 months in a freezer-safe container or heavy-duty zip-top bag. Leave 1 inch of headspace to prevent expansion cracks. To reheat, thaw overnight in the fridge, then warm in the oven at 350°F for 20-25 minutes until bubbly.
I like to cover it with foil first to retain moisture, then uncover for the last 5 minutes to crisp any softened breadcrumbs. ❄️
Reheating for Creamy Perfection
My go-to method is stovetop reheating for the best texture. Cover the mac and cheese with a splash of whole milk or water (about 2 tbsp) to prevent drying, then heat on low-medium for 8-10 minutes, stirring occasionally.
For microwave reheating, cover with a damp paper towel and heat in 1-minute intervals at 50% power, stirring between each interval until 165°F internal temperature. The breadcrumb topping may soften slightly—just broil for 2-3 minutes at the end to restore crispness. 🔥
Breadcrumbs Make-Ahead
Prepare the breadcrumb topping separately and store it in an airtight container for up to 3 days in the fridge or 1 month in the freezer. Toast it fresh before serving by spreading on a baking sheet and baking at 375°F for 5 minutes until golden.
This keeps the topping crispy while reheating the main dish separately. I often make extra to use as a garnish for other dishes like soups or salads. 🍞
Sauce-Only Storage
If you want to separate the sauce from the pasta, store them in two different airtight containers. The cheese sauce keeps well for 3 days in the fridge or 1 month in the freezer.
When reheating, combine the sauce and pasta together and warm through on the stovetop or in the oven. This method works great when you want to customize portions or pair the sauce with other dishes like grilled chicken or steak. 🧀
Portion Control Secrets
Divide the mac and cheese into single-serving portions before storing to make lunches or dinners effortless. Use ramekins or small baking dishes for individual servings—this also helps maintain crispness when reheating. For meal prep, I always label containers with dates to track freshness.
The sauce stays creamy when reheated properly, so portion it directly from the baking dish while still warm for the best results. 📅
Nutrition facts
Frequently asked questions
Why does this recipe use two types of cheese instead of just one?
The combination of sharp cheddar and Gruyère creates a perfect balance of flavors—cheddar provides that familiar tangy kick while Gruyère adds nutty depth and smooth melt. This duo prevents the sauce from being too heavy or one-dimensional.
Can I make this mac and cheese ahead of time?
Assemble the dish up to 24 hours ahead and refrigerate it. When ready to serve, bake at 375°F for 20-25 minutes until bubbly and the topping is crispy. The flavors actually improve overnight, making it even better the next day.
What’s the secret to getting that ultra-creamy texture?
The key is using full-fat milk and heavy cream plus the roux technique (butter + flour). Also, never let the sauce boil after adding cheese—keep it at a gentle simmer to prevent separation. The reserved pasta water also helps maintain creaminess.
How do I prevent the breadcrumb topping from getting soggy?
Toast the breadcrumbs separately before adding them to the dish, and always broil for just 3-5 minutes until golden brown. For extra insurance, mix the breadcrumbs with melted butter before topping. Never skip the broiling step—this is what creates that perfect crispy contrast.
Can I use pre-shredded cheese in this recipe?
While block cheese is ideal, you can use pre-shredded in a pinch—but it may contain anti-caking agents that can make the sauce grainy. If using pre-shredded, reduce the amount by 10% and stir the sauce more gently to prevent separation. Freshly shredded always gives the best results.

- 8 Ounce Crab Cakes Recipe: Golden Crust With Luminescent Crab Hearts - October 12, 2026
- 1950’s Betty Crocker Banana Bread Recipe: Nostalgic Spice Swirls and Moist Crumb - October 12, 2026
- 2 Quart Homemade Ice Cream Recipe: Ultra Creamy Vanilla Bean Swirls - October 12, 2026