
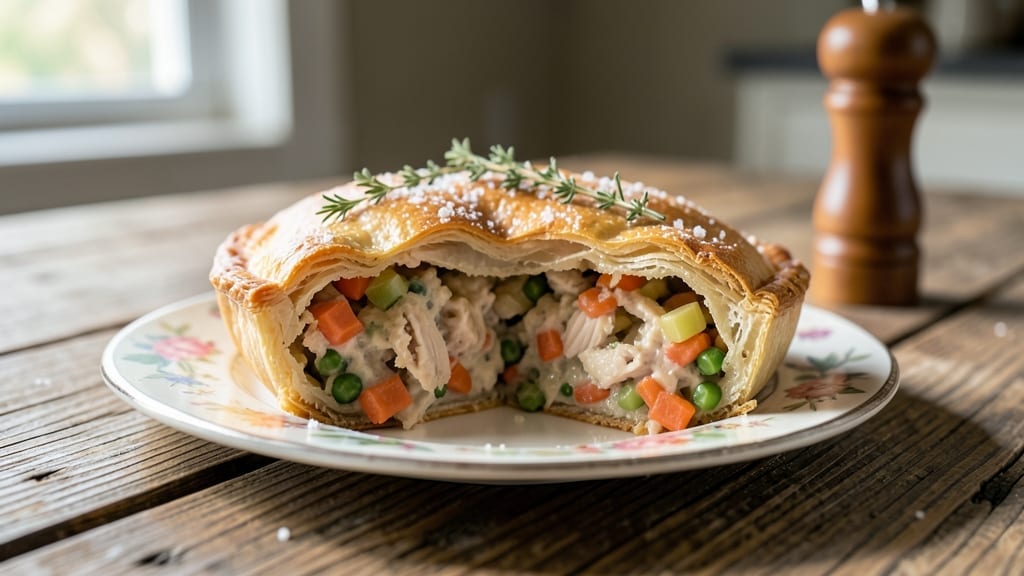
This chicken pot pie recipe with phyllo crust transforms a classic comfort dish into something extraordinary—crispy golden layers that shatter at every bite, encasing a rich, savory filling. 💛 I perfected this version after years of experimenting with phyllo, learning the delicate balance between flaky layers and tender filling that never feels soggy.
The secret lies in proper layering and a foolproof gravy technique that binds everything together.
Most pot pies rely on pie dough, but phyllo creates a lighter, more delicate crust with a crispness that rivals any bakery pastry. You’ll start with tender chicken, fresh vegetables, and a velvety gravy base, then assemble it all between sheets of phyllo brushed with butter.
The key is chilling the assembled pie before baking—this prevents the layers from puffing unevenly and ensures that crispy crust you crave.
By the time it emerges from the oven, you’ll have a pot pie with a lattice-like phyllo top that’s crisp enough to stand on its own, while the filling remains impossibly tender.
The aroma alone will have everyone gathering around the table, and each bite delivers that perfect harmony of flaky, buttery crust and hearty, flavorful filling. This is the kind of dish that feels like a hug on a plate.
Perfect for family dinners, holiday gatherings, or when you want to impress without spending hours in the kitchen. The phyllo technique might sound intimidating, but I’ve made it simple enough for anyone to master—just follow the layering steps, and you’ll achieve restaurant-quality results every time. Let’s get started!
Ingredients for chicken pot pie recipe with phyllo crust
Phyllo crust transforms classic pot pie into crispy, golden layers—just 14 ingredients for restaurant-quality comfort.
| Ingredient | Amount | Notes |
|---|---|---|
| Boneless, Skinless Chicken Breast 🍗 | 1 ½ lb | Cut into bite-sized pieces |
| Fresh Carrots 🥕 | 2 medium | Peeled and sliced into thin rounds |
| Yellow Onion 🧅 | 1 medium | Diced finely for sweetness |
| Celery Stalks 🌿 | 3 whole | Diced small for classic trio |
| Garlic Cloves 🧄 | 4 cloves | Minced for aromatic depth |
| All-Purpose Flour 🌾 | 2 tbsp | For thickening gravy |
| Unsalted Butter 🧈 | ½ cup | Cold for phyllo brushing |
| Chicken Broth 💧 | 2 cups | Low-sodium preferred |
| Heavy Cream 🥛 | ½ cup | Full-fat for richness |
| Fresh Thyme Leaves 🌿 | ¼ cup | Chopped finely for aroma |
| Salt 🧂 | 1 ½ tsp | Kosher or sea salt |
| Black Pepper 🌶️ | ½ tsp | Freshly ground preferred |
| Phyllo Dough Sheets 🍞 | 1 package | Thawed if frozen |
| Fresh Parsley 🌿 | ⅛ cup | Chopped for garnish |
The phyllo sheets are non-negotiable for that signature crispiness. Filomena or Fillo Works are my go-tos—they thaw quickly and layer beautifully. Keep them covered with a damp towel while working, or they’ll dry out faster than you can say ‘crispy crust’. The butter matters too—use unsalted so you control the seasoning. I always buy extra phyllo because it’s worth having on hand for other dishes like spanakopita. For the chicken, skinless breasts cook faster and stay juicier than thighs, though thighs work if you’re patient.
No fresh thyme? Dried works at one-third the amount, but fresh has that bright aroma you can’t replicate. Short on carrots? Substitute with parsnips or turnips for similar texture. The celery-onion-garlic trio is classic for a reason—skip it, and your gravy loses depth. For the gravy, all-purpose flour is your friend, but if you’re gluten-free, cornstarch works in a pinch. The heavy cream adds richness, but half-and-half cuts costs without sacrificing much flavor. Pro tip: Make the filling ahead—it tastes even better after flavors meld overnight.
Phyllo crust browns fast, so preheat your oven to 375°F and use a baking sheet underneath to catch any drips. The assembled pie keeps 3 days in the fridge, but it’s even better reheated—just cover with foil and warm at 350°F for 20 minutes. Freezes beautifully too—wrap tightly in foil and it’ll last 3 months. I always make a double batch because leftovers reheat like a dream for lunches.
Why You’ll Love This Recipe
- Phyllo Magic: I’ll be real—brushing that phyllo crust with butter and folding it into golden layers feels like cheating. The flaky, buttery top turns an ordinary pot pie into something that looks (and tastes) like it came from a bakery.
- Sweat-Free Prep: Minimal chopping required. Toss those carrots, onion, and celery into a food processor for a quick sizzle mix, then dump it all in one pot. The chicken shreds itself while you stir—no standing over a stove for hours.
- Leftovers That Don’t Suck: Honestly, the second day is even better. The phyllo stays crispy, the filling thickens just right, and it reheats in 10 minutes. Pack it for lunch or freeze half—no sad, soggy pot pie here.
- Weeknight Hero: Between us, this is my go-to when I’m exhausted but still need a meal. The phyllo crust adds a fancy touch without extra effort, and the garlic-infused filling hits all the right notes. Dinner on the table in under an hour? Yes, please.
Step-by-step instructions for chicken pot pie with phyllo crust
Here’s how to build layers of golden phyllo and rich filling that’ll have everyone begging for seconds.
🍳 Step 1: Sauté the Classic Vegetable Trio
Heat 2 tablespoons olive oil in a large skillet over medium heat. Add the 1 medium yellow onion, 2 medium fresh carrots, and 3 whole celery stalks (all diced small), and cook for 6-8 minutes until the vegetables soften and begin to caramelize.
Here’s the thing—don’t rush this step. You want those veggies to develop some color and sweetness. When they’re tender but still holding their shape, add the 4 minced garlic cloves and cook for another 30 seconds until fragrant. This aromatic base is the heart of your pot pie filling.
Remove the vegetables from the skillet and set them aside. You’ll be using them in the filling, but first, we need to cook the chicken.
🔥 Step 2: Cook the Chicken and Make the Gravy
In the same skillet, add 0.5 cup unsalted butter over medium heat. Once melted, add the 1.5 lb boneless, skinless chicken breast (cut into bite-sized pieces) and cook for 5-6 minutes until the chicken is no longer pink in the center and has browned slightly.
Here’s a pro tip: I like to press down gently on the chicken pieces during the first minute—this prevents them from curling and ensures even contact with the pan. Transfer the cooked chicken to a plate.
Return the skillet to medium heat and sprinkle in the 2 tablespoons all-purpose flour. Stir constantly for 1-2 minutes until the flour turns golden brown and nutty. Slowly pour in the 2 cups chicken broth while whisking to prevent lumps. Add the 0.5 cup heavy cream and 0.25 cup chopped fresh thyme leaves, then bring to a gentle simmer. Cook for 5 minutes until the gravy thickens slightly. Season with 1.5 teaspoons salt and 0.5 teaspoon black pepper.
🥘 Step 3: Assemble the Filling
In a large bowl, combine the cooked vegetables, chicken, and gravy. Stir gently to distribute everything evenly. Taste and adjust seasoning if needed—this is your chance to make sure the filling sings with flavor before it’s sealed under the crust.
Transfer the mixture to a 9×9-inch baking dish or similar size. The filling should come about ¾ of the way up the sides—this ensures the phyllo will cover it completely without overflowing. Smooth the top with a spatula for an even surface.
🔪 Step 4: Layer the Phyllo Crust for Maximum Crisp
Unfold the 1 package phyllo dough sheets and cover them with a damp towel to prevent drying. Working quickly, brush the bottom of the baking dish with melted butter (melt about 2 tablespoons of the remaining butter).
Place one sheet of phyllo dough over the filling, pressing it gently against the sides. Brush this sheet with more melted butter, then add a second sheet. Repeat this process, brushing each sheet with butter and pressing it down firmly. You should use about 4-5 sheets total, overlapping the edges slightly for a sealed crust.
Here’s the secret to crispy phyllo: don’t skip the butter between layers. The butter creates a barrier that prevents the phyllo from sticking to itself and ensures that golden, shatteringly crisp finish. Trim any excess phyllo from the edges with kitchen shears.
🔥 Step 5: Bake Until Golden and Bubbling
Preheat your oven to 375°F. Bake the pot pie for 35-40 minutes until the phyllo is deep golden brown and the filling is bubbling around the edges. The center should still be slightly jiggly—this indicates the filling is hot but not overcooked.
Here’s where it gets fun: the last 5 minutes of baking are critical. Watch the crust closely—it should turn from pale gold to a rich, caramelized brown. If it starts to brown too quickly, tent it loosely with aluminum foil to prevent burning while still allowing it to crisp.
Remove from the oven and let it rest for 10 minutes before serving. This resting time allows the filling to set slightly and makes it easier to slice. Garnish with 0.125 cup chopped fresh parsley right before serving for a pop of freshness.
Pro Tips For Making Chicken Pot Pie Recipe With Phyllo Crust
- Shred Chicken Properly: Overcooked chicken turns to rubber? Pull it when it hits 165°F, then let it rest 5 minutes before shredding—it’ll fall apart like it’s supposed to. (I used to force it and ended up with sad, stringy bits every time.)
- Sauté Onions Low and Slow: The onion should caramelize, not burn. Drop the heat to medium-low after 5 minutes and stir less—just let it bubble gently. (Yes, it’ll take longer, but that sweet, jammy flavor is worth it.)
- Prep Veggies Evenly: Cut carrots and celery into ¼-inch slices, onions into ⅛-inch pieces—uniform size means even cooking. (Uneven veggies = some mushy, some raw. Not ideal.)
- Brush Phyllo with Butter: Don’t just spray or drizzle—use a pastry brush to layer butter between every phyllo sheet. It’s the only way to guarantee a flaky, golden crust. (I know, it’s extra work, but lazy buttering = sad pie.)
Common mistakes when making this recipe
Phyllo Handling Errors
Skipping the damp towel over your phyllo sheets is a rookie mistake that leads to dry, brittle layers. I learned this the hard way—my first attempt with phyllo ended up looking like a crispy paper boat instead of a golden crust.
Always keep your phyllo covered with a damp kitchen towel while working. If you’re using frozen phyllo, thaw it completely before handling, or the layers won’t layer properly. 💫
Overfilling the Dish
Filling your baking dish too high causes the phyllo to overflow and create a messy, uneven crust. The filling should reach only ¾ of the way up the sides—this ensures the phyllo can cover it completely without spilling over.
I’ve seen people try to cram in extra filling, only to end up with a soggy bottom and a crust that looks like it was assembled by a toddler. Trust me, less is more here.
Skipping the Butter Layers
This is the cardinal sin of phyllo crusts. Butter isn’t just for flavor—it acts as a moisture barrier between layers, preventing them from sticking together. Brush each phyllo sheet with melted butter before adding the next layer.
I once made a pot pie without butter between layers, and the result was a sad, gummy mess. The butter also creates that signature crispiness you crave.
Not Chilling Before Baking
Assembling the pie and jumping straight into the oven is a recipe for disaster. Chill the assembled pot pie in the fridge for at least 30 minutes before baking. This allows the filling to firm up slightly and prevents the phyllo from puffing unevenly.
I now make it a habit to set my timer for 30 minutes of chilling time—it’s worth the wait for that perfect crust.
Overbaking the Crust
Phyllo crusts brown quickly, and once they turn golden, they continue cooking even after you remove them from the oven. Watch the crust closely during the last 5 minutes of baking—it should be deep golden brown, not burnt.
If it starts to darken too quickly, tent it loosely with aluminum foil. Overbaking turns that crispy dream crust into a tough, chewy nightmare. 🔥
Using Cold Butter
Cold butter between phyllo layers can create steam pockets that make the crust puff up unevenly. Always use melted butter that’s been warmed to room temperature. I keep a small bowl of melted butter nearby while assembling—this ensures each layer gets properly coated.
Cold butter also doesn’t spread evenly, leading to dry spots in your crust.
Nutrition facts
Frequently asked questions
Can I substitute phyllo dough for puff pastry?
While phyllo creates a lighter, crispier crust, puff pastry works beautifully too. Just brush the layers with melted butter and bake at 400°F for 20-25 minutes—it won’t be as delicate but still delivers that buttery, flaky texture. For best results, fold the pastry over the filling rather than layering sheets.
How do I make this recipe gluten-free?
Replace the phyllo with gluten-free phyllo sheets (like Fillo Works GF) and use cornstarch instead of flour for the gravy. The technique stays identical—just ensure all ingredients are certified gluten-free. The crust will still achieve that signature crispiness, though it may brown slightly faster.
Can I make this ahead of time?
This pie is perfect for meal prep! Assemble it completely (including the phyllo crust) and refrigerate for up to 24 hours before baking. For best results, chill the assembled pie for 30 minutes before baking. Leftovers reheat beautifully—cover with foil and warm at 350°F for 15-20 minutes.
What if my phyllo tears while assembling?
No stress—phyllo tears happen to everyone! Patch them with extra sheets or use a small piece to cover the tear. The key is to keep working quickly and keep your phyllo covered with a damp towel. If a sheet tears badly, just overlap another sheet to cover the gap—no one will notice the difference in the final dish.
Is this recipe kid-friendly?
Yes, but with a few tweaks! For picky eaters, blend the veggies into the gravy or serve the filling separately with crust on the side. The phyllo crust is always a hit—kids love the crispy texture. Just watch for potential nut allergies if using store-bought phyllo (some brands process in nut facilities).

- Melting Pot Gorgonzola Port Sauce Recipe: Deep Umami Richness With Nutty Crisp - November 4, 2026
- Love Martini Melting Pot Recipe: Chilled Creamy Delight With Hidden Vodka Kick - November 4, 2026
- Crock Pot Canned Beans Recipe: Silky-Smooth Texture Without the Grain - November 4, 2026