
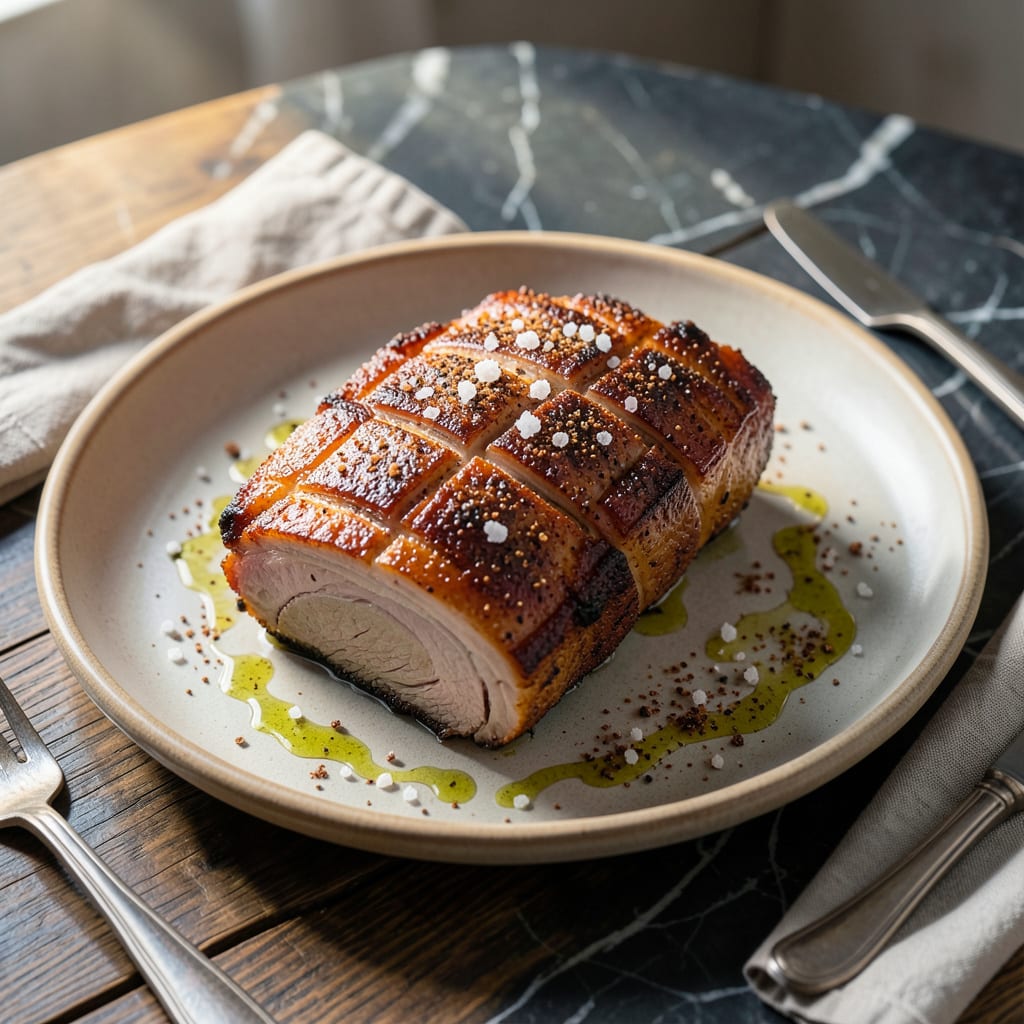
Mastering the fat cap on pork shoulder transforms your dish from good to extraordinary. This technique ensures crispy, flavorful crackling that enhances every bite.
By properly scoring and rendering the fat, you unlock rich, savory depth while keeping the meat juicy. The result is a perfectly balanced roast with an irresistible texture contrast.
Ingredients for Pork Shoulder Fat Cap
Quality pork shoulder and a few pantry staples create that perfect crispy fat cap everyone raves about.
| Ingredient | Amount | Notes |
|---|---|---|
| Pork Shoulder 🍖 | 4 lb | Bone-in, skin-on preferred |
| Kosher Salt 🧂 | 2 tbsp | Diamond Crystal preferred |
| Black Pepper 🌶️ | 1 tbsp | Freshly ground for best flavor |
| Garlic Powder 🧄 | 1 tbsp | Not garlic salt |
| Onion Powder 🧅 | 1 tbsp | Fresh ground preferred |
| Smoked Paprika 🌶️ | 1 tsp | Sweet or hot variety |
| Dried Thyme 🌿 | 1 tsp | Rubbed between fingers |
| Olive Oil 🫒 | 2 tbsp | For rubbing the skin |
| Apple Cider Vinegar 🍏 | 1 tbsp | For skin crisping |
| Brown Sugar 🍚 | 1 tbsp | Light or dark variety |
| Yellow Mustard 🟡 | 1 tbsp | For fat cap binding |
| Fresh Rosemary 🌿 | 2 whole | Sprigs, for aroma |
The pork shoulder is non-negotiable here. Bone-in, skin-on gives you the best crackling and moisture retention. Look for pieces with a thick, even fat cap—Costco or Whole Foods typically carry excellent options. Avoid pre-cut chunks; a whole roast lets you control the scoring. The skin should be intact, not punctured or torn, to ensure proper rendering during cooking.
Out of smoked paprika? Regular paprika plus a pinch of cayenne works in a pinch. Fresh rosemary not on hand? Dried rosemary at half the amount (1 tsp) is an acceptable substitute. If you don’t have apple cider vinegar, white wine vinegar or lemon juice will provide similar acidity. The brown sugar can be swapped for honey or maple syrup, though the flavor profile will shift slightly.
Store the pork shoulder in the fridge for up to 3 days before cooking, or freeze for 6-12 months. Spices keep for 6-12 months in a cool, dark place. Once cooked, leftovers stay fresh for 4-5 days refrigerated or can be frozen for up to 3 months.
Why You’ll Love This Recipe
- Set It and Forget: I rub the pork shoulder with salt, pepper, and those powders, then let the oven do the work—no babysitting required.
- Crispy, Juicy Magic: That fat cap renders down perfectly, leaving the meat tender inside with a flavorful crust from the garlic and onion.
- Feeds the Whole Crew: One pork shoulder means leftovers for tacos, sandwiches, or just picking at straight from the fridge.
- Budget-Friendly Win: Pork shoulder is cheap, and this recipe turns it into something that tastes like it came from a fancy smokehouse.
Step-by-Step Instructions for Pork Shoulder Fat Cap
Achieve perfectly crispy, flavorful crackling with this proven technique for rendering pork shoulder fat cap.
Step 1: Score and Dry the Skin
Pat the 4 lb Pork Shoulder completely dry with paper towels, focusing on the skin surface. Any moisture will prevent proper crisping. Using a sharp knife, score the skin in a crosshatch pattern, cutting through the skin and fat but not into the meat. This allows fat to render out and creates more surface area for crisping.
This drying step is critical—don’t skip it. I’ve found that skin-on pork shoulder needs this preparation to achieve that coveted crackling texture. The scoring also helps the seasoning penetrate deeper into the fat cap.
Step 2: Apply the Seasoning Rub
In a small bowl, combine the 2 tbsp Kosher Salt, 1 tbsp Black Pepper, 1 tbsp Garlic Powder, 1 tbsp Onion Powder, 1 tsp Smoked Paprika, and 1 tsp Dried Thyme. Rub this mixture all over the pork shoulder, pressing it into the scored skin and meat.
For the fat cap specifically, mix the 1 tbsp Brown Sugar, 1 tbsp Yellow Mustard, 2 tbsp Olive Oil, and 1 tbsp Apple Cider Vinegar into a paste. Rub this mixture thoroughly into the scored skin—it will help draw out moisture and create a sticky surface for maximum crispiness.
Step 3: Add Aromatics and Begin Roasting
Place the 2 whole Fresh Rosemary sprigs under the pork shoulder in your roasting pan. The rosemary will infuse the meat with aroma as it cooks. Position the pork skin-side up on a wire rack set in a roasting pan to allow air circulation.
Let the seasoned pork shoulder sit uncovered in the refrigerator for 1 hour (or up to 12 hours) to allow the skin to dry further. This air-drying step is what transforms good crackling into exceptional crackling.
Step 4: Render the Fat Cap to Perfection
Preheat your oven to 450°F. Roast the pork shoulder for 30 minutes at this high temperature to begin the fat rendering process. You’ll see the skin start to puff and crisp. This initial blast of heat is what starts the Maillard reaction that creates that deep, crispy texture.
After 30 minutes, reduce the temperature to 325°F and continue roasting. Baste the pork with its own rendered fat every 30-45 minutes to ensure even crisping. The fat cap is done when it’s deep golden brown and crackling like glass when tapped.
Step 5: Rest and Serve
Remove the pork from the oven and let it rest for 15-20 minutes before serving. This allows the juices to redistribute and the crackling to set. The fat cap should be completely crisp and separate easily from the meat beneath.
Serve the pork shoulder with the crackling intact—it’s the star of this preparation. The rendered fat cap will have transformed into a flavorful, crispy layer that adds texture and depth to every bite. The rosemary aroma will be subtly present throughout the meat.
Pro Tips For Making Pork Shoulder Fat Cap
- Score the Fat Cap: Cut 1/4-inch deep crosshatches into the fat cap before seasoning—this helps the salt and spices penetrate and renders the fat more evenly.
- Dry the Surface: Pat the pork shoulder completely dry with paper towels before seasoning; moisture is the enemy of a good crust.
- Don’t Rush the Rest: After cooking, let the pork shoulder rest for at least 20 minutes under foil—this keeps the juices from running all over the cutting board.
- Season Overnight: Apply the kosher salt, black pepper, garlic powder, and onion powder the night before; the dry brine makes the meat more flavorful and tender.
Perfect Pairings for This pork shoulder fat cap
Side Dish Pairings
I love serving this with garlic mashed potatoes to soak up the rich juices. The creamy texture contrasts beautifully with the crispy fat cap. For a lighter option, try sautéed green beans with almonds—toss 1 lb in 2 tbsp olive oil for 5-7 minutes. 🥗
Bread Companions
A crusty baguette or sourdough loaf is perfect for making sandwiches with leftovers. I toast slices and rub them with a garlic clove for extra flavor. Warm bread also softens slightly when pressed against the crackling.
Fresh Salad Options
Balance the richness with a citrus arugula salad. Toss 5 oz arugula with segments from 1 orange, 2 tbsp olive oil, and 1 tbsp balsamic vinegar. The peppery greens cut through the fat beautifully.
Sauce Pairings
A simple apple chutney complements the pork’s savory notes. I make mine with 2 diced apples, ¼ cup apple cider vinegar, and 2 tbsp brown sugar simmered for 15 minutes. 🍏
Vegetable Sides
Roasted brussels sprouts with pancetta add another layer of crispy texture. Toss 1 lb halved sprouts with 2 tbsp olive oil and roast at 400°F for 20-25 minutes. The caramelized edges mirror the fat cap’s crunch.
Beer Pairing
A malty amber ale like Fat Tire stands up to the rich flavors. The caramel notes complement the crispy skin while the carbonation cleanses your palate. For non-alcoholic, try sparkling apple cider. 🍺
Nutrition Facts
Frequently Asked Questions
Why score the fat before cooking?
Scoring helps render fat evenly and creates more surface area for crisping. Cut through skin and fat but not into meat for best results.
Can I use a boneless cut?
Yes, but bone-in gives better flavor and moisture. For boneless, reduce cooking time by 20-25% to prevent drying.
How do I know the crackling is done?
It should be deep golden brown and make a hollow sound when tapped. If it bends, it needs more time at 450°F.
What if my skin isn’t crispy?
Pat it completely dry before seasoning and increase initial oven temp to 475°F for 20 minutes.

- 8 Bean Soup Recipe Crock Pot: Hearty Vegetable Medley in One Pot - September 25, 2026
- 4C Bread Crumbs Meatballs Recipe: Crispy Crust and Juicy Centers - September 25, 2026
- 6 Oz Chocolate Chip Cookie Recipe: Perfectly Balanced Crispy Edges and Chewy Hearts - September 25, 2026