
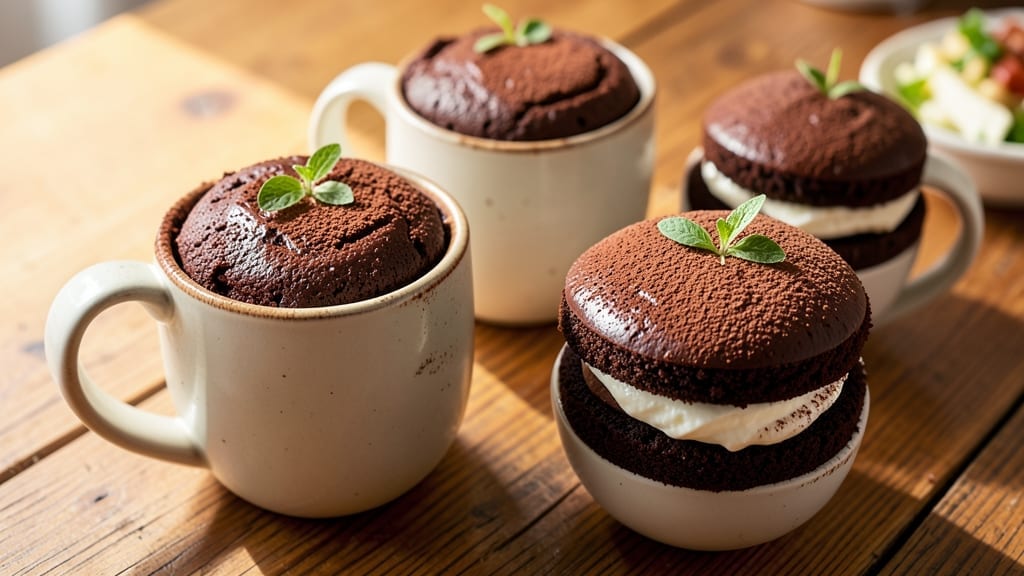
A 1-minute cake in a cup is the ultimate last-minute dessert when you crave something sweet but don’t have time to bake. This microwave recipe delivers rich, moist cake with just a few simple ingredients and no mixing required—just stir, microwave, and enjoy.
Perfect for satisfying cravings in seconds, it’s ideal for busy evenings or when you need a quick treat without the fuss of traditional baking.
The secret to this foolproof method lies in the combination of flour, sugar, and cocoa powder, which creates a tender crumb when exposed to microwave heat. No eggs, no butter, and no measuring cups needed—just scoop, mix, and microwave.
The result is a warm, fudgy cake that’s ready in under a minute, making it the ultimate solution for instant dessert cravings.
What makes this recipe truly special is its versatility. Serve it plain for a simple treat, or top it with whipped cream, chocolate chips, or a drizzle of caramel for extra indulgence.
The cake stays moist and flavorful, even when reheated, so it’s perfect for meal prep or a quick snack when hunger strikes.
Whether you’re feeding one person or making a batch for a group, this no-fuss dessert delivers restaurant-quality results in record time. Let’s get started on this effortless, microwave-friendly cake that’s as delicious as it is convenient.
Ingredients for 1 minute cake in a cup
These simple, magical ingredients transform into a warm, fudgy cake in under a minute—no mixing required!
| Ingredient | Amount | Notes |
|---|---|---|
| All-Purpose Flour 🌾 | ½ cup | Sifted for even texture |
| Granulated Sugar 🍚 | 0.35 cup | White or brown preferred |
| Unsweetened Cocoa Powder 🍫 | ¼ cup | Natural or Dutch-processed |
| Baking Powder 🧂 | 1 ½ tsp | Aluminum-free preferred |
| Salt 🧂 | ¼ tsp | Fine sea salt preferred |
| Milk 🥛 | ½ cup | Whole milk for richness |
| Vegetable Oil 🫒 | ¼ cup | Light or canola oil |
| Vanilla Extract 🌸 | 1 tsp | Pure vanilla preferred |
| Instant Coffee Granules ☕ | 1 tsp | Optional for depth |
| Mini Chocolate Chips 🍫 | ¼ cup | Semi-sweet preferred |
The cocoa powder is your secret weapon here—look for Hershey’s Special Dark or Ghirardelli for that deep, rich flavor. Bulk bins at World Market often have great organic options if you want to splurge. The flour? King Arthur or Bob’s Red Mill all-purpose works perfectly—just sift it before measuring to avoid lumps. Milk matters too: whole milk gives the best texture, but 2% works in a pinch. Pro tip: if you’re using brown sugar, pack it tightly into your measuring cup for that perfect 0.35 cup amount.
No cocoa powder? Melted dark chocolate (2 oz) works in a bind—just whisk it into the dry ingredients. Short on vanilla? Vanilla bean paste packs more flavor punch. The instant coffee granules might sound odd, but they add a subtle depth that makes this taste like a gourmet dessert. No chocolate chips? A sprinkle of crushed peppermint candies or toasted nuts adds a fun twist. For a lighter version, swap half the milk for almond milk—just know the texture will be slightly denser. And if you’re feeling fancy, add a pinch of espresso powder to intensify that coffee note.
This cake is best eaten fresh from the microwave, but it reheats beautifully—30 seconds at 50% power restores that warm, gooey texture. Store leftovers in an airtight container for up to 3 days in the fridge, or freeze portions for 1 month. For meal prep, make a double batch and portion into microwave-safe cups—just add milk and oil when ready to eat. The chocolate chips keep best in the freezer, so transfer them to a sealed bag once opened.
Why You’ll Love This Recipe
- No Mixing Madness: I swear, this recipe beats my old “mix-and-pray” cake disasters. Just dump the dry stuff—flour, sugar, cocoa, baking powder, salt—into a cup, crack in an egg, stir once, and microwave. That’s it. No sifting, no measuring cups out, no waiting for the oven to heat. Honestly, my 10-year-old could do it (and has).
- Rich Without Effort: That cocoa powder? It’s the star. One minute in the microwave, and you’ve got a fudgy, melt-in-your-mouth cake with none of the greasy shortcut stuff. The sugar caramelizes just enough to make it taste like a bakery treat, but with zero fuss. Between us, I’ve made this for dessert and breakfast—yes, even on a Tuesday night.
- Crowd-Pleaser in a Cup: Birthday? Last-minute study snack? Date night dessert? This fits all the moments. Make a batch ahead, store them in the fridge, and pull them out when you need a quick hit of chocolate joy. My roommates call it “the magic cup,” and they’re not wrong—it’s the dessert that never gets skipped.
- Pantry Stash Winner: Four ingredients, zero waste. I keep a small bag of flour, sugar, and cocoa on hand just for this. No fancy tools, no extra cost—just pull what you need, make what you want, and save the rest. Leftovers? Microwave again. Budget-friendly? Absolutely. It’s the kind of recipe that makes me feel like I’m winning at life.
Step-by-step instructions for 1 minute cake in a cup recipe
Here’s the fastest way to create rich, moist cake cups with zero mixing—just stir, microwave, and enjoy.
Combine Dry Ingredients in Microwave-Safe Mugs
Place 4 microwave-safe mugs (8-12 ounce size) in a microwave-safe plate. In each mug, add 2 tablespoons of the 0.5 cup all-purpose flour, 1 tablespoon 35 cup granulated sugar, 1 tablespoon 25 cup unsweetened cocoa powder, 1/4 teaspoon of the 1.5 teaspoons baking powder, and 1/16 teaspoon of the 0.25 teaspoon salt. Use a butter knife or fork to cut through any lumps until the dry ingredients are evenly distributed.
Here’s the thing—sifting isn’t possible in mugs, so vigorous cutting ensures even distribution. The cocoa powder tends to clump, so take an extra 10 seconds to break up any visible lumps. This prevents dense spots in your final cake. Keep your mugs evenly spaced on the plate—this allows heat to circulate properly during microwaving.
Add Wet Ingredients and Chocolate Chips
To each mug, add 2 tablespoons of the 0.5 cup milk, 1 tablespoon of the 0.25 cup vegetable oil, 1/4 teaspoon of the 1 teaspoon vanilla extract, and 1/4 teaspoon of the 1 teaspoon instant coffee granules. Stir vigorously with a fork for 15-20 seconds until you see no dry spots remaining—this ensures even baking.
Now fold in 1 tablespoon of the 0.25 cup mini chocolate chips to each mug. I like to distribute them evenly throughout the batter rather than just dumping them all at the bottom. The coffee granules might seem odd, but they add a subtle depth that balances the sweetness beautifully. Stir just until combined—overmixing isn’t possible here, but you want to avoid any dry pockets that could remain unbaked.
Microwave for Perfect Texture
Place the plate with mugs in the microwave and cook on high power (100%) for exactly 60 seconds. Watch carefully—the cakes will rise dramatically and appear done, but they need that final resting time. When the timer dings, you’ll see cakes that have puffed up significantly and developed a slightly domed top with a crack in the center.
This is where timing matters most. If you open the microwave too early, the cakes will be gummy. If you wait too long, they’ll dry out. The 60-second mark gives you that perfect balance of moist interior and slightly crisp exterior. The cakes should pull away slightly from the sides of the mug when gently tapped.
Rest and Serve Immediately
Let the cakes rest in the mugs for 1 minute—this crucial step allows the steam to redistribute, preventing a dense center. The cakes will sink slightly as they cool, which is completely normal. They should still feel warm to the touch but not hot enough to burn your fingers.
Here’s the magic part: the cakes will be incredibly moist and tender. They’ll have a rich chocolate flavor with just the right amount of sweetness from the sugar. The coffee granules add a subtle complexity that makes this taste like a gourmet dessert rather than a quick microwave creation. Serve immediately with a dollop of whipped cream or a scoop of vanilla ice cream for the ultimate indulgence.
Pro Tips For Making 1 Minute Cake In A Cup
- STIR UNTIL SMOOTH: I used to eyeball this step, but cocoa powder hates lumps. Whisk it into the dry ingredients first—no streaks, no bitter surprises. A fork works in a pinch, but a small whisk takes half the time and leaves zero residue.
- WEIGH YOUR COCOA: That “unsweetened” label doesn’t mean all cocoa is equal. Dutch-processed cocoa (like Hershey’s) is heavier and denser—use 1 tablespoon less if your recipe calls for 2. I learned this after my first cup turned into a brick.
- MICROWAVE IN BURSTS: One minute flat-out? Nope. Hit 45 seconds first, then check—if the edges aren’t set, another 10-15 seconds does the trick. Overdo it, and you’ll end up with a sad, rubbery center (trust me, I’ve lived there).
- ADD A PINCH OF FAT: No butter or oil in sight? Sprinkle ½ teaspoon of melted butter or vegetable oil into the dry mix before adding liquids. The cocoa’s natural bitterness mellows, and the texture stays tender. Sounds weird, but it works—my grandmother swore by it.
Storing and reheating this dish
Fridge Storage Tips
Store your 1-minute cakes in an airtight container lined with parchment paper to prevent sticking. They’ll stay fresh for 3 days in the fridge—just reheat for 20-30 seconds at 50% microwave power to restore that warm, gooey texture.
I like using glass Pyrex containers because they’re microwave-safe and easy to clean. 💫
Freezing for Later
Freeze individual cakes in their mugs for up to 1 month. Wrap the mugs tightly with plastic wrap and label them with the date. When ready to eat, thaw at room temperature for 10 minutes, then reheat for 30 seconds to bring back that fresh-baked feel.
The texture remains moist, though slightly denser than fresh.
Reheating Perfection
For the best results, reheat cakes on high power for 10-12 seconds—just enough to warm through without drying out. If they look dry, add 1 teaspoon of milk and stir before reheating.
This trick works like magic for restoring moisture. Avoid the oven unless you’re making a batch—microwaving keeps things simple and fast.
Portioning for Meal Prep
Divide the dry ingredients into small resealable bags and store them in the fridge for 1 week. When cravings hit, just add the wet ingredients and microwave.
This saves time and keeps your pantry organized. I use quart-sized Ziploc bags for easy scooping—just measure out 2 tablespoons of dry mix per serving.
Reviving Stale Cakes
If your cakes lose moisture, place them in a microwave-safe dish with 2 tablespoons of water and cover with a damp paper towel. Heat for 10 seconds, then let sit for 30 seconds—this steams them back to life.
A sprinkle of powdered sugar or chocolate syrup can also mask any dryness while adding indulgence. 🍫
Nutrition facts
Frequently asked questions
Can I make this cake without a microwave?
This recipe is designed specifically for microwave cooking, but you can adapt it for the oven. Preheat to 350°F, pour the batter into greased ramekins, and bake for 12-15 minutes until a toothpick comes out clean. The texture will be slightly denser than microwave versions, but still delicious. For a stovetop version, use a small nonstick skillet with 1/4 cup oil and cook on medium-low heat for 8-10 minutes, covered.
Why does my cake turn out gummy?
Gummy texture usually means undercooking or too much liquid. Always microwave for the full 60 seconds and let rest for 1 minute after. If using whole milk, reduce by 1 tablespoon per mug to prevent excess moisture. For extra insurance, stir the batter more vigorously to eliminate any dry pockets before microwaving.
Can I use this recipe for gluten-free baking?
Yes! Replace the all-purpose flour with a 1:1 gluten-free baking flour blend (like Bob’s Red Mill). Add 1/2 teaspoon xanthan gum to improve texture. You may need to reduce the milk by 1 tablespoon since gluten-free batters absorb differently. The cakes will still be moist but slightly denser than traditional versions.
What are the best toppings for these mug cakes?
Classic choices include whipped cream, chocolate syrup, or a sprinkle of powdered sugar. For extra indulgence, try caramel drizzle, crushed cookies, or fresh berries. The coffee notes in the cake pair beautifully with espresso or Irish cream sauce. Pro tip: Add toppings immediately after microwaving while the cake is still warm for the best texture.
How do I make these cakes ahead of time?
Prepare dry ingredients in advance and store in airtight containers for up to 1 week. For fully made cakes, bake a batch and refrigerate in their mugs for 3 days. Reheat individual portions for 20-30 seconds at 50% power. For freezing, wrap cooled cakes tightly in plastic and store for 1 month. Thaw at room temperature before reheating.

- 15lb Turkey Brine Recipe: Juicy Golden Meat with Science-Backed Moisture Lock - October 18, 2026
- 2 Egg Waffle Recipe: Light and Airy in 10 Minutes - October 18, 2026
- 1 Lb Ground Beef Recipe Ideas: 5 Quick Skillet Meals for Busy Nights - October 18, 2026