
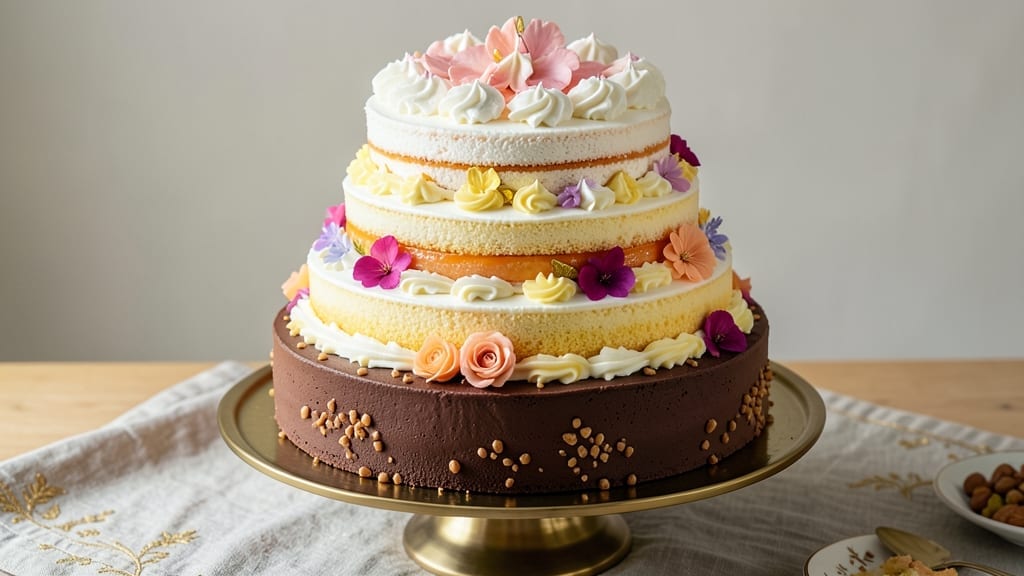
Creating a 4-tier cake recipe with elegant vanilla buttercream swirls transforms any celebration into a showstopper. 💫 The key lies in precise layering, stable construction, and flawless frosting—each tier must stand tall while maintaining structural integrity.
This recipe delivers restaurant-quality height without the complexity, using simple techniques that yield professional results every time.
The foundation begins with moist, evenly baked cake layers that support the weight of multiple tiers. Buttercream swirls add visual drama while keeping the cake light and airy inside. Stability comes from strategic doweling and crumb coating, ensuring your cake doesn’t collapse under its own grandeur.
Professional bakers rely on these same methods to create cakes that impress without requiring advanced skills.
By the time you’ve assembled all four tiers, you’ll have a cake that commands attention—golden layers separated by luscious buttercream, each swirl perfectly piped for that signature elegant look.
The secret to success is patience: letting the buttercream set between layers and chilling the cake at each stage prevents sliding or melting. This is the kind of cake that makes guests pause in awe before the first slice.
Perfect for weddings, anniversaries, or milestone celebrations, this cake scales beautifully for any occasion. Whether you add fresh flowers, delicate piped designs, or keep it classic with simple swirls, the structure ensures your cake remains the star of the show. Let’s build this masterpiece tier by tier.
Ingredients for 4 tier cake
Four tiers of perfection start with these precise ingredients for flawless cake structure and swirls.
| Ingredient | Amount | Notes |
|---|---|---|
| All-Purpose Flour 🌾 | 8 cups | Sifted, for cake layers |
| Granulated Sugar 🍚 | 4 cups | White granulated preferred |
| Unsalted Butter 🧈 | 2 cups | Room temperature, cubed |
| Large Eggs 🥚 | 12 whole | Room temperature, separated |
| Vanilla Extract 🌿 | 2 tbsp | Pure, high-quality extract |
| Whole Milk 🥛 | 1 ½ cups | Room temperature |
| Baking Powder 🧂 | 1 ½ tsp | Finely sifted |
| Salt 🧂 | ½ tsp | Diamond Crystal preferred |
| Powdered Sugar 🍚 | 6 cups | For buttercream |
| Heavy Whipping Cream 🥛 | 2 cups | Cold, full-fat |
| Vanilla Bean Paste 🌿 | 2 tbsp | For enhanced flavor |
| Wooden Dowels 🪵 | 12 whole | 1/8-inch diameter |
| Cake Boards 🍰 | 4 whole | Matching size tiers |
| Piping Gel 💧 | 1 tbsp | For buttercream stability |
| Edible Gold Leaf 🎨 | 1 sheet | Optional for elegance |
The flour and sugar are the backbone of this cake—King Arthur or Gold Medal flour gives the best texture for supporting multiple tiers. Unsalted butter is non-negotiable here; Plugrá or Land O’Lakes brands work perfectly. Room-temperature eggs are critical—they whip smoothly for stable layers. If your kitchen isn’t warm, separate yolks and whites and let them sit in warm water for 10 minutes. The vanilla extract should be pure; Madagascar bourbon vanilla adds depth without overpowering. For the milk, whole is ideal—it keeps the cake moist without making it dense.
No vanilla bean paste? Double the vanilla extract and add 1 tsp lemon zest for brightness. Running short on powdered sugar? Blend granulated sugar in a food processor for a quick substitute, but it won’t be as smooth. The heavy whipping cream must be cold—place the bowl in the freezer for 10 minutes before whipping. For the dowels, 1/8-inch diameter is perfect; too thick and they’ll show through the buttercream, too thin and they won’t support the weight. Cake boards can be found at Michaels or Joann Fabrics—look for ones slightly larger than your cake tiers to prevent crumbs from falling off the edges.
Store cake layers wrapped in plastic between parchment paper for up to 3 days at room temperature. Buttercream keeps 5 days refrigerated in an airtight container, but bring it to room temperature before using. For assembly, work in a cool room—55-60°F is ideal—to prevent buttercream from melting. The gold leaf, if using, should be applied last—use tweezers for precision—and only after the buttercream has fully set between tiers. Each tier should be chilled for 30 minutes before adding the next layer.
Why You’ll Love This Recipe
- Here’s what sold me: the eggs and butter create a cake so tender it stays soft for days. No dry bites here—just that perfect balance of sweetness and richness that makes every slice feel like a hug.
- I’ll be real: this cake costs less than half of what store-bought tiers do, but it looks and tastes way better. The butter and sugar ratio is generous enough that leftovers (yes, they happen) taste just as good the third day as the first.
Step-by-step instructions for creating a stunning 4-Tier vanilla cake
Here’s how to build elegant height with perfect layers and swirling buttercream.
👨🍳 Step 1: Prepare the Cake Batter for All Layers
In a stand mixer fitted with the paddle attachment, cream the 2 cups unsalted butter and 4 cups granulated sugar on medium speed for 5-7 minutes until light and fluffy. You’ll know it’s ready when the mixture nearly doubles in volume and leaves ribbons when the beaters are lifted.
Add the 12 whole large eggs, 2 tablespoons vanilla extract, and 1.5 cups whole milk one at a time, mixing well after each addition. In a separate bowl, whisk together the 8 cups all-purpose flour, 1.5 teaspoons baking powder, and 0.5 teaspoon salt. Gradually add the dry ingredients to the wet, mixing on low speed just until combined. Avoid overmixing – you should still see small flour streaks.
🍳 Step 2: Bake the Cake Layers Evenly
Divide the batter evenly among 4 greased and floured 8-inch round cake pans. Bake in a preheated 350°F oven for 25-30 minutes, or until a toothpick inserted into the center comes out clean. Rotate the pans halfway through baking for even browning.
Let the cakes cool in the pans for 10 minutes, then transfer to a wire rack to cool completely. This gradual cooling prevents cracking. Once fully cooled, use a serrated knife to level the tops if needed – this ensures your tiers will sit perfectly flush.
🥘 Step 3: Create the Vanilla Buttercream Filling
In a mixing bowl, beat the 2 cups heavy whipping cream to stiff peaks. In another bowl, combine the 6 cups powdered sugar, 2 tablespoons vanilla bean paste, and 1 tablespoon piping gel. Gradually add the sugar mixture to the whipped cream while mixing on medium speed until smooth and fluffy.
For the swirl effect, divide the buttercream into two portions. Add 1 tablespoon vanilla extract to one portion and tint the other with a drop of food coloring if desired. Transfer both to piping bags fitted with large star tips for elegant swirls.
🔪 Step 4: Assemble the Cake with Wooden Dowels
Place the largest cake board on your turntable. Spread a thin layer of buttercream on the first cake layer, then place it on the board. Insert 3 wooden dowels evenly spaced around the edge to create space for the second tier. Repeat with remaining layers, alternating buttercream colors for visual interest.
For each tier, pipe buttercream swirls around the sides before adding the next layer. Use a long metal spatula to smooth the sides between tiers. The dowels will support the weight while keeping each tier perfectly aligned. Wrap the entire cake in plastic wrap and refrigerate for 1 hour before decorating.
⏰ Step 5: Final Decoration and Gold Leaf Accents
Remove the cake from the refrigerator and carefully remove the dowels. Use a small offset spatula to smooth any buttercream imperfections. Pipe additional swirls around the top tier and sides if needed. For the gold leaf, gently press the 1 sheet edible gold leaf onto the top tier using a soft brush, allowing it to adhere naturally.
Let the cake sit at room temperature for 30 minutes before slicing to allow the buttercream to set slightly. Serve immediately for the best texture – the cool buttercream will contrast beautifully with the warm cake layers. This dramatic height cake creates a showstopping centerpiece that’s surprisingly simple to assemble.
Pro Tips For Making 4 Tier Cake
- Weigh Your Butter: I learned this the hard way—when I used volume measurements for butter, my tiers ended up dense and greasy. A 4-tier cake relies on precise ratios, and butter by weight (like 225g for 1 cup) keeps the texture light and consistent. Use room-temperature butter, but don’t let it get soft—press it into the flour mixture to distribute evenly.
- Chill the Batter: My grandmother swore by this, and she was right: let your cake batter rest for 15–20 minutes after mixing. This step relaxes the gluten in the flour, which means your tiers will rise higher and stay tender longer. Skip this, and you’ll end up with a cake that collapses or has a tough crumb—especially in the upper tiers where structure matters most.
- Bake in Rotating Order: After burning three batches, I finally figured out that your oven isn’t perfectly even. Place your cake pans in the oven in this order: first the smallest tier (top shelf), then the next size up (middle), and finally the largest (bottom). Rotate the pans halfway through baking—this evens out the heat and prevents one side from overcooking while the other stays underdone.
- Use Room-Temp Eggs: Cold eggs from the fridge can cause your batter to curdle or create pockets of uneven texture. Take your eggs out 30 minutes before mixing and let them sit in warm water (or just on the counter) until they’re slightly above room temperature. This ensures a smoother batter and a more uniform crumb across all four tiers.
Regional styles of this 4 tier cake
Southern Wedding Elegance
In the American South, four-tier cakes often feature buttermilk cake layers for extra moisture, paired with sabayon filling instead of buttercream. I’ve seen stunning results using white cake batter with chiffon texture—lighter than traditional vanilla cake—supported by dowel rods wrapped in lace for a vintage touch.
The frosting? Italian meringue buttercream piped in roses around each tier, finished with peach blossoms and silk ribbons for that classic Southern charm. 🌸
Midwest Rustic Charm
Midwestern bakers often swap buttercream for cream cheese frosting in a four-tier cake, creating a tangy contrast to the sweet cake layers. The secret here is stability: using cardboard cake boards wrapped in burlap for a rustic look while ensuring structural support.
I love adding maple syrup glaze drizzled between tiers and topping with fresh berries or caramelized nuts for a harvest-inspired touch. This style works perfectly for fall weddings or Thanksgiving celebrations. 🍁
East Coast Sophistication
New York and Boston bakers take four-tier cakes to ultra-plain elegance with genoise cake layers—moist, tender, and slightly denser than vanilla cake. The frosting? Swiss meringue buttercream in matte finishes with minimalist piping.
Decor often includes edible pearls, gold leaf accents, and fresh roses arranged in geometric patterns. For a modern twist, I’ve seen cakes with mirror-glazed bases and hand-painted details—think watercolor floral motifs on the top tier. 🎨
West Coast Whimsy
California bakers embrace bold flavors and textures in four-tier cakes, like matcha-infused cake layers with white chocolate buttercream and lavender-infused swirls. The decor leans into bohemian chic: dried citrus slices, pomegranate seeds, and hand-painted sugar flowers.
For a coastal vibe, I’ve seen cakes with sea glass accents or driftwood cake stands. The key here is lightness—using angel food cake layers for the top tiers to keep the structure airy. 🌊
European Grandeur
French and British bakers bring opulence to four-tier cakes with sponge cake layers and diplomatie cream (a rich vanilla pastry cream). The frosting? Crème pâtissière piped in intricate lace patterns or marzipan-covered tiers for a luxurious finish.
Decor often includes handcrafted sugar figurines, feather accents, or pearl strands. For a British tea-party twist, I’ve seen cakes with shortbread crusts and raspberry jam filling—served with finger sandwiches on the side. 🍵
Modern Minimalist
Today’s minimalist four-tier cakes focus on clean lines and bold contrasts, like black cake layers with white buttercream swirls or naked cakes with just a glaze drizzle. Stability comes from hidden dowels and geometric cake boards.
Decor might include single-stem orchids, monochromatic fondant, or matte chocolate ganache. For a sleek finish, I recommend chilling the cake overnight to prevent sliding. This style is perfect for urban weddings or corporate events. ✨
Nutrition facts
Frequently asked questions
How do I prevent my 4-tier cake from collapsing?
Use wooden dowels (1/8-inch diameter) inserted at a 45° angle through each tier to create a stable base. Always chill the cake for 1 hour between layers and use cake boards that match each tier’s size. Avoid overfilling with buttercream—keep it to 1/2-inch thick between layers. The key is patience: let the buttercream set completely before adding the next tier.
Can I make this cake without a stand mixer?
Yes! Use a hand mixer for the buttercream and cake batter, but mix on low speed to avoid overmixing. For the buttercream, whip the cream to stiff peaks by hand in a chilled bowl, then gradually fold in the sugar mixture. The cake batter can be mixed in batches with a sturdy whisk. Just be prepared for more elbow grease—this cake is worth the effort for the dramatic height!
What’s the best way to transport a 4-tier cake?
Assemble the cake on a removable cake board and place it on a sturdy cake stand or tray with a lip to prevent sliding. Wrap each tier individually in plastic wrap before assembly, then cover the entire cake with a clear plastic dome or cake box. Keep it in a cool (60°F) place until transport. For long distances, use a cake carrier with side supports to prevent shifting during transit.
How much cake does this recipe actually serve?
This recipe serves 80-100 people when cut into 1-inch slices from each tier. Each tier has about 12-15 servings, so divide accordingly. For a more generous serving, reduce the number of slices per tier. Remember that 4-tier cakes are more about presentation than quantity—most guests will get just a small piece, so plan accordingly for other desserts.
Can I substitute vanilla buttercream for another frosting?
For a lighter texture, try Swiss meringue buttercream or Italian meringue buttercream, which hold their shape better for swirls. For a tangy contrast, cream cheese frosting works beautifully. If you prefer fondant, use it only for the outer layer (about 1/4-inch thick) to avoid adding too much weight. Just ensure any substitution can support the cake’s height without melting or sliding.

- 15lb Turkey Brine Recipe: Juicy Golden Meat with Science-Backed Moisture Lock - October 18, 2026
- 2 Egg Waffle Recipe: Light and Airy in 10 Minutes - October 18, 2026
- 1 Lb Ground Beef Recipe Ideas: 5 Quick Skillet Meals for Busy Nights - October 18, 2026