
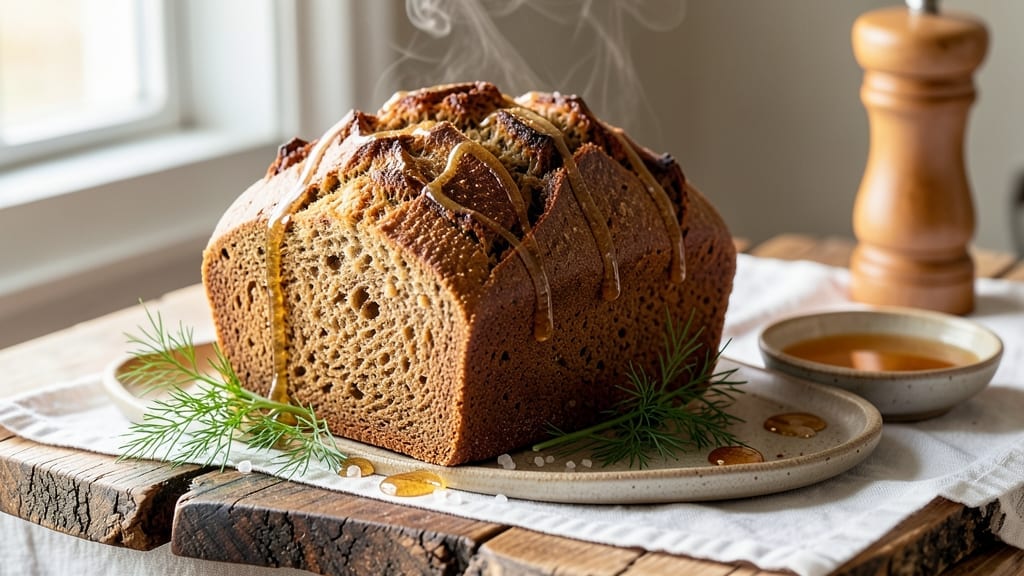
This 100 whole grain rye bread recipe delivers the perfect balance of hearty crust and nutty, dense crumb that makes every slice feel like a homecoming. 💛 I’ve baked countless loaves over the years, and this version—with its mix of whole rye flour, whole wheat, and a touch of honey—never disappoints.
The secret lies in the slow fermentation, which deepens flavor and creates that signature chewy texture.
What sets this recipe apart is the simplicity: no fancy equipment, no complicated steps—just good-quality ingredients and patience. The dough comes together in minutes, but letting it rise overnight (or at least 8 hours) transforms it into something extraordinary.
The crust develops a deep, crackly texture while the interior stays moist and packed with flavor.
By the time you pull it from the oven, you’ll have a loaf with a rich, caramelized crust and a crumb so dense it’s almost like eating a slice of rustic heaven.
The nutty, slightly tangy notes from the rye flour shine through, making this bread perfect for sandwiches, toast, or just enjoying on its own with a smear of butter.
Once you try this recipe, you’ll never go back to store-bought rye again. The best part? It’s versatile—add seeds, herbs, or even a pinch of salt to customize it to your taste. Let’s get baking!
Ingredients for 100 whole grain rye bread
Twelve simple ingredients transform into a loaf with a crackly crust and nutty crumb you’ll crave every day.
| Ingredient | Amount | Notes |
|---|---|---|
| Whole Rye Flour 🌾 | 4 cups | Dark rye flour for authentic flavor |
| Whole Wheat Flour 🌾 | 2 cups | Adds chewy texture and heartiness |
| All-Purpose Flour 🌾 | 1 cup | Balances the density of rye |
| Active Dry Yeast 🍞 | 2 ¼ tsp | Ensure yeast is fresh for rise |
| Honey 🍯 | ¼ cup | Adds subtle sweetness and moisture |
| Warm Water 💧 | 1 ½ cups | 105-110°F for optimal yeast activation |
| Salt 🧂 | 1 ½ tsp | Kosher or sea salt preferred |
| Olive Oil 🫒 | 2 tbsp | Extra-virgin for best flavor |
| Sunflower Seeds 🌻 | ½ cup | Toasted for extra crunch |
| Sesame Seeds 🌿 | ¼ cup | Optional but adds nutty flavor |
| Cornmeal 🌽 | ½ cup | For dusting the baking sheet |
| Ice Water ❄️ | ½ cup | For shaping the dough |
The flours are the heart of this recipe. King Arthur or Bob’s Red Mill whole rye flour gives the best depth, but any dark rye flour works. Whole wheat flour adds that signature chewiness—don’t skip it. For the yeast, Saf-Instant is foolproof (no need to proof), but if you’re using active dry yeast, make sure it’s fresh. The honey? Local raw honey adds subtle floral notes, but any liquid honey will work. Toast your seeds in a dry pan for 3-4 minutes—they’ll release their oils and pack more flavor.
No whole rye flour? Substitute with pumpernickel flour or mix in extra whole wheat. Running low on honey? Maple syrup or agave works 1:1, though the flavor will be slightly different. Seeds too pricey? Skip them entirely or use poppy seeds for a milder taste. The dough is forgiving—if it feels sticky, add a splash more flour (1 tbsp at a time). For a lighter loaf, proof the dough for 12-16 hours instead of overnight. And if you’re short on time, 2 hours at room temp still works—just expect a denser crumb.
This dough is a dream to handle. Shape it into a round loaf, tuck the sides under, and let it rise again for 1-2 hours before baking. Brush the crust with water and sprinkle extra seeds right before baking for a stunning finish. The bread keeps well for 5-7 days wrapped in a cloth, but it’s best enjoyed fresh. Freeze slices for up to 3 months—just toast from frozen. Pro tip: Slice it thick for maximum chewiness, or thin for sandwiches. Every loaf turns out slightly different—embrace the rustic charm!
Why You’ll Love This Recipe
- No-Knead Magic: I swear by this—just mix, let it rise overnight, and bake. The whole rye-wheat blend handles itself, so you’re not stuck kneading until your hands ache.
- Honey-Rich Depth: That touch of honey? It’s the secret. The bread stays moist for days, with a subtle sweetness that pairs perfectly with sharp cheeses or smoky salmon.
- Weeknight Workhorse: I make a loaf every Sunday because it’s the ultimate sidekick—great for sandwiches, toast, or even French toast. No fancy prep, just reliable flavor.
- Budget-Friendly Staple: Whole rye and wheat flours stretch further than white bread, and a single batch lasts my family five days. Plus, the yeast costs pennies—this is bread that won’t break the bank.
Step-by-step instructions for 100% whole grain rye bread
Here’s how to transform these hearty flours into a loaf with deep flavor and perfect texture.
👨🍳 Step 1: Activate the Yeast and Mix the Dough
In a large bowl, whisk together the 4 cups whole rye flour, 2 cups whole wheat flour, 1 cup all-purpose flour, 1.5 tsp salt, and 2.25 tsp active dry yeast. This mix creates the perfect balance of density and structure—rye gives the authentic flavor while all-purpose prevents cracking.
In a separate small bowl, combine the 1.5 cups warm water (between 105-110°F) and 0.25 cup honey. Pour this liquid mixture into the flour blend and stir until just combined. The dough will look shaggy at first—that’s normal. Let it sit for 10 minutes while the yeast activates. You’ll know it’s working when you see bubbles forming and the mixture becomes slightly foamy.
Add the 2 tbsp olive oil and mix again until fully incorporated. The oil helps create a tender crumb and prevents the dough from becoming too dense. If the dough feels too sticky, add 1-2 tablespoons of the whole rye flour until it comes together but remains slightly tacky.
🥘 Step 2: Knead Until Smooth and Elastic
Turn the dough onto a lightly floured surface and knead for 8-10 minutes until smooth and elastic. I like to use a bench scraper to help gather the dough and keep it contained. The dough should feel slightly springy when pressed—this indicates proper gluten development. If it’s too sticky to handle, wet your hands slightly to prevent sticking.
Real talk: Whole grain doughs are trickier to knead than white flour doughs. Don’t worry if it doesn’t look perfectly smooth—just focus on developing that gluten structure. The seeds we’ll add later will give it texture, so we don’t need perfect elasticity.
After kneading, place the dough in a lightly oiled bowl, cover with a damp towel, and let it rise in a warm place for 1-2 hours or until doubled in size. The warm environment helps the yeast work efficiently. If your kitchen is cold, place the bowl near a slightly warm oven with the light on for gentle heat.
🔥 Step 3: Shape and Add Seeds for Crunch
Once the dough has risen, punch it down to release air and shape it into a round loaf. This is where the fun begins—we’re adding texture! Sprinkle 0.5 cup sunflower seeds and 0.25 cup sesame seeds evenly over the dough’s surface. Gently press them in so they adhere well.
Shape the dough into a round boule by pulling the edges toward the center and sealing the seam. Place it seam-side down on a baking sheet dusted with 0.5 cup cornmeal. The cornmeal prevents sticking and gives that beautiful rustic bottom crust. Cover loosely with a towel and let it rise for another 30-45 minutes until puffy.
Here’s the thing—don’t overproof this dough. You want to see gentle expansion, not a full doubling. Overproofing leads to dense bread instead of that airy, open crumb we’re after.
🔥 Step 4: Preheat and Bake for Deep Flavor
Preheat your oven to 375°F with a Dutch oven inside for 30 minutes. This step is crucial for creating that signature rye crust. The hot Dutch oven creates steam that develops a crispy exterior while keeping the interior moist.
Carefully transfer the shaped dough (still on the cornmeal-dusted sheet) into the hot Dutch oven. Cover with the lid and bake for 30 minutes. Then remove the lid and bake for another 15-20 minutes until the bread is deep golden brown and sounds hollow when tapped on the bottom.
The internal temperature should reach 190-200°F when measured with an instant-read thermometer. This might seem hot, but rye bread continues cooking as it cools. If the top browns too quickly, tent it loosely with foil during the final baking time.
⏰ Step 5: Cool and Enjoy the Fruits of Your Labor
Remove the bread from the Dutch oven and let it cool on a wire rack for at least 1 hour before slicing. This resting period allows the crumb to set properly and prevents a gummy texture. The longer you wait, the better the texture—trust me, it’s worth it.
Once cooled, slice into thick pieces to reveal that beautiful open crumb and nutty depth. The crust should be crispy with a hint of caramelization, while the interior remains tender and slightly dense—perfect for sandwiches or toasted with butter. Store leftovers in an airtight container for up to 5 days, or freeze for longer storage.
Pro Tips For Making 100 Whole Grain Rye Bread
- Bloom the yeast in honey: Skip the warm water—mix the yeast with the honey first, then add the liquid. The honey feeds the yeast faster, and you’ll see bubbles in 5 minutes instead of 10. (Yes, even if you’re impatient like me.)
- Measure rye flour by weight: Rye flour packs tighter than wheat flour. Scoop it into your measuring cup, then level it off—don’t press down. A cup of packed rye can be 15% heavier than loose, and your dough will turn gummy if you overdo it.
- Don’t over-knead the dough: Whole rye and wheat flour tire out faster than all-purpose. Knead just until the dough pulls away from the bowl—about 8-10 minutes by hand. Overwork it, and you’ll end up with a dense, chewy brick instead of a light loaf.
- Use a Dutch oven for steam: Place a metal bowl filled with boiling water in the oven before baking. The steam helps the crust rise higher and browns it faster—no need to fuss with a spray bottle. (Works best with a heavy pot, like Le Creuset.)
Essential equipment for this dish
Dutch Oven Essentials
A Dutch oven is your secret weapon for achieving that perfect rye bread crust. I swear by my Le Creuset 5.5-quart—it retains heat beautifully and creates steam that develops a crackly exterior while keeping the interior moist.
If you don’t own one, a cast-iron skillet with a lid works in a pinch, though it may not hold heat as evenly. For budget-friendly options, Lodge’s 5.5-quart Dutch oven delivers professional results without the premium price. 🔥
Digital Thermometer
Rye bread’s dense texture means it takes longer to cook through than white bread. An instant-read thermometer (like the Thermoworks Thermapen) ensures you pull it out at the perfect 190-200°F internal temperature.
Without one, you risk overbaking—rye bread continues cooking as it cools, so accuracy is key. I keep mine handy for all my bread baking; it’s a game-changer for nailing doneness every time. ⏰
Bench Scraper
Whole grain doughs are stickier than white flour doughs, and a bench scraper (like the OXO Good Grips) is a lifesaver for turning, shaping, and cleaning up dough without sticking. I use mine to gather dough edges during kneading and to transfer it to the baking sheet.
It’s also great for dividing dough if you’re making multiple loaves. A flexible silicone spatula works too, but a scraper gives that professional touch. 💪
Proofing Tools
For consistent rises, I rely on a proofing box (like the Breville Smart Oven Air Fryer) to maintain a steady 78-82°F environment—ideal for fermentation. No proofing box? A turned-off oven with the light on does the trick.
For measuring dough rise, a clear glass measuring cup lets you peek at progress without disturbing it. And if you’re short on time, a proofing basket (like the Kasten bread basket) helps shape and support the dough during its final rise. ✨
Wire Rack
Never let your rye bread cool on a counter or cutting board—it’ll trap moisture and make the crumb gummy. A wire cooling rack (preferably with non-stick feet) lets air circulate evenly, ensuring a crisp crust and firm crumb.
I love the OXO Good Grips design; it’s sturdy and fits snugly in my Dutch oven. Pro tip: Place it directly on the baking sheet while the bread cools to catch any crumbs. 💫
Nutrition facts
Frequently asked questions
Can I make this rye bread without a Dutch oven?
While a Dutch oven creates the best crust, you can use a cast-iron skillet with a lid or even bake it on a regular baking sheet. For best results, place the shaped dough on a parchment-lined sheet and bake at 375°F for 50-55 minutes, covering with foil for the first 30 minutes to retain moisture. The crust won’t be as crackly, but the interior will still be delicious.
Why does my rye dough feel too sticky?
Whole grain flours absorb more moisture, making the dough naturally sticky. If it’s too wet to handle, add 1-2 tablespoons of whole rye flour at a time until it comes together but remains slightly tacky. Avoid over-kneading—just work it until it’s smooth enough to shape. The stickiness is normal and won’t affect the final bread’s texture.
How can I make this bread lighter?
For a lighter loaf, extend the proofing time to 12-16 hours in the fridge instead of room temperature. Cold fermentation slows yeast activity, creating more air pockets. You can also reduce the whole rye flour by 1 cup and replace it with 1 cup all-purpose flour for a slightly less dense crumb. The crust will still be flavorful, just with a bit more airiness.
Can I add other seeds or mix-ins?
Yes! Try flaxseeds, pumpkin seeds, or chia seeds for extra nutrition. Toast them first for 3-4 minutes to enhance flavor. For herbs, add 1 tablespoon dried rosemary or thyme to the dough. Just remember that seeds and herbs will make the dough even stickier—add them after the first rise when shaping. The possibilities are endless!
Why did my bread turn out dense?
Dense rye bread usually means overproofing or insufficient kneading. Make sure the dough only rises until it’s 50-75% larger, not doubled. Also, knead for the full 8-10 minutes to develop gluten properly. If your kitchen is cold, proof near a warm oven with the light on. The dense texture might also come from using too much whole grain flour—try reducing by ½ cup next time.

- Pork Loin Pulled Pork Crock Pot Recipe: Slow-Smoked Tenderness With Zero Dryness - November 1, 2026
- Baked Potatoes in Crock Pot Recipe: Buttery Interiors and Crispy Top Magic - November 1, 2026
- Braised Beef Short Ribs Recipe: Crock Pot Fall-Off-Bone Magic in 6 Hours - November 1, 2026