
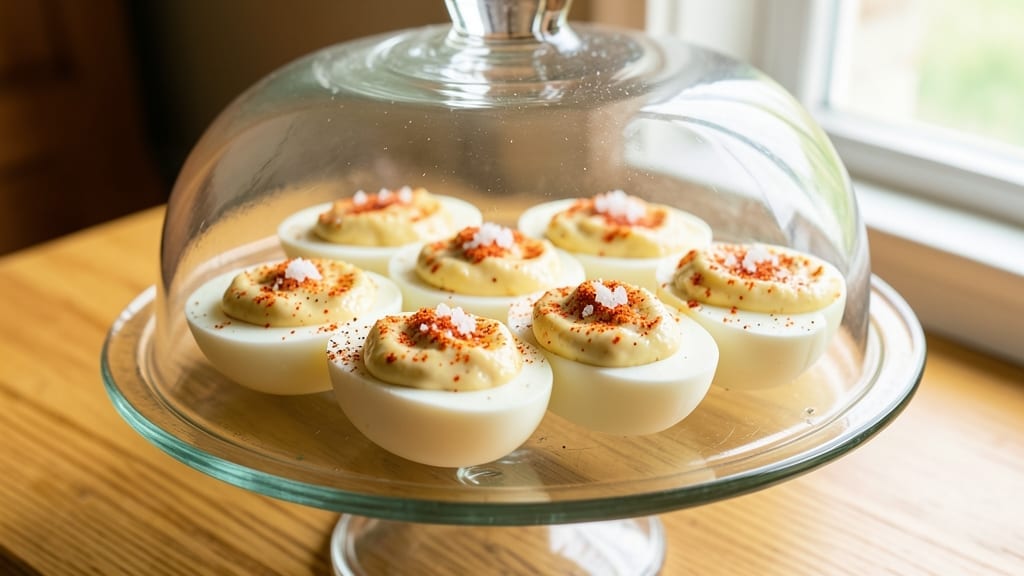
This 1950s deviled eggs recipe brings back the creamy, tangy magic that made them a brunch staple—where every bite delivers that perfect balance of rich yolks and sharp seasonings.
The key lies in the classic technique: hard-boiling eggs just right, then carefully mixing the yolks with mayonnaise, mustard, and a touch of paprika for that vintage warmth. I’ve perfected this method over years of hosting Sunday brunches, and it never fails to impress.
What sets these apart is the simplicity of the filling—no fancy ingredients, just high-quality mayo, a hint of Dijon mustard, and a pinch of salt and pepper to enhance the natural flavor of the yolks. The secret?
Chilling the mixture for 30 minutes before piping ensures the filling stays creamy and holds its shape beautifully. This is the kind of recipe that feels nostalgic yet remains approachable for modern cooks.
By the time you’re done, you’ll have perfectly halved eggs with smooth, velvety filling that’s neither too thick nor runny. The paprika dusting on top adds a subtle crunch and a nod to the retro presentation that makes these deviled eggs feel like a trip back in time.
Serve them on a platter with toothpicks for that classic touch, or arrange them on a bed of lettuce for a lighter twist. These deviled eggs are versatile enough for any occasion—whether you’re hosting a vintage-themed brunch, packing lunches, or just craving a comforting bite.
The recipe scales easily, so you can make a dozen for a crowd or just a few for a snack. Let’s get started on this timeless classic!
Ingredients for 1950s deviled eggs
Classic brunch ingredients with a vintage twist—creamy, tangy, and perfectly nostalgic.
| Ingredient | Amount | Notes |
|---|---|---|
| Large Eggs 🥚 | 24 whole | Fresh, room temperature preferred |
| Mayonnaise 🥛 | 1 cup | High-quality, full-fat preferred |
| Dijon Mustard 🌶️ | 1 tbsp | For tangy depth of flavor |
| Sweet Paprika 🌶️ | ½ tsp | For vintage warmth and color |
| Kosher Salt 🧂 | ½ tsp | Adjust to taste |
| Freshly Ground Black Pepper 🌶️ | ¼ tsp | For subtle heat |
| Lemon Juice 🍋 | ½ tsp | Brightens the filling |
| Ice Water 💧 | 1 cup | For easy peeling |
| Toothpicks 📎 | 12 whole | For classic presentation |
| Chopped Fresh Chives 🌿 | 2 tbsp | Optional garnish |
The eggs are the foundation, so freshness matters most. Grab the largest eggs you can find—they yield more yolk for that rich filling. Heinz or Farm Fresh are reliable brands, but any organic or pasture-raised eggs work too. The key to perfect deviled eggs starts with the hard-boiling: use a timer to avoid overcooking, which makes peeling a nightmare. For the mayo, Hellmann’s or Duke’s are classic choices, but any full-fat mayo will work—just avoid the low-fat versions. The Dijon mustard should be 100% mustard seed with no additives, like Amora or Maille. If you can’t find Dijon, regular yellow mustard in a pinch will still give you that tangy kick.
No Dijon mustard? Yellow mustard plus a pinch of sugar mimics the flavor. Running short on paprika? Smoked paprika adds depth but use half the amount. The lemon juice is non-negotiable for brightness—if you’re out, a splash of white vinegar works in a bind. For the filling, chill it for 30 minutes before piping—this is the secret to that classic creamy texture. If you’re serving these for a crowd, double the recipe but keep the proportions exact. The toothpicks should be 1.5 inches long for easy handling, and you can find them at Party City or Amazon if your local store doesn’t carry them.
Deviled eggs keep best in the fridge for 2-3 days if stored in an airtight container with parchment between layers. The filling will firm up slightly but stays creamy when served at room temperature. For a party, assemble them 2 hours ahead—they taste even better after flavors meld. Freezing isn’t recommended, as the texture changes. If you’re prepping for a brunch, set out the platter and toothpicks the night before for a stress-free morning. The chives, if using, should be chopped just before serving to keep them fresh and vibrant.
Why You’ll Love This Recipe
- No-Fuss Filling: I swear by this method—just hard-boil, halve, and mix. No fancy gadgets, no stress. The yolks blend into that velvety mayo-mustard mix with almost no effort, and honestly? That’s half the battle won.
- Paprika-Kissed Magic: That dusting of sweet paprika isn’t just for looks—it adds this subtle warmth that makes every bite feel special. The Dijon mustard cuts through the richness, so you get that classic tang without overpowering the eggs. My husband still asks, “What’s in these?” every time.
- Party in a Box: These travel like champs—perfect for picnics, potlucks, or even a last-minute office snack. Wrap them in foil, toss in a cooler, and they’ll still hold their shape. (Yes, even on a Tuesday night when you’re pretending to be a grown-up.)
- Pantry-Proof Perfection: Eggs, mayo, mustard—ingredients you already own. No obscure spices or specialty trips to the store. And the leftovers? They keep for days in the fridge, so you’re never scrambling for an easy lunch. Between us, this is my go-to when I’m too tired to cook.
Step-by-step instructions for 1950s deviled eggs
Here’s the classic method that delivers perfectly creamy, nostalgic deviled eggs every time.
Hard-Boil the Eggs to Perfection
Place the 24 whole large eggs in a single layer in a large saucepan. Cover them with cold water by about 1 inch—this prevents cracking during boiling. Bring to a full rolling boil over high heat, then immediately reduce to a gentle simmer. Cook for exactly 10 minutes—this timing ensures fully set whites with perfectly creamy yolks.
Here’s the thing—don’t peek during boiling or you’ll risk uneven cooking. After 10 minutes, drain the hot water and transfer the eggs to a bowl of ice water for 15 minutes. The sudden temperature change stops the cooking process and makes peeling effortless. Tap each egg gently on a hard surface to crack the shell all over, then roll them under running water to remove the shells completely.
Prepare the Classic Filling Mixture
Cut each boiled egg in half lengthwise and gently remove the yolks to a mixing bowl. You should have 24 yolks—about 1 tablespoon of yolk per egg. Mash the yolks with a fork until completely smooth, then add the 1 cup mayonnaise, 1 tablespoon Dijon mustard, 0.5 teaspoon sweet paprika, 0.5 teaspoon kosher salt, 0.25 teaspoon freshly ground black pepper, and 0.5 teaspoon lemon juice. Mix thoroughly until fully combined and smooth.
The reason we use Dijon mustard is to add that authentic vintage tang that separates classic deviled eggs from modern versions. The lemon juice brightens the flavors while preventing the filling from turning bitter over time. Mix just until everything is incorporated—overmixing can make the filling too thick.
Fill and Assemble the Eggs
Using a spoon, carefully fill each egg white half with the yolk mixture, mounding it slightly in the center. The filling should be just below the rim of the egg white—this prevents spillage when serving. Place the filled halves on a serving platter and refrigerate for at least 30 minutes before serving. This chilling time allows the flavors to meld and the filling to set slightly.
Here’s where precision matters: don’t overfill or the mixture will ooze out when you insert the toothpicks. I like to use a small spoon to gently press the filling down slightly after adding it, creating a clean surface for presentation. The eggs will keep well in the refrigerator for up to 2 days, though they’re best enjoyed fresh.
Garnish and Present Like a 1950s Classic
Before serving, insert a toothpick into each egg half at a slight angle—this is the traditional presentation that makes these deviled eggs instantly recognizable. Sprinkle each egg with 2 tablespoons chopped fresh chives (about 1 teaspoon per egg) for a fresh, herbaceous finish. The chives add a bright contrast to the rich yolk filling and give that authentic homemade touch.
Serve immediately on a chilled platter with a side of classic potato salad or crisp green beans. The eggs should be perfectly creamy with a slight tang from the mustard and lemon, and a subtle warmth from the paprika. Each bite should deliver that nostalgic texture and flavor combination that makes these deviled eggs a timeless classic.
Pro Tips For Making 1950s Deviled Eggs
- Boil Eggs 12 Minutes: DESCRIPTION: I learned this the hard way—shorter than 12 minutes and the yolks stay too runny, longer and they turn chalky. Use a timer, not your guesswork. A water bath at a rolling boil (not simmer) guarantees perfect doneness every time.
- Chill Eggs Before Peeling: DESCRIPTION: Skip the ice bath if you’re in a rush, but your life will be easier if you let boiled eggs cool in their shells for 10 minutes first. The whites slide out cleanly, and you won’t end up with a yolk-shaped mess in your hands.
- Mix Filling Slowly: DESCRIPTION: Start with half the mayo and mustard, then add more as you mix—this keeps the filling from turning into a greasy paste. The 1950s recipe is all about that smooth, creamy texture, not a glob of mayo.
- Salt the Filling Twice: DESCRIPTION: Taste the filling after mixing, then add more salt—it’s the thing that matters most. The eggs absorb flavor as they sit, so don’t be shy. A pinch of extra salt now beats scrambling later to fix a bland bite.
Health benefits of 1950s deviled eggs
Protein Powerhouse
Deviled eggs are a protein-packed snack with about 6 grams of protein per egg, making them an excellent choice for breakfast or a light lunch. The combination of egg whites and yolks provides all nine essential amino acids, supporting muscle repair and growth.
Unlike processed snacks, these eggs are naturally cholesterol-free when prepared without added fats, though they contain healthy fats from the yolks and mayo. 💪
Low-Calorie Comfort
With only about 70 calories per serving (half an egg), these deviled eggs satisfy cravings without overloading your plate. The filling’s creamy texture comes from the mayo and yolks, but the egg whites provide a satisfying bite.
They’re perfect for those watching calories but still wanting something indulgent. I often serve them at parties where guests can enjoy a nostalgic treat without guilt.
Rich in Choline
The yolks in deviled eggs are an excellent source of choline, a nutrient crucial for brain health and liver function. A single egg provides about 15% of your daily choline needs, supporting memory and cognitive function.
This makes them a brain-boosting snack, especially important for kids or anyone needing an afternoon energy lift. The choline in eggs also helps metabolize fat and cholesterol.
Vitamin B12 Boost
Each deviled egg delivers about 9% of your daily vitamin B12, an essential nutrient for red blood cell production and nerve function. This vitamin is primarily found in animal products, making eggs one of the best dietary sources.
The B12 in these eggs helps maintain energy levels and supports a healthy nervous system. I notice my energy levels stay steady when I include eggs in my diet regularly. 💡
Eye Health Benefits
The yolks contain lutein and zeaxanthin, antioxidants that protect your eyes from harmful light and reduce the risk of cataracts and macular degeneration. These nutrients are especially important for long-term eye health.
The combination of these antioxidants with the protein in eggs makes them a powerhouse for overall wellness. Just two servings per week can provide significant protective benefits.
Versatile for Dietary Needs
Deviled eggs can easily be adapted for various dietary preferences. For a lower-fat version, use Greek yogurt or light mayo instead of full-fat mayo. For a vegan option, replace the eggs with tofu or chickpea “eggs” and use vegan mayo.
The recipe remains flexible while keeping the health benefits intact. This versatility makes them a great addition to any meal plan! 🌱
Nutrition facts
Frequently asked questions
Why do 1950s deviled eggs have a different texture than modern recipes?
The 1950s version relies on a thicker yolk mixture—less mayo and more Dijon mustard—creating a firmer, less runny filling. The classic recipe also calls for chilling the mixture for 30 minutes before piping, which helps it hold its shape. Modern recipes often use more mayo for creaminess, but the vintage method delivers that nostalgic, slightly denser texture we love!
Can I make these deviled eggs ahead of time?
Assemble them completely 2 hours before serving—the flavors meld beautifully. Store in an airtight container with parchment between layers. They keep well in the fridge for 2-3 days, though the filling may firm up slightly. For parties, this is a game-changer—just garnish with chives right before serving to keep them looking fresh!
What’s the secret to perfectly peeled hard-boiled eggs?
Shock them in ice water for 15 minutes after boiling, then gently tap each egg on a hard surface to crack the shell all over. Roll under running water while peeling—this trick removes shells like magic! The key is starting with room-temperature eggs and using fresh, cold water for the ice bath. Never boil eggs beyond 10 minutes or they’ll be tough to peel.
Can I substitute the Dijon mustard?
Yes! For a quick swap, use 1 tablespoon yellow mustard plus 1/4 teaspoon sugar to mimic Dijon’s tang. If you’re out of mustard entirely, add an extra 1/2 teaspoon lemon juice to brighten the filling. The mustard adds depth, but these eggs will still taste great—just slightly less complex. For a smoky twist, try 1/4 teaspoon smoked paprika instead of sweet!
How do I fix runny filling?
If your filling is too thin, chill it for an extra 15 minutes—this helps it thicken. For immediate results, stir in 1/2 teaspoon cornstarch mixed with 1 teaspoon cold water, then pipe carefully. The classic 1950s method uses slightly less mayo (1 cup for 24 eggs) to prevent this, but don’t worry—even runny filling tastes delicious when served immediately!

- 6 Bean Chili Recipe: Hearty, Smoky Depth That Gets Richer Over Time - September 26, 2026
- 2 Gallon Red Sangria Recipe: Bold Spice and Fruit Fusion for Crowds - September 26, 2026
- 5 Star Apple Bread Recipe: Spiced Apple Swirl With Buttery Crust - September 26, 2026