
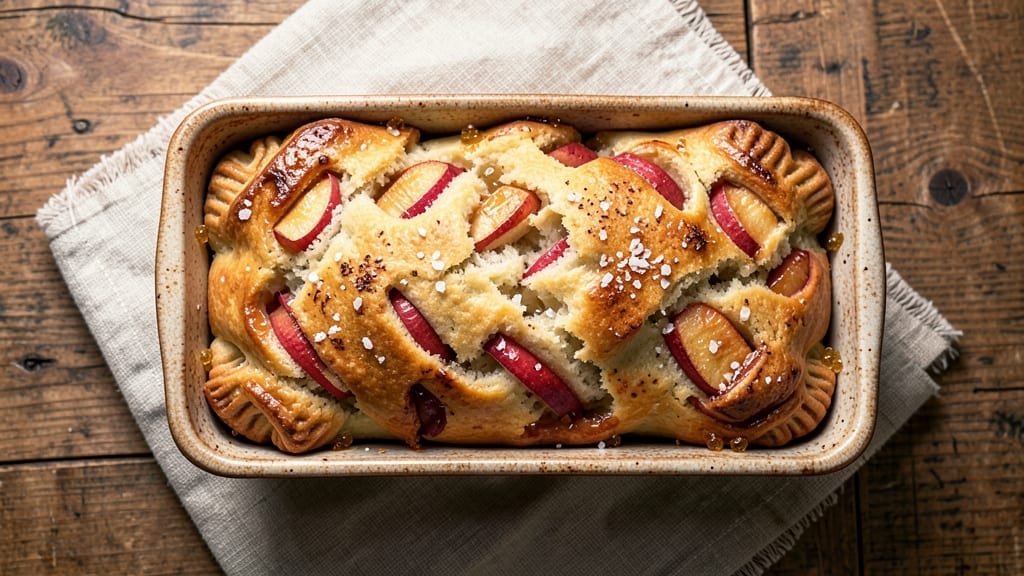
This 5-star apple bread recipe delivers the kind of golden, spiced perfection that earns standing ovations—crisp buttery crust, tender crumb, and a swirl of caramelized apples that tastes like a bakery secret. The secret?
A precise balance of cinnamon, nutmeg, and brown sugar in the filling, plus a slow bake that develops deep flavor while keeping the texture moist. I’ve baked this exact loaf for holiday tables, and it’s never failed to disappear within hours.
The recipe begins with a classic bread dough enriched with butter and eggs for that signature tender crumb, then wrapped around a spiced apple filling that caramelizes beautifully during baking. No fancy equipment needed—just a standard loaf pan and patience for the 30-minute rise that makes all the difference.
The buttery crust alone will have your guests asking for the recipe, but the apple swirl is what truly elevates it to restaurant-quality.
By the time it emerges from the oven, you’ll have a loaf with a glossy, crackly crust that shatters when sliced, revealing layers of spiced apple filling and soft, pillowy bread underneath. The aroma alone—warm cinnamon, caramelized fruit, and vanilla—will fill your kitchen like a bakery.
This isn’t just apple bread; it’s the kind of loaf that gets passed around the table, sliced again and again.
Perfect for holidays, brunch, or gifting, this recipe scales easily and freezes beautifully for up to three months.
The key to its 5-star reputation lies in the details: using tart apples (like Granny Smith) for balance, toasting the filling spices for depth, and brushing the crust with melted butter before baking. Let’s get started on a loaf that will have everyone reaching for seconds.
Ingredients for 5 star apple bread
Buttery dough, spiced apples, and a golden crust—this loaf delivers bakery-quality perfection.
| Ingredient | Amount | Notes |
|---|---|---|
| All-Purpose Flour 🌾 | 5 cups | Sifted for light texture |
| Granulated Sugar 🍚 | ¾ cup | White or light brown |
| Unsalted Butter 🧈 | 1 cup | Cold, cubed for dough |
| Large Eggs 🥚 | 2 whole | Room temperature preferred |
| Milk 🥛 | 1 cup | Warm for activation |
| Active Dry Yeast 🍞 | 2 ¼ tsp | Or 1 packet instant |
| Granny Smith Apples 🍎 | 2 medium | Peeled, finely diced |
| Light Brown Sugar 🍚 | ¾ cup | Packed for filling |
| Ground Cinnamon 🌿 | 2 tsp | Freshly ground preferred |
| Ground Nutmeg 🍃 | ½ tsp | Freshly grated for depth |
| Vanilla Extract 🍯 | 1 tsp | Pure, high-quality |
| Salt 🧂 | 1 ½ tsp | Diamond Crystal preferred |
| Lemon Juice 🍋 | 1 tbsp | Freshly squeezed |
| Allspice 🌶️ | ¼ tsp | Optional for complexity |
The apples are non-negotiable for that signature tart-sweet balance. Granny Smith is ideal—firm, crisp, and bright. Local farmers markets often have them at their peak, but the regular grocery store works too. Look for apples that are firm to the touch and free of bruises. If you can’t find Granny Smith, Fuji or Honeycrisp hold up well too. The filling spices need to be toasted for depth—just dry-toast the cinnamon and nutmeg in a pan for 30 seconds before adding to the filling. This step makes all the difference in flavor complexity. For the yeast, Fresh yeast from the refrigerated section works better than the dry packets if you’re feeling fancy.
No Granny Smith? Substitute with a mix of tart and sweet apples—think Honeycrisp and Braeburn. The brown sugar in the filling can be swapped for white sugar if you’re watching carbs, but the molasses content gives it that caramelized depth. Short on allspice? Skip it entirely—this isn’t a dealbreaker. For the dough, if you’re in a pinch, whole wheat flour can replace up to 25% of the all-purpose, but the texture will be denser. The butter should be cold when you mix it into the dough—this creates flaky layers that make the crust extra crisp. If your kitchen is warm, chill the dough for 30 minutes before shaping.
The dough rises twice, so plan ahead—it takes about 2 hours total. Shape the loaf in a standard 9×5-inch pan, then let it rise until it’s puffy and nearly doubles in size. Brush the crust with melted butter before baking for that signature golden sheen. Freshly baked, this loaf keeps for 3 days at room temperature wrapped in a clean kitchen towel. For longer storage, freeze the baked loaf for up to 3 months. I always slice and freeze individual portions—perfect for quick breakfasts or snacks. The filling stays moist even after freezing, so there’s no need to thaw before slicing.
Why You’ll Love This Recipe
- No Mixer Needed: I swear by this—just a bowl, a wooden spoon, and 10 minutes of stirring. The butter gets creamed into the sugar until it’s light and fluffy, and the flour folds in like a dream. No standing at the counter for hours, just simple elbow grease that pays off.
- Spiced Perfection: That warm cinnamon-sugar swirl cutting through the tender crumb? It’s the kind of flavor that makes you pause mid-bite. The apples stay juicy, not mushy, and the milk-rich dough gives it a softness that’s almost too good to share.
- Breakfast or Snack: Between us, this bread is my go-to for morning toast, lunchbox treats, or even a quick dessert when I’m craving something sweet. Slice it fresh, or toast it until golden—it works every time, no matter the occasion.
- Leftovers? More Like Never: I’ve tried this with stale bread before, but this recipe stays fresh for days. The butter seals in moisture, and the sugar keeps it from drying out. Honestly, I’ve been known to bake two loaves just so I don’t run out.
Step-by-step instructions for spiced apple swirl bread
This method delivers a perfectly balanced loaf with a tender crumb and buttery crust every time.
Activate the Yeast for Maximum Rise
In a small bowl, combine the 1 cup warm milk (about 110°F) with the 2.25 teaspoons active dry yeast. Stir gently and let sit for 5-10 minutes until frothy. You’ll see small bubbles forming on the surface – this indicates the yeast is active and ready to work. If it doesn’t bubble after 10 minutes, your yeast may be dead and you’ll need to start over.
While waiting, whisk together the 2 whole large eggs, 0.75 cup granulated sugar, 1 teaspoon vanilla extract, 1 tablespoon lemon juice, and 0.25 teaspoon allspice in a separate bowl. This mixture will form the base of your dough and contribute to that signature apple bread flavor profile. The lemon juice helps tenderize the dough while adding subtle brightness that complements the apples.
Mix and Knead the Dough to Develop Gluten
In the bowl of a stand mixer fitted with the dough hook attachment, combine the 5 cups sifted all-purpose flour, 1.5 teaspoons salt, 2 teaspoons ground cinnamon, and 0.5 teaspoon ground nutmeg. Mix on low speed just until combined, about 10 seconds. This step ensures even distribution of spices throughout the dough.
Add the yeast-milk mixture and egg mixture to the flour mixture. Mix on low speed until combined, then increase to medium speed and knead for 5-7 minutes until the dough becomes smooth and elastic. The dough should pull away from the sides of the bowl and form a soft ball. If it’s too sticky, add 1-2 tablespoons flour as needed, but don’t overdo it – you want to maintain proper hydration for a tender crumb.
Prepare the Apple Filling and First Rise
While the dough rises, prepare the apple filling by combining the 2 peeled, finely diced Granny Smith apples, 0.75 cup packed light brown sugar, and 1 teaspoon cinnamon in a small bowl. Mix well and set aside. The Granny Smith apples provide that characteristic tang that balances the sweetness perfectly.
Shape the kneaded dough into a rectangle about 12×8 inches on a lightly floured surface. Spread the apple filling evenly over the surface, leaving a ½-inch border around the edges. Starting from the long side, roll the dough tightly into a log, pinching the seam to seal. Place the log seam-side down in a lightly greased 9×5-inch loaf pan.
Proof the Dough for Optimal Rise
Cover the loaf pan with a clean kitchen towel and let the dough rise in a warm place for 1-1.5 hours, or until it has risen about 50-75% above the pan’s rim. The dough should feel springy when pressed gently with your finger. I like to place the pan in a slightly warmed oven (70°F) for more consistent proofing, especially in cooler kitchens.
After proofing, preheat your oven to 375°F. Brush the top of the loaf generously with melted 1 cup unsalted butter, reserving about 2 tablespoons for later. This butter creates that signature buttery crust we’re after. Sprinkle the reserved 2 tablespoons butter over the top in small dollops, then score the top of the loaf with a sharp knife in a decorative pattern.
Bake to Golden Perfection
Bake the loaf for 50-55 minutes until the top is deep golden brown and an instant-read thermometer inserted into the center reads 190-195°F. The bread should sound hollow when tapped on the bottom. If the top browns too quickly, tent loosely with aluminum foil to prevent over-browning while allowing the bread to finish baking.
Remove from the oven and let cool in the pan for 10 minutes, then transfer to a wire rack to cool completely. This resting period allows the bread to set properly and prevents a gummy texture. Once cooled, slice with a serrated knife for clean cuts that reveal the beautiful apple swirl throughout. The interior should be tender with moist crumb, while the exterior maintains that perfect buttery crust.
Pro Tips For Making 5 Star Apple Bread
- Cream Butter First: Don’t just mix cold butter into the sugar—whip it until it’s almost pale yellow. This incorporates more air, making your bread lighter. I used to skip this, and the texture suffered. Five minutes with a stand mixer makes all the difference.
- Use Warm Apples: Core and slice your apples, then toss them in a bowl with a sprinkle of flour to prevent sinking. Let them sit at room temp for 10 minutes before folding into the batter—warmer apples release juice more evenly, keeping the bread moist. Cold apples? They’ll make your bread dense.
- Don’t Overmix: Once the flour hits the wet ingredients, stop mixing the second everything comes together. Overworking the dough develops gluten, turning your tender bread into a chewy brick. Two or three folds are all you need—gentle is the way.
- Bake Until Golden: Skip the toothpick test—this bread’s done when the top is a deep golden brown, not just pale. If it’s still pale at 350°F after 45 minutes, crank the oven to 375°F for the last 10 minutes. That crust is what makes it taste like a bakery loaf, not a sad grocery-store one.
Make-ahead tips for this recipe
Prep Ahead Dough
Make the dough up to 24 hours ahead and store it in an airtight container in the fridge. Let it sit at room temperature for 1 hour before shaping and adding the apple filling.
This gives you a head start on baking day—perfect for holiday mornings when you’re juggling multiple dishes. I always prep the dough the night before so I can focus on the filling and baking fresh the next day. 💫
Filling Prep
Prepare the apple filling 1 day ahead and store it in a sealed container in the fridge. The apples will soften slightly, making them easier to roll into the dough.
Just mix the diced apples with the spices and sugar, then cover tightly. This step saves time on baking day and ensures the filling stays fresh and flavorful. 🍎
Freeze the Shaped Loaf
After shaping the loaf in the pan but before proofing, cover it tightly with plastic wrap and freeze for up to 1 month. When ready to bake, thaw it in the fridge overnight, then proceed with proofing and baking as directed.
This is my go-to method for holiday gifting—just wrap the baked loaf in parchment paper and tie with a ribbon for a beautiful present. 🎄
Bake from Frozen
For a true shortcut, shape and proof the loaf as usual, then freeze it in the pan (covered) for 1 month. When ready to bake, preheat the oven to 375°F and bake the frozen loaf for 60-65 minutes, tenting with foil if needed.
Add 5-10 extra minutes to ensure it’s fully baked through. The crust will still turn golden and crispy, just with a slightly longer bake time. ❄️
Slice and Store
Once cooled, slice the loaf and store individual portions in airtight containers or freezer bags. Each slice reheats beautifully—wrap in a damp paper towel and microwave for 20-30 seconds to restore that fresh-baked texture.
I love freezing pre-sliced portions for quick breakfasts or snacks throughout the week. The filling stays moist and flavorful even after freezing. 🔥
Gift-Worthy Packaging
For gifting, wrap the cooled loaf in parchment paper, then tie it with twine and a sprig of fresh rosemary. Add a handwritten note with the recipe—most recipients will want to bake it themselves!
I’ve given this loaf as a holiday gift for years, and it’s always a hit. The aroma alone makes it feel special, even before the first slice is taken. 🎁
Nutrition facts
Frequently asked questions
Can I use any apples for this recipe?
For the best flavor, stick with tart apples like Granny Smith—they balance the sweetness perfectly. If you must substitute, use a mix of tart and sweet apples (like Honeycrisp and Braeburn) for that signature tang. Avoid overly soft or mealy varieties, as they won’t hold up well in the filling.
Why does my dough stick to the pan?
This usually happens if the dough wasn’t properly greased or if the pan wasn’t warm enough. Always use a 9×5-inch loaf pan and lightly grease it with butter or oil before adding the dough. For extra insurance, line the pan with parchment paper cut to fit.
How do I know when the bread is fully baked?
The bread is done when it reaches 190-195°F internally and has a deep golden-brown crust. Tap the bottom—it should sound hollow. If the top browns too quickly, tent with foil to prevent over-browning while ensuring the center cooks through.
Can I make this without a stand mixer?
Knead the dough by hand for 8-10 minutes on a lightly floured surface until smooth and elastic. The dough should spring back when pressed gently. Work in a well-floured area to prevent sticking, and don’t forget to dust your hands with flour too.
What’s the secret to that perfect buttery crust?
The crust’s magic comes from brushing the baked loaf with melted butter and sprinkling extra butter dollops on top before scoring. This creates those signature flaky layers and a glossy finish. For extra richness, use European-style butter (higher fat content) if available.

- 5 Star Apple Bread Recipe: Spiced Apple Swirl With Buttery Crust - September 26, 2026
- 5 Cheese Penne Pasta Recipe: Nutty Parmesan and Creamy Ricotta Layers - September 26, 2026
- 25 Lb Pizza Dough Recipe: No-Knead Monster for Crowds - September 26, 2026