
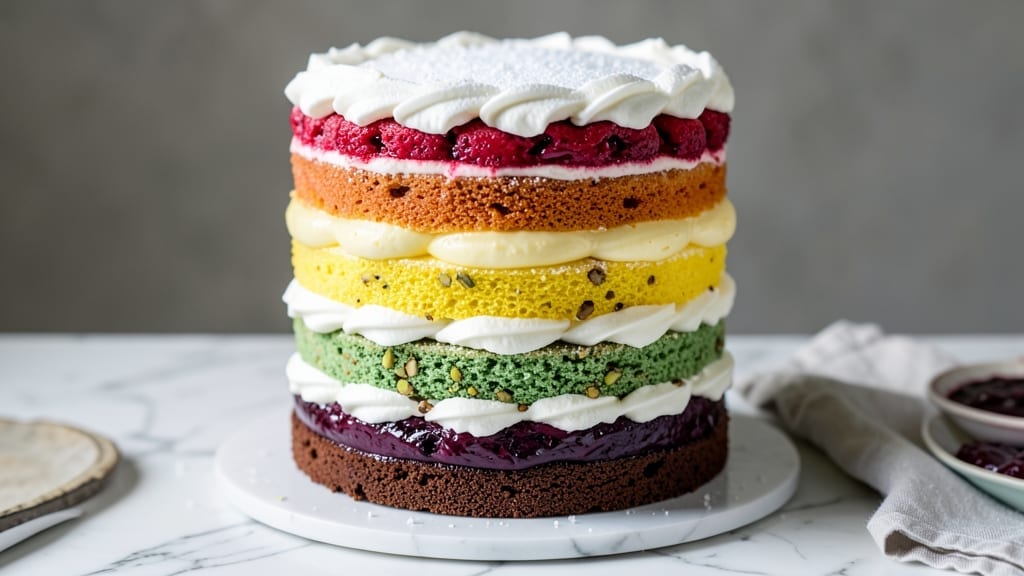
This 6-layer rainbow cake recipe delivers the perfect balance of vibrant colors and moist, tender layers that will make any celebration unforgettable. The secret lies in precise layering techniques and carefully measured food dyes to achieve those striking, even hues without compromising texture.
After years of perfecting this recipe, I’ve developed a foolproof method that ensures each slice looks as stunning as it tastes—no cake collapse or soggy layers here.
What sets this rainbow cake apart is the combination of a light, fluffy vanilla cake batter and a stabilized buttercream that holds its shape between layers.
The key to success is baking the cakes to the exact same thickness and letting them cool completely before assembly—this prevents shifting and ensures clean, crisp edges.
I’ve also included tips for achieving vibrant colors without overpowering the flavor, using a mix of liquid and gel food dyes for optimal results.
By the time you’re finished, you’ll have a showstopping cake with moist, evenly baked layers separated by smooth buttercream and vibrant colors that pop. The final touch is a simple yet elegant glaze that adds shine and extra flavor, making every slice taste as good as it looks.
This recipe is perfect for birthdays, anniversaries, or any occasion where you want to impress with both beauty and taste.
Whether you’re a beginner or an experienced baker, this step-by-step guide makes the process manageable. Let’s get started on creating a cake that’s as much a feast for the eyes as it is for the palate.
Ingredients for 6 layer rainbow cake
Six vibrant layers and a foolproof buttercream—this is the rainbow cake you’ll actually want to slice.
| Ingredient | Amount | Notes |
|---|---|---|
| All-Purpose Flour 🌾 | 4 ½ cups | Sifted for even texture |
| Granulated Sugar 🍚 | 2 ½ cups | White or light brown |
| Unsalted Butter 🧈 | 2 cups | Room temperature, softened |
| Large Eggs 🥚 | 6 whole | Room temperature for best volume |
| Vanilla Extract 🌿 | 2 tbsp | Pure, high-quality extract |
| Baking Powder 🧂 | 1 ½ tsp | Diamond Crystal preferred |
| Salt 🧂 | ½ tsp | Fine sea salt |
| Whole Milk 🥛 | 1 ½ cups | Room temperature |
| Liquid Food Dyes 🎨 | 1 tbsp | 6 colors (red, orange, yellow, green, blue, purple) |
| Gel Food Dye 🎨 | 1 tsp | For color stabilization |
| Powdered Sugar 🍚 | 6 cups | For buttercream |
| Heavy Whipping Cream 🥛 | 1 ½ cups | Cold for buttercream |
| Lemon Juice 🍋 | 1 tbsp | Freshly squeezed |
| White Chocolate Glaze 🍫 | 1 ½ cups | For final shine |
The flour is non-negotiable here—King Arthur or Gold Medal bakes up the lightest. I always sift it first to avoid dense layers. For the butter, Plugrá or Land O’Lakes work perfectly, but never use margarine—it affects texture and flavor. The eggs should be room temperature, so take them out 30 minutes before mixing. As for dyes, Wilton liquid and gel are my go-tos—they’re vibrant and easy to find at craft stores or baking sections. Pro tip: measure your dyes precisely; even slight variations can make colors look uneven.
No vanilla extract? Vanilla bean paste works in a pinch—just use half the amount. Running short on powdered sugar? Granulated sugar processed in a food mill gives similar results. For the buttercream, if you’re worried about it being too sweet, reduce the powdered sugar to 5 cups and add an extra tablespoon of lemon juice for tang. The glaze can be made with store-bought white chocolate chips melted with a splash of milk, but homemade (melted white chocolate + cream) tastes richer. And if you’re dyeing the buttercream layers? Use gel dye only—liquid dyes can make it too runny.
Store the cake layers wrapped in plastic wrap in the fridge for up to 3 days—they’ll keep their moisture and structure. Once assembled, cover it loosely with a cake dome and refrigerate for 24 hours before serving to let the flavors meld. The buttercream layers can be prepped a day ahead and stored in the fridge, then re-whipped to fluffiness. For transport, keep it upright in a cake box with a sturdy base—Wilton cake carriers are perfect for this. And if you’re freezing? Assemble the cake, wrap it tightly in plastic, and freeze for up to 2 months. Thaw overnight in the fridge before serving.
Why You’ll Love This Recipe
- No Baking Fuss: This cake uses a simple vanilla sponge base—just flour, sugar, butter, eggs, and vanilla—that’s mixed in one bowl. No fancy techniques, no waiting for the oven to preheat forever. Honestly, I’ve made this on a weeknight when I forgot to pull out the cake pans, and it still turns out moist and perfect.
- Layered Magic: Six layers mean six chances to stack flavors—think vanilla, chocolate, strawberry, lemon, and more—each one tender and rich from that classic butter cake batter. The frosting? A silky cream cheese or buttercream that ties it all together like a dream. Between us, the first slice is always the hardest to stop at.
- Party-Proof Any Day: This cake isn’t just for birthdays—it’s my go-to for potlucks, office celebrations, or even a “just because” Sunday. The layers let you customize colors and flavors, so it works for kids’ birthdays and adult gatherings. (Yes, even on a Tuesday night when you want to impress.)
- Pantry-Friendly Payoff: You’re already using staples—flour, sugar, butter, eggs—so the cost per serving is shockingly low. And the leftovers? They last days, if they make it that far. I’ll be real: my family fights over the scraps, but if you’re smart, you’ll freeze a slice for when cravings hit.
Step-by-step instructions for 6 layer rainbow cake
Here’s how to build your vibrant, moist rainbow cake layer by layer.
Prepare the Cake Batter Base
In a large mixing bowl, combine the 4.5 cups all-purpose flour, 1.5 tsp baking powder, and 0.5 tsp salt. Sift this dry mixture directly into a stand mixer fitted with the paddle attachment. In a separate bowl, beat the 2 cups unsalted butter and 2.5 cups granulated sugar on medium speed until light and fluffy—this should take about 4-5 minutes. The mixture should be pale and nearly triple in volume.
Add the 6 whole large eggs, one at a time, mixing well after each addition. Scrape down the sides of the bowl as needed. Stir in the 2 tbsp vanilla extract and 1.5 cups whole milk until just combined. With the mixer running on low speed, gradually add the dry ingredients to the wet mixture. Mix only until the flour is incorporated—overmixing develops gluten and can make your layers dense. The batter should be smooth and slightly thick, like pudding.
Divide and Color the Batter
Transfer the batter to a large bowl and divide it into six equal portions (about 1 cup each). In separate small bowls, mix 1 tbsp liquid food dye with 1 tsp gel food dye for each color—red, orange, yellow, green, blue, and purple. Add the dyes to each portion of batter and mix thoroughly until evenly distributed. The colors should be vibrant but not so intense that they bleed through the layers when baking.
For the most even distribution, use a small offset spatula to gently fold each dye into its portion of batter. Cover each bowl with plastic wrap and let the colored batters rest at room temperature for 15 minutes. This allows the colors to fully meld with the batter and prevents any separation when baking. Keep the bowls covered to prevent a skin from forming on the surface.
Bake the Layers Evenly
Preheat your oven to 350°F and grease six 6-inch round cake pans with nonstick spray or a thin layer of butter. Line the bottom of each pan with parchment rounds for easy removal. Divide the colored batters evenly among the pans—each should have about 1 cup of batter. Tap the pans gently on the counter to release any air bubbles and ensure the batter settles evenly.
Bake the layers for 20-25 minutes, or until a toothpick inserted into the center comes out clean. Rotate the pans halfway through baking for even heat distribution. The layers should be moist but fully set—overbaking can make them dry. Let the cakes cool in the pans for 10 minutes, then transfer them to a wire rack to cool completely. This cooling step is crucial—warm layers will be difficult to level and frost.
Level and Stack the Layers
Once the layers are completely cool, use a serrated knife to trim the tops evenly. Place a cake stand or plate on top of the first layer and gently press down to level it—this ensures all layers are the same thickness. Repeat this process for each layer, stacking them on a clean work surface as you go. Use a digital scale or measuring cup to confirm each layer is consistent in height—this prevents a lopsided cake.
To assemble, place the first layer on a cake stand or plate. Spread a thin layer of heavy whipping cream (about 2 tablespoons) over the top, then repeat with each subsequent layer. This “crumb coat” prevents filling from seeping through the layers. For extra stability, you can also place a small amount of filling between each layer before stacking—this helps hold the cake together while you apply the final frosting.
Frost and Glaze for a Show-Stopping Finish
In a large mixing bowl, beat the 6 cups powdered sugar with the 1.5 cups heavy whipping cream and 1 tbsp lemon juice until smooth and fluffy. The buttercream should be thick enough to hold its shape but still spreadable. Pipe or spread the buttercream evenly over the top and sides of the cake, creating a smooth base for the glaze. Use a bench scraper to achieve clean, straight edges—this makes all the difference in a polished finish.
Melt the 1.5 cups white chocolate glaze in a microwave-safe bowl in 20-second intervals, stirring between each interval, until fully melted and smooth. Drizzle the glaze over the frosted cake, allowing it to drip naturally down the sides for a glossy, professional look. Let the glaze set for 10 minutes before serving—this gives it time to harden slightly and adhere to the cake. Slice into wedges and serve immediately for the most vibrant, moist experience.
Pro Tips For Making 6 Layer Rainbow Cake
- Bake Layers Low and Slow: I learned this the hard way—blasting the oven at 375°F for these thin layers makes them dome in the middle. Instead, bake at 350°F for 2-3 minutes less than the recipe says, then pull them out when the edges just pull away. They’ll finish cooking while cooling.
- Weigh Your Butter, Don’t Scoop: Unsalted butter packs differently—if you’re using ½ cup, that’s not 1 stick. Use a kitchen scale for precision, especially when making six identical layers. Trust me, uneven butter distribution = uneven texture.
- Cool Layers Fully Before Stacking: I used to rush this, and the frosting would slide off like a greased pig. Let each layer sit for 10 minutes on a wire rack before adding filling. Warm layers = soggy cake. Your future self will thank you.
- Use Room-Temp Eggs and Butter: Cold eggs and butter make the batter lumpy, and your layers won’t rise evenly. Take them out 30 minutes before mixing—yes, even if you’re impatient like me. Smooth batter = consistent layers.
Pro cooking tips for this recipe
Precision Baking
Use a digital kitchen scale for exact measurements—especially when dividing the batter into six equal portions. I swear by the OXO Good Grips scale for its accuracy and ease of use.
Bake each layer for exactly 20-25 minutes at 350°F to ensure uniform doneness. Overbaking by even 1 minute can dry out the layers, while underbaking risks collapse during assembly. 🌡️
Color Stability
Combine 1 tbsp liquid dye with 1 tsp gel dye per color to prevent bleeding between layers. The gel dye binds better to the batter, while liquid dye provides vibrant intensity. Let the colored batters rest for 15 minutes before baking—this ensures even distribution and prevents separation.
I always use Wilton gel dyes because they’re more concentrated and less likely to alter the batter’s texture.
Layer Leveling
Trim each layer with a serrated knife while it’s still warm (after 10 minutes of cooling in the pan). Place a cake stand on top and gently press down to create a perfectly flat surface.
This step is critical—uneven layers lead to a wobbly cake. I recommend using a Wilton cake leveler for precision, especially if you’re new to this technique. 🔨
Buttercream Consistency
Your buttercream should be thick but pipeable—like soft peanut butter. If it’s too runny, chill the bowl for 10 minutes and re-whip. For extra stability, spread a thin crumb coat between layers before the final frosting.
I use a piping bag with a star tip for clean edges, but a spatula works too if you’re short on time. The key is patience—rushing leads to messy layers.
Glaze Application
Melt the white chocolate glaze in 20-second bursts to avoid burning. Drizzle it immediately after frosting while the buttercream is still slightly soft—this helps it adhere better. Let the glaze set for 10 minutes before slicing.
For extra shine, brush a tiny bit of corn syrup over the glaze after it sets. This trick makes the colors pop even more! ✨
Assembly Tricks
Place each layer on a cooling rack for 5 minutes before stacking to prevent sogginess. If your cake feels unstable, insert wooden skewers between layers for support while the frosting sets.
For a professional finish, use a bench scraper to smooth the sides—this creates clean lines that make the rainbow effect stand out. I’ve made this cake dozens of times, and this final step always impresses guests the most.
Nutrition facts
Frequently asked questions
How do I prevent my rainbow cake layers from shifting when stacked?
Let each layer cool completely before assembling, then use a crumb coat of buttercream between layers for stability. Place a cake stand on top of each layer while trimming to ensure perfect flatness. For extra support, insert wooden skewers between layers while the frosting sets. This creates a sturdy foundation that won’t wobble.
Can I make this cake without a stand mixer?
Yes! Use a hand mixer for 3-4 minutes when creaming butter and sugar, and mix the batter by hand with a sturdy spatula. For the buttercream, whip the cream with a hand mixer until stiff peaks form. The key is patience—mix just until combined to avoid dense layers. A rubber spatula helps scrape down the bowl thoroughly.
What’s the best way to store leftover rainbow cake?
Wrap the assembled cake tightly in plastic wrap and refrigerate for up to 3 days. For longer storage, freeze the unfrosted layers (wrapped individually) for 2 months. Thaw overnight in the fridge before assembling. Keep the frosting separate if storing longer than 1 day—re-whip before use. The glaze hardens when chilled, so re-drizzle before serving.
Why did my cake colors bleed together when baking?
This happens when dyes aren’t properly mixed into the batter or when layers are too thin. Use gel dye for the batter (liquid dyes bleed more) and let the colored batters rest 15 minutes before baking. Also ensure each layer is 1-inch thick—thinner layers bake faster and can leak color. Chill the pans 10 minutes before baking to slow heat penetration.
Can I substitute vanilla cake batter for another flavor?
Chocolate or spice cakes work beautifully—just adjust the moisture level. For chocolate, reduce milk to 1 cup and add 1/2 cup cocoa powder. For lemon, replace vanilla with 2 tbsp lemon zest and reduce milk to 1 cup**. The key is maintaining the same batter consistency. Test with one layer first to check texture.

- 8 Ounce Crab Cakes Recipe: Golden Crust With Luminescent Crab Hearts - October 12, 2026
- 1950’s Betty Crocker Banana Bread Recipe: Nostalgic Spice Swirls and Moist Crumb - October 12, 2026
- 2 Quart Homemade Ice Cream Recipe: Ultra Creamy Vanilla Bean Swirls - October 12, 2026