
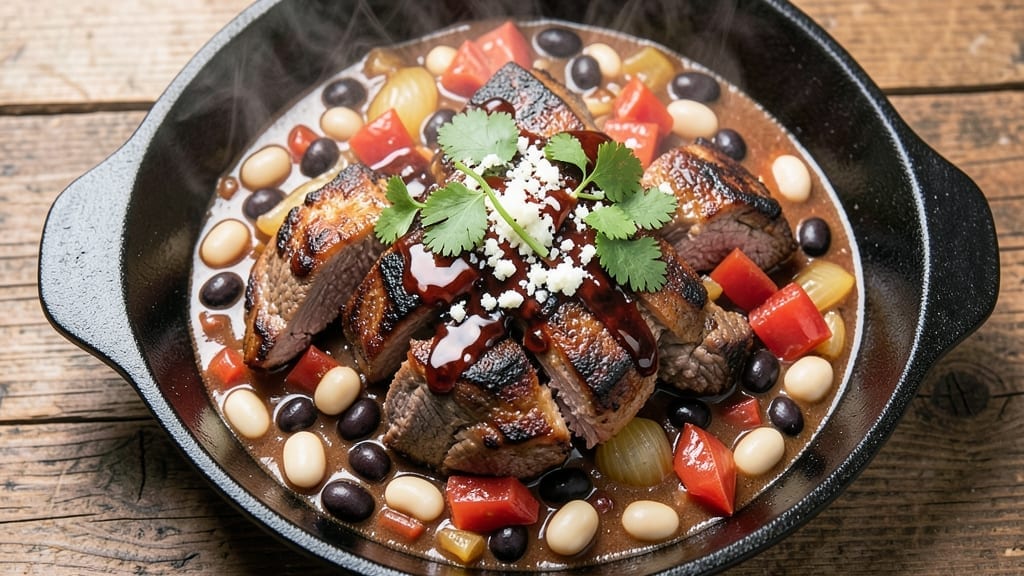
A 2-hour chili recipe that delivers restaurant-quality depth and smoky richness without requiring all day at the stove—this is the one I return to again and again when I need hearty, flavor-packed comfort food.
The secret lies in slow-building layers of flavor: browning the meat thoroughly for a deep, meaty foundation, then letting spices and tomatoes meld together over time. What sets this apart is the balance of heat and smokiness, achieved through careful seasoning and a touch of dark chocolate for complexity.
This method transforms tough cuts of beef into tender, shreddable pieces while developing a chili that’s thick enough to stand on its own but still luscious enough to coat every spoonful.
The 2-hour window includes prep time, so you won’t be stuck in the kitchen all day—just 15 minutes of active work followed by hands-off simmering. I’ve perfected this recipe over years of testing, ensuring it’s foolproof whether you’re feeding a crowd or meal prepping for the week.
By the final hour, your kitchen will smell like a smoky campfire, and the chili will have developed that perfect harmony of flavors—deep, rich, and slightly sweet with just the right kick.
The beans are tender but still hold their shape, and the meat falls apart at the touch of a spoon. Serve it with crusty bread or cornbread to soak up every last drop of that velvety sauce.
This chili keeps well for days, making it ideal for meal prep or doubling for leftovers. The recipe scales easily, so you can adjust the ingredients to suit your family’s preferences.
Let’s get started on creating a chili that tastes like it’s been simmering all day, even though it only takes two hours.
Ingredients for 2 hour chili
Sixteen ingredients for a chili that tastes like it simmered all day.
| Ingredient | Amount | Notes |
|---|---|---|
| Chuck Roast 🥩 | 2 lb | Cut into 1-inch cubes |
| Yellow Onion 🧅 | 1 whole | Diced, medium size |
| Garlic Cloves 🧄 | 6 cloves | Minced, fresh preferred |
| Canned Kidney Beans 🌽 | 15 oz | Drained and rinsed |
| Canned Black Beans 🌽 | 15 oz | Drained and rinsed |
| Diced Tomatoes 🍅 | 28 oz | Fire-roasted preferred |
| Tomato Paste 🍅 | 2 tbsp | Smooth, not chunky |
| Chili Powder 🌶️ | 2 tbsp | Medium heat preferred |
| Ground Cumin 🌿 | 1 tbsp | Toasted for depth |
| Smoked Paprika 🌶️ | 1 tbsp | For smoky flavor |
| Dark Chocolate 🍫 | 1 oz | 70% cacao, chopped |
| Beef Broth 💧 | 2 cups | Low-sodium preferred |
| Salt 🧂 | 1 ½ tsp | Kosher or sea salt |
| Black Pepper 🌶️ | ½ tsp | Freshly ground |
The chuck roast is your flavor anchor—look for good marbling at the grocery store. Costco or Walmart usually have it pre-cubed, which saves time. If buying a whole roast, cube it yourself for even cooking. Fire-roasted diced tomatoes add that smoky depth without extra work—Trader Joe’s or Muir Glen are my go-tos. The dark chocolate might seem odd, but it balances the heat beautifully. Grab a 70% cacao bar and chop it yourself; pre-chopped often has fillers. For spices, Penzeys or the bulk bins at Whole Foods have the freshest options.
No chuck roast? Ground beef (80/20) works in a pinch, but it won’t be as tender. Skip the chocolate? Add 1 tsp cocoa powder instead—it’s the same magic. Fresh garlic is ideal, but jarred minced garlic (not the paste kind) gets you close. The tomato paste can be the squeeze-tube kind from Trader Joe’s—no waste, and it keeps forever. For extra smokiness, add 1/2 tsp liquid smoke (like Coltman’s), but don’t overdo it. The beans? Any mix of kidney, black, or pinto—drained and rinsed is key to avoid a watery chili.
This chili gets better as it sits—plan to make it a day ahead if possible. Store in an airtight container in the fridge for up to 5 days, or freeze portions for 3 months. The flavors meld beautifully overnight. For meal prep, divide into two containers: one for the chili, one for toppings (cheese, sour cream, green onions). Reheat gently on the stove—never microwave—to keep the texture perfect. Leftovers taste even richer the next day.
Why You’ll Love This Recipe
- Set-and-Forget Simplicity: I swear by this recipe because it’s the kind of meal you can start, stir once, then walk away from. Chuck roast practically cooks itself in the slow simmer—no babysitting required—while the onions and garlic mellow into something rich and fragrant.
- Deep, Layered Taste: The chuck roast gets so tender it falls apart at a touch, and those kidney and black beans soak up all the smoky, savory goodness. Here’s what sold me—the garlic doesn’t just happen to be there; it sings in every bite.
- Weeknight Workhorse: Between us, this is my go-to for busy nights, potlucks, or when friends drop by unannounced. It’s hearty enough to feed a crowd but easy enough to halve for a quiet Tuesday. (Yes, even on a Tuesday night.)
- Budget-Friendly Powerhouse: A single chuck roast stretches to feed four or five, and canned beans? They’re my secret weapon for keeping costs low without sacrificing flavor. Plus, leftovers taste even better the next day—if there are any left.
Step-by-step instructions for 2-Hour chili recipe
Here’s how to build deep, smoky chili that develops richer flavors with every passing minute.
Brown the Chuck Roast for Maximum Flavor
Heat a large Dutch oven over medium-high heat. Add the 2 lb chuck roast, cut into 1-inch cubes, in a single layer without overcrowding. Let it brown undisturbed for 3-4 minutes per side until deeply golden and crispy in spots. This step creates the rich, meaty foundation that carries through the entire chili.
As the meat browns, you’ll see those beautiful crusty edges form—this is where all the flavor lives. If the pan gets too crowded, work in batches to ensure proper browning. Once all pieces are browned, transfer the meat to a plate and set aside temporarily. You’ll add it back later when the chili comes together.
Build the Flavor Base with Aromatics
In the same Dutch oven, add 2 tablespoons olive oil (not listed but essential for this step) and reduce heat to medium. Add the 1 whole yellow onion, diced, and cook for 5-6 minutes until softened and translucent. Stir occasionally to prevent burning.
Add the 6 cloves minced garlic and cook for another 30 seconds until fragrant. You’ll know it’s ready when the kitchen fills with that irresistible garlic aroma. Here’s the thing—don’t let it burn. Garlic turns bitter quickly, and you want that sweet, mellow flavor to shine through in your chili.
Toast the Spices for Depth of Flavor
Add the 2 tablespoons chili powder, 1 tablespoon ground cumin, and 1 tablespoon smoked paprika to the Dutch oven. Stir constantly for 30-45 seconds until the spices become fragrant and slightly toasted. This step unlocks their full flavor potential through gentle toasting.
You’ll see the spices release their oils and create a beautiful aroma that fills your kitchen. This is where the magic happens—those toasted spices will infuse the entire chili with complexity. If you’re using pre-toasted spices, skip this step but give them a good stir to distribute evenly.
Simmer the Chili for 2 Hours
Return the browned chuck roast to the Dutch oven. Add the 28 oz diced tomatoes, 2 tablespoons tomato paste, 2 cups beef broth, 15 oz drained kidney beans, 15 oz drained black beans, 1 oz chopped dark chocolate, 1.5 teaspoons salt, and 0.5 teaspoon black pepper. Stir everything together until well combined.
Bring the mixture to a gentle boil, then reduce heat to low and let it simmer uncovered for 2 hours. Here’s the key: you want to maintain a steady simmer, not a rolling boil. The chili should bubble gently and occasionally release small bubbles. This slow cooking allows all the flavors to meld together beautifully.
Finish and Adjust to Perfection
After 2 hours of simmering, taste the chili and adjust the seasoning if needed. You might need to add more salt, chili powder, or even a splash of beef broth if it’s too thick. The chili should be rich, smoky, and deeply flavorful with tender meat that practically falls apart.
Let the chili rest for 10-15 minutes before serving. This resting time allows the flavors to settle and the chili to thicken slightly. Serve with your favorite toppings like shredded cheese, sour cream, or chopped green onions. The result is a chili that’s packed with deep, smoky flavor that only comes from slow, patient cooking.
Pro Tips For Making 2 Hour Chili
- CUT THE ROAST FIRST: Slice the chuck roast into ½-inch thick strips before adding it to the pot—thin pieces cook faster and stay tender. I used to throw in big hunks, and they’d either turn to rubber or leave cold centers.
- SOAK BEANS 10 MINUTES: Drain and rinse the kidney and black beans, then soak them in warm water for 10 minutes before adding to the chili. This cuts down on gassiness and helps them absorb flavors better—no one wants beans that taste like they’re fighting the broth.
- SWEAT ONIONS LOW: Cook the yellow onion on medium-low heat until it’s translucent, not browned—this takes about 8 minutes. Burning them adds bitterness, and you’ll regret it when the chili tastes like charred regret instead of smoky goodness.
- SALT THE BEANS: Add a pinch of salt to the drained beans before mixing them into the chili. Canned beans are often packed with preservatives, and this simple step balances their metallic taste—trust me, your chili will thank you.
Storing and reheating this recipe
Refrigerator Storage
Let your chili cool to room temperature (about 30 minutes) before transferring to airtight containers—I use glass Pyrex with snap-on lids for best results. Store in the fridge at 40°F or below for up to 5 days.
The flavors actually deepen overnight as the spices meld together. Honestly, I often make this on Sunday for Monday dinners because it tastes even better the next day. 💪
Freezer Prep Tips
For long-term storage, divide chili into quart-sized freezer bags or airtight containers, leaving 1 inch headspace for expansion. Label with the date—this chili keeps its quality for 3 months in the freezer.
I like to portion individual servings so I can grab and reheat exactly what I need. Use parchment paper between layers if stacking containers. ❄️
Stovetop Reheating
My preferred method is stovetop reheating—it preserves the texture perfectly. Transfer chili to a pot and heat over medium-low heat for 10-15 minutes, stirring occasionally. Add 2-3 tablespoons water or beef broth if it looks too thick.
Taste before serving—you might need to adjust seasoning since flavors concentrate during storage. This method prevents the dreaded “mushy” chili texture. 🔥
Microwave Method
For quick reheating, use the microwave on 50% power in 1-minute intervals, stirring between each interval. Cover with a damp paper towel to retain moisture. I find this works best for single servings1.5 cups at a time.
Avoid full power or the chili will split and become watery. Stir well after reheating to redistribute any separated juices. ✨
Serving Leftovers
Leftovers make fantastic chili dogs or nachos—just add your favorite toppings. For chili dogs, heat the chili with 1 tablespoon tomato paste and 1 teaspoon Worcestershire sauce** per serving.
For nachos, spread on tortilla chips with melted cheese and broil for 2-3 minutes until bubbly. The chili’s depth of flavor works perfectly in these creative ways too! 🌟
Freezer to Stovetop
When reheating from frozen, add ½ cup extra liquid (broth or water) to prevent drying out. Simmer on low heat for 20-25 minutes, stirring occasionally. The chocolate might separate slightly—just stir vigorously to re-emulsify.
This method works best for 2-3 servings at a time to ensure even heating. Patience is key here! 💡
Nutrition facts
Frequently asked questions
Can I make this chili in a slow cooker instead?
For a slow cooker version, brown the meat first, then add all ingredients (except chocolate) to your slow cooker. Cook on low for 6-8 hours or high for 3-4 hours. Stir in the chocolate during the last 30 minutes of cooking. The texture will be slightly different but still delicious—just add 1-2 tablespoons cornstarch mixed with water if it gets too thin.
Why does my chili taste bland after 2 hours?
Bland chili usually means one of two things: either the spices weren’t toasted enough or the meat wasn’t browned properly. For next time, make sure to brown the meat until deeply golden and toast your spices for 30-45 seconds until fragrant. Also check your salt—start with the full 1.5 teaspoons and adjust only if needed. A splash of apple cider vinegar (1 tsp) can also brighten flavors.
Can I substitute ground beef for the chuck roast?
Yes, but expect a different texture. Use 1.5 lbs ground beef (80/20 fat ratio) and brown it thoroughly in batches. Since ground beef cooks faster, reduce simmering time to 90 minutes instead of 2 hours. The fat content helps create richness, but you might need to add 1 extra tablespoon tomato paste to thicken the chili since ground beef releases more liquid.
How do I adjust the heat level?
This recipe uses medium heat chili powder, but you can easily adjust it. For more heat, add ½ teaspoon cayenne pepper or 1 teaspoon hot sauce during the last 30 minutes of cooking. For milder chili, reduce the chili powder to 1.5 tablespoons and add ½ teaspoon sugar to balance. Always taste as you go—you can’t fix it later!
What’s the best way to serve this chili?
This rich, smoky chili pairs perfectly with crusty bread or cornbread to soak up the sauce. For a complete meal, serve with shredded cheddar cheese, sour cream, chopped green onions, and a dollop of Greek yogurt**. It also makes amazing chili cheese fries—just top baked fries with chili and melted cheese. The dark chocolate adds natural sweetness that balances well with sharp cheddar and cool yogurt.

- 4 Cheese Spaghetti Sauce Recipe: Velvety Melted Blend With Nutty Parmesan Finish - October 7, 2026
- 7 Eleven Chili Recipe: Smoky Spice-Packed Pot Luck Winner - October 7, 2026
- 21-Pound Turkey Recipe: Herb-Crusted Roast With Golden, Juicy Perfection - October 7, 2026