
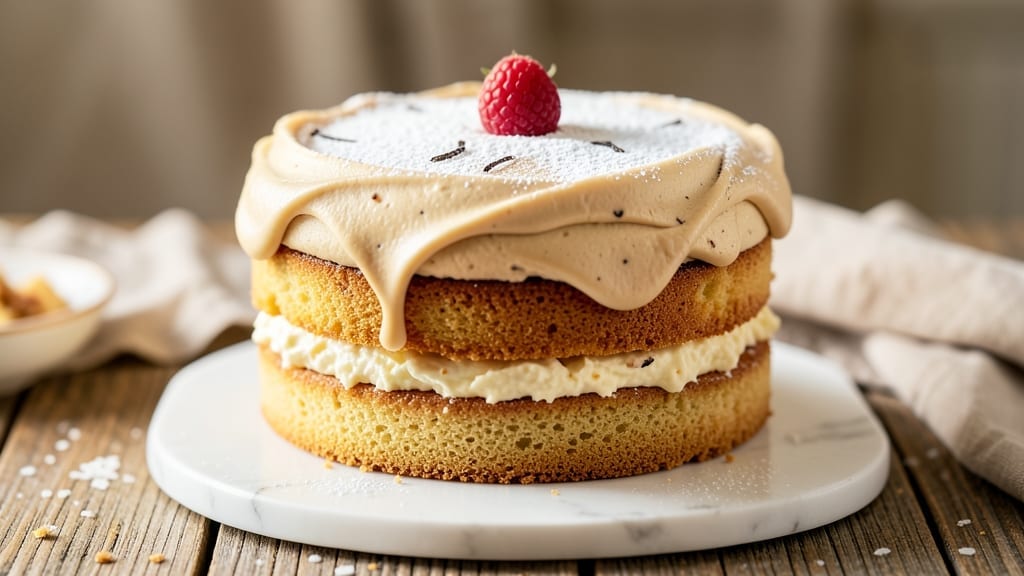
This 2-layer birthday cake recipe delivers the perfect balance of rich vanilla bean and decadent chocolate swirls, creating a showstopper that tastes as incredible as it looks. 💛 The secret lies in a foolproof vanilla cake base layered with a luscious chocolate buttercream swirl, ensuring every slice is moist, flavorful, and visually stunning.
Whether you’re baking for a child’s birthday or a milestone celebration, this recipe guarantees a cake that will impress even the most discerning guests.
The beauty of this recipe is its versatility—you can adjust the vanilla cake to your preferred sweetness or swap the chocolate buttercream for a lighter vanilla or fruit-flavored filling. The key to success is baking the layers evenly and letting them cool completely before frosting to avoid cracks.
With just a few simple steps, you’ll achieve professional-quality results that look like they came from a bakery.
Once assembled, the cake features a smooth vanilla bean frosting on the outside, hiding the stunning chocolate swirl within each layer. The contrast between the creamy vanilla and rich chocolate creates a flavor experience that’s both elegant and indulgent.
Serve it with fresh berries, whipped cream, or a sprinkle of powdered sugar for an extra touch of celebration.
Perfect for birthdays, anniversaries, or any special occasion, this cake is designed to be both impressive and approachable. With a little patience and attention to detail, you’ll create a dessert that’s sure to be the highlight of any gathering. Let’s get started on making memories—one delicious layer at a time.
Ingredients for 2 layer birthday cake
Twelve simple ingredients transform into a showstopping vanilla-chocolate masterpiece.
| Ingredient | Amount | Notes |
|---|---|---|
| All-Purpose Flour 🌾 | 3 ½ cups | Sifted for even texture |
| Granulated Sugar 🍚 | 2 ½ cups | Divided for cake and frosting |
| Vanilla Bean Paste 🌿 | 2 tbsp | High-quality for authentic flavor |
| Unsalted Butter 🧈 | 1 ½ cups | Room temperature, full-fat |
| Large Eggs 🥚 | 4 whole | Room temperature for even mixing |
| Baking Powder 🧂 | 1 ½ tsp | Ensures light, fluffy layers |
| Salt 🧂 | ½ tsp | Fine sea salt preferred |
| Milk 🥛 | 1 ½ cups | Whole milk for richness |
| Cocoa Powder 🍫 | ½ cup | Dutch-processed for smoothness |
| Chocolate Chips 🍫 | 1 ½ cups | Semi-sweet for balance |
| Heavy Whipping Cream 🥛 | 2 cups | Cold for stable buttercream |
| Powdered Sugar 🍚 | 4 cups | Sifted for smooth frosting |
| Vanilla Extract 🌿 | 1 tbsp | Pure vanilla for depth |
| Wheat Flour 🌾 | 1 cup | For dusting cake boards |
| Fresh Berries 🍓 | 2 cups | Optional garnish |
The vanilla bean paste is non-negotiable here—it’s what gives this cake that luxurious, professional bakery flavor. Look for high-quality brands like Nielsen-Massey or Madagascar vanilla at specialty stores or well-stocked grocery chains. If you can’t find paste, two teaspoons of pure vanilla extract will work in a pinch, but the seeds add that magical speckled look. For the butter, use European-style if possible—it’s higher in fat and gives a richer crumb. The Dutch-processed cocoa powder is key for the chocolate swirl; Hershey’s Special Dark or Valrhona are my go-tos, but any high-quality brand will do.
No vanilla bean paste? Double the vanilla extract and add a pinch of ground vanilla bean seeds if you’ve got any. Running low on heavy cream? Substitute with whipped coconut cream—it’s lighter but still works. The chocolate chips can be swapped for chopped chocolate bars if you prefer larger pieces, but stay with semi-sweet for balance. Pre-shredded chocolate gets clumpy, so chop your own. For the cake layers, don’t overmix—just combine until the flour is just incorporated. And if you’re feeling fancy, add a splash of bourbon or rum to the cake batter for extra depth.
This cake keeps beautifully for 3 days at room temperature if wrapped tightly in plastic. For longer storage, freeze the fully assembled cake (unfrosted) for up to 3 months—thaw overnight in the fridge before frosting. The buttercream can be made a day ahead, stored in the fridge, and whipped back to fluffiness with a hand mixer. Fresh berries should be added just before serving to keep them vibrant. And trust me, leftovers are rare—this cake disappears fast!
Why You’ll Love This Recipe
- No Mixer Needed: I swear by this recipe when my stand mixer’s on vacation. Creaming butter and sugar by hand gives you that perfect ribbon stage—no fancy tools required, just elbow grease and patience (the good kind).
- Vanilla Bomb Flavor: That little jar of vanilla bean paste? It’s the secret weapon. One swipe through the batter and suddenly you’ve got depth—warm, floral, and just sweet enough without cloying. Trust me, store-bought extract won’t cut it here.
- Crowd-Pleaser Basics: Birthday? Anniversaries? “Just because” Wednesdays? This cake handles it all. The rich, tender layers and buttery frosting (yes, you can make it from the same butter) make it feel special without requiring a bakery budget.
- Budget-Friendly Luxury: You’re using pantry staples here—no pricey specialty flours or exotic sugars. A single vanilla bean paste jar lasts for months, and the leftovers? Perfect for cake pops or breakfast sandwiches. Waste? None. Joy? All.
Step-by-step instructions for vanilla bean and chocolate swirl birthday cake
Let’s create a showstopping cake with luscious layers and decadent swirls—no shortcuts, just pure baking magic.
👨🍳 Step 1: Prepare the Vanilla and Chocolate Batter Separately
Divide the 2.5 cups granulated sugar in half—1.25 cups for each batter. In two separate large bowls, cream the 1.5 cups unsalted butter with the 1.25 cups sugar and 2 tbsp vanilla bean paste until light and fluffy, about 4-5 minutes on medium speed. This step is crucial for aerating the batter and creating that signature cake lightness.
In a separate bowl, whisk together the 3.5 cups all-purpose flour, 1.5 tsp baking powder, and 0.5 tsp salt. Add 1 cup of the flour mixture to each creamed butter mixture. Alternate adding 0.75 cups milk and the remaining flour to each bowl, mixing just until combined. For the chocolate layer, sift in the 0.5 cup cocoa powder along with the flour. The batter should be smooth but not overly mixed—overworking develops gluten and makes the cake tough.
🍳 Step 2: Swirl the Chocolate into the Vanilla Batter
Pour the chocolate batter into the vanilla batter, dividing it evenly. Using a spatula, gently fold the chocolate into the vanilla in a zigzag motion to create a marbled effect. Don’t overmix—just enough to distribute the chocolate evenly. This is where the magic happens—those beautiful swirls will show up once baked!
Divide the combined batter evenly between two 9-inch round cake pans lined with parchment paper. Smooth the tops with a spatula. Here’s a pro tip: Tap the pans gently on the counter to release any air bubbles. Bake at 350°F (175°C) for 25-30 minutes, or until a toothpick inserted in the center comes out clean. The edges should be golden brown, and the top should spring back when touched lightly.
🔥 Step 3: Cool and Assemble the Cake Layers
Remove the pans from the oven and let the cakes cool in the pans for 10 minutes. Then transfer them to a wire rack to cool completely. While they cool, prepare the chocolate buttercream: Beat the 2 cups heavy whipping cream until soft peaks form. Gradually add the 4 cups powdered sugar and 1 tbsp vanilla extract, beating until smooth and fluffy. Fold in the 1.5 cups chocolate chips for extra richness.
Once the cakes are completely cool, place the first layer on a cake stand or plate. Spread a generous layer of the chocolate buttercream on top, then place the second layer on carefully. Crumb coat the entire cake with a thin layer of buttercream, then chill in the refrigerator for 20 minutes to set. This step ensures clean, professional-looking sides.
🥘 Step 4: Frost and Decorate with Elegance
After chilling, apply the remaining buttercream to the entire cake, using a spatula to create smooth, even sides. For extra flair, pipe swirls or rosettes on top with a piping bag fitted with a star tip. Garnish with the 2 cups fresh berries, arranging them in a circular pattern or scattered artistically around the cake. The berries add a pop of color and a refreshing contrast to the rich chocolate and vanilla.
Let the cake sit at room temperature for 30 minutes before slicing to allow the frosting to set. Serve immediately for the perfect texture—moist layers, creamy frosting, and a stunning presentation that’ll make the birthday celebration unforgettable!
Pro Tips For Making 2 Layer Birthday Cake
- Weigh Your Butter: I learned this the hard way—using volume measurements for butter in cake batter leads to dry layers. Grab a kitchen scale and measure your unsalted butter by weight (usually 227 grams for two layers). The fat-to-flour ratio matters more than you think, and this keeps your crumb tender without guessing.
- Room Eggs First: Cold eggs from the fridge can curdle your batter when mixed with melted butter. Take them out 30 minutes before baking so they’re just warm to the touch. This ensures a smoother batter and lighter texture—no one wants a cake that fights back.
- Skip the Overmixing: Once your flour and butter are combined, mix just until the dough comes together. Overworking it develops gluten, and your cake will turn out dense instead of fluffy. Stop when it looks shaggy, not smooth—your future self will thank you.
- Test Doneness Early: Birthday cakes bake differently in every oven. After 20 minutes, stick a toothpick in the center—if it comes out clean, pull it. If not, wait another 5-10 minutes. Overbaking dries out layers faster than you can frost them, and no one wants a crumbly top.
Regional styles of this recipe
Classic American Vanilla-Chocolate
In the U.S., this iconic combo is a birthday staple—think vanilla cake with chocolate buttercream or fudge filling. The key difference here is the chocolate swirl baked into the vanilla layer, creating a marbled effect that’s especially popular in Midwest bakeries.
I’ve seen this variation at local diners where they add ½ cup crushed peppermint to the frosting for a festive twist during the holidays. 💛
For an extra American touch, top with red, white, and blue sprinkles or mini marshmallows—classic choices that never go out of style. The cake’s simplicity makes it perfect for potlucks or family gatherings, where you can easily customize the frosting with caramel drizzle or peanut butter filling for variety.
Italian Marbled Swirl
Italian bakeries take this concept further with a true marbled effect, where the chocolate and vanilla batters are swirled together before baking, creating bold, wavy patterns. The secret? Using high-quality Dutch-process cocoa powder like Valrhona and folding the batters with a bench scraper for precision.
I’ve tried this method, and it requires patience—each swirl must be deliberate to avoid mixing the flavors too much.
For decoration, Italians often dust the cake with powdered sugar and add espresso-infused buttercream for depth. A sprinkle of orange zest on top adds a bright, citrusy contrast that balances the richness. This version is especially popular for first communions and weddings in Italian-American communities.
Japanese Matcha-Chocolate Fusion
Japanese bakeries put their own spin on layered cakes by incorporating matcha powder into the vanilla batter, creating a vibrant green swirl alongside the chocolate. The matcha adds an earthy, slightly bitter note that pairs beautifully with the sweetness.
I’ve seen this variation in Tokyo patisseries, where they use ceremonial-grade matcha (like Ippodo Tea) for the best flavor. 🌿
The frosting is often a white chocolate matcha buttercream, and the cake is garnished with edible gold leaf or black sesame crumbs for a luxurious finish. This fusion is perfect for celebrating milestones or adding a modern twist to traditional birthday cakes.
Mexican Tres Leches with Chocolate
For a Latin American twist, replace the buttercream with a tres leches (three milks) filling—a creamy blend of evaporated milk, condensed milk, and heavy cream. The vanilla cake layers soak up the sweet filling, while the chocolate swirl adds a rich contrast.
Top with cinnamon sugar and chocolate shavings for a festive look. This version is a hit at quinceañeras and birthday parties in Mexican communities.
To make it extra special, drizzle cajeta (goat’s milk caramel) over the top and add chili powder for a subtle kick. The combination of sweet, creamy, and slightly spicy flavors makes this cake unforgettable—especially with a side of churros for serving.
British Victoria Sponge Adaptation
In the UK, the Victoria sponge cake is a classic, and this recipe adapts it with a chocolate ganache instead of jam. The layers are lighter, almost like a sponge, and the ganache is poured between them before baking.
The result? A gooey, decadent center that’s perfect for tea parties or afternoon celebrations. I’ve made this version with Earl Grey-infused buttercream for a sophisticated touch.
For decoration, British bakers often dust the cake with cocoa powder and add fresh raspberries or strawberries. A drizzle of honey over the top adds a floral note that complements the chocolate beautifully. This cake is all about elegance and simplicity—ideal for a refined gathering.
Nutrition facts
Frequently asked questions
Can I make this cake in a different size pan?
Yes, but adjust the baking time and temperature. For 8-inch pans, bake at 350°F (175°C) for 20-25 minutes—the smaller surface area cooks faster. For 10-inch pans, increase time to 35-40 minutes. Always check doneness with a toothpick. Pro tip: Use parchment paper in all pans to prevent sticking and even baking.
How do I prevent cracks in the cake layers?
Cracks usually happen when layers cool too quickly or aren’t level. Let cakes cool in pans for 10 minutes before transferring to racks, and ensure they’re perfectly flat when baked. For extra insurance, brush layers with simple syrup (½ cup water + ½ cup sugar) before frosting—this adds moisture and prevents dryness that can cause cracks.
Can I substitute the buttercream with another filling?
Try cream cheese frosting (mix 8 oz cream cheese with 1 cup butter and 3 cups powdered sugar) or ganache (melt 1 cup chocolate chips with ½ cup heavy cream). For a lighter option, use whipped cream mixed with 1 tbsp jam. Just ensure fillings are at room temperature before assembling to avoid melting.
How far ahead can I make this cake?
Bake the layers 1-2 days ahead and store wrapped tightly at room temperature. For the frosting, make it 24 hours early—store in the fridge and re-whip before using. Assemble the cake 4-6 hours before serving to allow frosting to set properly. The flavors actually improve overnight as the cake absorbs moisture from the filling.
What’s the best way to transport a decorated cake?
Use a sturdy cake carrier with a tight-fitting lid. Place the cake on a tray lined with parchment paper to catch any drips. For long trips, transport the unfrosted layers separately and frost at your destination. If you must transport decorated, keep it in a cool, dry place (not the trunk of a car) and avoid temperature changes that could cause frosting to melt.

- 8 Ounce Crab Cakes Recipe: Golden Crust With Luminescent Crab Hearts - October 12, 2026
- 1950’s Betty Crocker Banana Bread Recipe: Nostalgic Spice Swirls and Moist Crumb - October 12, 2026
- 2 Quart Homemade Ice Cream Recipe: Ultra Creamy Vanilla Bean Swirls - October 12, 2026