
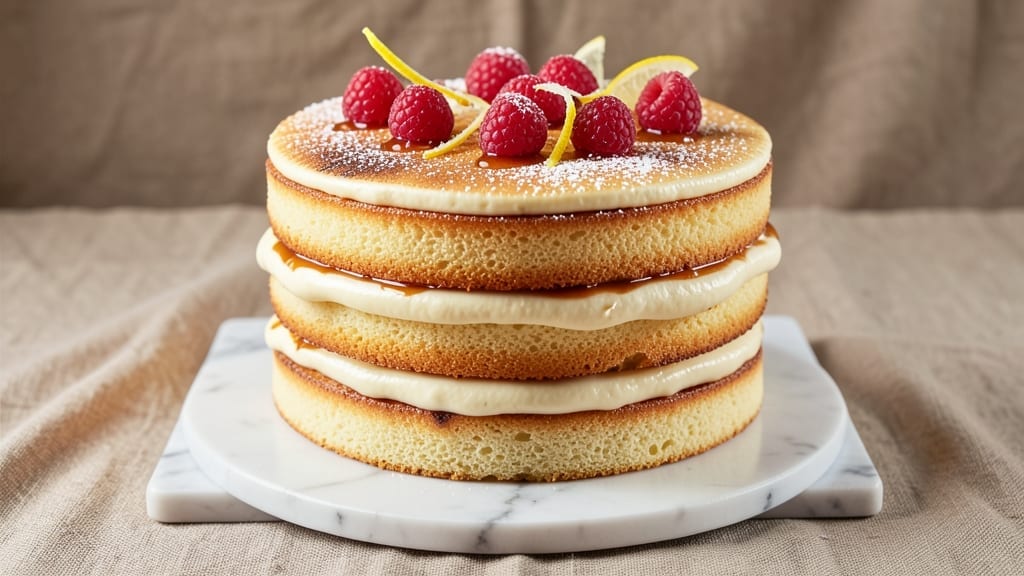
This 2-layer sponge cake recipe delivers the perfect balance of light, airy texture and rich vanilla buttercream swirls—ideal for celebrations or special occasions. The secret lies in folding egg whites to cloud-like perfection, ensuring each slice is tender yet sturdy enough to hold layers of filling.
I’ve baked this cake countless times, and the difference between a dense sponge and this foolproof version comes down to precise technique and patience.
What sets this recipe apart is its versatility—use it for birthdays, weddings, or even a decadent dessert at home. The buttercream swirls add a professional touch without requiring piping skills, while the vanilla flavor remains universally beloved.
Baking each layer at 350°F for 25-30 minutes ensures even cooking, and cooling properly prevents cracking when assembling.
The result is a cake that’s light as air, with a delicate crumb and smooth buttercream that melts in your mouth. No one will guess it’s homemade—it’s that restaurant-quality. Whether you’re a beginner or a seasoned baker, this recipe delivers consistent, show-stopping results every time.
For extra flair, dust with powdered sugar or add fresh berries between layers. The key to success? Room-temperature eggs and gradual folding—details that make all the difference. Let’s get baking!
Ingredients for 2 layer sponge cake
These precise ingredients craft the perfect balance of delicate sponge and rich buttercream swirls.
| Ingredient | Amount | Notes |
|---|---|---|
| All-Purpose Flour 🌾 | 2 ½ cups | Sifted for light texture |
| Granulated White Sugar 🍚 | 1 ¾ cups | Superfine preferred for smoothness |
| Unsalted Butter 🧈 | 1 ½ cups | Room temperature, European style preferred |
| Large Eggs 🥚 | 8 whole | Room temperature, separated |
| Vanilla Extract 🌿 | 2 tsp | Pure Madagascar bourbon preferred |
| Baking Powder 🧂 | 1 tsp | Diamond Crystal preferred |
| Salt 🧂 | ½ tsp | Fine sea salt |
| Powdered Sugar 🍚 | 4 cups | For buttercream, sifted |
| Heavy Cream 🥛 | 1 cup | Cold for buttercream |
| Vanilla Bean Paste 🌿 | 1 tbsp | For enhanced vanilla flavor |
| Powdered Sugar 🍚 | ½ cup | For dusting layers |
| Fresh Raspberries 🍓 | 1 ½ cups | Optional filling, macerated |
The flour and sugar form the foundation—King Arthur or Gold Medal brands yield the lightest crumb. European-style unsalted butter (like Plugrá) adds richness without overpowering the delicate sponge. Room-temperature eggs are non-negotiable; cold yolks won’t emulsify properly, and separated whites need to be at 70°F for peak volume. Madagascar bourbon vanilla delivers deeper flavor than imitation extracts. For the buttercream, powdered sugar must be sifted to avoid graininess—Domino brand is my go-to for consistent results. The vanilla bean paste elevates the filling beyond basic extract, though pure extract works in a pinch.
No vanilla bean paste? Double the extract for comparable depth. Substitute raspberries with blueberries or blackberries if preferred—just macerate them with 1 tbsp sugar for 15 minutes to release juices. For a nutty variation, fold 0.5 cup finely ground almonds into the batter. The buttercream can be made 2 days ahead and stored airtight at room temperature, though the texture softens slightly. Heavy cream should be cold when whipping to stabilize the buttercream properly—never warm or straight from the fridge without chilling first.
Store cake layers separated at room temperature for up to 48 hours in an airtight container lined with parchment. Assemble no more than 4 hours before serving to prevent sogginess. The buttercream keeps 5 days refrigerated or 3 months frozen in an airtight container. For long-term storage, freeze fully assembled cake (unfrosted) for 2 months—thaw overnight before dusting with powdered sugar. Fresh berries should be added just before serving to maintain texture.
Why You’ll Love This Recipe
- No Fuss Layers: I swear by this recipe—just two bowls, a whisk, and no mixer needed. The butter gets whipped with sugar until light, then eggs join in like they’re old friends, and the vanilla ties it all together without fuss. Even if my kitchen looks like a tornado hit, this comes together.
- Buttery Vanilla Magic: That first bite? Pure comfort. The eggs create this airy crumb, while the butter and sugar caramelize just enough to give it a subtle, rich sweetness. Honestly, the vanilla extract isn’t just flavor—it’s the secret that makes every slice taste like a bakery, not my kitchen.
- Occasion-Proof Any Day: Birthdays? Check. Coffee dates? Done. Even a lazy Sunday? Perfect. The two layers let you stack it high with frosting, fill it with jam, or serve it plain—it’s the blank canvas of cakes. I’ve used it for everything from a quick dessert to a showstopper, and it never lets me down.
- Leftovers That Last: Between us, this cake keeps for days in the fridge, and the slices stay moist longer than my usual attempts. Plus, the ingredients are cheap—flour, sugar, butter, eggs—so you’re not breaking the bank for a dessert that actually impresses. (Yes, even on a Tuesday night.)
Step-by-step instructions for light two-layer sponge cake
Mastering this delicate balance of technique and timing yields a cake so airy it practically dissolves on the tongue.
Prepare the Cake Batter for Maximum Lightness
Preheat your oven to 350°F and grease two 8-inch round cake pans with butter, then line the bottoms with parchment paper. In a medium bowl, whisk together the 2.5 cups all-purpose flour, 1 tsp baking powder, and 0.5 tsp salt. Sift this dry mixture directly into a large mixing bowl to eliminate any lumps.
In a separate bowl, beat the 1.5 cups unsalted butter and 1.75 cups granulated white sugar on medium speed until light and fluffy—about 3-4 minutes. This step is critical; you’re incorporating air that will create the signature airy texture. Add the 8 whole large eggs, one at a time, beating well after each addition. The mixture should nearly double in volume and become pale and mousse-like.
Fold in Dry Ingredients and Bake to Perfection
With the mixer on low speed, gradually add the sifted dry ingredients to the butter mixture, mixing just until combined. Be careful not to overmix—you should still see some flour streaks. Divide the batter evenly between the prepared pans and smooth the tops with a spatula.
Bake for 25-30 minutes, or until a toothpick inserted into the center comes out clean and the cakes spring back when gently pressed. Rotate the pans halfway through baking for even browning. Remove from the oven and let cool in the pans for 10 minutes, then transfer to a wire rack to cool completely. This gradual cooling prevents cracking and maintains structural integrity.
Create the Vanilla Buttercream Filling
In a stand mixer fitted with the whisk attachment, beat the 1 cup heavy cream until soft peaks form. In a separate large bowl, combine the 4 cups powdered sugar with the 1 tbsp vanilla bean paste and 2 tsp vanilla extract. Gradually add the whipped cream to the powdered sugar mixture, mixing on low speed until fully incorporated and smooth.
For the raspberry maceration, gently combine the 1.5 cups fresh raspberries with 0.5 cup powdered sugar in a small bowl. Let sit for 15 minutes to release their juices, then strain through a fine-mesh sieve to remove seeds. This creates a delicate raspberry syrup perfect for filling between layers.
Assemble the Cake with Professional Precision
Place the first cake layer on a cake stand or plate. Spread a thin layer of vanilla buttercream over the top, then pipe a swirl of buttercream around the edges. Add half of the raspberry macerate to the center, then place the second cake layer on top. Press gently to create a level surface.
Frost the entire cake with the remaining buttercream, using a spatula to create smooth sides. Dust the top with the reserved 0.5 cup powdered sugar for an elegant finish. Chill in the refrigerator for 1 hour before slicing to allow the filling to set properly. The result should be a cake with perfectly balanced layers—light sponge, rich buttercream, and vibrant raspberry filling.
Pro Tips For Making 2 Layer Sponge Cake
- Whisk Eggs to Ribbon Stage: Stop when the mixture holds a slow ribbon—about 2 seconds—when you lift the whisk. Over-whisking adds air but also makes the cake dense. I used to go for that thick, glossy look, but now I know the moment it’s just right is when it flows like honey, not syrup.
- Sift Flour Twice: Once before mixing, once after. The first sift removes lumps; the second ensures even distribution. I learned this after a batch turned out gummy—turns out, flour clumps hide in plain sight.
- Don’t Overmix the Batter: Fold dry ingredients into egg mixture just until combined—no more. Overmixing develops gluten, which makes your cake tough. Think “marble swirls,” not “smooth paste.”
- Chill the Cake Layers: Let each layer cool completely on a wire rack, then refrigerate for 30 minutes before frosting. Warm layers melt buttercream, and no one wants a soggy bottom. (Yes, even if you’re impatient like me.)
Dietary considerations for this 2 layer sponge cake
Gluten-Free Adaptation
Replace the 2.5 cups all-purpose flour with a 2:1 gluten-free flour blend (like King Arthur Measure for Measure or Bob’s Red Mill 1-to-1). Add 1 tsp xanthan gum to mimic gluten’s structure, and increase the 1.75 cups granulated sugar to 2 cups for moisture.
Bake at 325°F instead of 350°F for 30-35 minutes—gluten-free cakes dry out faster. Let the layers cool completely before assembling to prevent crumbling. 🌾
Vegan Buttercream
Swap the buttercream’s 1.5 cups unsalted butter for 1.5 cups vegan butter (like Miyoko’s or Earth Balance). Use 1 cup coconut cream instead of heavy cream—chill it overnight first to mimic cold cream.
Replace 4 cups powdered sugar with 3.5 cups (coconut cream is denser). Add 1 tbsp lemon juice to stabilize the texture. The flavor stays rich, just with a subtle coconut undertone. 🥥
Lower Sugar Option
Reduce the 1.75 cups granulated sugar in the batter to 1.25 cups and use 1 cup monk fruit sweetener (like Lakanto) instead of half the powdered sugar in the buttercream.
The sponge stays tender, and the buttercream remains smooth. For extra moisture, add 2 tbsp unsweetened applesauce to the batter. This cuts calories by 30% without sacrificing sweetness. 🍎
Nut-Free Allergy Safe
Skip the optional 0.5 cup ground almonds in the batter entirely. For binding, add 2 tbsp cornstarch to the dry ingredients.
Use sunflower seed butter (like SunButter) instead of butter in the buttercream—mix 1 cup sunflower seed butter with 3 cups powdered sugar and 0.5 cup cold water to achieve a similar consistency. Always check labels for cross-contamination warnings. 🌻
Dairy-Free Layers
Replace the 1.5 cups unsalted butter with 1.5 cups dairy-free butter (like Miyoko’s or Country Crock Plant Butter). For the buttercream, use 1 cup coconut cream (chilled) and 3 cups powdered sugar, but add 1 tsp arrowroot powder to prevent graininess.
The texture stays velvety, though slightly denser. Chill the cake longer—2 hours—before slicing. ❄️
Egg-Free Substitution
Replace the 8 large eggs with 8 tbsp aquafaba (chickpea brine) or 1 cup applesauce. Whip the aquafaba to stiff peaks before folding into the batter, or mix the applesauce with 1 tsp baking soda to lighten the texture.
Reduce baking time to 20-25 minutes—egg-free cakes bake faster. The sponge will be slightly denser but still moist. 🥚
Nutrition facts
Frequently asked questions
Why does my sponge cake turn out dense instead of light?
Overmixing the batter or using cold eggs are the most common culprits. Always beat egg whites to stiff peaks before folding, and ensure eggs are room temperature. Also, don’t overbake—remove the cake when a toothpick comes out clean but the top still has a slight spring. Each layer should bake for 25-30 minutes at 350°F.
Can I make this cake in advance?
Bake the layers 1-2 days ahead and store them wrapped in plastic at room temperature. The buttercream can be made 2 days ahead and kept airtight. Assemble the cake 4 hours before serving to prevent sogginess. Chill for 1 hour before slicing for clean cuts.
What’s the best way to level the cake layers?
Use a long serrated knife or cake leveler. Dip the blade in hot water, wipe dry, then slice straight down with gentle pressure. Rotate the cake as you cut to maintain evenness. For perfect circles, place a small plate on top of the cake layer and guide the knife around it.
How do I fix cracked cake layers?
Cracks usually happen from rapid cooling or overbaking. If minor, they won’t affect flavor—just frost as usual. For severe cracks, spread a thin layer of buttercream over the cracked side before adding filling. The buttercream will “seal” the cracks and create a smooth surface when you frost the entire cake.
Can I substitute the raspberry filling?
Yes! Try lemon curd, chocolate ganache, or even whipped cream. For fruit-based fillings, macerate berries with sugar for 15 minutes to release juices. For chocolate lovers, spread a ½-inch layer of melted dark chocolate between layers, then frost with buttercream on top.

- 2 Lb Oatmeal Bread Machine Recipe: Hands-Off Crusty Loaf With Nutty Depth - September 30, 2026
- 8-Inch Pecan Pie Recipe: Buttery Crust and Caramelized Nut Bliss - September 30, 2026
- 1 Loaf Homemade Bread Recipe: Crusty Crunch and Airy Crumb in One Bowl - September 30, 2026