
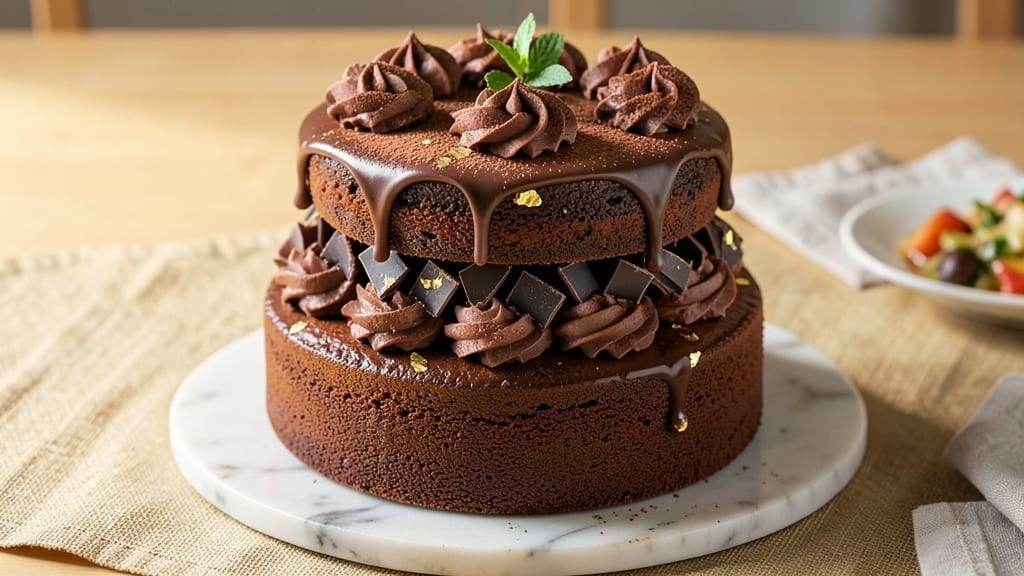
This 2-tier chocolate cake recipe delivers layers of rich cocoa depth, velvety swirls, and a perfectly balanced frosting that’ll have guests begging for seconds. The secret lies in precise baking temperatures and a foolproof frosting technique that creates those signature smooth peaks—no shortcuts, just restaurant-quality results.
I’ve baked this cake for special occasions, and every time, it becomes the star of the dessert table.
The recipe starts with two 9-inch cake layers baked at 350°F for 30-35 minutes, ensuring a moist crumb without dryness. While the cakes cool, the frosting—a blend of buttercream and ganache—gets whipped into silky perfection.
This combination gives you the best of both worlds: the tangy richness of ganache and the light airiness of buttercream, all in one decadent spread.
Assembling the cake is where the magic happens. You’ll pipe the frosting onto each layer, then stack them with a smooth, professional finish—no messy crumbs or uneven tiers.
The final touch? A dusting of cocoa powder or chocolate shavings for that elegant, showstopping look. Every slice reveals layers of chocolate perfection, making it the ultimate crowd-pleaser.
Perfect for birthdays, anniversaries, or just because, this cake requires patience but delivers foolproof, show-stopping results. The recipe scales easily for larger gatherings, and the frosting can be made ahead, so you’re not rushing on the big day. Let’s get baking—your taste buds (and your guests) will thank you.
Ingredients for 2 tier chocolate cake
Rich cocoa, velvety frosting, and precise layers—this is your showstopping chocolate cake essentials.
| Ingredient | Amount | Notes |
|---|---|---|
| Unsalted Butter 🧈 | 1 ½ cups | Room temperature for easy mixing |
| Granulated Sugar 🍚 | 2 ½ cups | Superfine preferred for smooth texture |
| All-Purpose Flour 🌾 | 3 cups | Sifted for light crumb |
| Cocoa Powder 🍫 | 1 cup | Natural or Dutch-processed |
| Large Eggs 🥚 | 6 whole | Room temperature for best mixing |
| Baking Powder 🍞 | 1 tbsp | Aluminum-free for best results |
| Salt 🧂 | ½ tsp | Fine sea salt preferred |
| Vanilla Extract 🌿 | 2 tsp | Pure Madagascar bourbon preferred |
| Hot Water 💧 | ½ cup | To bloom cocoa powder |
| Heavy Cream 🥛 | 1 ½ cups | Cold for ganache |
| Semisweet Chocolate Chips 🍫 | 1 ½ cups | High-quality for ganache |
| Powdered Sugar 🍚 | 4 cups | For buttercream |
| Cocoa Powder 🍫 | ¼ cup | For buttercream coloring |
| Cocoa Powder 🍫 | 0.1 cup | For dusting top layer |
The cocoa powder is non-negotiable here—Valrhona or Guittard are my go-to brands for that deep, velvety chocolate flavor. Natural cocoa gives a slightly tangy bite, while Dutch-processed is smoother. I always grab mine from Williams Sonoma or Amazon for consistent quality. For the chocolate chips, Ghirardelli or Lindt make all the difference in the ganache—avoid the store-brand stuff, trust me. The butter should be European-style like Plugrá or Land O’Lakes—it has higher fat content for that ultra-rich texture. Room temperature is key for both butter and eggs, so take them out 30 minutes before baking.
No vanilla extract? Vanilla bean paste at half the amount works beautifully—it’s like having real vanilla seeds in your cake. Short on cocoa powder? Melted chocolate at 1:1 ratio can substitute in a pinch, but the texture will be slightly denser. The heavy cream for ganache must be cold—straight from the fridge ensures smooth, glossy results. For the buttercream, powdered sugar should be sifted first to avoid lumps. If you’re feeling fancy, add a pinch of espresso powder to deepen the chocolate flavor without changing the recipe. The cocoa powder for dusting? Use the same brand as your cake mix for consistent color.
This cake keeps beautifully—3 days at room temperature covered loosely, or 1 week refrigerated wrapped tightly. For longer storage, freeze the fully assembled cake (without dusting) for up to 3 months. Let it thaw overnight in the fridge before serving. The frosting can be made 2 days ahead and stored in the fridge—just rewhip before assembling. For a restaurant-quality finish, use an offset spatula to create those signature smooth sides, and dust the top with cocoa powder right before serving. Every slice will look like it came from a patisserie.
Why You’ll Love This Recipe
- No Mixer Needed: I swear by this recipe when I’m in a rush—just cream the butter and sugar by hand, fold in the eggs, and let the cocoa powder do its magic. The batter’s so smooth, you won’t believe it’s not mixed to perfection.
- Rich Without Overpowering: That perfect balance of butter and sugar keeps it decadent, but the cocoa powder (and a pinch of salt, trust me) cuts through the sweetness just enough. It’s the kind of cake where every bite feels like a hug.
- Party Ready in Hours: Bake it, frost it with store-bought ganache (or homemade if you’re feeling fancy), and boom—you’ve got a showstopper for birthdays, anniversaries, or just because. The two tiers make it feel extra special without the fuss.
- Budget-Friendly Luxury: You’re using pantry staples—flour, sugar, butter—that stretch far. Leftovers? Slice them up for breakfast toast or stash them in the freezer for a quick dessert later. Cheap, but it tastes like you spent all day baking.
Step-by-step instructions for 2-Tier chocolate cake
Here’s how to create layers so rich and moist they’ll disappear in seconds.
Prepare the Cake Batter with Perfect Swirls
Preheat your oven to 350°F and grease two 9-inch round cake pans, lining the bottoms with parchment paper. In a stand mixer fitted with the paddle attachment, beat the 1.5 cups unsalted butter and 2.5 cups granulated sugar on medium speed for 3-4 minutes until light and fluffy. Scrape down the sides of the bowl to ensure even mixing.
Add the 6 whole large eggs one at a time, mixing well after each addition. Stir in the 2 teaspoons vanilla extract and 0.5 teaspoon salt. In a separate bowl, whisk together the 3 cups all-purpose flour, 1 cup cocoa powder, and 1 tablespoon baking powder. Gradually add the dry ingredients to the wet mixture on low speed until just combined.
For those signature swirls, divide the batter evenly between the two prepared pans. Pour 0.5 cup hot water into one pan, then carefully swirl it with a knife or offset spatula to create marbled patterns. Pour the remaining batter into the second pan, then divide the 1.5 cups semisweet chocolate chips evenly between both pans, pressing some into the batter for extra richness.
Bake Until Golden and Springy
Bake the cakes for 25-30 minutes or until a toothpick inserted into the center comes out clean. The edges should be deep golden brown while the tops remain slightly domed. Rotate the pans halfway through baking for even cooking.
I always tap the side of the pans gently when they come out of the oven—they should spring back slightly. If the tops look too dark, cover them loosely with aluminum foil for the last 5 minutes of baking. Let the cakes cool in the pans for 10 minutes, then transfer them to a wire rack to cool completely.
Create the Ultimate Chocolate Ganache
While the cakes cool, prepare the ganache by combining the 1.5 cups heavy cream and 1.5 cups semisweet chocolate chips in a heatproof bowl. Place this over a pot of simmering water (double boiler method) and stir gently until the chocolate melts completely and the mixture becomes glossy and smooth.
Remove from heat and let the ganache cool slightly—it should be thick enough to coat the back of a spoon but still pourable. This ganache will become the luscious filling between your cake layers, so don’t rush this step. The texture should be like warm, velvety chocolate pudding.
Assemble with Buttercream and Ganache
Level the tops of your cooled cakes with a serrated knife if needed. For the buttercream, beat the 1.5 cups unsalted butter until smooth, then gradually add the 4 cups powdered sugar and 0.25 cup cocoa powder, mixing on high speed until light and fluffy. Add the 2 teaspoons vanilla extract and a pinch of salt for balance.
Spread a generous layer of buttercream on the bottom cake, then pour half of the ganache over it, letting it drip slightly over the edges. Place the second cake layer on top and spread remaining buttercream over the top and sides. Add the remaining ganache, letting it cascade down the sides for that decadent look. Chill the cake in the refrigerator for 1 hour to set.
Decorate and Serve with Confidence
Before serving, dust the top layer with the remaining 0.1 cup cocoa powder using a fine-mesh sieve for an elegant finish. The contrast between the rich chocolate layers and creamy buttercream will make every slice look like a masterpiece.
Slice with a hot knife (dip in hot water and wipe dry between cuts) for clean, perfect portions. Serve at room temperature—this cake is best enjoyed when the ganache has softened slightly, creating that perfect balance of warm cake and cool filling. Each bite should deliver layers of chocolate intensity with a velvety texture that melts in your mouth.
Pro Tips For Making 2 Tier Chocolate Cake
- Whip Butter & Sugar: DESCRIPTION: Cream the butter and sugar until it’s light and fluffy—think ribbons that hold their shape for 10 seconds. I used to rush this, and my cakes turned dense. Use a stand mixer with the paddle attachment (not whisk) and scrape the bowl every 30 seconds to guarantee air gets trapped.
- Sift Cocoa Twice: DESCRIPTION: Sift the cocoa powder before measuring, then sift it again into the dry ingredients. Lumpy cocoa makes for uneven texture, and this recipe relies on it dissolving smoothly. Trust me, the extra 30 seconds saves you from a brick-like crumb.
- Test Doneness with a Toothpick: DESCRIPTION: Stick a toothpick in the center of the top tier first—it’s the one that dries out faster. If it comes out clean but crumbly, pull it. If it’s wet but with a few moist crumbs, bake another 2–3 minutes. Overbaking kills moisture, and you’ll regret it when slicing.
- Chill the Cake: DESCRIPTION: Let the cake cool in the pans for 10 minutes, then transfer to a wire rack—but don’t rush the frosting. Wait at least 2 hours (overnight is ideal) before assembling. Warm cake melts buttercream, and you’ll end up with a soggy mess. Patience here makes all the difference.
Best sauces and condiments for this 2 tier chocolate cake
Classic Chocolate Ganache
This velvety ganache is the star of your cake, combining 1.5 cups heavy cream and 1.5 cups semisweet chocolate chips for a luscious, glossy filling. I use a double boiler method to melt the chocolate gently, ensuring no graininess.
Let it cool to 100°F before using—this temperature gives you that perfect pourable consistency without losing its rich, smooth texture. 🍫
Buttercream Perfection
The secret to fluffy buttercream lies in proper technique: beat 1.5 cups unsalted butter until completely smooth, then gradually add 4 cups powdered sugar and 0.25 cup cocoa powder on low speed. Increase to high only after all the sugar is incorporated to avoid a greasy texture.
For extra flavor, I add a pinch of espresso powder—it deepens the chocolate notes without altering the recipe. 🥛
Salted Caramel Drizzle
Elevate your cake with a salted caramel drizzle made from 1 cup granulated sugar, 6 tbsp heavy cream, and 2 tbsp unsalted butter. Cook the sugar until amber, then carefully whisk in the cream.
Finish with 1 tsp flaky sea salt and drizzle over the assembled cake. The contrast of sweet, salty, and chocolate is pure magic. 💛
Espresso-Infused Syrup
For a sophisticated twist, brush the cake layers with an espresso-infused syrup made from 0.5 cup water, 0.5 cup granulated sugar, and 1 tbsp instant espresso powder.
Simmer until dissolved, then cool completely before using. This adds a subtle coffee depth that pairs beautifully with the chocolate. ✨
Chocolate Glaze Finish
For a showstopping topper, melt 1 cup semisweet chocolate chips with 2 tbsp heavy cream over low heat, then drizzle over the chilled cake. Use a fork to create decorative cracks in the glaze.
This adds a glossy, professional finish that makes your cake look like it came from a bakery. 💫
Whipped Cream Topping
Lighten up the presentation with whipped cream sweetened with 1 tbsp powdered sugar and dusted with 0.1 cup cocoa powder. Pipe it around the base of the cake for a rustic, elegant look. The contrast of airy cream against rich chocolate creates a perfect balance of textures. 🥛
Nutrition facts
Frequently asked questions
How do I prevent my 2-tier chocolate cake from collapsing?
Never skip the cooling step! Let cakes cool completely in pans for 10 minutes, then transfer to a wire rack. Chill the assembled cake in the fridge for 1 hour before decorating. Overbaking or rushing the cooling process is the #1 cause of collapsed tiers. Also, use room-temperature ingredients—especially eggs and butter—to ensure even baking.
Can I make this cake without a stand mixer?
Use a hand mixer or even a whisk for the buttercream and ganache. For the cake batter, mix by hand in a large bowl with a sturdy whisk. The key is patience—beat the butter and sugar for 5-7 minutes by hand to achieve that light, fluffy texture. The swirl technique works the same way with a spoon or spatula instead of a mixer.
What’s the best way to transport a 2-tier cake?
For short trips (1 hour or less), keep it at room temperature in its serving box. For longer trips, refrigerate it for 1-2 hours first, then wrap tightly in plastic wrap with a cake board on top and bottom. Place it in a sturdy cake carrier—never transport it upright. Bring it to room temperature for 30 minutes before serving to let the ganache soften.
How do I adjust this recipe for a 3-tier cake?
Use three 8-inch cake pans instead of two 9-inch pans. Bake each layer for 25-30 minutes at 350°F, then scale the frosting up by 50%. You’ll need about 6 cups buttercream total and 2 cups ganache. The assembly technique remains the same—just add an extra layer with more frosting between each. Chill for 2 hours to prevent collapse with the extra weight.
Why did my cake turn out dense instead of light?
Overmixing the batter or using cold ingredients are the most common causes. Mix the dry ingredients into the wet just until combined—don’t overbeat. Also, ensure your butter is truly room temperature (it should dent when pressed) and eggs are at room temp. Another tip: don’t overfill the pans—fill them only 2/3 full to prevent overflow and dense centers.

- 3 Cheese Pimento Cheese Recipe: Sharp Cheddar, Peppery Heat, and Creamy Spread Magic - October 10, 2026
- 7 Egg Cake Recipe: Fluffy Layers With Vanilla Bean Infusion - October 10, 2026
- 3 Musketeers Cookie Recipe: Crunchy Chocolate Shells With Gooey Caramel Centers - October 10, 2026