
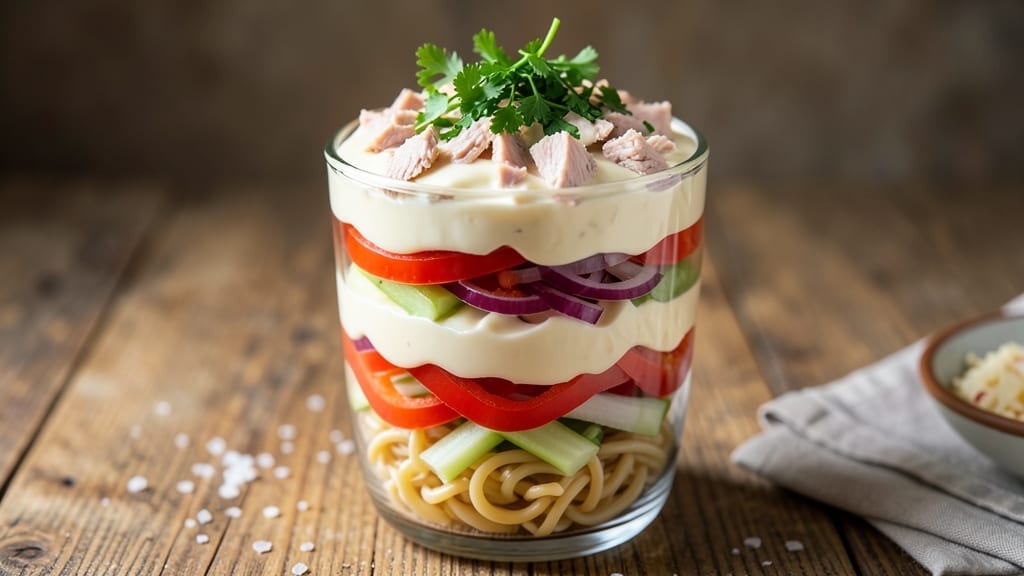
A 24-hour 7-layer salad transforms any gathering into a crowd-pleasing centerpiece without last-minute stress. The secret lies in layering flavors and textures—creamy pasta, tender tuna, crisp veggies, and a final crunchy topping—that meld overnight into a cohesive, restaurant-worthy dish.
This isn’t just a salad; it’s a party staple that requires zero effort at the moment of serving. The magic happens during the 24-hour refrigeration, where ingredients absorb flavors and soften just enough to create a harmonious bite.
Each layer plays a role: the pasta base holds everything together, the tuna adds protein, and the final crunchy topping—whether crackers or nuts—elevates the experience. No one will guess it took almost no effort to assemble.
What you’ll end up with is a visually stunning, no-fuss salad that’s perfect for potlucks, office parties, or family gatherings. The layers remain distinct yet cohesive, with each component contributing to a satisfying crunch and creamy texture in every bite.
This is the kind of dish that makes you look like the hostess with the most—without the stress. Serve chilled, garnished with fresh herbs, and watch it disappear. The best part? You can prep it days ahead, so your guests never know how little work went into their favorite dish.
Ingredients for 24 hour 7 layer salad
Party-ready ingredients that layer perfectly for a stunning, stress-free 7-layer salad.
| Ingredient | Amount | Notes |
|---|---|---|
| Short Pasta (Rotini or Fusilli) 🍝 | 12 oz | Uncooked, al dente texture preferred |
| Canned Tuna (in Water) 🐟 | 2 cans | 5 oz each, drained well |
| Mayonnaise 🥫 | 1 cup | Full-fat for creaminess |
| Red Bell Pepper 🌶️ | 1 whole | Diced small, seeds removed |
| Celery Sticks 🥬 | 3 whole | Thinly sliced, about 1 cup |
| Red Onion 🧅 | 1 whole | Thinly sliced, about 1 cup |
| Creamy Caesar Dressing 🥫 | 1 ½ cups | Store-bought or homemade |
| Rice Crackers 🍪 | 2 cups | Crushed for crunchy topping |
| Fresh Parsley 🌿 | ¼ cup | Chopped for garnish |
| Salt 🧂 | 1 ½ tsp | Kosher or sea salt |
| Black Pepper 🌶️ | 1 tsp | Freshly ground preferred |
| Lemon Juice 🍋 | 1 tbsp | Freshly squeezed |
| Garlic Powder 🧄 | ½ tsp | For extra flavor depth |
The pasta is the foundation—rotini or fusilli holds everything together best. Whole Foods or Trader Joe’s carry the best-quality short pasta, but any al dente variety works. Cook it just shy of package instructions so it doesn’t get mushy during the 24-hour rest. For the tuna, Wild Planet or Starkist brands are my go-tos—they drain better and have less fishy aftertaste. The red bell pepper and onion should be bright and firm, not limp or bruised. If you’re prepping ahead, slice them just before assembling to keep that crisp texture.
No rice crackers? Puffed wheat cereal or crushed potato chips work in a pinch for the crunchy topping. The Caesar dressing can be swapped for ranch if you prefer, but Bolthouse Farms makes a creamy version that’s perfect here. Fresh parsley is ideal for garnish, but dried parsley at half the amount gets you close. The mayonnaise should be full-fat—Hellmann’s or Duke’s are reliable choices. If you’re watching calories, use a light mayo but add an extra tablespoon of lemon juice to keep it bright. The garlic powder is non-negotiable for that subtle depth of flavor that makes this salad taste restaurant-quality.
This salad tastes even better after 24 hours—the flavors meld beautifully in the fridge. Store in an airtight glass container with layers separated by parchment paper to keep everything distinct. Keeps for 4-5 days in the fridge, though the texture starts to soften after day 3. For parties, I always make it in a large glass bowl so it’s ready to serve without transferring. Garnish with fresh parsley right before serving—it adds that final pop of color that makes it look like you slaved over it.
Why You’ll Love This Recipe
- No-Chop Nightmare: I swear by this for lazy nights—just dice the bell pepper and celery once, then let the layers do the work. The rotini holds up perfectly overnight, so you’re not scrambling to eat it fresh.
- Creamy-Tuna Magic: That mayo-tuna mix? It’s the star. The canned tuna stays flaky, the mayo adds richness, and the pasta soaks it up like a dream. Honestly, I’ve had people ask if it’s a restaurant dish.
- Lunchbox Hero: Between us, this is my go-to for packed lunches. The flavors meld overnight, and it travels way better than a sad desk salad. My kid still asks for it in his lunchbox after three months.
- Pantry Stash Winner: You’re using ingredients you already have—no fancy shopping. Rotini, a can of tuna, mayo, and a pepper from last week’s grocery run. It’s the ultimate budget hack that still tastes like you tried.
Step-by-step instructions for your crunchy 7-Layer salad
This make-ahead party staple comes together in layers—each one building flavor and texture for maximum crunch.
Cook and Cool the Short Pasta
Bring a large pot of salted water to a rolling boil and cook the 12 oz short pasta (rotini or fusilli) for 1 minute less than package instructions suggest. You want it al dente—firm enough to hold its shape when layered. Drain immediately and rinse under cold water to stop the cooking process.
Spread the drained pasta on a baking sheet and let it cool completely to room temperature. This prevents sogginess when you assemble the salad later. I like to give it 20-30 minutes to fully cool while I prep the other ingredients. The pasta should be cool to the touch before proceeding.
Prepare the Crunchy Top Layer
Crush the 2 cups rice crackers in a resealable plastic bag using a rolling pin or heavy pan. You want them broken into pea-sized pieces—not powdered, just broken for texture. Set aside in a bowl while you prepare the other layers.
In a small bowl, whisk together 1 tbsp lemon juice, 0.5 tsp garlic powder, 1.5 tsp salt, and 1 tsp black pepper. This seasoning blend will enhance the flavor of the crunchy topping when it’s mixed in at the end. The acidity from the lemon juice helps balance the richness of the mayonnaise and Caesar dressing.
Mix the Creamy Base Layers
Drain the 2 cans canned tuna (in water) thoroughly, pressing between paper towels to remove excess moisture. In a large bowl, combine the tuna with 1 cup mayonnaise and 1.5 cups creamy Caesar dressing. Mix until fully incorporated and the tuna is evenly distributed. This forms the creamy foundation of your salad.
Add the 0.25 cup chopped fresh parsley to the tuna mixture and stir gently. The parsley adds a fresh brightness that cuts through the richness of the mayonnaise and Caesar dressing. Taste the mixture and adjust seasoning if needed—this is your flavor base, so getting it right now matters.
Chop and Layer the Vegetables
Finely dice the 1 whole red bell pepper into small pieces, removing seeds and membranes first. Thinly slice the 3 whole celery sticks (about 1 cup) and the 1 whole red onion (about 1 cup). Place each vegetable in separate bowls to keep them from getting watery before layering.
Here’s where the magic happens: Arrange the layers in this order from bottom to top in a large glass or plastic container with a lid. Start with the pasta, then add the red bell pepper, celery, and red onion. Pour the tuna mixture over the vegetables, spreading it evenly. The vegetables will absorb some of the creamy dressing, so don’t worry about perfect distribution.
Assemble and Chill for 24 Hours
Sprinkle the crushed rice crackers evenly over the top layer, pressing down gently to help them adhere. Seal the container tightly and refrigerate for at least 24 hours. This long chilling time allows the flavors to meld together perfectly and the pasta to absorb the creamy dressing without getting mushy.
Before serving, give the salad a good stir to redistribute all the ingredients. The rice crackers will have softened slightly but still maintain their crunch. Serve chilled in individual bowls or directly from the container for a party-friendly presentation. This salad keeps well in the refrigerator for up to 48 hours, making it perfect for large gatherings.
Pro Tips For Making 24 Hour 7 Layer Salad
- Drain pasta cold: Skip the hot water rinse—drain your cooked rotini or fusilli under cold running water for 30 seconds. This stops the cooking, prevents mushiness, and keeps those little spirals holding their shape in the mayo mix. (Yes, even if it feels like overkill.)
- Drain tuna thoroughly: Open that can of tuna and let it sit in a colander for 5 minutes before mixing. The water pools at the bottom—dump it. Wet tuna makes the mayo layer watery, and nobody wants a soggy 7-layer salad. Trust me, the extra minute saves headaches later.
- Dice bell pepper small: Cut that red bell pepper into 1/4-inch cubes, not thick slices. Thick pieces stay crunchy but turn to mush after 24 hours, while small dice blend into the texture without getting rubbery. (And yes, seed it first—less cleanup.)
- Layer mayo last: Assemble all dry layers (pasta, veggies, tuna) first, then pour the mayo over the top. This keeps the bottom from getting soggy while you’re waiting for the flavors to marry overnight. Pro move: Press down gently to seal the layers—no air gaps.
Common mistakes when making this dish
Overcooking the Pasta
This is the #1 mistake I see—pasta that’s too soft after 24 hours turns the salad into a mushy mess. Cook your 12 oz short pasta for just 1 minute less than the package suggests, then rinse it immediately in cold water.
Spread it on a baking sheet to cool completely before layering. I’ve ruined more salads than I’d admit by skipping this step—trust me, the pasta should still have a slight bite when you bite into it after chilling. 🍝
Skipping the Cooling Step
Hot pasta steams the other layers, making everything soggy. Never assemble a warm salad—let the pasta cool to room temperature first. I learned this the hard way when my first attempt turned into a sad, watery pile.
Place the drained pasta on a baking sheet and let it sit for 20-30 minutes while you prep the other ingredients. The extra time prevents moisture buildup that ruins texture. ❄️
Uneven Layer Distribution
The secret to a perfect 7-layer salad is balance—each layer should be roughly the same thickness. If you pile more pasta or veggies in one area, the salad will be dense there and light elsewhere. Use a large glass container with straight sides to make layering easier.
Spread each component evenly with a spatula before adding the next layer. I like to use a 9×13-inch dish for parties—it keeps everything proportional. 📏
Not Draining Tuna Properly
Excess moisture from the tuna makes the salad watery. Drain the 2 cans tuna thoroughly, then press it between paper towels to remove every last drop. I even squeeze the tuna in my hands to get rid of moisture—it’s worth the effort.
Wet tuna turns the creamy layers into a sad, soupy mess. The extra step ensures your salad stays crisp and flavorful. 🐟
Crushing Crackers Too Finely
If you crush the 2 cups rice crackers into powder, you lose the essential crunch. Aim for pea-sized pieces—just broken, not ground. Use a rolling pin in a plastic bag to avoid over-crushing.
I’ve tried both methods, and the slightly larger pieces maintain texture even after 24 hours. The contrast between creamy and crunchy is what makes this salad shine. 🍪
Rushing the Chill Time
Resist the urge to serve it immediately—24 hours is non-negotiable for flavor development. The salad needs time for the pasta to absorb the dressing and for all ingredients to meld.
I’ve tried serving it after just 4 hours, and while it was edible, it lacked that restaurant-quality depth. The longer it chills, the better the flavors become. Patience pays off! ⏳
Nutrition facts
Frequently asked questions
Can I make this salad without tuna?
Swap the tuna for 1.5 cups cooked chicken breast (diced) or 1 cup chickpeas (for a vegetarian version). For extra flavor, mix in 1 tbsp Dijon mustard with the mayonnaise and Caesar dressing. The protein-to-veggie ratio stays balanced, and the texture remains creamy.
How do I adjust the recipe for a smaller crowd?
Cut all ingredients in half for 6 servings. Use a 6-cup container instead of a large bowl, and reduce the rice crackers to 1 cup crushed. The layering ratio stays the same—just scale everything down proportionally. This works perfectly for family dinners or office potlucks.
Can I use a different type of pasta?
Stick with short pasta like penne or farfalle for best results—they hold layers better than long noodles. Avoid al dente pasta that’s too firm (like rigatoni), as it may not soften enough during the 24-hour chill. If you must substitute, small shells work in a pinch, but they’ll require more careful layering.
Why does my salad get watery after chilling?
This usually happens from excess moisture in the tuna or not cooling the pasta completely. Press tuna between paper towels to remove all liquid, and let pasta cool fully before assembling. Also, check your veggies—they should be dry before layering. A splash of 1 tsp lemon juice in the tuna mix helps absorb moisture too.
Can I add other vegetables?
Yes! Try adding ½ cup diced cucumber or ¼ cup chopped olives to the veggie layer. For extra crunch, sprinkle 2 tbsp chopped nuts (walnuts or pecans) with the crackers. Just keep portions balanced—don’t overpower the classic flavors. The key is maintaining that perfect creamy-crunchy contrast.

- 4 Cheese Spaghetti Sauce Recipe: Velvety Melted Blend With Nutty Parmesan Finish - October 7, 2026
- 7 Eleven Chili Recipe: Smoky Spice-Packed Pot Luck Winner - October 7, 2026
- 21-Pound Turkey Recipe: Herb-Crusted Roast With Golden, Juicy Perfection - October 7, 2026