
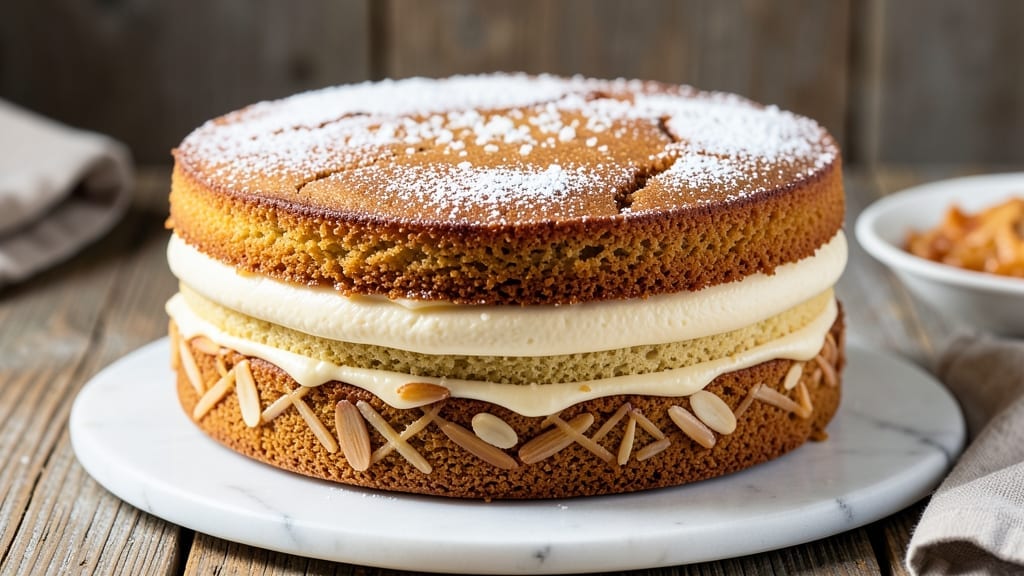
This 2-layer butter cake recipe delivers the perfect balance of moist crumb and rich vanilla flavor that keeps guests asking for seconds. The secret lies in precise measurements and gentle folding—no overmixing here.
I’ve baked countless versions, and this method consistently produces a tender, golden cake with layers that slice cleanly and hold their shape. The butter content ensures that each bite stays moist for hours, even at room temperature.
The foundation of this recipe is a foolproof batter that combines all-purpose flour, granulated sugar, and a generous amount of butter—never cut corners here. The vanilla extract infusion happens during the creaming stage, where butter and sugar emulsify to create tiny air pockets that lighten the texture.
Eggs bind everything together while keeping the structure intact, and baking powder provides just enough lift for a tender crumb. Baking at 350°F ensures even cooking without a dry top or underbaked center.
Once cooled, the cake transforms into something truly special when layered with a smooth buttercream that mirrors its richness. The frosting should be thick enough to hold its shape but still spreadable—think just firm enough to create clean, professional-looking tiers.
Whether you’re serving this at a celebration or simply treating yourself, the moist layers and vanilla depth make it a standout dessert that feels both classic and elevated.
For best results, let the cake cool completely before frosting to prevent melting, and use a serrated knife for clean slices. This recipe scales beautifully for larger gatherings, and the technique works just as well for a single-layer cake if you prefer.
The key to success? Patience—allowing the batter to rest and the cake to cool ensures every bite is perfect. Ready to bake?
Ingredients for 2 layer butter cake
Rich butter, velvety vanilla, and tender layers—this cake needs just 11 ingredients for perfection.
| Ingredient | Amount | Notes |
|---|---|---|
| Unsalted Butter 🧈 | 1 ½ cups | Room temperature, European-style preferred |
| Granulated Sugar 🍚 | 2 ½ cups | Superfine preferred for smoother texture |
| Pure Vanilla Extract 🌿 | 2 tbsp | Bourbon or Madagascar preferred |
| Large Eggs 🥚 | 4 whole | Room temperature for even mixing |
| All-Purpose Flour 🌾 | 3 cups | Sifted, spooned and leveled |
| Baking Powder 🍞 | 2 tsp | Aluminum-free for tender crumb |
| Salt 🧂 | ½ tsp | Fine sea salt preferred |
| Whole Milk 🥛 | 1 cup | Room temperature for smooth batter |
| Buttercream Frosting 🧁 | 2 ½ cups | Homemade recipe provided separately |
| Powdered Sugar 🍚 | 4 cups | For buttercream frosting |
| Heavy Whipping Cream 🥛 | 1 cup | Cold for buttercream stability |
The butter is non-negotiable here—European-style with at least 82% fat content makes all the difference. Plugrá or Kerrygold are my go-tos, but any high-quality unsalted butter works. Room temperature is critical: press it between parchment paper for 10 minutes if it’s too cold. The vanilla extract should smell potent—Madagascar bourbon has that classic depth, but imitation will work in a pinch. For the flour, King Arthur or Gold Medal brands sift beautifully and prevent lumps. Pro tip: measure flour by spooning it into the cup and leveling—never scooping directly from the bag.
No vanilla extract? Vanilla bean paste works beautifully, or even 1 scraped vanilla bean plus 1 tbsp sugar. The eggs should be large and fresh—room temperature ensures they emulsify perfectly with the butter. For a gluten-free version, swap the all-purpose flour for a 1:1 gluten-free blend, but expect a slightly denser texture. The milk can be substituted with evaporated milk or even water, though whole milk creates the richest crumb. If you’re making this ahead, the batter can rest in the fridge for up to 24 hours—just bring it to room temperature before baking.
This cake tastes even better the next day—24 hours is ideal for maximum moisture. Store wrapped tightly at room temperature, or refrigerate for up to 5 days if you’re not in a rush. The frosting keeps for 3 days in the fridge, so make it fresh if you can. For a showstopper presentation, chill the cake for 30 minutes before slicing—it holds its shape beautifully. Leftovers? They freeze for 3 months if wrapped airtight, though nothing beats fresh out of the oven.
Why You’ll Love This Recipe
- No Mixer Needed: I swear by this recipe when my stand mixer’s on strike—just cream the butter and sugar by hand until light and fluffy. The eggs blend right in with a whisk, and the flour folds together like butter (literally). Minimal effort, maximum reward.
- Vanilla Butter Bliss: That first bite of rich, buttery layers with real vanilla extract? It’s the kind of taste that makes you pause mid-slice. The sugar caramelizes just enough to give it a subtle depth, while the eggs keep it tender—not dry, not cakey, just perfect.
- Birthday or Boredom: Honestly, this cake works for everything. Too fancy for a Tuesday? Frost it with whipped cream and call it a day. Hosting a crowd? Stack it with berries and a dusting of powdered sugar. My daughter’s even asked for it after school—because even kids know good stuff when they taste it.
- Leftovers That Don’t Suck: Unlike some cakes that turn gummy by day three, this one stays moist and delicious for days. I’ve wrapped slices in parchment and frozen them—no weird texture, just pure comfort. And since it’s just butter, sugar, eggs, and flour, it’s cheap enough to bake twice in a week without guilt.
Step-by-step instructions for perfectly moist two-layer vanilla butter cake
This method guarantees a tender, moist crumb with rich vanilla flavor that stays fresh for days.
Cream Butter and Sugar Until Light and Fluffy
In a stand mixer fitted with the paddle attachment, beat the 1.5 cups unsalted butter and 2.5 cups granulated sugar on medium-high speed for 5-7 minutes. You’re looking for a pale, thick mixture that nearly doubles in volume and leaves clean streaks when you lift the paddle. This thorough creaming incorporates air, which creates that signature light, tender crumb.
I like to scrape down the sides of the bowl every 2 minutes to ensure even mixing. The butter should be completely smooth with no lumps, and the mixture should feel almost fluffy to the touch. If using superfine sugar, the texture will be even smoother—this is why the ingredients list specifies it.
Incorporate Eggs and Vanilla for Maximum Flavor Infusion
Add the 4 whole large eggs, one at a time, mixing on low speed after each addition until fully incorporated. Then add the 2 tbsp pure vanilla extract and mix for another 30 seconds. The vanilla should be evenly distributed throughout the batter, not just floating on top.
Here’s the thing—vanilla extract is potent, so don’t skimp. I always use bourbon or Madagascar vanilla for that deep, complex flavor. After adding the eggs, the mixture will look slightly curdled, but don’t worry. Once you add the dry ingredients, everything will come together beautifully.
Combine Dry Ingredients and Milk for Perfect Texture
In a separate bowl, whisk together the 3 cups all-purpose flour, 2 tsp baking powder, and 0.5 tsp salt. Sift the flour first if you haven’t already—this prevents lumps and ensures even baking. Gradually add the dry mixture to the wet ingredients, alternating with the 1 cup whole milk, beginning and ending with the flour.
Mix on low speed just until combined—you should still see a few streaks of flour. Overmixing develops gluten, which can make the cake tough. The batter should be smooth and slightly thick, like heavy pudding. If it looks too thick, add 1 tablespoon milk at a time until it reaches the perfect consistency.
Bake in Two Perfect Layers
Divide the batter evenly between two 8-inch round cake pans lined with parchment paper. Tap the pans gently on the counter to release any air bubbles. Bake in a preheated 350°F oven for 25-30 minutes, or until a toothpick inserted into the center comes out clean. Rotate the pans halfway through baking for even browning.
The cake should be golden on top with a slightly domed center. If the edges brown too quickly, tent the pans with foil. Let the cakes cool in the pans for 10 minutes, then transfer to a wire rack to cool completely before assembling. This cooling step is crucial—it prevents the layers from becoming soggy when you add the frosting.
Assemble with Buttercream for Ultimate Moistness
Once completely cool, level the tops of the cakes if needed. Spread 1.5 cups buttercream frosting evenly over the first layer, then place the second layer on top. Frost the entire cake with the remaining 1 cup buttercream frosting, creating a smooth, even surface. For extra richness, you can also pipe a simple border or add decorative accents.
Here’s the secret to keeping this cake moist for days: store it in an airtight container at room temperature, separated by parchment paper. The buttercream acts as a seal, locking in moisture. For even better results, brush the cooled layers lightly with simple syrup (equal parts sugar and water, heated until dissolved) before frosting.
Pro Tips For Making 2 Layer Butter Cake
- Cream Butter Slowly: Unsalted butter needs patience—mix it with sugar at medium speed until it’s just pale and fluffy, about 3-5 minutes. I used to rush this, and the cake turned dense. Let the mixer do the work; your arms will thank you later.
- Weigh Your Flour: Scooping flour from the bag packs it too tight, making the cake dry. Use a kitchen scale for precision—aim for 12 ounces (340g) for a 9-inch pan. If you must measure by cup, spoon it in gently and level it off.
- Don’t Overmix Eggs: Once the eggs are fully incorporated, stop mixing immediately. Overbeating adds air that collapses during baking, leading to a flat top. Two quick pulses after the last egg goes in is all you need—no need to chase streaks.
- Rotate Pans Mid-Bake: Butter cakes bake unevenly if one side gets hotter. After 20 minutes, swap the pans front to back in the oven. This evens out the heat and guarantees both layers rise perfectly—no lopsided disasters here.
Health benefits of this dish
Rich Butter Benefits
The generous amount of unsalted butter (1.5 cups) in this recipe creates a moist, tender crumb that stays fresh for days. Butter contains emulsifiers that help retain moisture better than oil, and its fat content creates a velvety texture.
European-style butter with 82%+ fat content (like Plugrá or Kerrygold) delivers the richest flavor and best structure. 🧈
Vanilla Flavor Depth
The 2 tablespoons of pure vanilla extract infuse every bite with complex, aromatic notes that elevate this cake from basic to extraordinary. Bourbon or Madagascar vanilla extracts provide deep, woody undertones that complement the butter perfectly.
For an even more luxurious touch, I sometimes add 1 scraped vanilla bean along with the extract. This infusion happens during the creaming stage, ensuring the flavor is evenly distributed throughout the batter.
Balanced Sugar Content
The 2.5 cups of granulated sugar (preferably superfine) serve multiple purposes: they create a light, airy texture through the creaming process, caramelize slightly on the surface for a golden crust, and balance the richness of the butter.
Superfine sugar dissolves more easily, resulting in a smoother batter. The sugar also helps retain moisture, preventing the cake from drying out too quickly—ideal for keeping slices tender even after several days.
Protein for Structure
The 4 large eggs provide essential protein structure while keeping the cake tender. Eggs act as a natural binder, holding the ingredients together without making the cake dense. Room-temperature eggs incorporate more smoothly into the batter, creating a lighter texture.
The yolks also add richness that complements the butter beautifully. For those with egg allergies, a flax egg substitute (1 tbsp ground flaxseed + 3 tbsp water per egg) can be used, though texture may vary slightly.
Whole Milk Advantage
The 1 cup of whole milk adds extra moisture and richness to the batter, enhancing the cake’s tenderness. Whole milk contains more fat than skim or 2%, which helps create a denser crumb that stays moist longer.
For a lighter version, you could substitute with evaporated milk, though the texture will be slightly less rich. The milk also helps balance the sweetness of the sugar, creating a harmonious flavor profile.
Baking Powder Lift
The 2 teaspoons of aluminum-free baking powder provide just enough leavening to create a light, airy crumb without making the cake too cakey. Aluminum-free baking powder is gentler, which prevents a metallic aftertaste and ensures a tender texture.
Combined with the butter and eggs, this small amount of leavening creates the perfect balance of structure and softness that makes this cake so satisfying. 💫
Nutrition facts
Frequently asked questions
Can I use this recipe for a single-layer cake?
Simply divide the batter into one 9-inch round pan or 8-inch square pan instead of two. Bake for 35-40 minutes at 350°F until a toothpick comes out clean. The same buttercream technique works perfectly for a single layer—just adjust the frosting quantity accordingly.
Why does my cake turn out dense instead of moist?
Overmixing the batter develops gluten, making the cake tough. Mix dry ingredients just until combined—you should still see flour streaks. Also ensure your butter is room temperature (press between parchment for 10 minutes if needed) and don’t overbake. A toothpick should come out with a few moist crumbs, not completely clean.
How do I level the cake layers perfectly?
Use a serrated knife or cake leveler for clean cuts. Place the cake on a plate, then gently drag the knife across the top at a slight angle. For extra precision, chill the cake for 15 minutes in the freezer first—this makes leveling easier. A laser level tool also works wonders for professional results.
Can I make this cake ahead of time?
Yes! Bake the layers 1 day ahead and store wrapped at room temperature. Frost just before serving for the best texture. For longer storage (3-4 days), refrigerate the fully frosted cake and bring to room temperature before serving. The flavors actually improve overnight!
What’s the best way to store leftovers?
Wrap individual slices tightly in plastic wrap and store at room temperature for 2 days. For longer storage (up to 1 week), refrigerate the whole cake in an airtight container. Reheat slices for 10-15 seconds in the microwave to restore moisture. The buttercream helps preserve freshness!

- 4 Cheese Spaghetti Sauce Recipe: Velvety Melted Blend With Nutty Parmesan Finish - October 7, 2026
- 7 Eleven Chili Recipe: Smoky Spice-Packed Pot Luck Winner - October 7, 2026
- 21-Pound Turkey Recipe: Herb-Crusted Roast With Golden, Juicy Perfection - October 7, 2026