
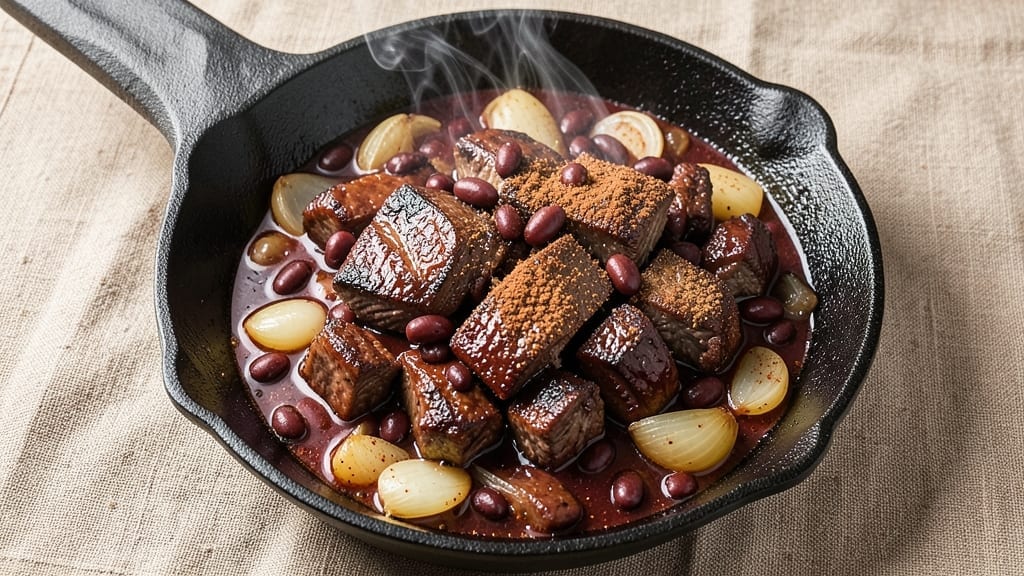
This 3 drop chili recipe delivers the bold, smoky heat that defines Texas comfort food—where just three drops of hot sauce transform simple ingredients into a dish that simmers with deep, complex flavor.
The secret lies in slow cooking, which develops a rich, velvety texture while letting the spices meld into every bite. I’ve perfected this version over years of weekend cookouts, where it becomes the star of the table without needing fancy ingredients.
The beauty of this chili is its balance: tender chunks of beef or sausage, hearty beans, and a deep, smoky base that’s elevated by the signature three drops of hot sauce or chili oil.
Unlike quicker versions, this recipe rewards patience with layers of flavor—caramelized onions, toasted spices, and a sauce that thickens just enough to coat every spoonful. It’s the kind of dish that tastes even better the next day, when the flavors have fully settled.
What makes this chili truly special is how it brings people together—whether it’s a family gathering or a casual dinner with friends. The slow simmer creates an aroma that fills the house, and the heat builds gradually, giving you control over the spice level.
Serve it with crusty cornbread or warm tortillas to soak up every last drop of that smoky, spicy goodness.
This recipe isn’t just about the heat; it’s about tradition and simplicity. With just a few key ingredients and a little time, you’ll have a chili that’s restaurant-quality at home.
The method is straightforward, but the result is unforgettable—perfect for chilly evenings or any time you crave a dish that’s bold, comforting, and full of character.
Ingredients for 3 drop chili
Sixteen ingredients, slow simmered to smoky perfection—this chili delivers Texas comfort food at its boldest.
| Ingredient | Amount | Notes |
|---|---|---|
| Chuck Roast 🥩 | 2 ½ lb | Pre-cubed for even cooking |
| Kidney Beans 🌱 | 1 lb | Dried or canned, drained |
| Yellow Onion 🧅 | 2 whole | Diced, caramelized |
| Garlic Cloves 🧄 | 6 cloves | Minced, toasted lightly |
| Chili Powder 🌶️ | 2 tbsp | Smoked or mild variety |
| Ground Cumin 🌿 | 1 tbsp | Toasted for depth |
| Dried Oregano 🍃 | 1 tsp | Mexican oregano preferred |
| Salt 🧂 | 1 ½ tsp | Kosher or sea salt |
| Black Pepper 🌶️ | ½ tsp | Freshly ground |
| Cayenne Pepper 🔥 | ½ tsp | Adjust for heat |
| Tomato Paste 🍅 | ½ cup | High-quality, no salt added |
| Beef Broth 💧 | 4 cups | Low-sodium preferred |
| Red Wine 🍷 | 1 cup | Bold, dry variety |
| Hot Sauce or Chili Oil 🌶️ | 3 drops | Signature finishing touch |
| Olive Oil 🫒 | 2 tbsp | Extra-virgin for richness |
The chuck roast is non-negotiable here—it breaks down into tender chunks that soak up all the smoky flavors. Costco or local butchers often have it pre-cubed, but if you’re buying a whole roast, ask for the chuck section. Look for good marbling to ensure juiciness. Kidney beans add heartiness, but any dried bean works—just soak overnight if using dried. The onions and garlic are the flavor foundation, so take your time caramelizing them. I usually buy a big bag of onions at Trader Joe’s—they stay fresh longer and are perfect for this recipe.
No smoked paprika? Substitute with an extra 1/2 tbsp chili powder plus a pinch of liquid smoke. Running low on cumin? Ground coriander at the same amount works in a pinch. The tomato paste can be swapped for crushed tomatoes (use 1 can), but it won’t caramelize the same way. For the wine, any bold red will do—Cabernet Sauvignon or Merlot are my go-tos. If you’re avoiding alcohol, beef broth with a splash of balsamic works beautifully. The hot sauce is the star—Tabasco or Cholula are classic choices, but any high-quality hot sauce will do.
This chili tastes even better the next day, so make it ahead if you can. Store in an airtight container in the fridge for up to 5 days, or freeze portions for 3 months. I like to portion it into individual containers for easy lunches—just reheat with a splash of water or broth. The flavors deepen over time, so don’t rush it. Serve with cornbread or tortillas to soak up every last drop of that rich, smoky goodness.
Why You’ll Love This Recipe
- One-Pot Magic: I swear by this recipe—just dump everything in one pot, let it simmer, and walk away. The chuck roast practically melts into tender shreds while the onions caramelize right in the same liquid, no extra pans or fuss.
- Deep, Smoky Richness: That chili powder isn’t just a pinch—it’s the backbone of this dish. The slow cook transforms tough chuck into fall-apart meat, while the garlic and onions build layers of warmth that hit different. Honestly, the first bite makes me close my eyes.
- Weeknight Workhorse: Between us, this is my go-to when I’m too tired to think. Double the batch on Sunday, and you’ve got lunch for Monday, Tuesday, and even a quick reheat for Wednesday. The beans soak up all the flavors, so every serving tastes like the first.
- Budget-Buster Win: Kidney beans and chuck roast stretch this chili into a meal that feeds four for under $10. I’ll be real: my grocery budget thanks me every time I make it. Plus, the leftovers only get better the next day—proof that good food doesn’t have to break the bank.
Step-by-step instructions for slow-simmered 3 drop chili
Here’s the method for rich, smoky chili with deep flavors and perfect texture.
Sear the Chuck Roast for Deep Flavor
Heat the 2 tbsp olive oil in a large Dutch oven over medium-high heat. Cut the 2.5 lb chuck roast into 1-inch cubes and add them to the pot. Sear undisturbed for 3-4 minutes per side until deeply browned—this creates the Maillard reaction that builds rich, meaty flavor.
Real talk: Don’t crowd the pan. Work in batches if needed, but get that beautiful crust on each piece. Once browned, remove the meat and set aside temporarily. You’ll add it back later once all the aromatics are cooked.
Build the Flavor Base with Aromatics
In the same Dutch oven, add the 2 whole yellow onion and cook for 5-6 minutes until softened and beginning to caramelize. Add the 6 cloves garlic cloves and toast for 30 seconds until fragrant—this prevents bitter garlic flavors.
Stir in the 2 tbsp chili powder, 1 tbsp ground cumin, 1 tsp dried oregano, 1.5 tsp salt, 0.5 tsp black pepper, and 0.5 tsp cayenne pepper. Cook for 1 minute to toast the spices and release their essential oils. Here’s where the chili gets its signature depth.
Develop the Sauce Foundation
Pour in the 1 cup red wine and scrape up any browned bits from the bottom of the pot. Let it simmer for 2-3 minutes until reduced by half. Add the 0.5 cup tomato paste and stir to combine—this thickens the base and adds umami richness.
Next, add the 4 cups beef broth and bring to a gentle boil. Return the seared chuck roast to the pot and add the 1 lb kidney beans. Partially cover and let it simmer for 1 hour—this initial cook time ensures the meat becomes fork-tender and flavors meld.
Slow-Simmer for Maximum Tenderness
After the initial hour, adjust the heat to low and continue simmering uncovered for another 2-3 hours. The chili should reduce slightly and develop a thick, velvety consistency. Stir occasionally to prevent sticking and ensure even cooking.
I know it’s tempting to check constantly, but resist the urge. Every time you lift the lid, you lose heat and moisture. The chili will thicken naturally as it cooks. You’ll know it’s ready when the meat pulls apart easily and the sauce coats the back of a spoon.
Finish with Signature Heat and Rest
Once the chili reaches your desired consistency, stir in the 3 drops hot sauce or chili oil. This is where the “3 drop” name comes from—just enough heat to complement without overpowering. Taste and adjust seasoning if needed, adding more salt or spices as necessary.
Let the chili rest for 15-20 minutes off the heat before serving. This resting period allows the flavors to fully develop and the texture to set. Serve with crusty bread or cornbread to soak up every last drop of that rich, smoky sauce.
Pro Tips For Making 3 Drop Chili
- Sear the Chuck Roast: Walk away from the stove after browning—don’t rush the crust. A deep, dark sear on all sides (3-4 minutes per side) locks in flavor, and that’s the foundation of your chili’s depth. I used to flip it obsessively, but patience here means the difference between “good” and “unforgettable.”
- Soak Beans Overnight: Skip the quick-soak—just toss kidney beans in water the night before. Drain and rinse the next morning, then add them to the pot with the meat and broth. This ensures they absorb flavor instead of turning mushy or splitting open mid-cook. (Yes, even if you’re impatient like me.)
- Deglaze with Beer First: After browning the meat, splash in a ½ cup of beer (or broth) before adding tomatoes or beans. The alcohol burns off quickly, but it pulls up those stuck-on bits—more flavor than a quick water splash. I learned this the hard way after tasting bland chili that tasted like it was missing something.
- Control the Heat: Start with a rolling boil for 10 minutes to sterilize the pot, then drop to a simmer. Too much heat = tough meat and split beans. A gentle simmer (small bubbles, occasional swirls) keeps everything tender. I used to walk away, only to find a watery, overcooked mess—now I check it every 20 minutes.
Make-ahead tips for this recipe
Prep Ahead for Flavor
I always start chili prep the night before—soak 1 lb dried kidney beans in water for at least 8 hours (or overnight). This cuts cooking time by 1-2 hours and ensures even texture. Drain and rinse them before adding to the pot.
For extra flavor, I toast the 2 tbsp chili powder and 1 tbsp cumin in a dry skillet for 2 minutes the day before and store in an airtight container. 🌶️
Slow Cooker Shortcut
Use a 6-quart slow cooker to make this chili hands-off. After searing the meat and cooking the aromatics on the stovetop, transfer everything to the slow cooker and cook on low for 8 hours or high for 5 hours.
The slow cooker maintains consistent heat, so you won’t need to monitor it. Just add the 3 drops hot sauce at the end and let it rest before serving.
Freezer-Friendly Portions
Portion chili into quart-sized freezer bags with 1-inch headspace for expansion. Lay them flat to freeze, then stack for easy storage. Thaw overnight in the fridge before reheating.
I like to freeze individual servings for quick lunches—just reheat with 2 tbsp water or broth to restore moisture. Label bags with the date to track freshness. ❄️
Make-Ahead Serving Tips
Chili tastes even better the next day, so double the recipe and store half for later. Reheat gently on the stovetop with medium-low heat and a splash of broth to prevent drying out.
For serving, keep cornbread or tortillas warm in a 200°F oven while reheating the chili. The residual heat keeps them fresh until ready to serve.
Spice Level Control
Adjust heat by adding the 3 drops hot sauce gradually. Start with just 1 drop and taste before adding more. For milder chili, substitute 1 tsp mild chili oil instead of hot sauce.
If you love heat, add ½ tsp cayenne pepper along with the spices. Always taste as you go—this is your chance to customize! 🔥
Garnish Like a Pro
Fresh toppings elevate chili the next day. Keep a stash of chopped cilantro, diced avocado, and shredded cheese in the fridge. Add them just before serving to keep the chili vibrant.
A squeeze of lime juice brightens flavors, and a sprinkle of crushed tortilla chips adds crunch. These garnishes also make chili feel restaurant-worthy when reheated. ✨
Nutrition facts
Frequently asked questions
What makes this 3 drop chili different from regular chili?
The signature difference is the 3 drops of hot sauce or chili oil added at the end, which creates a balanced heat without overpowering the rich, smoky flavors. This recipe also uses a slow-simmering technique for 3+ hours to develop deep, complex layers of flavor that quick chili recipes miss. The red wine and toasted spices give it a distinct, restaurant-quality taste.
Can I substitute ground beef for chuck roast?
Yes, but the texture will be different. Ground beef cooks faster and won’t break down into tender chunks. For best results, use 1.5 lbs of 80/20 ground chuck and brown it thoroughly before adding other ingredients. The searing step is still crucial for building flavor. For extra richness, add 1 tbsp tomato paste to compensate for the lack of meaty depth.
How do I adjust the heat level if I can’t handle spicy food?
Start by reducing the cayenne pepper to ¼ tsp and using mild chili oil instead of hot sauce. For even milder heat, omit the cayenne entirely and add just 1 drop of hot sauce. If you accidentally add too much spice, balance it with 1 tbsp honey or sugar and a splash of milk or sour cream. Taste as you go—this is your chance to customize!
What’s the best way to reheat leftover chili?
Reheat gently on the stovetop over medium-low heat with 2 tbsp water or beef broth to prevent drying out. For microwave reheating, cover with a damp paper towel and heat in 30-second intervals, stirring between each. Never reheat in the microwave uncovered—it can make the chili watery. The slow, gentle method preserves the rich texture and prevents a skin from forming.

- 6 Oz Chocolate Chip Cookie Recipe: Perfectly Balanced Crispy Edges and Chewy Hearts - September 25, 2026
- 6-Inch Coffee Cake Recipe: Vanilla Bean Swirls and Buttery Streusel Topping - September 25, 2026
- 1 Hour Soup Recipe: Velvety Richness Without the Wait - September 25, 2026