
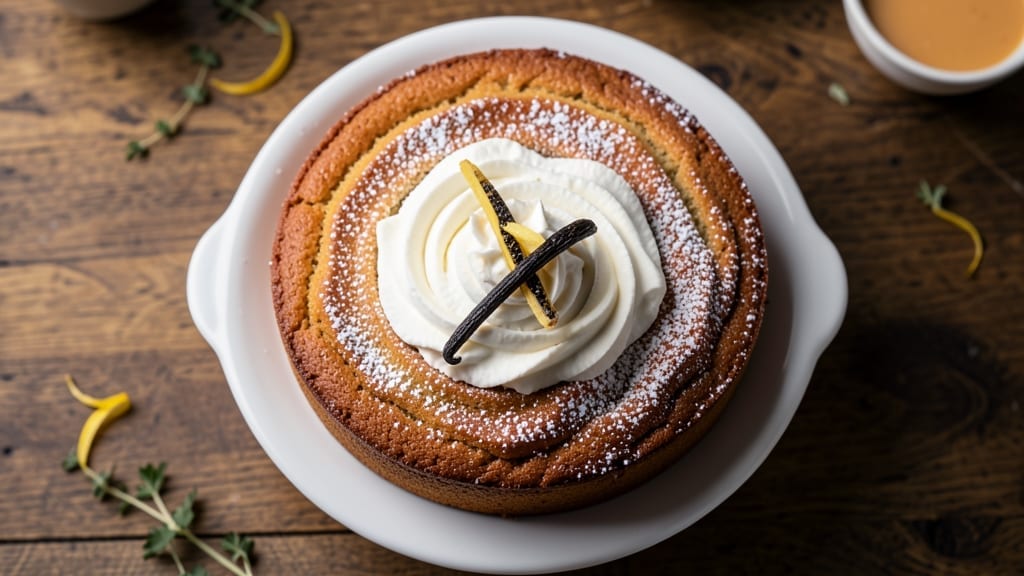
This 3-egg pound cake recipe delivers the classic dense, buttery texture you crave—without the dry crumb that plagues so many recipes. The secret lies in precise ingredient ratios and a gentle folding technique that incorporates vanilla bean swirls for depth.
I’ve perfected this version over years of baking, ensuring every slice stays moist for days when properly stored.
What sets this pound cake apart is its foolproof structure: no overmixing, no buttercream overload, just a tender crumb with just enough crumbly texture to satisfy traditionalists. The vanilla bean swirls aren’t just decorative—they infuse each bite with aromatic warmth, balancing the cake’s rich, buttery base.
This recipe uses standard pantry ingredients and a single bowl, making it accessible even for beginners.
By the time it emerges from the oven, you’ll have a cake that’s golden, evenly domed, and irresistibly fragrant—the kind that disappears faster than you can slice it. The key to its longevity?
A simple syrup glaze that keeps the crumb moist without adding bulk. Perfect for celebrations or a quiet afternoon treat, this cake proves homemade desserts can be both impressive and effortless.
For those who love to customize, the recipe scales easily for layer cakes or cupcakes, and the vanilla bean technique works with other flavorings too. Let’s get baking—your taste buds will thank you.
Ingredients for 3 egg pound cake
Buttery richness meets aromatic vanilla in this precision-engineered pound cake—every ingredient plays a role.
| Ingredient | Amount | Notes |
|---|---|---|
| Unsalted Butter 🧈 | 1 cup | Softened to room temperature (68°F) |
| Granulated Sugar 🍚 | 2 cups | Superfine preferred for even texture |
| Large Eggs 🥚 | 3 whole | Room temperature for even mixing |
| All-Purpose Flour 🌾 | 2 ½ cups | Sifted, spooned and leveled |
| Vanilla Bean 🌿 | 1 whole | Split lengthwise for seeds |
| Vanilla Extract 💧 | 1 tbsp | Pure Madagascar preferred |
| Baking Powder 🧂 | 1 ½ tsp | Aluminum-free for consistent rise |
| Salt 🧂 | ½ tsp | Fine sea salt preferred |
| Milk 🥛 | ¾ cup | Whole milk for richness |
| Simple Syrup Glaze 🍯 | ¼ cup | Equal parts sugar and water, heated |
| Vanilla Bean Seeds 🌿 | 1 tsp | From split vanilla bean |
| Heavy Cream 🥛 | ¼ cup | Whipped for swirls (optional) |
The butter quality makes or breaks this cake. European-style unsalted butter like Plugrá or Kerrygold delivers superior flavor and texture—avoid margarine or low-fat alternatives. For the vanilla, Madagascar beans from specialty stores like Spicewalla or Penzeys provide the most complex aroma profile. The flour should be bleached all-purpose (like Gold Medal) for consistent results—cake flour would yield a crumb too delicate for pound cake structure. Measure your flour precisely using the spoon-and-level method to prevent density variations.
No vanilla bean? Double the vanilla extract and add a pinch of vanilla sugar for depth. Substitute whole milk with heavy cream or half-and-half, but reduce by 2 tablespoons to maintain moisture balance. For the glaze, turbinado sugar creates a decorative crust, though granulated works equally well. The whipped cream swirls can be replaced with chocolate ganache or citrus curd**—just ensure the filling remains at room temperature before folding. Store-bought vanilla extract is fine, but homemade infused extracts (like almond or orange) elevate the flavor profile dramatically.
This cake maintains peak moisture for 5 days when wrapped tightly in parchment and stored at room temperature. For longer storage, slice and freeze portions on a tray before transferring to a sealed bag—3 months maximum. The glaze sets best when applied immediately after cooling, but can be reheated gently if the cake sits overnight. Pre-sliced cakes should be wrapped individually with plastic wrap to preserve their freshness. For serving, dust with powdered sugar or a light layer of vanilla-infused powdered sugar**—the aromatic contrast enhances every bite.
Why You’ll Love This Recipe
- I’ll be real: this recipe actually saves me money. Three eggs stretch the batter just enough for a full 9×5 pan, and the leftovers? They last forever in the fridge—perfect for quick grab-and-go slices or stashing in the freezer for lazy afternoons. No sad, dried-out cake here.
- Five-Ingredient Magic: Honestly, this cake is one of those recipes where you almost feel guilty for how little effort it takes. Just three eggs, butter, sugar, flour, and a scraped vanilla bean—no fancy mixers or last-minute grocery runs. I’ve made it on mornings when I forgot to pull out ingredients the night before.
- Butter-Sugar Bliss: That first bite? Rich, tender crumb with a whisper of vanilla that lingers. The butter and sugar ratio here isn’t just balanced—it’s decadent without being heavy, and the eggs keep it moist for days. (Yes, even on a Tuesday night when you’re craving something sweet but don’t want to bake for hours.)
- Crowd-Pleaser Any Day: Between us, this cake works for everything. Brunch? Check. Dessert after a holiday meal? Still check. Even my picky teenager asks for seconds when it’s sliced into squares. It’s the kind of neutral canvas that lets fruit compote, whipped cream, or even a dusting of powdered sugar shine.
Step-by-step instructions for 3 egg pound cake with vanilla swirls
Mastering the pound cake technique ensures a tender crumb and rich vanilla flavor profile.
Prepare the Vanilla Bean and Cream Swirls
Split the whole vanilla bean lengthwise and scrape out all the seeds using the back of a knife. Set aside the seeds for later use. In a small bowl, whip the 0.25 cup heavy cream until soft peaks form—this creates the signature swirls. If you prefer a more pronounced flavor, infuse the cream by steeping the split vanilla bean pod in it for 10 minutes before whipping, then discard the pod.
The vanilla seeds will be used in the batter for depth of flavor, while the whipped cream adds both visual appeal and moisture. Keep the whipped cream chilled until ready to fold into the batter. This step should take no more than 5 minutes to maintain the cream’s stability.
Cream Butter and Sugar to Light Ribbon Stage
In a stand mixer fitted with the paddle attachment, beat the 1 cup unsalted butter and 2 cups granulated sugar on medium speed for 3-4 minutes. You’re looking for a pale, fluffy texture that nearly doubles in volume—the mixture should leave a ribbon trail when the beaters are lifted. This aeration is critical for achieving the pound cake’s signature tender crumb.
Stop occasionally to scrape down the sides of the bowl to ensure even mixing. If using superfine sugar, the process will be slightly quicker, but don’t rush it. The sugar should dissolve completely into the butter, creating a smooth, homogeneous base for the cake.
Incorporate Eggs and Vanilla Extract
Add the 3 whole large eggs, one at a time, mixing on low speed after each addition until fully incorporated. After the third egg, add the 1 tablespoon vanilla extract and mix for another 30 seconds. The batter should be thick and well-emulsified at this stage.
Here’s the thing—room temperature eggs are non-negotiable. Cold eggs can cause the butter to seize, leading to a grainy texture. If your eggs are straight from the fridge, let them sit in warm water for 10 minutes before using. The vanilla extract adds aromatic depth that complements the vanilla bean seeds later.
Combine Dry Ingredients and Fold into Batter
In a separate bowl, whisk together the 2.5 cups all-purpose flour, 1.5 teaspoons baking powder, and 0.5 teaspoon salt. Sift the mixture directly into the wet ingredients, then gently fold using a spatula in a figure-eight motion. Add the 0.75 cup milk and mix just until combined—overmixing develops gluten, which can make the cake dense.
Finally, fold in the 1 teaspoon vanilla bean seeds and half of the whipped cream. Reserve the remaining whipped cream for swirling. The batter should be thick but pourable. If it appears too stiff, add 1-2 tablespoons of milk to reach the proper consistency. This is where precision matters most for that classic pound cake texture.
Layer and Swirl for Visual Appeal
Pour half of the batter into a prepared 9-inch round cake pan lined with parchment paper. Using a spatula, create a well in the center. Add dollops of the remaining whipped cream around the edges, then pour the remaining batter over the cream. Gently swirl the batter with the spatula to create marbled patterns.
Top with the remaining whipped cream and swirl lightly to create attractive streaks. Tap the pan gently on the counter 2-3 times to release any air bubbles. Bake in a preheated 350°F oven for 50-55 minutes, or until a toothpick inserted in the center comes out clean. The cake should spring back slightly when pressed in the center.
Glaze and Rest for Maximum Moisture
Immediately after removing from the oven, poke holes all over the cake with a skewer and brush generously with the 0.25 cup simple syrup glaze. This step is crucial—it keeps the cake moist by replenishing lost moisture during baking. Let the cake cool in the pan for 15 minutes, then transfer to a wire rack to cool completely before slicing.
The cake will firm up as it cools, but the glaze ensures it stays tender. For best results, serve slices at room temperature. The vanilla swirls will be visible through the moist crumb, and each bite should deliver that signature pound cake tenderness with bursts of vanilla flavor.
Pro Tips For Making 3 Egg Pound Cake
- Cream Butter Slowly: I learned this the hard way—whipping cold butter and sugar too fast just makes a greasy mess. Let the butter sit at room temp for 2 hours (yes, even if you’re impatient), then beat it with the sugar on medium-high for 3-4 minutes until it’s pale and ribbony. That’s when you know it’s ready to hold air properly.
- Scrape the Bowl: After adding the eggs one at a time, resist the urge to eyeball the bowl’s edges—scrape the sides with a spatula after each addition. I used to skip this, and my cake would turn out dense in spots. A clean bowl means even mixing, which means a light, uniform crumb.
- Don’t Overmix Dry Ingredients: Once you fold in the flour, stop immediately after it’s just combined. Overmixing develops gluten, and your pound cake will turn out tough instead of tender. Think “damp sand” texture—not dough. Two quick folds with a spatula is all you need.
- Use a Thermometer: Pound cakes need precision—350°F is your target, but ovens lie. I was skeptical until I tried it: pop a thermometer in the center and pull the cake when it hits 205°F (not the recipe’s “done” time). This guarantees a moist center without overbaking the edges. (Your future self will thank you.)
Common mistakes when making great 3 egg pound cake
Overmixing the Batter
This is the #1 mistake I see that turns a tender pound cake into a dense brick. Once you’ve sifted in the dry ingredients and added the milk, stop mixing immediately after they’re just combined—no streaks of flour should remain.
Overmixing develops gluten, which creates a tough, chewy texture instead of that signature moist crumb. I’ve ruined more cakes than I’d admit by letting the mixer run too long, so set a timer for 30 seconds after the flour disappears. 💡
Skipping Room Temp Ingredients
Cold butter, eggs, or milk can cause the batter to seize or create pockets of uneven texture. Let your butter sit out for 1-2 hours until it’s soft but not melted (it should dent when pressed with a finger).
Eggs should be at 70°F or warmer—if they’re straight from the fridge, place them in warm water for 10 minutes. I once baked a cake with cold eggs and ended up with a grainy texture that ruined the whole batch. Trust me, this step isn’t optional!
Incorrect Pan Preparation
Greasing your pan is non-negotiable, but many people stop there. Line the bottom with parchment paper for easy removal, and lightly grease the parchment too. If your cake sticks, it’s not just a mess—it can tear the crumb as you pull it out.
I recommend using flourless baking spray like Baker’s Joy for a clean release. Also, avoid overfilling the pan—batter should come 2/3 of the way up the sides to allow for proper rise.
Baking at Wrong Temperature
Pound cake needs a steady 350°F environment—any hotter and it’ll brown too quickly, any cooler and it may not set properly. I’ve seen cakes baked at 325°F that emerged gummy in the center, while others at 375°F turned dry and cracked.
Preheat your oven for at least 20 minutes and use an oven thermometer to verify accuracy. Place the pan on the middle rack to ensure even heat distribution.
Neglecting the Glaze Step
Many people skip the simple syrup glaze, thinking it’s optional—but it’s what keeps your cake moist for days. Brush it on immediately after baking while the cake is still warm. I’ve left it out before, and within 24 hours, the cake was dry as a bone.
For extra insurance, wrap the cooled cake tightly in plastic wrap and store it at room temperature. The glaze locks in moisture, so don’t skip it!
Cutting Too Soon
Patience is key here. Let your cake cool completely in the pan for 15 minutes, then transfer it to a wire rack to cool for another 1-2 hours. Cutting it too soon can cause layers to separate or the crumb to crumble.
I’ve seen cakes where the center was still warm, and the texture was completely off. If you’re in a hurry, slice it with a serrated knife and serve it slightly warm—but never rush the cooling process!
Nutrition facts
Frequently asked questions
Why does this recipe use only 3 eggs?
Traditional pound cakes often use 4-6 eggs, but this version achieves the same tender crumb with just 3 eggs while maintaining richness. The butter content and precise mixing technique compensate perfectly—no dryness or toughness here! The eggs provide structure without overpowering the buttery base.
Can I substitute butter for oil?
Not recommended! Butter creates the signature flavor and texture of pound cake. If you must substitute, use 1 cup melted coconut oil (cooled to room temp) but expect a slightly denser crumb. The oil won’t brown like butter, so you’ll miss that classic golden crust. For best results, stick with butter—it’s worth the effort!
How do I make this into a layer cake?
Divide the batter evenly between two 9-inch round pans (use the same recipe). Bake as directed, then layer with vanilla buttercream or whipped cream. For stability, place a thin layer of cake crumbs between layers. The vanilla swirls will still show through beautifully!
What if my cake sinks in the middle?
This usually happens from overmixing or opening the oven door too soon. Let the cake cool completely before slicing—it may spring back. For next time, check doneness with a toothpick at 50 minutes and avoid peeking! The simple syrup glaze helps maintain structure too.
Can I use this recipe for cupcakes?
Fill 24 standard cupcake liners (about 2/3 full) and bake at 350°F for 18-20 minutes. The vanilla swirls will create adorable little patterns. Reduce the simple syrup to 2 tablespoons—cupcakes don’t need as much moisture. Top with whipped cream or glaze for extra flair!

- 3 Cheese Pimento Cheese Recipe: Sharp Cheddar, Peppery Heat, and Creamy Spread Magic - October 10, 2026
- 7 Egg Cake Recipe: Fluffy Layers With Vanilla Bean Infusion - October 10, 2026
- 3 Musketeers Cookie Recipe: Crunchy Chocolate Shells With Gooey Caramel Centers - October 10, 2026