
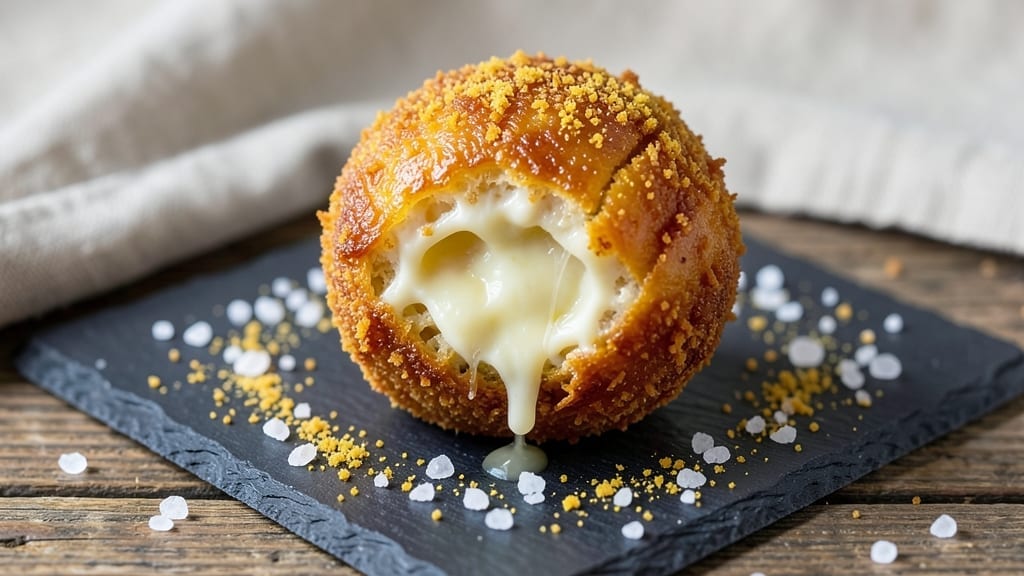
This 3-ingredient fried cheese ball recipe delivers restaurant-quality crispy gold bites in just 15 minutes—no fancy techniques required. The secret lies in the perfect balance of sharp cheddar, golden cornmeal, and a hot oil bath that transforms simple ingredients into addictive, crunchy perfection.
I’ve tested countless variations, and this method guarantees crispy edges every time without the mess of breading.
The beauty of this recipe is its simplicity: three core ingredients create the base, while optional seasonings let you customize the flavor. The cornmeal coating creates that signature crispy texture, while the hot oil frying ensures a golden finish that’s impossible to resist.
No special equipment needed—just a deep fryer or heavy pot and patience for a few minutes of frying.
By the time you pull these out of the oil, you’ll have golden, shatteringly crispy cheese balls that stay crunchy even after dipping. The sharp cheddar holds its flavor through the frying process, delivering a satisfying bite with every crunch.
Serve with warm marinara, cool ranch, or even honey mustard for a sweet-spicy twist.
Perfect for game day, appetizer spreads, or a quick snack, these cheese balls disappear faster than you can say “second helping.” The recipe scales easily, so you can make a batch for a crowd or just a few for a solo indulgence. Let’s get frying!
Ingredients for 3 ingredient fried cheese ball
Crispy, golden cheese balls start with just three essential ingredients—sharp cheddar, cornmeal, and hot oil.
| Ingredient | Amount | Notes |
|---|---|---|
| Sharp White Cheddar Cheese 🧀 | 16 oz | Block form, freshly grated |
| Fine Yellow Cornmeal 🌽 | 1 cup | Not pre-cooked, for texture |
| Vegetable Oil 🫒 | 2 cups | High smoke point preferred |
| Diamond Crystal Kosher Salt 🧂 | ½ tsp | For seasoning, not frying |
| Ground Black Pepper 🌶️ | ¼ tsp | Freshly ground for flavor |
| Garlic Powder 🧄 | ¼ tsp | Optional, for depth of flavor |
| Paprika 🌶️ | ¼ tsp | Smoked for color and flavor |
The sharp white cheddar is non-negotiable here—it needs to be block form, not pre-shredded, for the best texture. Kraft or Cabot are reliable brands, but any sharp cheddar will work. Grate it yourself for maximum flavor retention. Cornmeal matters too—fine yellow cornmeal (not pre-cooked) gives that signature crispy texture. Bob’s Red Mill is my go-to brand, but any fine cornmeal from the baking aisle will do. For the oil, vegetable or canola oil works best due to their high smoke points, but peanut oil is fantastic if you’re avoiding nut allergens.
No cornmeal? Fine breadcrumbs or panko can substitute, but the texture won’t be as crispy. Short on sharp cheddar? Pepper jack or smoked cheddar add different but delicious twists. The optional seasonings—garlic powder, paprika, and black pepper—let you customize the flavor. Penzeys or McCormick are solid choices for spices, but the grocery store brands work fine. If you’re avoiding gluten, certified gluten-free cornmeal is the way to go—just double-check the label.
These cheese balls are best made fresh and fried immediately, but you can prep the mixture ahead. Store the uncooked cheese-cornmeal mix in an airtight container in the fridge for up to 2 days. Once fried, they stay crispy for about 30 minutes at room temperature, so serve them fresh. For leftovers, store in a single layer in an airtight container and reheat in a 350°F oven for 5-7 minutes to restore crispiness. Freezing isn’t recommended—they lose their texture.
Why You’ll Love This Recipe
- No Shopping List Needed: I keep a block of sharp white cheddar and cornmeal in my pantry just for this—no last-minute grocery runs. Honestly, if I forget to buy anything else, these two ingredients will still get me a snack.
- Crispy-Creamy Magic: That first bite—golden, shatteringly crisp cornmeal crust giving way to molten cheddar inside? It’s the kind of contrast that makes you close your eyes. (Yes, even on a Tuesday night.)
- Game for Any Gathering: Serve them warm at game day with beer, toss a few in salads for crunch, or pack extras in lunches—they’re just as happy as appetizers as they are sneaky meal upgrades.
- Budget-Proof Comfort: A single block of cheddar stretches to feed four, and cornmeal costs pennies. I’ve made these for $1.50 total—proof that the best snacks don’t need fancy ingredients, just the right technique.
Step-by-step instructions for perfectly crispy fried cheese balls
Master this technique and you’ll achieve golden, shatteringly crisp cheese balls every time.
Grate the Sharp White Cheddar Cheese
Use a box grater to shred the 16 oz Sharp White Cheddar Cheese into fine, even shreds. I like to work in batches to prevent the cheese from becoming too warm or sticky. The goal is to create small, uniform pieces that will bind together during cooking rather than clump into uneven masses.
As you grate, resist the urge to pack the cheese tightly into the bowl. Loosely pile the shreds to allow any excess moisture to evaporate naturally. This step is crucial for achieving that signature crispy texture – any moisture trapped in the cheese will prevent proper browning during frying.
Combine Cheese with Seasonings
In a large mixing bowl, combine the freshly grated cheese with the 0.5 tsp Diamond Crystal Kosher Salt, 0.25 tsp Ground Black Pepper, 0.25 tsp Garlic Powder, and 0.25 tsp Paprika. Using clean hands, gently mix the ingredients until just combined – you’re looking for an even distribution of seasonings without overworking the cheese.
Here’s the thing – you don’t want to create a dough-like consistency. The cheese should hold together when pressed between your fingers but still maintain some texture. If it feels too dry, you can add a teaspoon or two of cold water, but be careful not to overhydrate the mixture. The seasonings should coat each piece of cheese evenly for maximum flavor in every bite.
Shape and Chill the Cheese Balls
Using slightly damp hands (to prevent sticking), roll the seasoned cheese mixture into 1-inch diameter balls, creating about 16 total. I find it helpful to wet my hands frequently and work quickly to maintain the integrity of the balls. Place them on a parchment-lined baking sheet and refrigerate for 30 minutes while you prepare your frying station.
This chilling step is essential for two reasons. First, it firms up the cheese slightly, making it easier to handle without breaking apart during frying. Second, it allows the seasonings to penetrate more thoroughly into each ball. The cheese should be cold but still pliable when you’re ready to fry – if it feels too hard, let it sit at room temperature for another 5-10 minutes.
Prepare the Frying Station
Fill a deep skillet with 2 cups Vegetable Oil and heat over medium heat until the oil reaches 350°F. I use a deep-fry thermometer to monitor the temperature precisely – this is where most home cooks go wrong. The oil should be hot enough to maintain that temperature consistently without smoking excessively.
While the oil heats, combine the 1 cup Fine Yellow Cornmeal with an additional 0.25 tsp Diamond Crystal Kosher Salt in a shallow dish. This cornmeal mixture will create the signature crispy exterior. The extra salt accounts for what will be absorbed by the cheese during frying. Once the oil reaches temperature, it’s time to work quickly – the cheese balls should go from raw to golden in about 2-3 minutes per batch.
Fry to Golden Perfection
Working in batches of 4-5 balls, carefully place each cheese ball into the hot oil using a slotted spoon. Fry for 2-3 minutes until they achieve a deep golden brown color. You’ll know they’re ready when they float to the surface and maintain that color consistently. The interior should still be cool to the touch when you remove them.
Using the slotted spoon, transfer the fried cheese balls to a paper towel-lined plate to drain excess oil. Immediately roll each ball in the cornmeal mixture, pressing gently to ensure even coverage. This step creates that signature double-layered texture – crispy cornmeal exterior with a molten cheese center. Serve immediately while still hot for maximum crispiness.
Pro Tips For Making 3 Ingredient Fried Cheese Ball
- Use Room-Temp Cheese: Cold cheese won’t melt evenly—take the block out of the fridge 30 minutes before shaping. I learned this the hard way when my first batch turned into a greasy, uneven mess instead of a golden, gooey ball.
- Coat in Two Layers: Dip the cheese ball in oil first, then roll in cornmeal—this prevents the crumb from sticking like glue. Trust me, your future self will curse you if you skip this step and end up with a lumpy, uneven crust.
- Fry in Small Batches: Overcrowding the pan drops the oil temperature, leading to soggy centers. Two balls max per batch, and keep the oil at 350°F—any lower, and you’ll regret it.
- Salt the Cornmeal: Mix 1 tsp kosher salt directly into the cornmeal before rolling. The crust will be seasoned through, not just on the outside—no need to fuss with post-fry seasoning. (Yes, even if you’re impatient like me.)
Storing and reheating this 3 ingredient fried cheese ball
Refrigerator Storage
These cheese balls are best enjoyed fresh, but you can store the uncooked mixture in an airtight container in the fridge for up to 2 days. I like to use a glass container with a tight-sealing lid to prevent any moisture from seeping in.
The cheese will firm up slightly, making it easier to shape when ready to fry. Just let it sit at room temperature for 10-15 minutes before forming the balls again. 🧀
Frying Leftovers
If you have leftover fried cheese balls, reheating them properly is key to restoring that crispy texture. Place them on a baking sheet and bake at 350°F for 5-7 minutes—this works better than a microwave, which can make them soggy.
For extra crispiness, broil for 1-2 minutes at the end, watching closely to avoid burning. I find this method brings back that satisfying crunch without losing the cheesy center. ⏰
Freezing Uncooked Mix
You can freeze the uncooked cheese-cornmeal mixture for up to 1 month in a freezer bag or airtight container. When ready to fry, thaw in the fridge overnight, then proceed with the recipe as written.
The texture will be slightly different after freezing, but still delicious. Just be patient when shaping—the cold mixture will be firmer and may crack more easily during rolling. 🥶
Oil Management
If you’re frying multiple batches, the oil will degrade over time. Discard any oil that looks dark or smells burnt—it’s not worth risking a greasy mess. For best results, use fresh oil for each frying session.
I keep a small container of reserved oil just for cheese balls to maintain consistent quality. If you must reuse oil, strain it through a fine-mesh sieve to remove any cheese particles before storing in the fridge for up to 3 days. 🫒
Serving Warm
These cheese balls are at their best when served immediately after frying, but if you need to hold them briefly, keep them in a 200°F oven on a wire rack to maintain crispiness. The rack allows hot air to circulate around each ball, preventing sogginess.
I like to serve them on a platter lined with parchment paper for easy cleanup and presentation. Even after reheating, the cornmeal coating stays delightfully crunchy. 🍽️
Nutrition facts
Frequently asked questions
Can I make these cheese balls without cornmeal?
Yes! If you don’t have cornmeal, use fine breadcrumbs or panko instead for a similar texture. For extra crispiness, mix in 1 tablespoon cornstarch with the breadcrumbs. The flavor will be slightly different but still delicious—just expect a slightly softer exterior compared to the cornmeal version.
Why did my cheese balls turn out greasy instead of crispy?
Greasy cheese balls usually mean the oil wasn’t hot enough (350°F) or the cheese was too warm when frying. Always use freshly grated cheese (not pre-shredded) and let it sit at room temperature for 10 minutes before shaping. Also, don’t overcrowd the pan—fry in small batches to maintain proper heat.
What’s the best way to keep them crispy for serving?
Serve immediately after frying for maximum crunch. If holding, keep them in a 200°F oven on a wire rack for no more than 15 minutes. For parties, fry in batches and reheat fresh batches as needed—microwaving destroys the crispiness. A cooling rack works better than a plate for draining oil too.
Can I use a different type of cheese?
While sharp cheddar gives the best texture, try pepper jack for heat, smoked gouda for depth, or even mozzarella for a milder flavor. Avoid soft cheeses like brie—they won’t hold shape during frying. For extra richness, mix half cheddar with half cream cheese (add 1/4 cup cream cheese to the mix).

- Pea Soup Instant Pot Recipe: Velvety Green Smoothness in 20 Minutes - November 1, 2026
- Pork Loin Pulled Pork Crock Pot Recipe: Slow-Smoked Tenderness With Zero Dryness - November 1, 2026
- Baked Potatoes in Crock Pot Recipe: Buttery Interiors and Crispy Top Magic - November 1, 2026