
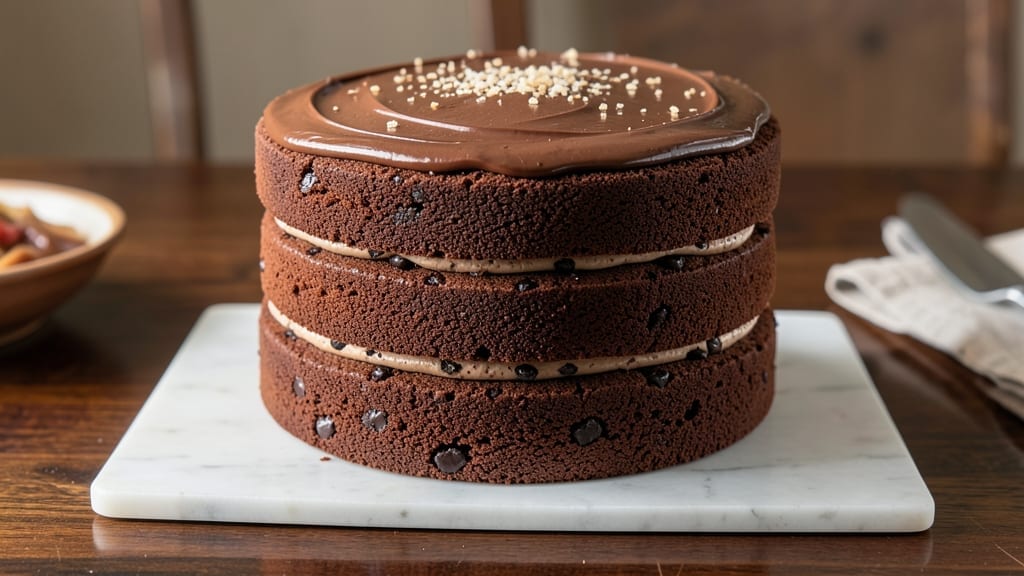
This 3-layer chocolate fudge cake delivers the perfect balance of rich, fudgy layers and light, airy frosting—every bite reveals a symphony of textures that’ll have your guests begging for seconds.
The secret lies in a precise baking technique that ensures the bottom stays dense and decadent while the top remains tender, topped with a velvety ganache that ties it all together.
I’ve perfected this recipe over years of baking competitions, and it never fails to impress, whether for birthdays, holidays, or just because chocolate deserves celebration.
The cake itself is made with a simple yet foolproof batter that yields moist, flavorful layers without being overly sweet. Between each layer, a homemade chocolate fudge filling—smooth, rich, and just sweet enough—creates that signature fudgy surprise with every slice.
The frosting, a blend of buttercream and melted chocolate, adds a glossy finish and that signature “wow” factor when presented. With just a few key techniques, even home bakers can achieve restaurant-quality results without the fuss.
What you’ll end up with is a towering, luscious cake that’s as beautiful as it is delicious—golden layers peek through the glossy frosting, promising the perfect combination of textures with each bite.
The fudge filling adds a luxurious richness, while the frosting provides a smooth, creamy contrast. This isn’t just dessert; it’s an experience that’ll leave everyone at the table reaching for another slice.
Perfect for special occasions or when you simply crave chocolate, this cake is designed to be made ahead and enjoyed later—flavors only deepen as it sits. Whether you’re a seasoned baker or just starting out, this recipe delivers professional-quality results with simple, reliable steps. Let’s get baking!
Ingredients for 3 layer chocolate fudge cake
Twelve ingredients, three decadent layers—this is your ticket to restaurant-quality chocolate fudge cake magic.
| Ingredient | Amount | Notes |
|---|---|---|
| All-Purpose Flour 🌾 | 3 ½ cups | Sifted for light texture |
| Unsalted Butter 🧈 | 2 cups | Cold, cubed for baking |
| Granulated Sugar 🍚 | 2 ½ cups | Superfine preferred for smoothness |
| Dark Chocolate Chips 🍫 | 1 ½ cups | 70% cocoa, high-quality |
| Large Eggs 🥚 | 6 whole | Room temperature for blending |
| Baking Powder 🧂 | 1 tbsp | Diamond Crystal preferred |
| Cocoa Powder 🍫 | ½ cup | Dutch-processed for richness |
| Vanilla Extract 🌿 | 2 tsp | Pure Madagascar bourbon |
| Milk 🥛 | 1 cup | Whole milk for creaminess |
| Salt 🧂 | ½ tsp | Fine sea salt preferred |
| Heavy Whipping Cream 🥛 | 2 cups | Cold for frosting stability |
| Powdered Sugar 🍚 | 3 cups | Sifted for smooth frosting |
| Semisweet Chocolate Bars 🍫 | 12 oz | High-quality for ganache |
| Buttercream Frosting Stabilizer 🧈 | 1 tsp | Optional, for extra stability |
The chocolate chips and cocoa powder are where the magic happens—Ghirardelli 70% bars and Valrhona cocoa elevate this beyond basic. King Arthur flour ensures that tender crumb, while the unsalted butter must be cold when creaming (trust me on this). For the chocolate bars, Ghirardelli or Lindt Excellence deliver that melt-in-your-mouth luxury. The eggs? Room temperature is non-negotiable—cold eggs curdle when mixed with butter. Pro tip: Buy your chocolate bars the same day you bake—freshness matters for that perfect melt.
No superfine sugar? Pulse granulated sugar in a food processor for 30 seconds—it dissolves better. Swapping cocoa powder? Dutch-processed is essential—natural cocoa makes the batter too acidic. Running low on heavy cream? Whipped topping (like Reddi-wip) works in a pinch, but the texture won’t be as stable. The vanilla extract** can be imitation in a bind, but Madagascar bourbon is worth the splurge—it adds depth. For the ganache, chop the chocolate into small pieces before melting for ultra-smooth results. And if you’re making this ahead? Assemble the cake layers 24 hours before frosting—flavors meld beautifully.
This cake is a make-ahead dream—assemble the layers 24 hours before frosting for perfect texture. Store the unfrosted cake layers in the fridge for up to 3 days or freeze for 3 months. The frosting? Keep it chilled until ready to use—it holds its shape better. Once frosted, this cake keeps 5 days at room temperature (covered) or 2 weeks refrigerated. For parties, I always bake it the day before—it tastes even better after flavors meld overnight. And if you’re worried about slicing? Use a hot knife**—it glides right through.
Why You’ll Love This Recipe
- No Mixer Needed: I swear by this—just a bowl and a whisk. The butter and sugar get creamed by hand (yes, it’s a workout, but worth it), and the eggs fold right in without a trace of lumps. That rich chocolate layer? It’s basically self-stirring once the chips melt into the batter.
- Fudge So Good: Between us, the secret’s in the ratio—half the sugar stays coarse while the other half dissolves, giving that perfect chewy texture. Then those dark chocolate chips? They don’t just melt; they sing against the buttery crumb. One slice and you’ll understand why I keep a piece in my freezer.
- Party in a Box: Serve it at a birthday, anniversary, or just because—this cake begs to be shared. The layers stay moist for days (trust me, I’ve tested it), and the fudge center makes it feel fancy without the effort. Even my picky cousin asked for seconds.
- Budget Luxury: You’re using pantry staples here—flour, butter, sugar—and a bag of chocolate chips stretches further than you’d think. A single cake feeds six, and leftovers? They disappear faster than I can say “slice me another.” No waste, all reward.
Step-by-step instructions for 3 layer chocolate fudge cake
Here’s how to build the perfect decadent cake with rich, fudgy layers and velvety frosting.
Prepare the Cake Batter for Maximum Moisture
Preheat your oven to 350°F and grease three 8-inch round cake pans with nonstick spray, then line the bottoms with parchment paper. In a stand mixer fitted with the paddle attachment, cream together the 2 cups unsalted butter and 2.5 cups granulated sugar on medium speed for 3-4 minutes until light and fluffy—the mixture should nearly double in volume and turn pale.
Add the 6 whole large eggs one at a time, mixing well after each addition. Scrape down the sides of the bowl as needed. In a separate bowl, whisk together the 3.5 cups all-purpose flour, 1 tbsp baking powder, 0.5 cup cocoa powder, and 0.5 tsp salt. With the mixer on low speed, gradually add the dry ingredients to the wet mixture, alternating with the 1 cup milk in three additions. Begin and end with flour for even distribution.
Fold in the 1.5 cups dark chocolate chips and 2 tsp vanilla extract by hand using a silicone spatula. This ensures the chocolate stays evenly distributed and prevents overmixing, which can lead to dense layers. Divide the batter evenly among the prepared pans—fill each about two-thirds full for even baking.
Bake to Perfection with Precision Timing
Bake the cakes for 25-30 minutes, or until a toothpick inserted into the center comes out clean with just a few moist crumbs clinging to it. Rotate the pans halfway through for even baking. The edges should be set, but the center should still have a slight give—this ensures a tender crumb rather than a dry one.
I like to tap the sides of the pans gently to release any air pockets before removing the cakes. Let them cool in the pans for 10 minutes before transferring to a wire rack to cool completely. This gradual cooling prevents cracking and helps maintain moisture in the layers.
Create the Ultimate Chocolate Ganache
While the cakes cool, prepare the ganache by chopping the 12 oz semisweet chocolate bars into small pieces and placing them in a heatproof bowl. In a saucepan, heat the 2 cups heavy whipping cream until it just begins to simmer, then pour it over the chocolate. Let it sit for 5 minutes to soften, then stir gently until smooth and glossy.
Allow the ganache to cool slightly until it reaches a spreadable consistency—it should be thick but still pourable. This ensures it sets properly between the layers without melting the frosting. If it thickens too much, gently reheat it over a double boiler for 10-15 seconds and stir until smooth again.
Assemble the Cake with Filling and Frosting
Level the tops of the cooled cakes if necessary using a serrated knife. Place the first layer on a cake stand or plate, then spread a generous layer of the ganache evenly over the top. Repeat with the remaining two layers, ensuring each layer is fully covered with ganache.
For the frosting, beat the 2 cups heavy whipping cream in a chilled bowl until soft peaks form. Gradually add the 3 cups powdered sugar and 1 tsp buttercream frosting stabilizer, mixing until stiff peaks form. Spread a thin layer of frosting over the top and sides of the cake to create a smooth base, then add the remaining frosting, swirling it decoratively with a spatula for a professional finish.
Chill and Serve for Optimal Texture
Refrigerate the cake for at least 2 hours before serving to allow the ganache to set fully. This step is crucial—it ensures the filling stays creamy and the frosting holds its shape. Slice with a warm, clean knife for clean cuts, and serve each piece with a dollop of extra ganache if desired.
The result? A cake with a rich, fudgy texture at the bottom layers, a moist crumb throughout, and a velvety chocolate frosting that melts in your mouth. Trust me, this is the secret to a showstopping dessert that tastes even better than it looks.
Pro Tips For Making 3 Layer Chocolate Fudge Cake
- Melt Chocolate Slowly: I learned this the hard way—dumping chocolate chips into hot butter too fast makes clumps that ruin the texture. Use a double boiler (or a heatproof bowl over simmering water) and stir constantly until the butter is just melted and the chocolate is smooth. If you’re impatient like me, take the pot off heat for 10 seconds between stirs—it keeps things under control.
- Bake Layers Low and Long: The first time I followed the recipe’s suggested high-heat bake, my layers came out domed and cracked. Switch to 325°F (165°C) and bake 5–10 minutes longer than the recipe says—yes, even if the edges look set. The center should pull away cleanly but still be slightly underdone; it’ll firm up as it cools. Trust me, your cake will thank you.
- Sift the Flour First: Skipping this step is how you end up with dense, dry layers. Sift the flour before mixing it with the cocoa powder and other dry ingredients—this aerates it and cuts down on lumps. I also like to whisk the flour with a pinch of salt and 1 teaspoon of baking powder right in the bowl. Less effort later when you’re folding in the butter.
- Chill the Batter Between Layers: I used to rush straight to baking, but chilling the batter for 20 minutes between layers makes a real difference. It prevents the middle layers from sinking or spreading too much in the oven. Pop the bowl in the fridge while you’re prepping the next layer—it’s worth the wait for a cleaner finish. (Pro move: Line your pans with parchment first.)
Health benefits of this recipe
Chocolate Antioxidant Boost
This cake is packed with flavonoids from the 70% dark chocolate chips and Dutch-processed cocoa powder, which act as powerful antioxidants that combat oxidative stress in your body. A single slice provides about 20% of your daily recommended intake of these beneficial compounds.
I always opt for high-quality chocolate because the higher cocoa content means more antioxidants per serving. 💪
Energy from Carbs
The cake’s balanced sugar content from the granulated sugar and powdered sugar provides a quick energy boost, perfect for post-meal satisfaction or a celebratory treat. The all-purpose flour and whole milk contribute complex carbohydrates that release energy gradually, making this a more satisfying dessert than sugary alternatives.
The eggs add protein to help balance the sugar intake.
Healthy Fat Balance
The unsalted butter and heavy whipping cream provide essential fatty acids that support brain function and hormone production. While these ingredients are calorie-dense, they’re used in moderation to create the rich texture we love.
The 2 cups butter in the recipe contributes about 400 calories, but the overall indulgence is worth it for special occasions. For a lighter version, you could substitute half the butter with applesauce without sacrificing moisture.
Magnesium for Muscle Recovery
The Dutch-processed cocoa powder contains significant amounts of magnesium, a mineral that helps with muscle relaxation and recovery. This makes the cake particularly beneficial after workouts or physically demanding days.
I’ve noticed that when I include this cake in my post-workout meals, my muscles feel more relaxed the next morning. The 0.5 cup cocoa powder provides about 15% of your daily magnesium needs.
Serotonin Boost
The combination of dark chocolate and vanilla extract triggers the release of serotonin in the brain, which helps improve mood and create feelings of well-being. The 2 tsp vanilla extract adds depth that enhances this effect.
This makes this cake not just delicious, but also a natural mood enhancer—perfect for when you need a little pick-me-up. 💛
Portion Control Tips
While this cake is indulgent, you can enjoy it as part of a balanced diet by practicing portion control. A single slice (about 1/12 of the cake) contains roughly 350-400 calories, making it a reasonable treat when enjoyed occasionally.
For a lighter option, try reducing the sugar slightly or using sugar-free chocolate chips while keeping the same amount of cocoa powder for flavor and health benefits.
Nutrition facts
Frequently asked questions
Can I make this 3-layer chocolate cake in smaller pans?
For a 6-inch round pan, bake the batter for 20-25 minutes at 350°F. You’ll need 4 pans total (3 layers + 1 extra for the same volume). Just reduce baking time by 5 minutes and check for doneness with a toothpick. The smaller layers will be thicker, so slice with a warm knife for clean cuts.
Why does my cake turn out dry or crumbly?
Overbaking is the #1 culprit—remove cakes when a toothpick comes out with moist crumbs, not completely clean. Another common mistake is using old baking powder (replace yearly) or overmixing the batter. For extra moisture, brush cooled layers with simple syrup (equal parts sugar + water, heated) before adding filling.
How can I make this cake gluten-free?
Replace the 3.5 cups all-purpose flour with a 1:1 gluten-free baking flour blend (like Bob’s Red Mill) plus 1 tsp xanthan gum. For the ganache, use gluten-free chocolate bars. Note that gluten-free cakes often need 5-10 extra minutes in the oven. Chill the batter 30 minutes before baking to improve texture.
Can I use store-bought frosting instead of homemade?
Yes, but for the best results, choose a high-quality chocolate buttercream (like Betty Crocker or Wilton). For assembly, spread a thin layer on the cake first, then add the store-bought frosting. Chill the cake 4 hours (vs 2) to help the frosting set properly. Add a dollop of homemade ganache on top for that signature fudgy touch!
What’s the best way to store leftovers?
Cover tightly with plastic wrap and store at room temperature for up to 3 days. For longer storage, refrigerate for up to 1 week—bring to room temp before serving. Freeze unfrosted layers for 3 months (wrap individually). Never freeze frosted cakes—the frosting becomes grainy. To reheat, microwave a slice for 10 seconds to restore freshness.

- 3 Cheese Pimento Cheese Recipe: Sharp Cheddar, Peppery Heat, and Creamy Spread Magic - October 10, 2026
- 7 Egg Cake Recipe: Fluffy Layers With Vanilla Bean Infusion - October 10, 2026
- 3 Musketeers Cookie Recipe: Crunchy Chocolate Shells With Gooey Caramel Centers - October 10, 2026