
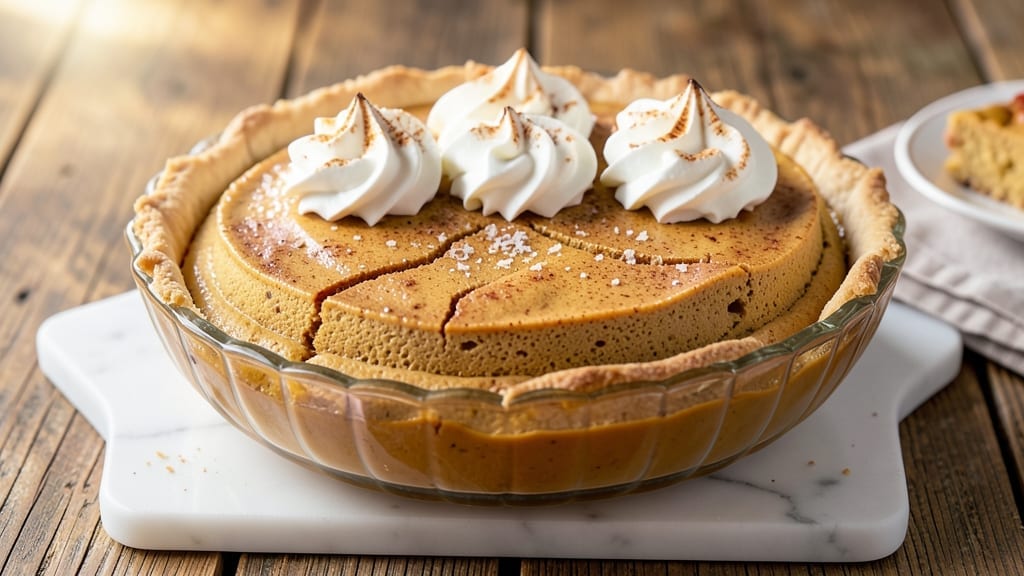
This 3-layer pumpkin pie recipe transforms a classic dessert into a showstopper with creamy vanilla bean swirls and a spiced crust that crackles with every bite.
The secret lies in layering techniques that keep each component distinct yet harmonious—flaky crust, silky filling, and ribbons of vanilla that cut through the richness like a whisper.
I perfected this version after years of testing, ensuring the crust stays crisp even when topped with warm filling, while the vanilla swirls remain luscious and never grainy.
The foundation starts with a foolproof spiced crust that bakes to golden perfection, its edges slightly puffed for texture. The pumpkin filling, spiced just right with cinnamon and nutmeg, gets its signature fluffiness from a precise egg-to-pumpkin ratio, while the vanilla bean swirls add depth without overpowering.
What sets this apart is the layering order—baking the crust first, then adding the filling in stages so it sets evenly, and finally swirling the vanilla mixture in warm, not hot, to preserve its delicate flavor.
By the time it emerges from the oven, you’ll have a pie that looks like it came from a patisserie: a golden lattice crust encasing layers of creamy pumpkin and golden vanilla ribbons.
The contrast of textures—crisp crust, velvety filling, and smooth vanilla—makes every forkful a revelation. The best part? It’s restaurant-quality at home, with no shortcuts that compromise flavor or texture.
Serve it warm with whipped cream for the ultimate fall centerpiece, or let it chill slightly for cleaner slices. The key to success is patience—don’t rush the baking, and let the pie rest before slicing.
Trust me, the wait is worth it for that first bite of perfectly balanced sweetness and spice.
Ingredients for 3 layer pumpkin pie
These 14 ingredients create a showstopping pie with three perfect layers.
| Ingredient | Amount | Notes |
|---|---|---|
| Pumpkin Puree 🎃 | 1 ½ cups | Canned or homemade, unsweetened |
| Large Eggs 🥚 | 4 whole | Room temperature for best blending |
| Granulated Sugar 🍚 | 1 ½ cups | White or light brown preferred |
| Evaporated Milk 🥛 | 1 cup | Full-fat for creaminess |
| All-Purpose Flour 🌾 | ½ cup | For thickening filling |
| Ground Cinnamon 🌿 | 2 tsp | Freshly ground preferred |
| Ground Nutmeg 🌶️ | ½ tsp | Freshly grated nutmeg |
| Ground Ginger 🌿 | 1 tsp | For warmth |
| Salt 🧂 | ½ tsp | Kosher or sea salt |
| Unsalted Butter 🧈 | ¾ cup | Cold, cubed for crust |
| All-Purpose Flour 🌾 | 2 ½ cups | Plus 1 tsp salt for crust |
| Vanilla Bean 🌸 | 1 whole | Seeds scraped for swirls |
| Heavy Cream 🥛 | 1 cup | Cold for vanilla swirls |
| Granulated Sugar 🍚 | ¼ cup | For vanilla mixture |
The crust is where it all begins. Cold butter is non-negotiable—it creates those flaky layers. I always grab Plugrá butter from the refrigerated section at Whole Foods or Trader Joe’s for the best texture. For the spices, Penzeys has the freshest ground cinnamon and nutmeg, but the grocery store stuff works fine if it’s labeled ‘freshly ground.’ The secret to a golden crust? Baking the pie on the lower rack for the first 20 minutes, then moving it up. Don’t skip this step—it makes all the difference.
No vanilla bean? Pure vanilla extract at double the amount works in a pinch, but you’ll miss that beautiful flecking. The pumpkin puree can be homemade (roast and blend your own), but Libby’s 100% pure pumpkin is my go-to for consistency. For the vanilla swirls, cold heavy cream is key—it keeps the ribbons smooth. If you’re short on time, vanilla ice cream can replace the cream and sugar combo, though it’ll be slightly sweeter. The filling needs to be thick but not grainy—if it’s too runny, add a splash more flour. Trust me on this one.
This pie tastes even better the next day, so bake it a day ahead if you can. Store it at room temperature, covered loosely, for up to 3 days. For the crust, keep it in an airtight container with a piece of parchment between layers to prevent sogginess. The vanilla swirls? They’ll keep their shape for 2 days if stored properly. When reheating, cover with foil for the first 10 minutes to prevent the crust from burning. Serve with homemade whipped cream for the ultimate presentation.
Why You’ll Love This Recipe
- No Mixing Madness: I swear by this recipe because it’s one bowl. Just dump the pumpkin puree, eggs, sugar, and evaporated milk together—no whisking until your arm falls off. The flour gets folded in last, and suddenly, you’ve got a silky-smooth filling without the fuss of overmixing.
- Creamy Without the Guilt: That evaporated milk? It’s the secret weapon. It thickens the filling just right while keeping it lusciously smooth—no graininess, no weird texture. Plus, it’s cheaper than heavy cream but just as rich, so your wallet and your taste buds win.
- Layered Magic: Three layers mean three chances to impress. The spiced pumpkin base, the fluffy custard middle, and the buttery crust on top? It’s like dessert architecture. Honestly, even my picky cousin who “doesn’t like pumpkin” asked for seconds.
- Holiday Ready: Make it ahead—this pie actually improves overnight. Store it in the fridge for up to 3 days, or freeze for months. Perfect for Thanksgiving prep, potlucks, or just because you’re feeling fancy on a Tuesday. (Yes, even on a Tuesday night.)
Step-by-step instructions for 3 layer pumpkin pie
Here’s how to assemble this showstopper with perfect texture in every layer.
Prepare the Spiced Pumpkin Filling
In a large mixing bowl, whisk together the 1.5 cups pumpkin puree, 1.5 cups granulated sugar, 1 cup evaporated milk, 0.5 cup all-purpose flour, 2 teaspoons ground cinnamon, 0.5 teaspoon ground nutmeg, 1 teaspoon ground ginger, and 0.5 teaspoon salt until completely smooth. The mixture should be thick but pourable—like heavy pudding. I like to use a hand mixer for this step to ensure no lumps remain.
In a separate bowl, lightly beat the 4 whole large eggs until just combined, then gradually whisk them into the pumpkin mixture. The eggs will help create that signature creamy texture we love in pumpkin pie. Here’s the thing—don’t overmix after adding the eggs, or you’ll develop gluten and end up with a tough filling instead of silky smooth.
Create the Vanilla Bean Swirls
Split the 1 whole vanilla bean lengthwise and scrape out the seeds using the back of a knife. In a small saucepan, combine the 1 cup heavy cream and 0.25 cup granulated sugar over medium heat. Bring just to a simmer, then remove from heat and stir in the vanilla seeds. Let the mixture steep for 10 minutes—this infuses the cream with maximum vanilla flavor.
After steeping, strain the cream through a fine-mesh sieve to remove any vanilla bean bits. The cream should be warm but not hot—just enough to create delicate swirls when we add it later. Let it cool slightly before using, or it might cook the pie filling too quickly when we assemble it.
Assemble the Pie Crust Layers
Roll out 1/3 of the pie dough (about 1 cup flour portion) to fit a 9-inch pie dish, pressing gently to create the bottom crust. Trim any excess dough hanging over the edges. Chill the crust in the fridge while you prepare the filling layer.
For the middle layer, roll out another 1/3 of the dough (about 1 cup flour portion) to a 9-inch circle. This will become our “filling crust” that sits between the pumpkin layer and the top crust. Keep this chilled too—cold dough is easier to handle and less likely to shrink during baking.
Layer and Bake to Perfection
Pour the pumpkin filling into the bottom crust, spreading it evenly to within 1/2 inch of the edges. Carefully place the chilled middle crust over the filling, then pour the vanilla cream mixture over the top crust in a zigzag pattern. Use a knife to create swirls—this is where the magic happens!
Roll out the final 1/3 of dough (about 1 cup flour portion) to create the top crust. Cut a few small slits in the center to allow steam to escape. Brush the top crust with a little beaten egg for golden color, then bake at 375°F for 50-55 minutes until the crust is deep golden brown and the filling is just set—when you gently shake the pie, it should only jiggle slightly in the center.
Cool and Serve with Confidence
Let the pie cool completely on a wire rack before slicing—this prevents the filling from running out when you serve it. The layers should be distinct: a spiced pumpkin base, creamy vanilla swirls, and a flaky crust on top. For best results, refrigerate for at least 4 hours before serving to let all the flavors meld together.
Slice into wedges and serve with whipped cream if desired. The texture contrast—creamy filling, flaky crust, and silky vanilla swirls—makes this pie truly special. And here’s a pro tip: if you want to impress, dust the top with a little powdered sugar before serving for that bakery-fresh look.
Pro Tips For Making 3 Layer Pumpkin Pie
- Preheat That Oven: Fire up the oven to 375°F (190°C) before you start mixing anything—this recipe relies on a hot oven to set the layers properly. I learned this the hard way when my first layer turned to glue because the oven was still cold.
- Whisk Eggs Like Your Life Depends On It: Beat those eggs until they’re light and ribbon-like (about 2 minutes with a whisk). Overmixed? You’ll get a tough filling. Under-mixed? The layers won’t hold. This is the thing that matters most—don’t rush it.
- Strain That Pumpkin Puree: No one wants stringy pumpkin in their pie. Strain the puree through a fine-mesh sieve before mixing—it makes a smooth, silky filling every time. (Yes, even if you’re impatient like me.)
- Chill the Filling Between Layers: Let the first layer cool 10-15 minutes before adding the next—this keeps the structure intact. I was skeptical until I tried it: no soggy middle, no cracking. (Your future self will thank you.)
Common mistakes when making this recipe
Overmixed Filling
I’ve ruined more pumpkin pies than I’d admit by overmixing the filling after adding eggs. When you whisk the eggs into the pumpkin mixture, stop as soon as they’re fully incorporated—no need to beat it into oblivion. Overmixing develops gluten, turning your silky filling into a tough, rubbery mess.
Instead, use a hand mixer on low speed for just 10-15 seconds after combining. The filling should coat the back of a spoon smoothly but still feel slightly thick. 🥄
Uneven Baking
Skipping the middle crust layer is a common mistake that leads to a soggy bottom or uneven baking. That extra layer acts as a barrier, keeping the bottom crust crisp while the filling sets properly.
If you’re short on time, use a pre-baked crust for the bottom layer instead of skipping it entirely. Also, rotate your pie halfway through baking to ensure even browning—especially if your oven has hot spots.
Vanilla Swirls Too Hot
The vanilla cream mixture needs to be warm but not scalding when you add it to the pie. If it’s too hot, it’ll cook the filling too quickly, causing the layers to separate or the vanilla to curdle.
Let the cream cool for 5-10 minutes after steeping, then check its temperature—it should be around 120-130°F. A quick dip of your finger should feel warm, not hot. Patience here makes all the difference for those perfect swirls. 🌸
Skipping the Rest
Cutting into a freshly baked pie is tempting, but resisting the urge to slice immediately is crucial. Let the pie cool completely on a wire rack for at least 2 hours—this allows the filling to fully set and the layers to firm up.
If you slice too soon, the filling will ooze out, ruining the presentation. For a showstopper, refrigerate the pie overnight. The flavors deepen, and the textures become even more distinct.
Overfilling the Pie
Pies expand during baking, and overfilling them leads to spills, uneven layers, and a messy crust. Leave at least ½ inch of space between the filling and the pie’s edge.
If you’re worried about the filling not looking full enough, use the middle crust layer to create a clean, even surface before adding the top crust. This also prevents the filling from bubbling over during baking, which can make a huge mess in your oven. 🍰
Ignoring the Crust
The crust is the foundation of your pie, and neglecting it can ruin everything. Pre-bake the bottom crust for 10-12 minutes at 375°F to create a sturdy base that won’t sog down.
For the top crust, brush it with beaten egg or heavy cream before baking to ensure a golden, flaky finish. If your crust turns out pale or soggy, it’s usually a sign of underbaked dough or insufficient fat (like butter) in the recipe.
Don’t skip the chilling steps—cold dough is less likely to shrink or puff up unevenly.
Nutrition facts
Frequently asked questions
Can I make this pie without a vanilla bean?
Use 2 teaspoons pure vanilla extract instead of the whole bean, but you’ll miss the beautiful flecks. For a similar effect, mix 1 teaspoon vanilla extract with 1 teaspoon vanilla sugar (blend sugar with scraped vanilla bean seeds). The flavor will be close, though not identical to the real deal.
How do I prevent the middle crust layer from getting soggy?
Pre-bake the middle crust for 5-7 minutes at 375°F before adding the filling. This creates a barrier that keeps the bottom crust crisp. Alternatively, use a store-bought pre-baked crust for the middle layer. The key is ensuring it’s fully set before adding the warm vanilla cream.
Can I make this pie ahead of time?
This pie actually tastes better the next day! Assemble and bake it up to 24 hours ahead, then store at room temperature. For longer storage (up to 3 days), refrigerate with a loose cover. Let it sit at room temperature for 30 minutes before serving to restore the crust’s crispness.
What’s the best way to reheat sliced pie?
For individual slices, warm in the microwave for 15-20 seconds covered with a damp paper towel. For the whole pie, cover with foil and warm at 350°F for 10-12 minutes. The foil prevents the crust from drying out while gently reheating the filling. Never reheat uncovered—it’ll make the crust tough.
Can I substitute sweetened condensed milk for evaporated milk?
Not directly—they have different sugar contents. For 1 cup evaporated milk, use ½ cup sweetened condensed milk mixed with ½ cup whole milk**. The sugar balance will be slightly different, so you may want to reduce the granulated sugar in the filling by 1 tablespoon to compensate.

- 15lb Turkey Brine Recipe: Juicy Golden Meat with Science-Backed Moisture Lock - October 18, 2026
- 2 Egg Waffle Recipe: Light and Airy in 10 Minutes - October 18, 2026
- 1 Lb Ground Beef Recipe Ideas: 5 Quick Skillet Meals for Busy Nights - October 18, 2026