
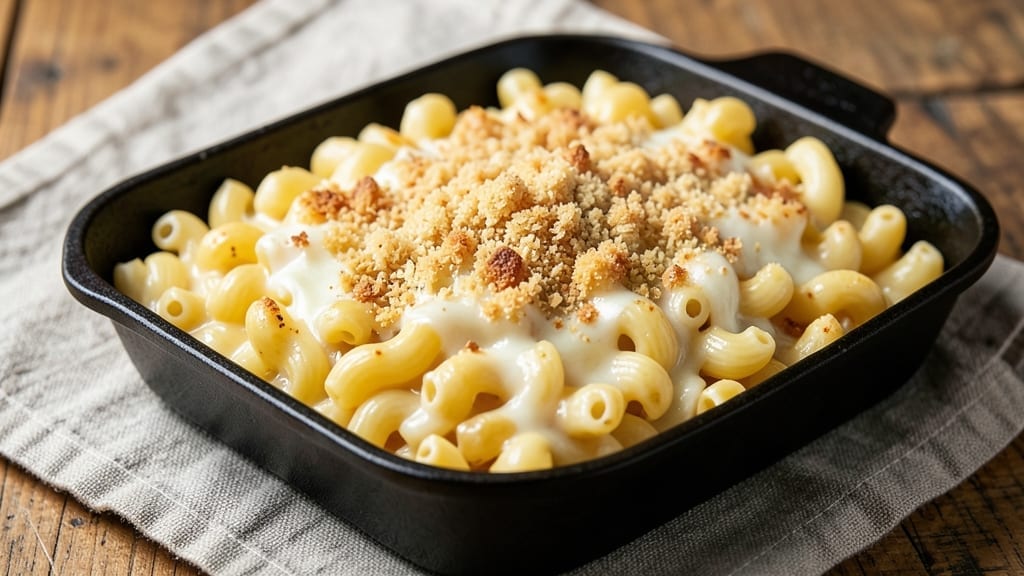
This 8×8 macaroni and cheese recipe delivers the ultimate comfort food experience—creamy, cheesy layers topped with a golden, bubbly crust that’s impossible to resist. 🔥 The secret lies in a proper cheese sauce that clings to every noodle, while the baking process transforms it into a casserole that’s crispy on top and gooey inside.
I’ve perfected this version over years of testing, ensuring it’s foolproof for weeknight dinners or holiday gatherings.
The recipe starts with a rich, velvety cheese sauce made from a blend of sharp cheddar, Gruyère, and cream cheese, creating depth and creaminess that store-bought versions can’t match. Cooking the macaroni al dente ensures it holds up during baking, while a buttery breadcrumb topping adds texture and color.
The result? A dish that’s restaurant-quality but simple enough for any home cook to master.
By the time it emerges from the oven, you’ll have a golden, bubbly macaroni and cheese with a crispy crust that’s perfect for scraping up every last bite. The cheese sauce is thick enough to coat the noodles without being gluey, and the flavor is rich, tangy, and satisfying.
This is the kind of dish that turns a regular meal into a cozy, crowd-pleasing centerpiece.
Serve it as-is for a classic presentation, or add optional toppings like extra cheese, bacon bits, or green onions for a personalized touch. The best part? It’s ready in just 30 minutes, making it the ultimate weeknight solution. Let’s get baking!
Ingredients for 8×8 macaroni and cheese
Eight ingredients transform into a bubbly, golden masterpiece—creamy, cheesy perfection in every bite.
| Ingredient | Amount | Notes |
|---|---|---|
| Elbow Macaroni 🍝 | 1 ½ lbs | Cooked al dente, drained well |
| Sharp Cheddar Cheese 🧀 | 2 cups | Shredded, aged 6+ months preferred |
| Gruyère Cheese 🧀 | 1 cup | Shredded, nutty flavor essential |
| Cream Cheese 🧈 | 8 oz | Full-fat for maximum creaminess |
| Heavy Whipping Cream 🥛 | 1 cup | Whole milk fat for rich sauce |
| Unsalted Butter 🧈 | ½ cup | Melted, salt added separately |
| All-Purpose Flour 🌾 | ¼ cup | For thickening sauce |
| Milk 🥛 | 1 ½ cups | Whole milk for creaminess |
| Panko Breadcrumbs 🍞 | ½ cup | For crispy golden crust |
| Parmesan Cheese 🧀 | ¼ cup | Freshly grated for topping |
| Dried Mustard 🌶️ | ½ tsp | Adds subtle tanginess |
| Salt 🧂 | 1 ½ tsp | Kosher salt, adjust to taste |
| Black Pepper 🌶️ | ½ tsp | Freshly ground preferred |
| Garlic Powder 🧄 | ½ tsp | For subtle depth of flavor |
The cheese blend is everything—sharp cheddar brings the tang, Gruyère adds nutty depth, and cream cheese ensures that velvety texture. Grab Kraft sharp cheddar if you want consistency, but aged cheddar (like Cabot) makes this even better. Gruyère can be pricey, but Whole Foods or specialty cheese shops usually carry it pre-shredded for convenience. Cream cheese? Philadelphia is the gold standard—none of that powdered stuff. Pro tip: Shred your own cheese for the best texture; pre-shredded gets gummy when baked. And trust me, full-fat cream cheese makes all the difference here—skip the low-fat version.
No Gruyère? Swiss cheese works in a pinch (same nutty vibe), though it melts slightly differently. Running low on sharp cheddar? Pepper Jack adds a kick, but reduce the salt. The Panko breadcrumbs are non-negotiable for that perfect crispy crust—Trader Joe’s sells it in bulk for cheap. Fresh out of dried mustard? Dijon mustard at half the amount gives you that same tang. And if you’re feeling fancy, add a pinch of smoked paprika to the breadcrumb mix for extra depth. The macaroni? Barilla is my go-to—it holds up perfectly during baking, but any elbow macaroni will work. Just don’t overcook it; you want al dente so it doesn’t turn mushy.
This casserole is a make-ahead dream—prep the sauce and assemble it up to 2 days ahead, then bake when ready. The crust gets even crispier if you bake it straight from the fridge (about 10 minutes longer). Leftovers? 3-4 days in the fridge, but honestly, it’s so good it won’t last that long. For freezing, bake it first, then portion and freeze—reheats beautifully with 10 minutes at 350°F. And if you’re serving a crowd, double the recipe—this 8×8 pan is perfect for sharing, but a 9×13-inch pan works too if you adjust the baking time.
Why You’ll Love This Recipe
- One-Pot Magic: I swear by this recipe because it’s the only mac and cheese I’ve ever made that doesn’t require a separate cheese sauce pot. Just toss the elbow macaroni, shredded cheddar, gruyère, cream cheese, and heavy cream into the same pan—no mess, no stress, and zero extra dishes.
- Velvet Cheese Dream: Between us, the combo of sharp cheddar and nutty gruyère with a swirl of cream cheese makes this ridiculously rich. The heavy cream keeps it luscious without being greasy, and that golden top? It’s the kind of crispy-cheesy crust you’ll scrape the pan for.
- Lunchbox Hero: Here’s what sold me—this recipe doubles effortlessly for meal prep. Pack it in an 8×8 pan for easy reheating, or portion it into containers for school lunches (my kids still ask for it, even though they pretend they’re “too cool” for mac and cheese).
- Budget Buster: Honestly, I make this at least once a month because it’s my go-to cheap comfort food. Gruyère might sound fancy, but a little goes a long way, and the rest of the ingredients—elbow mac, cheddar, cream cheese—are pantry staples that won’t break the bank. Leftovers? Even better.
Step-by-step instructions for 8×8 macaroni and cheese
This method guarantees that bubbly, golden crust you crave—every time.
🍳 Step 1: Cook the Macaroni to Al Dente Perfection
Fill a large pot with water and bring to a rolling boil. Add 1.5 lbs elbow macaroni and cook until 1 minute before the package instructions say al dente. This ensures the pasta finishes cooking in the oven while soaking up that creamy sauce. Drain thoroughly in a colander, shaking to remove all excess water—you want it dry enough to crisp up in the oven.
Here’s the thing—don’t rinse the pasta. Those surface starches are what help create that perfect sauce consistency later. I like to give the drained pasta a quick shake in the colander to break up any clumps before transferring it to your baking dish.
👨🍳 Step 2: Make the Ultra-Creamy Cheese Sauce
In a large saucepan over medium heat, melt the 0.5 cup unsalted butter until foamy. Whisk in the 0.25 cup all-purpose flour and cook for 1-2 minutes until it forms a smooth paste—this is your roux. Slowly pour in the 1.5 cups milk while whisking constantly to prevent lumps.
Bring the mixture to a gentle simmer and cook for 3-4 minutes until it thickens enough to coat the back of a spoon. Now add the 2 cups sharp cheddar cheese, 1 cup gruyère cheese, 8 oz cream cheese, 1 cup heavy whipping cream, 0.5 tsp dried mustard, 0.5 tsp garlic powder, 1.5 tsp salt, and 0.5 tsp black pepper. Stir until completely melted and smooth—you should have a velvety, thick sauce that coats a spoon.
🥘 Step 3: Combine Pasta and Sauce in the Baking Dish
Pour the cooked macaroni into an 8×8-inch baking dish and spread it out evenly. Then pour the cheese sauce over the pasta, gently tossing with a spatula to distribute everything completely. The sauce should look like it’s coating every noodle—if it’s too thick, add 1-2 tablespoons milk to loosen it up.
Here’s where it gets fun—sprinkle the 0.25 cup parmesan cheese evenly over the top. This adds that final nutty depth of flavor and helps create a beautiful golden crust. I like to give it a little press with my fingers so it sticks to the surface.
🔥 Step 4: Top with Crispy Breadcrumbs for the Perfect Crust
Mix the 0.5 cup panko breadcrumbs with 1 tablespoon melted butter in a small bowl. Spread this mixture evenly over the entire surface of the macaroni and cheese. The butter helps the breadcrumbs stick and creates that irresistible golden crust.
Pop the dish in a 375°F oven and bake for 20-25 minutes until the top is deep golden brown and bubbling vigorously. You’ll see those beautiful bubbles forming—that’s your sign it’s ready. If it’s browning too quickly, tent it loosely with foil for the last 5 minutes to prevent over-browning.
⏰ Step 5: Rest and Serve for Maximum Creaminess
Let the macaroni and cheese rest for 5-10 minutes before serving. This resting time is crucial—it allows the sauce to set slightly and makes it easier to slice. The dish will be hot, so be careful when you remove it from the oven and transfer it to a cutting board.
Slice into squares and serve immediately. The outside should be crispy and golden, while the inside remains creamy and bubbly. Each bite delivers that perfect combination of melty cheddar, nutty gruyère, and creamy texture. Trust me, it’s worth the wait!
Pro Tips For Making 8×8 Macaroni And Cheese
- MELT CHEESE LOW AND SLOW: I learned this the hard way—dumping all that sharp cheddar and Gruyère into a hot pan turns it into a greasy sludge. Start your cheese sauce on medium-low, whisking constantly until it’s just smooth enough to coat the back of a spoon before adding the pasta. Too hot, and you’ll end up with a sad, grainy mess.
- GRATE THE CHEESE FINE: Pre-shredded cheese is coated in anti-caking agents that make the sauce clump like a glue factory. Grab a box grater and shred your own sharp cheddar and Gruyère—it melts faster and gives you that perfect, velvety texture. (Yes, it takes 5 minutes, but your future self will notice the difference.)
- DRAIN PASTA WELL: I used to think “drained” meant “a little damp.” Wrong. Run your elbow macaroni through the colander until it’s actually dry—no clinging water. The last thing you want is a watery, soupy casserole. A quick shake in the colander helps too.
- ADD CREAM CHEESE LAST: Tossing in cream cheese too early turns it into rubbery chunks. Wait until the sharp cheddar and Gruyère are fully melted and the sauce is thickened—then stir in the cream cheese and heavy cream together. This keeps the texture smooth and rich, not lumpy. (Trust me, you’ll taste the difference.)
Essential equipment for 8×8 macaroni and cheese
Must-Have Baking Dish
An 8×8-inch baking dish is non-negotiable for this recipe—it’s the perfect size for individual portions while ensuring even baking. I recommend a glass or ceramic dish (like Pyrex) because they distribute heat evenly and create that signature golden crust.
Avoid dark-colored metal pans—they can make the crust brown too quickly before the inside is fully cooked. If you only have a 9×13-inch pan, reduce the baking time by 5-7 minutes and watch closely for browning. 🔥
Essential Mixing Tools
For the cheese sauce, a whisk is your best friend—it prevents lumps and creates a silky texture. I use a heat-resistant silicone whisk (like OXO Good Grips) because it’s gentle on non-stick pans and easy to clean.
A wooden spoon works too, but avoid metal if your pan isn’t non-stick. For tossing the pasta and sauce, a flexible silicone spatula (such as Epicurean) helps scrape every last bit from the baking dish. 🥄
Cheese Prep Tools
Shredding your own cheese makes all the difference—pre-shredded cheese contains anti-caking agents that turn gummy when baked. Grab a box grater (I love the Microplane) for sharp cheddar and Gruyère, or a mandoline for quick, even shreds.
For cream cheese, cut it into small cubes before adding to the sauce so it melts smoothly. A small mixing bowl (like Pyrex 1.5-quart) is perfect for combining the breadcrumb topping with butter. 🧀
Oven Thermometer
Ovens lie—even a brand-new model can run 25°F hotter or cooler than the set temperature. An oven thermometer (like Thermoworks Oven Thermometer) ensures your 375°F setting is accurate.
I’ve seen casseroles undercook or over-brown because of inconsistent heat. Place the thermometer near the baking dish while preheating to confirm your oven’s true temperature. ⏱️
Optional Upgrades
For extra crispiness, a pizza stone or baking steel (like Lodge) adds texture and even heat distribution. If you’re adding toppings like bacon or green onions, a small offset spatula helps arrange them neatly.
A kitchen scale (such as OXO Good Grips) ensures precise measurements for the cheese blend—critical for that perfect balance of flavors. And if you’re making this often, a stand mixer (like KitchenAid) can whip up the sauce faster, though a whisk works just fine. 💡
Nutrition facts
Frequently asked questions
Can I use a different type of pasta?
Elbow macaroni is ideal for this recipe because its shape holds up well during baking and creates pockets for maximum cheese. For alternatives, try cavatappi or penne—both work similarly. Avoid long pasta like spaghetti or linguine, as they tend to break apart when baked. If you must use a different shape, reduce the baking time by 2-3 minutes to prevent overcooking.
Why does my mac and cheese get watery?
Watery mac and cheese usually happens when the pasta isn’t drained well or the sauce is too thin. Always drain the pasta thoroughly and shake it in the colander to remove excess water. If the sauce seems too thin, let it simmer uncovered for an extra 1-2 minutes to thicken. For extra insurance, stir in 1 tablespoon cornstarch mixed with 1 tablespoon cold water at the end.
How do I make it ahead of time?
This recipe is perfect for meal prep! Assemble the dish (including the breadcrumb topping) up to 24 hours ahead and refrigerate uncovered. When ready to bake, pop it straight from the fridge at 375°F for 25-30 minutes (about 5 minutes longer than fresh). The cold start actually helps create an extra-crispy crust. For best texture, serve within 3 days of baking.
Can I substitute Gruyère with another cheese?
Gruyère adds nutty depth, but you can swap it for Swiss cheese (similar melt) or Parmesan (for extra umami). For a sharper flavor, try Jarlsberg or Emmental**. If using Parmesan, reduce the amount to 0.5 cup since it’s saltier. Avoid pre-shredded versions—always grate your own for the best texture.
What’s the best way to reheat leftovers?
For maximum crispiness, cover the leftovers with foil and reheat at 350°F for 10-15 minutes until warmed through. To revive the crust, place the dish under the broiler for 1-2 minutes at the end. For microwave reheating, cover with a damp paper towel and heat in 30-second intervals until hot—this prevents sogginess. Never reheat uncovered in the microwave.

- 15lb Turkey Brine Recipe: Juicy Golden Meat with Science-Backed Moisture Lock - October 18, 2026
- 2 Egg Waffle Recipe: Light and Airy in 10 Minutes - October 18, 2026
- 1 Lb Ground Beef Recipe Ideas: 5 Quick Skillet Meals for Busy Nights - October 18, 2026