
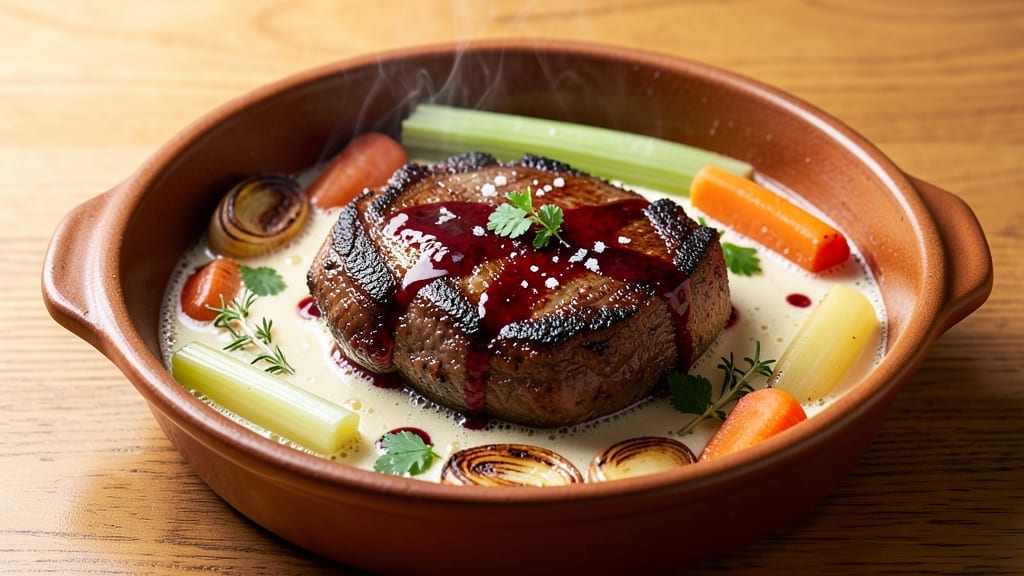
Transforming 500g beef shin into melt-in-your-mouth tenderness requires patience and precision—a slow-braised method that turns tough cuts into luxurious, gelatinous perfection. This French-inspired technique, traditionally used for joue de bœuf, relies on low-and-slow cooking to break down collagen into rich, velvety sauce.
The result? A dish that feels like a restaurant centerpiece, achieved in your own kitchen with minimal effort once you master the timing.
The key to success lies in the braising liquid—red wine, aromatics, and herbs infuse the meat with deep, complex flavors while the collagen-rich connective tissue dissolves into a naturally thickened sauce.
Unlike quicker cuts, beef shin benefits from a 2.5- to 3-hour cook, where the meat becomes so tender it practically falls apart at the touch of a fork. This method also works beautifully in a pressure cooker, cutting prep time without sacrificing texture.
What you’ll end up with is a plate of glistening, fork-tender beef shin swimming in a glossy, wine-infused sauce that clings to every bite. The meat’s natural gelatin creates a luxurious mouthfeel, while the aromatics deliver layers of savory depth.
Serve it with crusty bread to soak up every last drop of that rich sauce, or pair it with roasted root vegetables for a complete, hearty meal.
Whether you’re cooking for a special occasion or simply craving a restaurant-quality main course, this recipe delivers foolproof tenderness with professional results. The process is straightforward once you understand the science behind slow braising—no fancy equipment required, just time and attention to detail.
Let’s get started on creating a dish that will impress even the most discerning palates.
Ingredients for 500g beef shin
Pantry staples meet French technique for restaurant-worthy beef shin tenderness.
| Ingredient | Amount | Notes |
|---|---|---|
| Beef Shin 🥩 | 1.1 lb | 500g equivalent, trimmed of excess fat |
| Dry Red Wine 🍷 | 1 cup | Bold variety like Cabernet Sauvignon |
| Beef Stock 💧 | 1 cup | Homemade or high-quality store-bought |
| Yellow Onion 🧅 | 1 whole | Cut into 1-inch chunks |
| Carrots 🥕 | 2 medium | Peeled, cut into 2-inch pieces |
| Celery Stalks 🧅 | 2 whole | Cut into 2-inch pieces |
| Garlic Cloves 🧄 | 4 cloves | Smashed for maximum flavor |
| Fresh Thyme 🌿 | ½ ounce | Or 2 tbsp dried thyme |
| Fresh Rosemary 🌿 | 1 sprig | Or 1 tsp dried rosemary |
| Olive Oil 🫒 | 2 tbsp | Extra-virgin for best flavor |
| Tomato Paste 🍅 | 2 tbsp | Smooth, no sugar added |
| Salt 🧂 | 1 ½ tsp | Diamond Crystal kosher salt |
| Black Peppercorns 🌶️ | 10 whole | Crushed for texture |
| Bay Leaves 🌿 | 2 whole | Fresh preferred, dried works |
| All-Purpose Flour 🌾 | 1 tbsp | For thickening sauce if needed |
The beef shin is the star here—look for well-marbled cuts from your butcher or Costco’s pre-cut beef shin if you want convenience. The fat cap should be intact (it renders down for flavor), but trim any silverskin. For wine, grab whatever bold red you have open—Cabernet Sauvignon or Merlot work perfectly. The beef stock matters too: homemade is ideal, but store-bought brands like Kitchen Basics or Pacific Foods are solid. Fresh herbs elevate this dish, so buy thyme and rosemary from the grocery store’s fresh section—they’ll keep for weeks in the fridge if wrapped properly.
No red wine? Substitute beef broth with 1 tbsp balsamic vinegar—it mimics the acidity. Fresh thyme and rosemary unavailable? Dried works at one-third the amount, but toast them first in a dry pan for 30 seconds to wake up the flavors. The carrots can be baby carrots if that’s what’s in your fridge, but whole carrots with the peel on add more earthiness. For tomato paste, Trader Joe’s squeeze tubes are perfect—no waste, and they keep for months. The flour is just for sauce thickening if needed, but honestly, the collagen in the shin will thicken it beautifully on its own.
This dish tastes even better the next day as the flavors meld. Store leftovers in the fridge for up to 5 days, covered tightly to keep aromas in. For longer storage, freeze portions for up to 3 months—the sauce stays rich and the meat remains tender when reheated gently. I always make a double batch because this reheats like a dream, perfect for quick lunches or potlucks. The sauce thickens as it cools, so add a splash of broth if it seems too stiff when reheating.
Why You’ll Love This Recipe
- Slow-Simmer Magic: I swear by the 3-hour braise—minimal hands-on work, just dump-and-go. The wine and stock melt into the shin, turning tough cuts into something so tender, it falls apart at the touch of a fork.
- Wine-Infused Richness: That dry red wine isn’t just for show—it cuts through the richness while adding depth. The onions and carrots caramelize into the sauce, giving every bite a sweet, savory punch that’s dangerously addictive.
- Budget Meal, Big Impact: For under $15, you feed four with leftovers that taste even better the next day. My wallet thanks me, and my family doesn’t question the meal plan when dinner smells this good.
- Weeknight Workhorse: I make this when I’m too tired to think—just sear the shin, add the veggies, and let the stock do the heavy lifting. Pairs with crusty bread or mashed potatoes, and it’s the only dish that makes my lazy Sundays feel special.
Step-by-step instructions for slow-braised beef shin
Transform tough beef shin into melt-in-your-mouth perfection with this slow-braising method.
Sear the Beef Shin for Deep Flavor
Heat a heavy Dutch oven over medium-high heat until hot. Add 2 tablespoons olive oil and swirl to coat the bottom. Place the 1.1 lb beef shin fat-side down and sear undisturbed for 8-10 minutes until deeply browned on one side. Flip and repeat on the other side, then transfer to a plate.
This initial searing creates the Maillard reaction, which develops rich, caramelized flavors that infuse the braising liquid. Don’t rush this step—patience here ensures maximum flavor development. If your pan isn’t hot enough, the fat won’t render properly and you’ll miss out on that deep, savory foundation.
Build the Aromatic Base
In the same Dutch oven, add 1 whole yellow onion, 2 medium carrots, and 2 whole celery stalks, all cut into 1-inch chunks. Cook for 5-6 minutes until softened and beginning to caramelize. Add 4 smashed garlic cloves, 0.5 ounce fresh thyme, and 1 sprig fresh rosemary, stirring for 30 seconds until fragrant.
Here’s where the magic starts—the vegetables release their natural sugars and meld with the meat’s sear. I like to add a pinch of the 1.5 teaspoons salt now to help draw out moisture from the vegetables, intensifying their flavor. The thyme and rosemary should perfume the air with their piney, earthy notes—this is your signal they’re ready for the next step.
Deglaze and Develop the Braising Liquid
Pour in the 1 cup dry red wine and scrape up all the browned bits from the bottom of the pot with a wooden spoon. This deglazing captures all the flavor you’ve built so far. Let it simmer for 3-4 minutes until reduced by half. Add 2 tablespoons tomato paste and stir to combine.
The wine should reduce to a syrupy consistency, deepening in color and intensity. This step forms the foundation of your braising liquid. I always use bold red wine like Cabernet Sauvignon—its tannins complement the beef’s richness. If you’re concerned about alcohol content, the long simmer will evaporate most of it, leaving behind concentrated flavor.
Braise Until Fork-Tender
Return the beef shin to the Dutch oven. Add 1 cup beef stock, 10 whole black peppercorns, and 2 whole bay leaves. Bring to a simmer, then cover and transfer to a 300°F oven. Braise for 3-4 hours until the beef is fork-tender and falls apart easily.
This is where the transformation happens—the collagen in the beef shin breaks down into gelatin, creating that luxurious, velvety texture. I check the beef after 2 hours to ensure it’s not drying out. If the liquid reduces too quickly, add a splash of water or stock to maintain the proper braising environment. The beef should be so tender that a gentle probe with a fork reveals no resistance.
Finish and Thicken the Sauce
Remove the beef shin and strain the braising liquid through a fine-mesh sieve into a clean saucepan. Return the liquid to medium heat and whisk in 1 tablespoon all-purpose flour to thicken. Simmer for 3-4 minutes until the sauce coats the back of a spoon. Season with additional salt if needed.
The flour creates a silky, velvety sauce that clings beautifully to the beef. If the sauce is too thick, whisk in a splash of the reserved braising liquid to reach your desired consistency. The finished dish should have a rich, glossy sauce that enhances rather than overpowers the tender beef. Serve immediately with crusty bread to soak up every last drop of that luxurious braising liquid.
Pro Tips For Making 500g Beef Shin
- Brown the Shin First: Don’t skip the sear—get that pot smoking hot and let the shin develop a deep crust before adding liquid. I learned this the hard way: pale, soggy shin means flavorless shin. Five minutes per side with a heavy pan and a splash of oil makes all the difference.
- Cut Onions into Wedges: Slice those yellow onions into thick wedges (not rings) so they caramelize faster and hold their shape. Thin slices turn to mush and disappear into the wine—where’s the texture then? A sharp knife and a steady hand save you from sad, mushy onions.
- Deglaze with Wine Immediately: As soon as you remove the shin, pour in that dry red wine and scrape every last bit of fond from the bottom. That browned crust is where the magic lives—let it dissolve into the sauce. I used to wait, and the sauce was always duller.
- Simmer, Don’t Boil: Keep the liquid at a gentle simmer (tiny bubbles, not a rolling boil) to avoid toughening the shin. After the first hour, lower the heat if needed—rushed cooking turns tender meat back into chewy disappointment. Patience here guarantees fork-tender results.
Storing and reheating this dish
Fridge Storage Tips
Let your braised beef shin cool completely before storing—about 1-2 hours at room temperature. Transfer to an airtight container with a tight-fitting lid and refrigerate for up to 5 days.
The sauce will thicken as it cools, so add 2-3 tablespoons beef broth when reheating if needed. I always store the beef and sauce separately to prevent sogginess. 🥫
Freezer Prep
For longer storage, freeze portions in quart-sized freezer bags with 1-inch headspace to prevent ice crystals. Label with the date—this dish keeps for 3 months without texture loss.
Thaw overnight in the fridge before reheating. The meat stays fork-tender, though the sauce may separate slightly. Just whisk it back together when reheating. ❄️
Stovetop Reheating
My preferred method is stovetop reheating—it preserves the sauce’s richness. Place the beef and sauce in a pot over medium-low heat, cover, and warm for 10-15 minutes, stirring occasionally.
If the sauce thickens too much, add 1-2 tablespoons broth. The beef should reach 165°F internal temperature for safety. 🔥
Microwave Method
For quick reheating, transfer the beef and sauce to a microwave-safe dish, cover loosely with a microwave-safe lid, and heat on 50% power in 2-minute intervals until warmed through.
Stir between intervals to distribute heat evenly. The sauce may thin slightly, so reduce it on the stovetop afterward if needed. 💡
Sauce Salvage
If your sauce separates after storage, don’t toss it! Simply whisk vigorously to recombine, then strain through a fine-mesh sieve to remove any lumps. For extra richness, add 1 teaspoon cold butter or a splash of red wine while reheating.
The beef’s natural gelatin will thicken the sauce back to perfection. ✨
Serving Leftovers
Leftovers make an even better meal the next day as flavors deepen. Serve with crusty bread for dipping or alongside mashed potatoes to soak up the sauce. For a lighter option, pair with roasted asparagus or a simple green salad.
The beef’s tenderness makes it ideal for sandwiches too—just pile it onto fresh bread with a drizzle of sauce. 🍽️
Nutrition facts
Frequently asked questions
Why does beef shin need such a long cooking time?
The slow braising method is essential because beef shin contains abundant collagen in its connective tissue. When cooked at 300°F for 3-4 hours, this collagen breaks down into gelatin, transforming tough meat into luxurious, fork-tender bites. The low-and-slow process also allows flavors to meld deeply, creating that restaurant-quality sauce.
Can I use a pressure cooker to speed up this recipe?
For a pressure cooker version, follow the same searing and aromatic steps, then add all ingredients and pressure cook on high pressure for 60 minutes. Quick-release the pressure, then shred the beef and reduce the sauce. This cuts cooking time to about 1 hour while maintaining incredible tenderness.
What if my beef shin doesn’t become tender?
If the meat still has resistance after 3-4 hours, it likely needs more time. Extend cooking to 4-5 hours or increase temperature to 325°F for the final hour. Check for proper liquid coverage—meat should be 3/4 submerged at all times. If using a Dutch oven, ensure it’s heavy enough to maintain even heat distribution.
How do I know when the beef shin is fully cooked?
The beef is done when it’s fork-tender—a gentle probe should reveal no resistance, and the meat should practically fall apart. The internal temperature should reach 195-205°F (well above the usual 145°F for other cuts). The sauce will also thicken noticeably as collagen converts to gelatin.
What’s the best way to serve braised beef shin?
This dish shines with crusty bread for dipping, or pair it with mashed potatoes and roasted root vegetables. For a lighter option, serve with steamed greens or a fresh salad. The rich sauce makes it perfect for sandwiches too—just pile the beef on fresh bread with a drizzle of sauce.

- 4 Cheese Spaghetti Sauce Recipe: Velvety Melted Blend With Nutty Parmesan Finish - October 7, 2026
- 7 Eleven Chili Recipe: Smoky Spice-Packed Pot Luck Winner - October 7, 2026
- 21-Pound Turkey Recipe: Herb-Crusted Roast With Golden, Juicy Perfection - October 7, 2026