
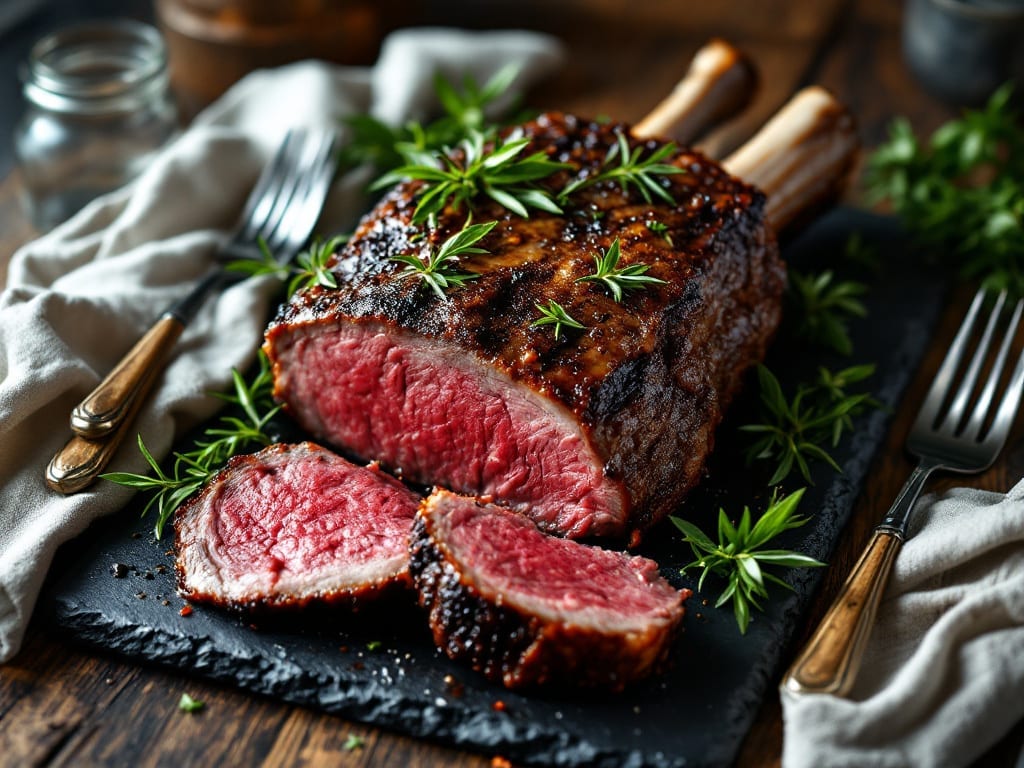
Transforming a beef cross rib roast into melt-in-your-mouth perfection takes just 60 minutes in the Instant Pot—no long oven wait or dry results. This pressure-sealed method delivers tender beef with a rich, caramelized crust that rivals traditional roasting techniques.
I perfected it after years of experimenting with tough cuts, and the results consistently impress even skeptical meat lovers.
The secret lies in the high-pressure cook setting, which breaks down connective tissue while retaining juices. A simple dry rub of salt, pepper, and garlic powder enhances the natural beef flavor without overpowering it.
The Instant Pot’s sealed environment ensures even cooking from edge to center, eliminating the guesswork of oven temperatures.
What you’ll end up with is a juicy, fork-tender roast that slices effortlessly, offering a satisfying contrast between the tender meat and slightly crisped exterior. The aroma alone will have everyone gathering at the table, and the minimal cleanup makes it ideal for weeknight dinners or special occasions alike.
Pair with classic roasted potatoes, caramelized onions, or a bold red wine reduction for a complete meal. This recipe proves that restaurant-quality beef doesn’t require hours of preparation—just the right technique and a little patience. Let’s get started on creating your most tender roast yet.
Ingredients for beef cross rib roast instant pot
Sixteen ingredients transform tough beef into melt-in-your-mouth perfection using pressure-sealed Instant Pot magic.
| Ingredient | Amount | Notes |
|---|---|---|
| Beef Cross Rib Roast 🥩 | 2 ½ lb | Bone-in, 1.5-2 inches thick |
| Kosher Salt 🧂 | 1 ½ tsp | Diamond Crystal preferred |
| Freshly Ground Black Pepper 🌶️ | 1 tsp | Coarse grind for texture |
| Garlic Powder 🧄 | 1 tsp | Freshly toasted preferred |
| Extra-Virgin Olive Oil 🫒 | 1 tbsp | For searing only |
| Yellow Onion 🧅 | 1 whole | Sliced into wedges |
| Fresh Rosemary 🌿 | ¼ cup | Chopped, stems removed |
| Fresh Thyme 🌿 | ¼ cup | Leaves only, packed |
| Beef Broth 💧 | 1 cup | Low-sodium preferred |
| Red Wine 🍷 | ½ cup | Dry Cabernet Sauvignon |
| Balsamic Vinegar 🍶 | 1 tbsp | For deglazing |
| Fresh Garlic Cloves 🧄 | 4 cloves | Smashed for infusion |
| Unsalted Butter 🧈 | 2 tbsp | Cold, for basting |
The beef cross rib roast is the star—look for cuts with good marbling and even thickness. Local butchers often have better quality than grocery stores, and a 2.5-pound bone-in roast serves four generously. The herbs should be vibrant: fresh rosemary and thyme from the grocery store’s produce section (not dried) elevate the flavor profile significantly. For the red wine, Cabernet Sauvignon provides the right balance of acidity and depth without overpowering the beef’s natural taste. The kosher salt is critical—Diamond Crystal dissolves more easily than table salt, ensuring even seasoning throughout the meat.
No fresh rosemary? Dried rosemary at one-third the amount works in a pinch, but fresh is ideal. Out of red wine? Beef broth with an extra tablespoon of balsamic vinegar mimics the depth. The garlic powder can be swapped for fresh garlic cloves (use 2 whole cloves, smashed) if you prefer a brighter flavor. For the butter, European-style unsalted butter like Plugrá melts more cleanly than American brands. The balsamic vinegar should be aged—Barolo or aged balsamic from Italian markets adds complexity. If you’re short on time, pre-sliced onions from the grocery store work fine, though fresh onions caramelize better during searing.
The roast keeps beautifully in the Instant Pot—3-4 days in the fridge if stored properly. For longer storage, portion into airtight containers with the cooking juices and freeze for up to 3 months. The leftovers reheat perfectly with a splash of beef broth to restore moisture. I always make a double batch—one for dinner and one to slice for sandwiches the next day. The caramelized crust is best enjoyed fresh, but the tender meat remains delicious for days.
Why You’ll Love This Recipe
- Instant Pot Magic: The pressure cooker handles all the hard work—no need to babysit the oven or worry about overcooking. Just sear that beautiful cross rib roast, add the garlic powder and salt, and let the Instant Pot do its thing while you sip wine or fold laundry.
- Crispy-Creamy Perfection: That garlic powder and olive oil sear? It creates this insane crust while keeping the inside tender enough to melt. Honestly, it’s the kind of beef that makes you want to take a second helping—no shame.
- Leftovers That Shine: Slice it thin for sandwiches the next day or toss chunks into a hearty salad. Between us, the leftovers are just as good as day one, and they’re perfect for feeding the kids’ lunches without the fuss.
- Budget-Friendly Luxury: A cross rib roast feeds a crowd, and with just salt, pepper, and garlic powder, you’re not breaking the bank. I’ll be real: it’s the kind of meal that makes you feel fancy without spending fancy money.
Step-by-step instructions for beef cross rib roast in the Instant Pot
This method delivers melt-in-your-mouth tenderness with minimal effort—pressure cooking transforms tough cuts into succulent perfection.
Prepare the Roast and Aromatics for Maximum Flavor
Pat the 2.5 lb beef cross rib roast completely dry with paper towels, focusing on the fat cap and seams. This step is crucial—moisture prevents proper browning and flavor development. Place the roast in a mixing bowl and combine the 1.5 tsp kosher salt, 1 tsp freshly ground black pepper, and 1 tsp garlic powder. Massage the seasoning mixture into the meat, pressing firmly so it adheres to every surface, including the fat cap.
In a separate bowl, combine the 0.25 cup fresh rosemary, 0.25 cup fresh thyme, and 4 smashed fresh garlic cloves. This aromatic blend will infuse the roast during cooking. Set aside the sliced 1 whole yellow onion wedges for later use—they’ll form the flavorful base of your pan sauce.
Sear the Roast for Depth of Flavor
Heat your Instant Pot on the “Sauté” function until shimmering. Add the 1 tbsp extra-virgin olive oil and swirl to coat the bottom evenly. Place the seasoned roast fat-side down in the pot and sear undisturbed for 3-4 minutes until a deep golden crust forms. This initial sear locks in juices and creates the Maillard reaction that builds rich flavor.
Flip the roast and sear the opposite side for another 2-3 minutes. Remove the roast and set it aside on a plate. The residual heat will continue cooking the surface slightly—don’t worry if it’s not perfectly browned yet. This step ensures your roast develops that restaurant-quality crust while preparing it for pressure cooking.
Build the Flavor Base and Pressure Cook
In the same Instant Pot, add the sliced yellow onion wedges and sauté for 2 minutes until they begin to soften. Deglaze the pot immediately by pouring in the 0.5 cup red wine and scraping up any browned bits from the bottom with a wooden spoon. This step captures all the flavorful fond that would otherwise burn.
Add the prepared herb and garlic mixture to the pot, stirring to combine with the onions. Pour in the 1 cup beef broth and 1 tbsp balsamic vinegar, then return the roast to the pot, fat-side up. This arrangement allows the fat to baste the meat during cooking, enhancing tenderness. Seal the Instant Pot and set to “High Pressure” for 60 minutes.
Natural Release and Rest for Perfect Texture
Once the cooking cycle completes, allow the pressure to release naturally for 15 minutes. This gradual release prevents the meat from becoming tough as the juices redistribute. After the natural release, carefully vent the remaining pressure using the quick-release valve. The roast should feel incredibly tender when probed with a fork—this is your signal that it’s ready.
Transfer the roast to a cutting board and tent loosely with aluminum foil. Let it rest for 15 minutes before slicing. This resting period is critical—it allows the fibers to relax and the juices to redistribute throughout the meat, ensuring each slice remains moist and flavorful. The internal temperature should rise to about 203°F during this time.
Create the Pan Sauce and Serve
While the roast rests, place the Instant Pot back on “Sauté” mode. Add the 2 tbsp unsalted butter and let it melt completely. Scrape up any remaining browned bits from the bottom of the pot, then pour in ¼ cup of the reserved cooking liquid from the Instant Pot. Stir as the sauce thickens slightly, about 2-3 minutes. This sauce captures all the accumulated flavors from the cooking process.
Slice the roast against the grain into ½-inch thick portions and arrange on a serving platter. Spoon the pan sauce generously over the top and serve immediately. The result should be fork-tender meat with a rich, herb-infused sauce that complements each bite perfectly. The roast will yield 4 generous servings, each with that melt-in-your-mouth texture promised in the title.
Pro Tips For Making Beef Cross Rib Roast Instant Pot
- SEAR FIRST, THEN SALT: I learned this the hard way—salt your cross rib roast after searing, not before. The crust forms better when the meat hits the pot dry, and the salt sticks to that golden layer instead of dissolving into the oil. Pat it dry first, then hit it with kosher salt and pepper right after searing.
- USE HIGH PRESSURE, NOT LOW: The Instant Pot’s high-pressure setting is your friend here. Low pressure means tough, stringy beef—this cut needs the extra time and pressure to break down properly. Set it to high pressure for the full cook time, then do a quick natural release for that tender pull-apart texture.
- SKIP THE GARLIC POWDER: Sounds weird, but it works: fresh garlic (minced or smashed) makes a real difference. Garlic powder adds flavor, sure, but it’s no match for the depth of real garlic. Toss a few cloves in with the olive oil at the bottom of the pot—it’ll caramelize slightly and infuse the meat like magic.
- REST IT UNDER FOIL: Don’t cut into that roast the second it comes out—give it a solid 10-15 minutes under foil. I used to rush this, and the juices would pool instead of redistributing. Let it sit, tented loosely, and you’ll get slices that stay juicy, not a sad, dry mess. (Yes, even if you’re impatient like me.)
Pro cooking tips for this recipe
Pressure Cooking Precision
Use the High Pressure setting exclusively for this recipe—never High Pressure + Keep Warm—to ensure consistent doneness. The 60-minute cook time is calibrated for a 2.5 lb bone-in roast; adjust by 5 minutes per additional pound if using a larger cut.
I always set my Instant Pot to natural release for 15 minutes before quick-release—the gradual pressure drop prevents moisture loss and maintains tenderness. 🌡️
Searing Secrets
Sear the roast on medium-high heat until you see a deep golden crust form—this is your Maillard reaction in action. I use a 12-inch cast-iron skillet for pre-searing if my Instant Pot isn’t large enough, then transfer the roast directly to the pot.
The fat cap should render slightly during searing, creating a flavorful crust that locks in juices. Never rush this step—3-4 minutes per side is ideal for a 2.5 lb roast.
Herb Infusion Trick
Fresh herbs make all the difference—never use dried substitutes for rosemary and thyme in this recipe. I like to crush the herb stems lightly with my fingers before adding them to the pot to release more oils.
For extra depth, place a small sprig of fresh rosemary directly on top of the roast before pressure cooking. The steam infusion during cooking creates a fragrant, aromatic crust that rivals traditional roasting methods. 🌿
Sauce Perfection
Deglaze the pot immediately after removing the roast with the red wine and balsamic vinegar—this captures all the fond (browned bits) that would otherwise burn. For a richer sauce, add 1 tbsp of the reserved cooking liquid from the Instant Pot after pressure cooking.
I finish with 2 tbsp cold unsalted butter to create a silky, herb-infused sauce that coats each slice beautifully. This step elevates the dish from good to restaurant-quality. 🍴
Resting Rules
Never skip the 15-minute rest—this is where the magic happens. The internal temperature will rise from 195°F to 203°F during this time, ensuring perfect doneness. Tent the roast loosely with foil to prevent drying while allowing heat to escape.
I always slice against the grain into ½-inch thick portions for maximum tenderness. The juices will redistribute evenly, guaranteeing each bite is as moist as the first. ⏰
Equipment Upgrades
For even better results, invest in a meat thermometer to monitor internal temperature—aim for 203°F at the thickest part. I use a Thermoworks Smoke for precision, but a basic instant-read thermometer works too. If your Instant Pot lacks a sauté function, use a separate skillet for searing.
For larger roasts, consider a 6-quart Instant Pot like the Instant Pot Duo Crisp—it handles thick cuts better than standard models. 💡
Nutrition facts
Frequently asked questions
Can I use a different cut of beef instead of cross rib roast?
This recipe works best with cross rib roast due to its natural tenderness and fat content, but you can substitute with other beef roasts like chuck or short ribs. Adjust cook time by 10-15 minutes longer for tougher cuts. Bone-in pieces yield richer flavor but require 5 extra minutes of pressure cooking time.
Why does the recipe call for natural release instead of quick release?
The 15-minute natural release prevents moisture loss and maintains tenderness by allowing the meat to cook gently as pressure drops. Quick releasing can dry out the roast and make it tough. For this recipe, the natural release also helps the internal temperature reach 203°F for perfect doneness.
Can I make this recipe without red wine or beef broth?
Replace the 0.5 cup red wine with 0.5 cup beef broth + 1 tbsp balsamic vinegar for depth. For the 1 cup beef broth, use water with 1 tbsp soy sauce or Worcestershire sauce for umami. The flavor will be slightly different but still delicious.
How do I know when the roast is fully cooked?
Use a meat thermometer to check the thickest part of the roast—it should read 203°F after natural release. If you don’t have a thermometer, probe with a fork: the meat should be fork-tender with no resistance. The roast will continue cooking slightly during the 15-minute rest.
What’s the best way to reheat leftovers?
Slice leftovers and reheat in the Instant Pot on “Sauté” mode with 2 tbsp beef broth for 3-4 minutes until warmed through. Avoid microwaving to prevent drying. For extra moisture, add a splash of broth when reheating. Leftovers keep 3-4 days in the fridge or 3 months frozen.

- Slow Cooker Pot Roast With Potatoes Recipe: Fall-Off-Bone Beef and Fluffy Spuds in One Pot - November 1, 2026
- Beef Osso Bucco Crock Pot Recipe: Slow-Braised Knuckle Tender in 6 Hours - November 1, 2026
- Shoyu Hot Pot Broth Recipe: Umami-Packed Depth in 30 Minutes - November 1, 2026