
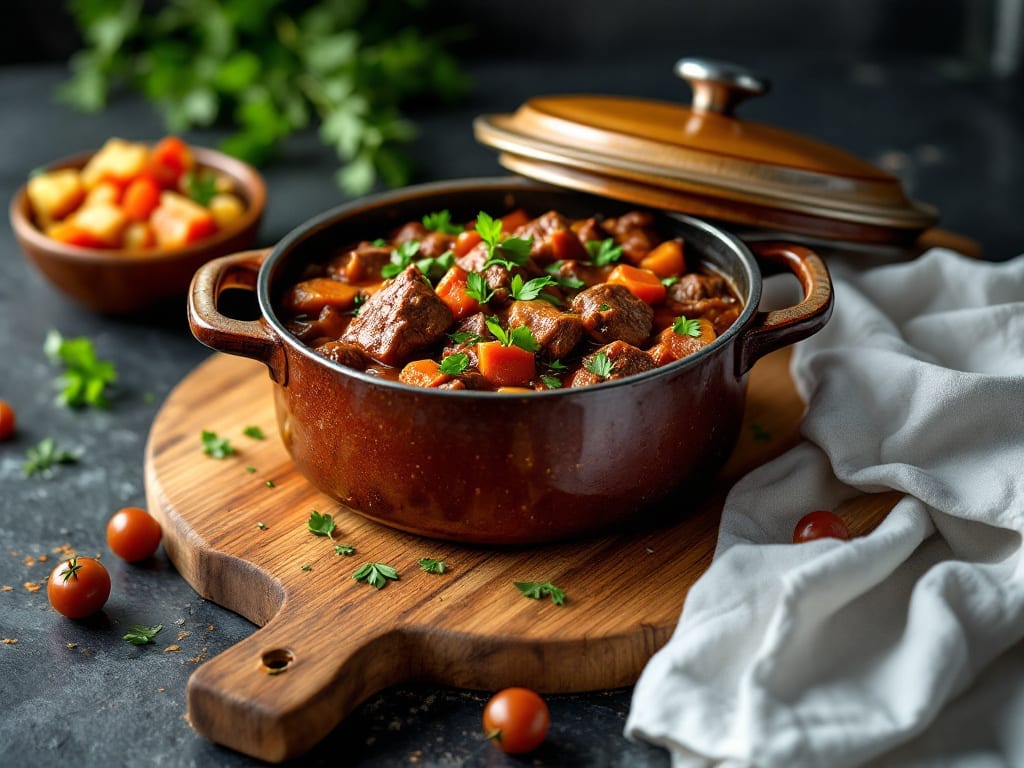
A one-pot beef stew transforms tough cuts into melt-in-your-mouth tenderness while building layers of rich umami flavor that deepen with each passing hour. This method eliminates cleanup while delivering restaurant-quality results in a single pot, where caramelized beef meets perfectly softened vegetables in a deeply aromatic broth.
I developed this recipe after years of testing slow-cooked variations, refining it to balance simplicity with maximum flavor impact.
The secret lies in browning the beef thoroughly before adding liquids—a crucial step that locks in deep, savory notes through the Maillard reaction.
A blend of red wine and tomato paste forms the foundation of the broth, while aromatic vegetables like carrots, celery, and onions infuse the liquid with natural sweetness and complexity. The long, gentle simmer breaks down connective tissue, turning inexpensive cuts into tender, flavorful morsels that practically fall apart.
What you’ll end up with is a hearty stew where each spoonful delivers layers of savory richness, tender beef, and vegetables that have absorbed the essence of the broth.
The aroma alone will have everyone gathering at the table, and the one-pot method means less time scrubbing pots and more time enjoying the meal. This is the kind of dish that tastes even better the next day, making it perfect for meal prep or feeding a crowd.
Serve with crusty bread to soak up every last drop of that deeply flavorful broth, or pair it with roasted potatoes for a complete meal.
The beauty of this recipe is its versatility—it works equally well for a weeknight dinner or a special occasion, all while keeping prep and cleanup to a minimum. Let’s get started on creating this deeply satisfying one-pot masterpiece.
Ingredients for beef stew one pot
Sixteen ingredients transform inexpensive beef into restaurant-quality stew with deep umami flavor.
| Ingredient | Amount | Notes |
|---|---|---|
| Chuck Roast Beef 🥩 | 3 lb | Cut into 1.5-inch cubes, trimmed of fat |
| Yellow Onion 🧅 | 2 whole | Chopped into 1/2-inch pieces |
| Carrots 🥕 | 4 whole | Cut into 1-inch chunks, peeled |
| Celery Stalks 🥬 | 4 whole | Chopped into 1/2-inch pieces |
| Garlic Cloves 🧄 | 6 cloves | Smashed, not minced |
| Red Wine 🍷 | 1 cup | Bold dry variety like Cabernet Sauvignon |
| Tomato Paste 🍅 | 2 tbsp | Squeeze tube preferred for convenience |
| Beef Broth 💧 | 4 cups | Low-sodium preferred, homemade if possible |
| Dried Thyme 🌿 | 1 tsp | Or 1 tbsp fresh thyme leaves |
| Bay Leaves 🍃 | 2 whole | Removed before serving |
| Black Peppercorns 🌶️ | 1 tsp | Freshly cracked for optimal flavor |
| All-Purpose Flour 🌾 | 1 tbsp | For thickening if needed |
| Olive Oil 🫒 | 2 tbsp | Extra-virgin for high heat searing |
| Salt 🧂 | 1 ½ tsp | Kosher salt, adjust to taste |
| Fresh Parsley 🌿 | ¼ cup | Chopped, for garnish (optional) |
The beef selection is non-negotiable for this recipe. Chuck roast delivers the best texture and flavor, with its ideal balance of fat and connective tissue. Most grocery stores carry pre-cut chuck roast, but if you’re buying a whole roast, look for well-marbled cuts—the fat renders out during cooking, creating rich flavor. For optimal results, Costco or local butchers often have the best quality at competitive prices. If you can’t find chuck, short ribs or round roast work as substitutes, though cooking times may vary. The key is to avoid lean cuts like sirloin, which won’t develop the same tender texture.
Red wine adds depth, but no bold red? Substitute with 1 cup beef broth plus 1 tbsp balsamic vinegar—it mimics the acidity and complexity. For the tomato paste, Trader Joe’s squeeze tubes are perfect—they’re convenient, last months in the pantry, and eliminate waste. Fresh thyme is ideal, but dried works at one-third the amount. The bay leaves should be high-quality, dried—avoid those pre-packaged mixes with questionable ingredients. If you’re short on time, pre-chopped mirepoix from the store works fine, though fresh vegetables yield better flavor. For the olive oil, avoid light or refined oils—they lack the fruity notes needed for high-heat searing.
This stew tastes even better the next day as flavors meld. Store in an airtight container in the refrigerator for up to 5 days, or freeze portions for 3 months—the broth actually improves with time. For meal prep, portion into individual containers with a layer of broth on top to prevent drying. The beef and vegetables can be prepped ahead and refrigerated overnight, then browned and simmered the next day. When reheating, add a splash of water or broth to restore consistency. Serve with crusty bread to soak up every last drop of that deeply flavorful broth.
Why You’ll Love This Recipe
- One-Pot Magic: I swear by this recipe because it’s literally one pot—no chopping boards, no extra pans, just dump and simmer. The chuck roast softens to melt-in-your-mouth perfection while the onions and celery caramelize right in the broth, no fuss.
- Deep Flavor, Zero Guilt: That slow-cooked beef with garlic-infused broth? It’s ridiculously rich, but the carrots and celery keep it from feeling heavy. Honestly, the first bite makes me forget I’m making a healthy meal—it just tastes like a restaurant dish.
- Weeknight to Potluck: Make a double batch on Sunday, and you’ve got lunch Monday through Wednesday. Or bring it to a holiday gathering—it’s hearty enough for a crowd but simple enough to throw together last-minute. My in-laws still ask for the recipe every year.
- Budget-Friendly Powerhouse: Chuck roast is cheap, and this recipe stretches it into days of leftovers. I’ll be real: I’ve reheated this stew for breakfast with toast, and no one batted an eye. Plus, the veggies stretch the meal further without breaking the bank.
Step-by-step instructions for beef stew one pot recipe
Here’s how to build rich, layered flavor in a single pot that gets better with each passing hour.
Sear the Chuck Roast for Deep Flavor
Heat the 2 tablespoons olive oil in a large Dutch oven over medium-high heat until shimmering. Working in batches, add the 3 lb chuck roast beef, cut into 1.5-inch cubes, and sear until deeply browned on all sides—about 3-4 minutes per batch. This step creates the Maillard reaction that forms the stew’s foundation.
Don’t overcrowd the pot—sear in batches if needed. The meat should release easily from the bottom when ready. Transfer the seared beef to a plate and set aside. You’ll notice the pot’s bottom develop a rich, caramelized crust—this is flavor you don’t want to miss.
Build the Aromatic Base with Vegetables
In the same Dutch oven, add the 2 whole yellow onion, 4 whole carrots, and 4 whole celery stalks, all chopped as specified. Cook for 5-6 minutes until the vegetables begin to soften and the onions turn translucent. This step develops their natural sweetness while preventing them from cooking to mush later.
Add the 6 smashed garlic cloves and 2 tablespoons tomato paste, stirring to coat everything evenly. Cook for another 1-2 minutes until the raw garlic smell disappears. This creates a flavorful paste that will form the stew’s rich base. If the vegetables stick, add 1-2 tablespoons beef broth to deglaze.
Deglaze and Add Liquids for Umami Depth
Pour in the 1 cup red wine and scrape up all the browned bits from the bottom of the pot using a wooden spoon. This deglazing step captures all the meaty flavor that would otherwise burn. Let the wine simmer for 2-3 minutes until it reduces by half and the alcohol smell dissipates.
Add the 4 cups beef broth, 1.5 teaspoons salt, 1 teaspoon dried thyme, 2 whole bay leaves, and 1 teaspoon cracked black peppercorns. Stir to combine, then return the seared beef to the pot. Bring everything to a gentle boil, then reduce heat to low to maintain a bare simmer.
Simmer Slowly for Tender Meat and Rich Broth
Cover the pot and let the stew simmer gently for 2.5-3 hours, stirring occasionally. The meat is done when it’s fork-tender and easily pulls apart. This slow cooking transforms tough beef into melt-in-your-mouth pieces while developing a deeply flavorful broth.
Here’s the thing—don’t rush this step. The longer it simmers, the more the flavors meld together. Check occasionally and add water or broth if needed to maintain liquid level. The stew should have about 1 cup of liquid remaining when finished.
Finish and Adjust for Perfect Texture
Once the beef is tender, remove and discard the bay leaves. Taste the stew and adjust seasoning with additional salt or black peppercorns if needed. For a thicker stew, mix the 1 tablespoon all-purpose flour with 2 tablespoons cold water to form a slurry, then stir it into the pot. Simmer for another 5 minutes to thicken.
Garnish with 0.25 cup chopped fresh parsley just before serving. The parsley adds freshness that cuts through the richness of the stew. Serve immediately with crusty bread to soak up every last drop of that umami-packed broth.
Pro Tips For Making Beef Stew One Pot
- Brown the Chuck First: I learned this the hard way—skipping the sear means your stew will taste like a sad, pale broth instead of rich, caramelized perfection. Get that roast deep golden in a hot pot with oil before adding anything else. The crust locks in flavor and keeps the meat tender.
- Dice Veggies Evenly: Unevenly chopped carrots and celery mean some bits turn to mush while others stay crunchy. Aim for ½-inch pieces—big enough to hold shape but small enough to cook through. (Yes, even if you’re impatient like me.)
- Don’t Crowd the Pot: After burning three batches, I finally figured out: if your stew pot is packed tight, the onions and garlic will steam instead of brown. Give them room to sizzle—add veggies in batches if needed.
- Deglaze with Wine (or Vinegar): Sounds weird, but it works: after browning the meat, splash in ½ cup of red wine (or apple cider vinegar in a pinch) and scrape up those stuck-on bits. That’s where half the flavor hides. (Your future self will thank you.)
Pro cooking tips for this recipe
Dutch Oven Essentials
Your choice of pot makes all the difference. A 5-6 quart Dutch oven is ideal for this recipe—it provides enough space for the beef to sear properly while allowing room for the vegetables and broth to develop.
I recommend a Lodge cast iron Dutch oven for its superior heat retention and even cooking. If you don’t have one, a heavy-bottomed stainless steel pot works too. Preheat your Dutch oven on the stove for 5 minutes before adding oil to ensure even searing. 🔥
Searing Perfection
Don’t skip this critical step—the Maillard reaction creates deep, complex flavors that transform a good stew into a great one. Work in batches if needed to avoid overcrowding, and resist the urge to move the meat around too much.
Let each piece develop a deep brown crust, which should take about 3-4 minutes per side. I like to use tongs for this to avoid piercing the meat and releasing juices prematurely. The caramelized bits that form on the bottom are pure flavor—don’t miss them!
Deglazing Like a Pro
The wine deglazing step is where you capture all those precious browned bits that would otherwise burn. Use a wooden spoon to scrape the bottom vigorously, then let the wine reduce by half before adding the broth. This creates a rich, flavorful base that forms the heart of your stew.
If you’re short on wine, apple cider vinegar works in a pinch—just use ½ cup and reduce for 3-4 minutes to intensify the flavor. 🍷
Simmering Secrets
Low and slow is the key here—maintain a gentle simmer where you can see just a few small bubbles at the edges of the pot. This takes about 2.5-3 hours, but don’t be tempted to speed it up.
The longer the stew simmers, the more the collagen breaks down, creating that luxurious, velvety texture. I like to check the liquid level every 30 minutes and add a splash of broth or water if needed to prevent drying out.
Thickening Tricks
If your stew ends up too thin, don’t despair—there are several ways to fix it. The flour slurry method works well, but you can also use 1 tablespoon cornstarch mixed with 2 tablespoons cold water for a glossier finish.
For a more rustic texture, mash a few cooked vegetables directly into the stew. Always thicken at the end of cooking to avoid making the stew gummy. Taste as you go—sometimes the stew is perfect just as is! 💡
Flavor Boosters
Elevate your stew with a few simple additions. A 1-inch piece of kombu seaweed simmered for the last 30 minutes adds incredible umami depth, then simply remove it before serving. For extra richness, stir in 1 tablespoon Worcestershire sauce during the final 10 minutes of cooking.
Or try a pinch of smoked paprika for a subtle smoky note. These small tweaks can take your stew from ordinary to extraordinary without changing the core recipe.
Nutrition facts
Frequently asked questions
Can I use a different cut of beef for this one-pot stew?
While chuck roast is ideal for its fat and connective tissue, you can substitute with short ribs (add 1 hour to cooking time) or round roast. Avoid lean cuts like sirloin—they won’t develop the same tender texture. For best results, choose cuts with good marbling to keep the stew rich and flavorful.
How do I prevent the stew from getting too watery?
Start with 4 cups of broth and adjust as needed during cooking. If it’s too thin, thicken with a flour slurry (1 tbsp flour + 2 tbsp cold water) or cornstarch slurry (1 tbsp cornstarch + 2 tbsp water) in the last 5 minutes of cooking. Simmering uncovered for the final 10 minutes also helps reduce excess liquid.
What if I don’t have red wine? Can I still make this stew?
Replace the 1 cup red wine with 1 cup beef broth plus 1 tbsp balsamic vinegar for acidity, or use ½ cup apple cider vinegar reduced by half. The key is maintaining acidity to balance the flavors—just reduce the substitute liquid longer than the wine to intensify its flavor.
Can I make this stew in an Instant Pot or slow cooker?
Yes! For an Instant Pot, sear the beef separately, then add all ingredients and cook on high pressure for 45 minutes, followed by a 10-minute natural release. For a slow cooker, brown the beef in a skillet first, then transfer everything to the pot and cook on low for 6-8 hours or high for 3-4 hours. Adjust liquid as needed—slow cookers may require less broth.
Why does my stew taste bland after cooking?
Bland flavor usually means insufficient browning or seasoning. Always sear the beef thoroughly to develop the Maillard reaction, and taste as you go—add more salt, pepper, or herbs if needed. A splash of soy sauce or Worcestershire sauce in the last 10 minutes can also boost umami depth.

- Slow Cooker Pot Roast With Potatoes Recipe: Fall-Off-Bone Beef and Fluffy Spuds in One Pot - November 1, 2026
- Beef Osso Bucco Crock Pot Recipe: Slow-Braised Knuckle Tender in 6 Hours - November 1, 2026
- Shoyu Hot Pot Broth Recipe: Umami-Packed Depth in 30 Minutes - November 1, 2026