
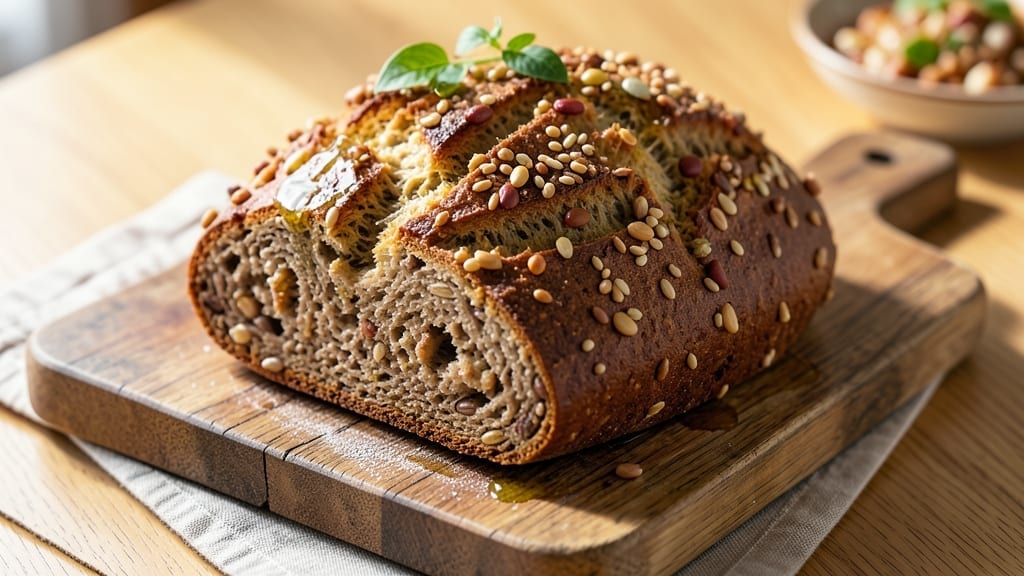
This 12-grain cereal bread recipe delivers a rustic, hearty loaf packed with nutty crunch and complex flavor—perfect for sandwiches, toast, or serving alongside soups. 🌾 The combination of whole grains like wheat berries, rye, and barley creates a satisfying texture that stands up to bold toppings while keeping the interior tender.
I developed this recipe after years of experimenting with grain-forward breads, and it’s become a staple in my kitchen for its versatility and depth of flavor.
The secret to achieving the perfect balance lies in the grain-to-flour ratio and proper hydration. Unlike traditional breads, this recipe incorporates cooked grains—including barley, millet, and quinoa—that add chewiness and a subtle sweetness.
The dough requires a longer fermentation time to fully develop the grains’ flavors, but the result is worth the patience: a loaf with a crisp, golden crust and a crumb that’s both airy and substantial.
What makes this bread truly special is its ability to elevate simple meals. Toast it with butter and jam for breakfast, or use it for sandwiches with hearty fillings like roasted vegetables and hummus.
The grains hold up beautifully to strong flavors, making this an ideal choice for both everyday meals and special occasions. The aroma alone as it bakes will fill your home with warmth and anticipation.
Ready to bake? This recipe is designed for beginners and experienced bakers alike, with clear instructions for mixing, kneading, proofing, and baking. The key to success is patience—allowing the dough to rise slowly and the grains to soften properly.
Once baked, you’ll have a loaf that’s as beautiful as it is delicious, with a texture that’s impossible to resist.
Ingredients for 12 grain cereal bread
Twelve whole grains and flours blend for a rustic loaf with nutty depth and satisfying texture.
| Ingredient | Amount | Notes |
|---|---|---|
| Wheat Berries 🌾 | 1 cup | Cooked until tender, cooled |
| Barley 🌾 | ½ cup | Cooked until tender, cooled |
| Millet 🌾 | ½ cup | Cooked until tender, cooled |
| Quinoa 🌾 | ½ cup | Cooked until tender, cooled |
| Rye Flour 🌾 | 1 ½ cups | For rustic flavor profile |
| Whole Wheat Flour 🌾 | 1 ½ cups | High-protein for structure |
| All-Purpose Flour 🌾 | 1 cup | Balances texture and rise |
| Active Dry Yeast 🍞 | 2 ¼ tsp | Instant yeast preferred |
| Granulated Sugar 🍚 | 1 tbsp | Feeds yeast fermentation |
| Salt 🧂 | 1 ½ tsp | Diamond Crystal preferred |
| Olive Oil 🫒 | ¼ cup | Extra-virgin for richness |
| Warm Water 💧 | 1 ½ cups | 110°F for optimal yeast activation |
| Honey 🍯 | 1 tbsp | Enhances grain sweetness |
| Sesame Seeds 🌻 | 1 tbsp | For crust decoration |
| Poppy Seeds 🌻 | 1 tbsp | For crust decoration |
The grains are the heart of this recipe—Bob’s Red Mill has the best pre-cooked options, but you can toast and cook them yourself for deeper flavor. Look for organic or stone-ground varieties when purchasing whole grains; they retain more nutrients and flavor. The rye flour gives that signature tang, while the all-purpose flour ensures a balanced rise. For the yeast, Saf-Instant is my go-to because it doesn’t require proofing in water first. Store your grains in airtight containers to preserve their freshness, and always measure flours by weight if you have a kitchen scale—it’s far more accurate than volume measurements.
No wheat berries? Spelt or farro work beautifully as substitutes, though the texture will differ slightly. Running short on rye flour? Substitute with whole wheat flour at a 1:1 ratio**, but expect a denser crumb. The honey can be swapped for maple syrup or agave nectar if you prefer, though honey adds a subtle floral note that complements the grains. For the seeds, sunflower seeds or flaxseeds are great alternatives if you’re avoiding sesame or poppy. If you’re baking at high altitude, reduce the yeast by 25% and add 1 tbsp extra olive oil** to prevent a dry crumb.
This dough needs time to develop its flavors—at least 2 hours of cold fermentation is ideal, but overnight works wonders. Store the dough in the fridge between kneading and shaping to slow fermentation and enhance flavor. The baked loaf keeps well at room temperature for 3-4 days wrapped in a cotton towel, or you can freeze slices for up to 3 months. For reheating, wrap slices in foil and warm in a 350°F oven for 5-7 minutes—they’ll taste fresh-baked every time. The crust stays crisp for about 2 days, so enjoy it while it’s at its best.
Why You’ll Love This Recipe
- I’ll be real: this recipe saved me money. Using whole grains I already had (plus a few bucks for rye flour) means no specialty ingredients. And because it keeps so well, I’m not tempted to buy overpriced artisanal bread. Win-win.
- No-Soaking Needed: I’ll admit, I used to dread the prep for cereal bread—soaking grains overnight felt like a chore. But this recipe skips that step entirely. The wheat berries and barley soften just enough during baking, giving that satisfying chew without demanding your whole evening.
- Earthy Nutty Magic: Honestly, the flavor is what hooked me. That deep, toasty rye flour base pairs perfectly with the millet’s slight sweetness and quinoa’s crunch. Toast it, and you’ve got a bread with layers of flavor—like a cross between sourdough and granola, but better.
- Weeknight Workhorse: Between us, this bread is my go-to for sandwiches, toast, or even croutons. I make a big batch on Sundays, and it lasts me all week—no sad, stale loaves here. The rye flour keeps it dense enough to hold up to anything, from peanut butter to avocado.
Step-by-step instructions for 12-Grain cereal bread
Mastering this hearty bread requires patience and precision—but the results are worth every minute.
👨🍳 Step 1: Cook the Grain Base
In a large pot, combine the 1 cup wheat berries, 0.5 cup barley, 0.5 cup millet, and 0.5 cup quinoa with 4 cups water (double the total grain volume). Bring to a boil, then reduce heat to medium-low and simmer uncovered for 30-40 minutes, stirring occasionally, until all grains are tender and the liquid is absorbed. You’ll know they’re done when the grains hold their shape but are soft enough to crush between your fingers.
Drain any excess liquid through a fine-mesh strainer, then spread the cooked grains on a baking sheet to cool completely. This step builds the bread’s nutty depth—don’t rush it. Once cool, roughly chop the grains with a knife to mimic whole-grain texture before mixing. The contrast between the grains and flours creates that signature rustic crunch.
🍳 Step 2: Mix the Dough
In a large mixing bowl, whisk together the 1.5 cups rye flour, 1.5 cups whole wheat flour, and 1 cup all-purpose flour. Create a well in the center and add the 2.25 tsp active dry yeast, 1 tbsp granulated sugar, and 1.5 tsp salt. Stir to combine, then drizzle in the 0.25 cup olive oil and 1 tbsp honey. Mix until the dry ingredients are evenly moistened.
Gradually add the 1.5 cups warm water (test temperature with your finger—it should feel like bathwater) while stirring with a wooden spoon. Once the dough begins to form a shaggy mass, fold in the cooled, chopped grains. The dough will be thick and sticky—this is normal. Use a dough scraper to work it until it just comes together, about 5 minutes. The high grain content makes this dough denser than traditional bread dough.
🥘 Step 3: Knead and Rest
Turn the dough onto a lightly floured surface and knead for 8-10 minutes until smooth and elastic. You’ll need to add 1-2 tablespoons more flour during kneading—this dough resists gluten development due to the whole grains. Shape into a round loaf, place in a lightly oiled bowl, cover with a damp towel, and let rise in a warm place for 1.5-2 hours, or until doubled in size. The yeast needs time to ferment the complex grains fully.
Here’s the thing—this dough won’t rise dramatically like sourdough. Instead, look for a 30-40% increase in volume and a slightly puffy top. If it doesn’t rise much, that’s okay; the grains add natural structure. Punch down the dough gently to release air, then shape it into your preferred loaf form—whether a rustic boule or a free-form shape.
🔥 Step 4: Bake to Golden Perfection
Preheat your oven to 375°F and place a baking stone or inverted baking sheet on the middle rack. Once hot, transfer the shaped dough onto a parchment-lined baking sheet. Brush the top with a little water, then sprinkle evenly with the 1 tbsp sesame seeds and 1 tbsp poppy seeds. Bake for 40-45 minutes, rotating the pan halfway through, until the crust is deep golden brown and the internal temperature reaches 205°F.
The bread’s aroma will fill your kitchen—earthy from the grains, sweet from the honey, with a subtle nuttiness. Tap the bottom: it should sound hollow. If the top browns too quickly, tent with foil after 25 minutes to prevent over-browning. Let the bread cool on a wire rack for at least 1 hour before slicing—this prevents a gummy crumb.
⏰ Step 5: Rest and Serve
While the bread cools, prepare a simple compound butter by mixing 2 tablespoons softened butter with 1 tsp honey and a pinch of salt. Once the bread reaches room temperature, slice it thickly (about 1-inch slices) and serve with the honey butter. The contrast between the dense, nutty interior and the crispy crust makes every bite satisfying.
This bread keeps well for 3 days at room temperature or 1 week wrapped in plastic in the fridge. For best texture, toast slices before serving—it enhances the grain flavors and adds extra crunch. The seeds on top add a delightful texture contrast with each bite, making this more than just bread—it’s a flavor experience.
Pro Tips For Making 12 Grain Cereal Bread
- SOAK THE GRAINS OVERNIGHT: I learned this the hard way—skipping the soak means your wheat berries and barley stay rock-hard no matter how long you bake. Cover them in water (or yogurt for tang) and let them sit 12+ hours; they’ll triple in size and blend seamlessly into the dough.
- GRIND RYE FRESH: Store-bought rye flour loses its bite fast. Pulse whole rye berries in a food processor until you get a coarse, rustic grind—it adds chew and depth. (Yes, it’s messy, but your bread will taste like it came from a bakery.)
- DON’T OVERMIX THE DOUGH: After combining the soaked grains, rye flour, and water, resist the urge to knead like you’re making baguettes. This bread thrives on a sticky, shaggy texture—overworking it turns it dense. Just fold it gently 2-3 times.
- BAKE LOW AND SLOW: Cereal bread needs patience. Start at 350°F (175°C) for the first 20 minutes, then drop to 325°F (160°C) until the center hits 205°F (96°C)—it’ll stay moist without drying out. (Your instant-read thermometer is your new best friend.)
Make-ahead tips for this recipe
Prep Ahead Strategy
The real secret to this bread is planning—this dough benefits from overnight cold fermentation in the fridge. After mixing, shape the dough into a loaf, place it in an oiled bowl, cover tightly with plastic wrap, and refrigerate for 12-18 hours.
The cold slows fermentation, allowing flavors to meld beautifully. When ready to bake, simply remove it from the fridge and let it sit at room temperature for 1 hour before shaping and baking. This method also improves digestibility by breaking down phytic acid in the grains. 🌾
Grain Prep Shortcut
Don’t have time to cook grains from scratch? Use pre-cooked grains from the bulk section of stores like Whole Foods or Trader Joe’s. Look for labels like “steamed” or “parboiled” varieties—they’re ready to chop and mix.
For extra convenience, toast the grains in a dry skillet over medium heat for 5 minutes before mixing to deepen their flavor. This reduces your active cooking time by 30 minutes without sacrificing texture. ⏰
Freezer-Friendly Dough
Make this dough up to 3 days in advance and freeze it for later use. After the first rise, shape the dough into a loaf, wrap tightly in plastic wrap, then place inside a ziplock freezer bag>.
When ready to bake, thaw the dough in the fridge overnight, then proceed with the baking instructions. The cold fermentation continues during thawing, enhancing flavor development. Label your bag with the date—it stays fresh for up to 1 month in the freezer. 🧊
Baked Loaf Storage
For maximum freshness, let the bread cool completely, then wrap it in a clean kitchen towel> (not plastic) to preserve moisture. Store at room temperature for 3-4 days, or freeze individual slices for up to 3 months.
To reheat, wrap slices in foil and warm in a 350°F oven for 5-7 minutes>—they’ll regain that bakery-fresh crunch. The towel wrapping prevents sogginess and keeps the crust crisp longer than plastic. 🍞
Grain Mix Variations
Want to experiment? Swap out grains while keeping the total 2 cups cooked volume. Try buckwheat> for a slightly bitter contrast or amaranth> for a nutty, earthy depth. For a sweeter profile, add ½ cup cooked wild rice>—it pairs beautifully with the honey.
Just remember: denser grains (like buckwheat) may require 1 extra tablespoon olive oil> during mixing to maintain dough elasticity. ✨
Batch Baking Tips
Double this recipe for a large batch—just use two mixing bowls and divide the dough evenly. Bake both loaves simultaneously on the middle and lower racks to ensure even heat distribution. For a 2-loaf pan approach, shape the dough into ovals and bake at 350°F for 45-50 minutes>.
Label your baked loaves with the date—they’ll stay fresh for 5 days> when stored properly. Perfect for meal prep or gifting! 💫
Nutrition facts
Frequently asked questions
Why do I need to cook the grains before adding them to the dough?
Cooking the grains first ensures they soften completely, preventing a gritty texture in your bread. The grains absorb moisture during cooking, which helps create a cohesive dough structure. Plus, the cooking process enhances their natural sweetness and nutty flavors, making them more digestible and delicious in the final loaf.
Can I substitute any of the grains if I don’t have all 12?
You can swap individual grains while keeping the total 2 cups cooked volume. For example, replace barley with buckwheat for a nutty bite or wild rice for a sweeter profile. Just maintain the same total volume and adjust olive oil by 1 tbsp if using denser grains like buckwheat to keep the dough workable.
What’s the best way to store leftover bread to keep it fresh?
Wrap the cooled loaf in a clean kitchen towel (not plastic) to preserve moisture and crust crispness. Store at room temperature for 3-4 days or freeze slices for up to 3 months. To reheat, wrap slices in foil and warm in a 350°F oven for 5-7 minutes—they’ll taste fresh-baked every time!
Why did my bread turn out dense instead of light and airy?
This bread is intentionally hearty due to the whole grains, but a few common issues can make it denser: over-kneading (which develops too much gluten), insufficient yeast, or not enough fermentation time. Try using instant yeast, letting the dough rise longer (up to 2 hours at room temp), or adding 1 tbsp extra olive oil for moisture. The grains themselves add natural density that traditional breads lack.
Can I make this bread without a stand mixer?
Yes! This dough is best mixed by hand to avoid over-developing the gluten. Use a wooden spoon to combine ingredients, then knead by hand on a lightly floured surface for 8-10 minutes. The sticky texture is normal—the high grain content makes it denser than traditional dough. A dough scraper helps gather any sticky bits during kneading.

- 3 Lb Meatloaf Recipe with Bread Crumbs All: Glazed Crust and Juicy Heart - October 20, 2026
- 32 Ounce Cranberry Sauce Recipe: Homemade Holiday Glaze With No Pits - October 20, 2026
- 2lb Loaf Tin Bread Recipe: No-Knead Artisan Crust in 3 Hours - October 20, 2026