
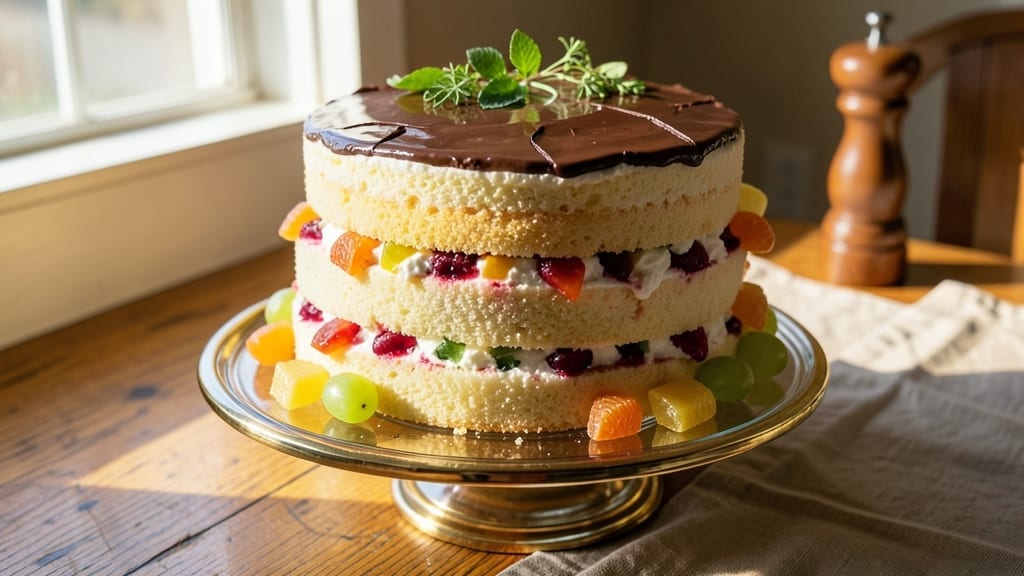
This 1960s fruit cocktail cake brings back the golden era of homemade desserts with its vibrant layers of citrus and vanilla, a nostalgic treat that still feels fresh today. 💛 The recipe combines classic fruit cocktail—think maraschino cherries, pineapple, and citrus—with tender vanilla sponge layers, creating a dessert that’s both comforting and celebratory.
It’s the kind of cake that tastes like childhood memories, perfect for tea parties or Sunday suppers.
The secret to this recipe lies in its simplicity: a basic vanilla cake batter infused with fruit cocktail juice for extra moisture, layered with store-bought or homemade fruit cocktail. The cake bakes up tender and fluffy, while the fruit adds bursts of sweet-tart flavor in every bite.
No fancy techniques are needed—just a few essential steps and a little patience for the layers to set.
What you’ll end up with is a moist, citrus-kissed cake topped with a light vanilla buttercream, garnished with fresh fruit or maraschino cherries for that retro touch. The contrast of the bright fruit against the soft vanilla layers makes this cake visually stunning as well as delicious.
It’s the perfect dessert for anyone who loves a taste of the past with a modern twist.
Serve it with a cup of Earl Grey tea or a glass of cold milk for the full 1960s experience. This cake keeps well for a few days, making it ideal for gatherings or a special treat.
Let’s bring back the magic of homemade fruit cocktail cake—one layer at a time.
Ingredients for 1960 fruit cocktail cake
Classic ingredients for a cake that tastes like nostalgia—bright fruit and tender vanilla layers.
| Ingredient | Amount | Notes |
|---|---|---|
| All-Purpose Flour 🌾 | 3 cups | Sifted for even texture |
| Granulated Sugar 🍚 | 2 cups | White or light brown |
| Unsalted Butter 🧈 | 1 cup | Room temperature, full-fat |
| Large Eggs 🥚 | 4 whole | Room temperature |
| Milk 🥛 | 1 ½ cups | Whole milk preferred |
| Vanilla Extract 🌸 | 2 tsp | Pure extract, not imitation |
| Baking Powder 🧂 | 2 tsp | Diamond Crystal preferred |
| Salt 🧂 | ½ tsp | Fine sea salt |
| Store-Bought Fruit Cocktail 🍒 | 2 cups | Drained, with juice reserved |
| Fruit Cocktail Juice 💧 | ½ cup | From drained fruit cocktail |
| Maraschino Cherries 🍒 | ½ cup | Pitted, chopped for garnish |
| Lemon Zest 🍋 | 1 tbsp | Freshly grated |
| Powdered Sugar 🍚 | 3 cups | For buttercream |
| Heavy Cream 🥛 | 1 cup | Cold, for buttercream |
| Vanilla Bean Paste 🌸 | 1 tsp | For buttercream richness |
The fruit cocktail is the heart of this recipe, so pick a high-quality jarred version—look for pieces that are plump and vibrant, not mushy. Trader Joe’s and Whole Foods carry excellent options, but any store-bought fruit cocktail will work. Drain it well, but save that juice—it adds moisture to the cake batter. The vanilla matters too: use pure extract, not imitation. For extra authenticity, add a splash of orange juice to the batter for that classic citrus note. The butter should be room temperature—press it gently to test.
No store-bought fruit cocktail? Mix canned pineapple, mandarin orange segments, and maraschino cherries yourself. Short on vanilla? Almond extract at half the amount works in a pinch. The buttercream can be made ahead—just whip it up and refrigerate until ready to use. For a lighter frosting, fold in whipped cream instead of heavy cream. If you want to skip the buttercream entirely, a dusting of powdered sugar gives that retro look. The cake layers can be baked a day ahead—they actually taste better after resting overnight.
This cake keeps beautifully for 4-5 days at room temperature, wrapped tightly in plastic. For longer storage, freeze the layers (unfrosted) for up to 3 months. Bring to room temperature before assembling. The buttercream can be refrigerated for 5 days or frozen for 3 months. Garnish with fresh fruit or extra cherries just before serving—it adds that final retro touch. Serve with a cup of Earl Grey tea for the full 1960s experience.
Why You’ll Love This Recipe
- No Mixer Needed: I swear by this recipe because it’s a classic hand-mixed cake—no stand mixer required. Creaming butter and sugar by hand gives those tender crumbs, and the eggs and milk blend in smooth as silk with just a whisk and a bowl. Honestly, it’s the kind of recipe that lets you chat with the kids or scroll through your phone while it comes together.
- Fruit Cocktail Magic: That jarred fruit cocktail isn’t just nostalgia—it’s the secret weapon. The mix of pineapple, cherries, and grapes soaks into the cake, turning every bite into a burst of tangy-sweet flavor. Between us, the butter and sugar combo makes the cake rich enough to stand up to the fruit’s brightness, so it’s never cloying or one-note.
- Birthday Party Ready: This cake is my go-to for celebrations because it’s effortless but feels special. The simple vanilla frosting (just powdered sugar and milk) lets the fruit shine, and it slices neatly for cupcakes or a whole sheet cake. I’ll be real: my nephew’s third birthday cake was this one, and he didn’t even notice it wasn’t store-bought.
- Budget-Friendly Staples: Flour, sugar, butter—these are pantry basics that won’t break the bank. The recipe stretches easily for leftovers (trust me, it keeps well for days), and the fruit cocktail means no last-minute grocery runs. It’s the kind of dessert that makes you feel like you’re treating people without the stress or cost of a fancy bake.
Step-by-step instructions for 1960s fruit cocktail cake
This classic layer cake delivers perfect texture and nostalgic flavor with simple techniques.
🍳 Step 1: Prepare the Cake Batter
Preheat your oven to 350°F and grease three 9-inch round cake pans with butter, then line the bottoms with parchment paper. In a large mixing bowl, cream together the 1 cup unsalted butter and 2 cups granulated sugar on medium speed until light and fluffy, about 3-5 minutes. You’ll see the mixture nearly double in volume and become pale.
Add the 4 whole large eggs, one at a time, mixing well after each addition. Then stir in the 1.5 cups milk, 2 teaspoons vanilla extract, and 1 tablespoon lemon zest until fully combined. In a separate bowl, whisk together the 3 cups all-purpose flour, 2 teaspoons baking powder, and 0.5 teaspoon salt. Gradually fold the dry ingredients into the wet mixture just until combined—don’t overmix.
🍳 Step 2: Drain and Fold in Fruit
Drain the 2 cups store-bought fruit cocktail in a colander, pressing gently to remove excess liquid. Reserve 0.5 cup fruit cocktail juice and set aside. Chop 0.5 cup maraschino cherries into small pieces. Gently fold the drained fruit and chopped cherries into the cake batter, being careful not to deflate the mixture.
Divide the batter evenly among the prepared cake pans. Smooth the tops with a spatula and bake for 25-30 minutes, or until a toothpick inserted into the center comes out clean. Real talk: your oven might run hot, so start checking at the 20-minute mark. Let the cakes cool in the pans for 10 minutes, then transfer to a wire rack to cool completely.
🥘 Step 3: Make the Vanilla Buttercream
While the cakes cool, beat the 1 cup cold heavy cream in a chilled mixing bowl until soft peaks form. In a separate bowl, combine the 3 cups powdered sugar and 1 teaspoon vanilla bean paste. Gradually add the powdered sugar mixture to the cream while beating on low speed until fully incorporated.
Increase the speed to medium and beat for 2-3 minutes until the buttercream is light and fluffy. If it’s too thick, add 1-2 tablespoons reserved fruit juice to reach a smooth, spreadable consistency. This buttercream should be thick enough to hold its shape but still pipe smoothly.
🥘 Step 4: Assemble the Cake
Level the tops of the cooled cakes if needed, then place one layer on a cake stand or plate. Spread a generous layer of vanilla buttercream on top, then repeat with the remaining two layers. For that classic 1960s look, pipe additional buttercream around the edges of the cake to create a decorative border.
Press the drained fruit cocktail pieces decoratively on top of the buttercream. You can arrange them in a circular pattern or simply scatter them for a more casual look. Chill the assembled cake in the refrigerator for at least 1 hour before serving to allow the flavors to meld and the buttercream to set properly.
Pro Tips For Making 1960 Fruit Cocktail Cake
- Cream Butter Properly: DESCRIPTION: Don’t just mix the butter and sugar—beat them until they’re pale and fluffy, about 3-5 minutes. I used to rush this, and the cake turned dense. The butter needs to fully incorporate air, or you’ll end up with a heavy, brick-like texture.
- Sift the Flour Twice: DESCRIPTION: Yes, even if the recipe doesn’t say it. Sift the flour before mixing it with the dry ingredients, then sift it again when folding it in. This prevents lumps and ensures the cake rises evenly—no one wants a cake with hidden pockets of dry flour.
- Don’t Overmix the Batter: DESCRIPTION: Stop mixing as soon as the flour disappears. Overmixing develops gluten, which makes the cake tough. Fold in the dry ingredients just until combined—like a few turns of a spoon. Trust me, your cake will thank you.
- Use Room-Temp Eggs: DESCRIPTION: Cold eggs make the batter curdle or separate. Let them sit in warm water for 5 minutes before cracking them in—no need for a full room-temperature wait. The cake will be smoother and more stable in the oven.
Pro cooking tips for great 1960 fruit cocktail cake
Batter Consistency
For the perfect 1960s texture, fold the fruit cocktail into the batter gently—think “just until combined” to avoid deflating those airy vanilla bubbles. Overmixing here turns your tender cake into a dense brick.
I like to use a rubber spatula and lift the batter from the bottom of the bowl to keep it light. The reserved fruit juice (about ½ cup) adds moisture without making the batter runny. 💛
Layering Like a Pro
Use a serrated knife to level the cake layers if needed—uneven tops make stacking messy. Place each layer on a wire rack before frosting to prevent sogginess. Spread the buttercream evenly, leaving a ½-inch border for the fruit garnish.
This prevents the fruit from sinking into the cake during chilling. For extra stability, I freeze the cake for 10 minutes before adding the final fruit topping.
Fruit Placement Tricks
Arrange the fruit cocktail pieces in a circular pattern on top for that vintage appeal, or scatter them randomly for a rustic look. Press them gently but firmly—they should stay put during transport.
For added flair, add a ring of chopped maraschino cherries around the edge before chilling. This creates a stunning visual contrast against the pale vanilla frosting.
Buttercream Perfection
Chill your mixing bowl and beaters before whipping the buttercream to prevent melting. If your frosting is too thick, add reserved fruit juice 1 tablespoon at a time—it’s more hydrating than milk.
For a smoother finish, sift the powdered sugar before mixing. This buttercream should hold its shape when piped but still be spreadable—like a cloud you can shape with your hands.
Oven Temperature Tips
Every oven behaves differently, so start checking for doneness at 20 minutes instead of waiting the full 25-30 minutes. A toothpick should come out clean, but the cake should spring back when gently pressed.
If the edges brown too quickly, cover them loosely with aluminum foil after 15 minutes. The goal is a golden dome with a tender crumb—no dry edges!
Chilling for Stability
Never skip the 1-hour chilling before serving—this lets the buttercream set properly and prevents messy crumbs. For a firmer cake, chill for 2 hours if serving in warm weather. I also recommend wrapping the cake in plastic wrap after chilling to keep it fresh for up to 3 days**.
The flavors actually deepen overnight, making it taste even better the next day. ✨
Nutrition facts
Frequently asked questions
Can I substitute fresh fruit for the canned fruit cocktail?
Yes, but you’ll need to adjust the preparation. Use a mix of diced pineapple, mandarin oranges, and peaches (about 2 cups total) in place of the canned fruit cocktail. Toss them in a little lemon juice to prevent browning, then drain well before folding into the batter. Fresh fruit adds more natural moisture, so you may need to reduce the reserved juice by 1-2 tablespoons to balance the batter consistency.
Why does my cake turn out dense instead of light and fluffy?
Overmixing the batter is the #1 culprit—fold the dry ingredients just until combined to avoid developing gluten. Another common issue is underbaking: check for doneness at 20 minutes (a toothpick should come out clean). Also ensure your butter and eggs are at room temperature, and don’t skip the chilling step before frosting—this prevents a gummy texture. For extra fluffiness, sift the flour before measuring.
How can I make this cake gluten-free?
Replace the 3 cups all-purpose flour with a 1:1 gluten-free baking flour blend (like Bob’s Red Mill) plus 1 teaspoon xanthan gum. Use ½ cup extra milk to compensate for reduced moisture in GF flours, and increase the baking powder to 2.5 teaspoons. Chill the batter 30 minutes before baking for better rise. Note: texture will be slightly denser, but still delicious!
Can I bake this cake in a different pan size?
For a 2-layer cake, use two 9-inch pans and reduce baking time to 20-25 minutes. For a single 10-inch layer, increase batter by 30% and bake 30-35 minutes. Always adjust oven racks to the middle position and check for doneness 5 minutes early—smaller pans bake faster. If using non-round pans, aim for 2-inch depth for even baking.
What’s the best way to store leftovers?
Wrap individual layers tightly in plastic wrap and store at room temperature for 2 days. For longer storage, freeze layers (unfrosted) for up to 3 months. To serve, thaw overnight in the fridge, then reassemble with fresh buttercream. The cake actually improves after 24 hours—the flavors meld beautifully! For the frosting, refrigerate for up to 5 days or freeze for 3 months.

- 12 Bean Chili Recipe: Hearty Slow-Cooked Depth With 12 Legumes - October 17, 2026
- 5 Seed Bread Recipe: Nutty Crunch and Artisan Flavor in One Loaf - October 17, 2026
- 1 Lb Macaroni Salad Recipe: Bold, Crunchy, and Crowd-Pleasing - October 17, 2026