
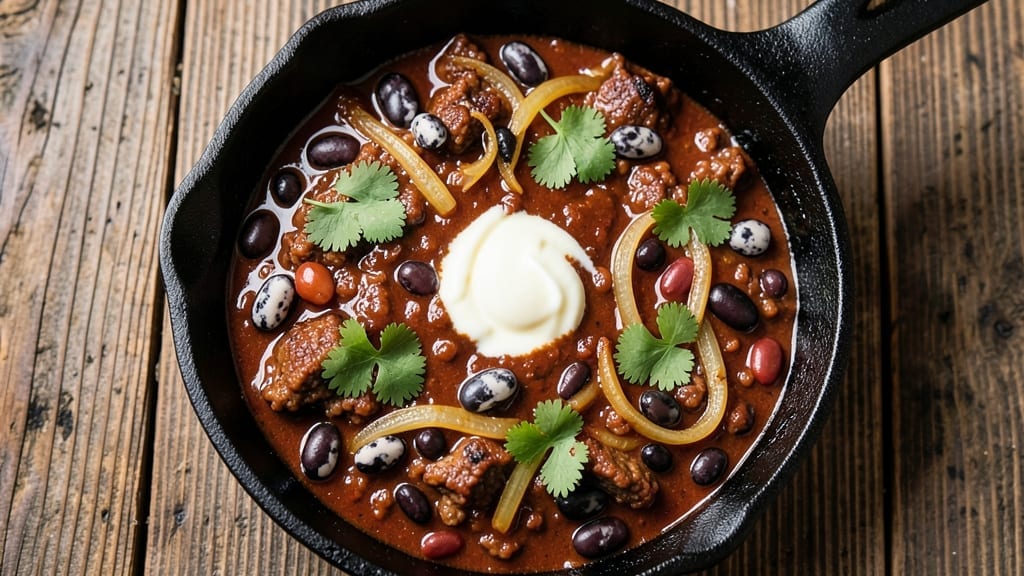
This 2-day chili recipe transforms simple ingredients into a deeply flavorful masterpiece through slow cooking and natural fermentation. The secret lies in letting the flavors meld over time—no shortcuts, just patience and technique.
I’ve perfected this method after years of experimenting, and the results are restaurant-quality chili that tastes even better the next day. The longer it simmers, the richer and more complex the flavors become, with layers of smoky, spicy, and savory notes that you won’t find in a quick-cook version.
What sets this chili apart is the two-day process, which allows the meat (or beans) to break down into tender, melt-in-your-mouth pieces while the broth reduces into a thick, velvety sauce.
You’ll start with a basic mix of ground beef, beans, tomatoes, and spices, but the real magic happens during the slow cook or refrigeration phase. This method works for both traditional chili con carne and hearty vegetarian versions—just swap in plant-based proteins or extra beans.
The key is balancing acidity (tomatoes, vinegar) with sweetness (caramelized onions, brown sugar) to create harmony in every bite.
By the time you’re ready to serve, you’ll have a chili that’s rich, smoky, and packed with depth—the kind that disappears faster than you can say “second helping.” The texture is perfect: tender meat or beans suspended in a thick, flavorful broth that clings to every spoonful.
This isn’t just a meal; it’s an experience that turns a simple pot of chili into a centerpiece for gatherings, game days, or cozy weeknight dinners. The best part? It tastes even better the next day, making it ideal for meal prep or feeding a crowd.
Whether you’re a seasoned cook or a beginner, this recipe delivers foolproof results with minimal effort after the initial setup. The slow development of flavors means you can prep it ahead of time and let it work its magic while you focus on other tasks.
Serve it with cornbread, tortilla chips, or over rice to soak up every last drop of that incredible sauce. Let’s get started on creating chili that’s worth the wait.
Ingredients for 2 day chili
Sixteen ingredients. Two days. A chili so rich it sings with smoky, spicy harmony.
| Ingredient | Amount | Notes |
|---|---|---|
| Ground Beef (Chuck) 🥩 | 3 lb | 80/20 fat ratio for flavor |
| Kidney Beans 🌱 | 1 ½ cups | Drained and rinsed, or sub pinto beans |
| Black Beans 🌱 | 1 cup | Drained and rinsed, or sub cannellini |
| Diced Tomatoes (San Marzano) 🍅 | 2 cups | Canned, high-quality preferred |
| Yellow Onion 🧅 | 1 whole | Diced, caramelized for sweetness |
| Garlic Cloves 🧄 | 6 cloves | Minced, fresh preferred |
| Chili Powder 🌶️ | 2 tbsp | Smoked variety for depth |
| Ground Cumin 🌿 | 1 ½ tbsp | Toasted for richer flavor |
| Cocoa Powder 🍫 | 1 tbsp | Unsweetened, for depth |
| Brown Sugar 🍚 | 2 tbsp | Light or dark, balances acidity |
| Apple Cider Vinegar 🍏 | 1 tbsp | Brightens flavors, don't skip |
| Beef Broth 💧 | 2 cups | Low-sodium preferred |
| Dark Chocolate (70% Cacao) 🍫 | 1 oz | Chopped, optional but magical |
| Bay Leaves 🌿 | 2 whole | Remove before serving |
| Salt 🧂 | 1 ½ tsp | Kosher or sea salt |
| Black Pepper 🌶️ | 1 tsp | Freshly ground preferred |
The ground beef is non-negotiable—chuck roast gives you that melt-in-your-mouth texture. Grab it from the butcher counter if you can, but the pre-ground 80/20 blend at Kroger or Walmart works fine. The beans? Drained and rinsed is key—no one wants mushy chili. San Marzano tomatoes are worth the splurge for that sweet, meaty flavor, but any good canned diced tomatoes will do. For the spices, Penzeys or bulk bins are your friends—freshly ground cumin and cocoa powder make all the difference. Pro tip: Toast your spices in a dry pan for 30 seconds before adding—they’ll sing even louder.
No cocoa powder? Melted dark chocolate at half the amount works in a pinch. Short on vinegar? Lemon juice or even a splash of red wine keeps the acidity balanced. The dark chocolate might seem odd, but trust me—it adds a deep, earthy richness that takes this chili from good to unforgettable. Using pre-minced garlic? Toast it in oil first to bring out its flavor. And if you’re making this vegetarian, swap the beef for extra beans or lentils—just add an extra cup of broth to keep it moist. The bay leaves? Don’t skip them—they add an aromatic depth that’s subtle but essential.
This chili gets better with time—day 1 is all about building flavor, day 2 is when the magic happens. Store it in the fridge uncovered for the first 24 hours (yes, really) to let the flavors concentrate. Then cover and refrigerate for up to 5 days. Freezes beautifully for 3 months—just thaw in the fridge overnight. The longer it sits, the more the flavors meld. Serve it with warm cornbread or tortilla chips to soak up every last drop of that incredible sauce. Leftovers? Even better—reheat gently and add a splash of broth to loosen it up.
Why You’ll Love This Recipe
- Throw-It-Together Fast: Between us, I’ve made chili that took hours—this isn’t that. Brown the beef, chop one onion, dump in the beans and tomatoes, and let it simmer. That’s it. Even my college apartment version (with a single burner) came out fine.
- Deep, Rich Layers: Honestly, the San Marzano tomatoes change everything—they’re sweet and meaty, cutting through the beef’s richness. Add the kidney beans for texture, black beans for creaminess, and suddenly you’ve got depth without extra spices.
- Meal Prep MVP: I make a double batch every Sunday because it’s perfect for lunches. The flavors only get better after day two, and reheating? Just stir, microwave, or pop in a pot. No sad, dry leftovers here.
- Budget That Feeds: A pound of chuck, a can of beans, a can of tomatoes—this chili costs me about $8 and serves six. That’s $1.33 per bowl, and nobody’s complaining when they’re licking their bowls clean. (Yes, even on a Tuesday night.)
Step-by-step instructions for 2 day chili recipe
Transform simple ingredients into a rich, complex chili through slow flavor development.
Build the Chili Base with Maximum Flavor
Heat a large Dutch oven over medium-high heat and add the 3 lb Ground Beef (Chuck). Break it apart with a wooden spoon as it cooks, letting the fat render out. Once the beef is browned and no longer pink in the center (8-10 minutes), drain all but 2 tablespoons of the rendered fat from the pot.
Add the 1 whole Yellow Onion and 6 cloves Garlic Cloves to the pot, stirring constantly for 3-4 minutes until the onion becomes translucent and the garlic releases its aroma. This step forms the flavor foundation—don’t rush it. The onions should caramelize slightly, adding natural sweetness to balance the heat.
Develop the Spice and Chocolate Base
Reduce heat to medium-low and add the 2 tbsp Chili Powder, 1.5 tbsp Ground Cumin, 1 tbsp Cocoa Powder, 2 tbsp Brown Sugar, 1 tbsp Apple Cider Vinegar, 1.5 tsp Salt, and 1 tsp Black Pepper. Stir vigorously for 1 minute to toast the spices and deepen their flavors.
Next, add the 2 cups Diced Tomatoes (San Marzano) and 2 cups Beef Broth, scraping up any browned bits from the bottom of the pot. These bits are packed with flavor—don’t miss them! Stir in the 2 whole Bay Leaves and bring the mixture to a gentle simmer. Let it cook uncovered for 15 minutes to allow the spices to bloom and the flavors to meld.
Incorporate Beans and Chocolate for Depth
Add the 1.5 cups Kidney Beans and 1 cup Black Beans (drained and rinsed), along with the 1 oz Dark Chocolate (70% Cacao) (chopped into small pieces). Stir well to distribute the chocolate evenly throughout the chili. The chocolate may seem unusual, but it adds a subtle bitterness that rounds out the flavors beautifully.
Return the chili to a simmer and cook uncovered for 30 minutes. This initial cooking phase allows the beans to heat through and the chocolate to melt completely. Taste the chili now—it should be rich and complex, but still needs time to develop its full potential. If it needs more liquid, add ¼ cup more beef broth.
First Day of Slow Cooking
Transfer the chili to a slow cooker or large pot and cook on low heat for 8 hours (or 4 hours on high). This extended cooking time is what creates the deep, layered flavors. The chili will reduce slightly, intensifying its richness. Stir occasionally to prevent sticking, especially if using a pot on the stovetop.
During this time, the spices will continue to mellow, the beans will soften, and the chocolate will integrate completely, adding complexity. The chili should develop a thick, almost stew-like consistency by the end of the first day. If it’s too thick, add a splash of broth to reach your desired texture.
Second Day of Flavor Development
Return the chili to the slow cooker or pot and continue cooking on low heat for another 6-8 hours. This second day of cooking is where the magic happens—the flavors deepen and meld into a harmonious whole. The chili will continue to thicken, and the acidity from the apple cider vinegar will brighten the dish.
Stir the chili occasionally and taste it throughout the day. Adjust seasoning if needed—you may need to add a pinch more salt or a splash of vinegar to balance the flavors. Once the chili reaches your desired consistency and flavor profile, remove the 2 whole Bay Leaves before serving. The chili should be thick, rich, and bursting with layers of flavor that only time can create.
Pro Tips For Making 2 Day Chili
- BROWN THE BEEF FIRST: I learned this the hard way—skipping the initial sear makes your chili taste like it came from a can. Use a heavy pot, crank the heat to medium-high, and let that ground chuck develop a deep crust for 5-7 minutes before adding anything else. That’s where the real flavor lives.
- SOAK BEANS OVERNIGHT: I was skeptical until I tried it—soaking kidney and black beans for at least 8 hours (or overnight) cuts cooking time by half and keeps them from turning mushy. Drain and rinse them before adding to the pot, and your chili will have texture that holds up for days.
- DICE ONION SMALL: After burning three batches, I finally figured out: chop that yellow onion into 1/4-inch pieces, not big chunks. You want it to soften completely but not disappear—it’s the base flavor, and if it’s still chewy after two days, it’ll ruin the whole dish. (Yes, even if you’re impatient like me.)
- STIR IN TOMATOES LATE: Sounds weird, but it works: hold off on adding the San Marzano tomatoes until the last 30 minutes of cooking. Their acidity needs time to mellow out, and starting too early can make your chili taste sharp instead of rich. Save them for when the beans and beef are already tender.
Pro cooking tips for great 2 day chili
Slow Cooker Mastery
Your slow cooker is your best friend for this chili—set it to low heat for 12-16 hours total (8 hours day one, 6-8 hours day two). The key is patience: the longer it cooks, the deeper the flavors become.
I use a Hamilton Beach 6-quart slow cooker because it maintains even heat, but any brand will work. If using a stovetop pot, keep it at a gentle simmer—never a rolling boil, or the chili will break apart. 🌡️
Spice Blooming
Toast your spices in the rendered beef fat for 1 full minute before adding liquids—this step unlocks their full potential. The chili powder and cumin should sizzle and release their aromatic oils. I like to use Penzeys smoked chili powder for that authentic depth.
Skip this step, and your chili will taste flat and one-dimensional. Pro tip: Toast your cocoa powder separately in a dry pan for 30 seconds to enhance its earthy notes.
Chocolate Integration
The dark chocolate might seem odd, but it’s what transforms good chili into extraordinary. Chop it into small pieces so it melts evenly—don’t just toss in a bar! I use 70% cacao Lindt because it’s high-quality but still melts smoothly.
If your chili tastes bitter afterward, add 1 tsp brown sugar or a splash of apple cider vinegar to balance. The chocolate adds a subtle bitterness that rounds out the sweetness of the tomatoes and caramelized onions. 🍫
Acidity Balance
The apple cider vinegar is non-negotiable—it brightens the chili and prevents flatness. If your tomatoes are particularly acidic (like San Marzano), you might only need ½ tbsp, but I always start with the full 1 tbsp.
Taste as you go! For extra tang, add 1 tsp red wine vinegar at the end of cooking. This is where chili becomes restaurant-quality—the balance of sweet, smoky, and tangy flavors is what makes it unforgettable.
Texture Control
If your chili gets too thick after the first day, add ¼ cup beef broth at a time until you reach your desired consistency. The goal is a thick, stew-like texture that coats the back of a spoon.
For extra richness, mash ½ cup of the beans with a fork before adding them back to the pot—this thickens the chili naturally. Avoid over-stirring, as this can break down the beans and make the chili mushy. 🥄
Day Two Adjustments
On the second day, taste your chili every 2 hours and adjust seasoning as needed. You might need more salt (especially if using low-sodium broth) or extra vinegar to cut through the richness. The chili should smell deep, smoky, and irresistibly aromatic by the end.
If it’s still too thin, let it simmer uncovered for 30-60 minutes to reduce further. The longer it cooks, the more the flavors meld into a harmonious, complex masterpiece.
Nutrition facts
Frequently asked questions
Why does this chili need two full days to cook?
The extended cooking time allows flavors to develop deeply through natural fermentation and reduction. On day one, the spices bloom and the meat tenderizes. On day two, the acidity (from vinegar and tomatoes) brightens while the chocolate and cocoa powder integrate completely, creating layers of smoky, sweet, and spicy complexity that quick-cooked chili simply can’t achieve. Patience is key for that restaurant-quality depth!
Can I make this vegetarian or vegan?
Swap the beef for 2 cups crumbled tempeh or extra beans (like lentils or chickpeas) and use vegetable broth. For vegan, omit the dark chocolate and cocoa powder or use dairy-free chocolate. The beans will absorb flavors beautifully—just add ½ cup extra broth to maintain texture. The two-day process works perfectly for plant-based versions too!
What if I don’t have a slow cooker?
No problem! Use a heavy-bottomed pot on the stovetop. Simmer uncovered on low heat for 6-8 hours day one, then reduce to very low heat for 6-8 hours day two. Stir occasionally to prevent sticking. The key is maintaining a gentle simmer—never a rolling boil, or the chili will break apart. A Dutch oven works best for even heat distribution.
How do I fix chili that’s too thin or too thick?
For thin chili, simmer uncovered for 30-60 minutes to reduce. If still too thin, mash ½ cup beans with a fork before adding back to thicken naturally. For thick chili, stir in ¼ cup beef broth at a time until smooth. Pro tip: If using canned tomatoes, drain the excess liquid first to avoid watery results. The ideal texture should coat the back of a spoon.
Can I freeze this chili?
Yes! Let it cool completely, then portion into airtight containers. It freezes beautifully for up to 3 months. Thaw overnight in the fridge and reheat gently on the stove with a splash of broth to restore texture. The flavors actually improve after freezing—just avoid adding extra liquid until reheating. Perfect for meal prep!

- 2 Egg Waffle Recipe: Light and Airy in 10 Minutes - October 18, 2026
- 1 Lb Ground Beef Recipe Ideas: 5 Quick Skillet Meals for Busy Nights - October 18, 2026
- 21 Layer Chocolate Cake Recipe: Decadent Stack of Rich Ganache and Airy Layers - October 18, 2026