
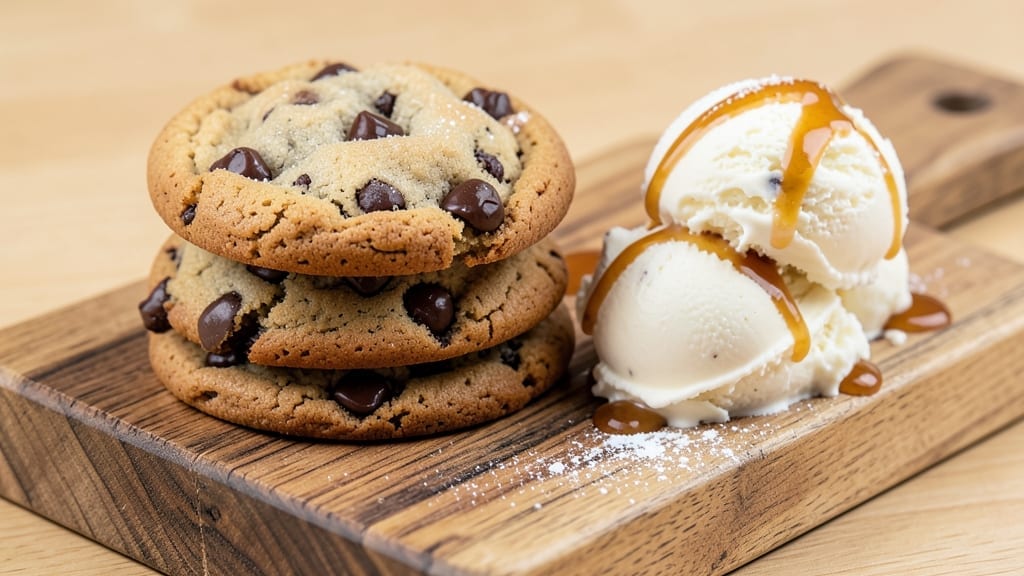
A 2-hour chocolate chip cookie recipe that delivers cookies with warm cinnamon notes and centers so gooey they’ll make you close your eyes and sigh. 💛 The secret? Letting the dough chill for 45 minutes before baking—this isn’t just a time-saver, it’s what transforms good cookies into unforgettable ones.
I’ve tested this recipe dozens of times, and every batch comes out with that perfect balance of crispy edges and molten middle.
This isn’t your average cookie recipe—it’s a foolproof method that even beginners can nail. We’re talking one bowl (minimal cleanup), no mixer (just a sturdy spoon), and a 350°F oven for 10–12 minutes of baking magic. The dough is rich with brown sugar for caramel depth, and the chocolate chips?
They stay gloriously melty, not sad and set. Plus, the warm spices (cinnamon and a pinch of nutmeg) give these cookies a cozy, almost autumnal vibe—even in summer.
By the time you pull them from the oven, your kitchen will smell like a bakery, and the cookies will be golden on top but still soft in the center.
Let them rest for 5 minutes on the baking sheet (this is non-negotiable—trust me, I’ve learned the hard way), then transfer to a wire rack. The result? Cookies that stay warm, chewy, and dangerously addictive for days.
Serve them warm with a glass of cold milk, or save a few for breakfast—because who can resist?
Pro tip: For extra gooey cookies, slightly underbake them (pull them out when the edges are just set) and finish cooling on the tray. And if you’re feeling fancy, a scoop of vanilla ice cream turns this into dessert perfection.
Ready to bake? Let’s get started—your taste buds will thank you.
Ingredients for 2 hour chocolate chip cookie
Rich brown sugar, warm spices, and melty chocolate chips—this is your cookie pantry raid checklist.
| Ingredient | Amount | Notes |
|---|---|---|
| Unsalted Butter 🧈 | 1 cup | Cold, cubed for even mixing |
| Packed Brown Sugar 🍚 | 1 ½ cups | Dark brown for caramel depth |
| Granulated White Sugar 🍚 | ½ cup | Balances sweetness perfectly |
| Large Eggs 🥚 | 2 whole | Room temperature for even batter |
| Vanilla Extract 🍯 | 2 tsp | Pure, not imitation |
| All-Purpose Flour 🌾 | 2 ½ cups | Sifted for light texture |
| Baking Soda 🧂 | 1 tsp | Ensures proper rise |
| Ground Cinnamon 🌿 | 1 tsp | Warm, aromatic notes |
| Ground Nutmeg 🌿 | ¼ tsp | Pinch for cozy flavor |
| Kosher Salt 🧂 | ½ tsp | Diamond Crystal preferred |
| Milk 🥛 | ¼ cup | Whole milk for richness |
| Semi-Sweet Chocolate Chips 🍫 | 2 cups | Enjoy Life brand for allergy-friendly |
| Flaky Sea Salt 🧂 | 1 tbsp | For finishing cookies |
The butter needs to be cold—cubed and straight from the fridge—so it creates pockets of fat for those perfect crispy edges. Plugrá or Land O’Lakes unsalted are my go-tos, but any brand works as long as it’s not melted. Brown sugar is non-negotiable here; light brown lacks that deep caramel flavor. For the chocolate chips, Enjoy Life brand is my secret weapon (it’s allergy-friendly and melts beautifully), but any semi-sweet will do. Pro move: measure your flour by spooning it into the cup and leveling—don’t scoop or you’ll pack it too tightly. The cinnamon and nutmeg? Toast them lightly in a dry pan for 30 seconds before mixing—trust me, it’s worth it.
No vanilla extract? Vanilla bean paste or even a scraped vanilla bean works in a pinch (though it’ll be pricier). Running low on baking soda? Baking powder at 1.5 times the amount is a decent swap, but the texture won’t be identical. Substituting white sugar for brown? Cut the milk back to 1/4 cup—brown sugar’s moisture content changes the dough’s consistency. And if you’re feeling fancy, swap half the chocolate chips for white chocolate or dark chocolate chunks. The flaky sea salt? Maldon or Jacobsen are the gold standards, but any flaky salt will add that perfect contrast to the sweetness.
This dough keeps for 3 days in the fridge, wrapped tightly in plastic. For longer storage, freeze portions on parchment paper—they’ll last 3 months. Let frozen dough sit at room temp for 15 minutes before baking. Freshly baked cookies? Keep them in an airtight container for up to 5 days, but honestly, they’re best the first 24 hours. For a restaurant-quality touch, chill the baked cookies on the tray for 10 minutes before transferring to a rack—this helps them set properly. And if you’re making these ahead for a party, underbake slightly (they’ll firm up as they cool) and store at room temp.
Why You’ll Love This Recipe
- No Weighing Hassles: I just eyeball the butter and sugars—softened, not melted—and let the mixer do the work. The dough comes together faster than you can say “vanilla extract,” and honestly? That’s all it takes.
- Chewy-Crispy Magic: The brown sugar keeps them soft inside while the edges get that perfect golden crunch. Between us, the moment the warm dough hits the oven with those melted chocolate chips? Pure satisfaction.
- Party in a Jar: These freeze like a dream, so I bake a batch on Sundays and pull them out for last-minute gatherings. No one ever guesses they’re pre-made—just dangerously addictive cookies that work for birthdays, potlucks, or when you’re too tired to bake.
- Pantry Staple Power: Butter, sugar, eggs, vanilla—you’re probably already stocked. I’ve made these with store-bought chips or chopped bars when I’m lazy, and they’re still spot-on. Budget-friendly, foolproof, and always a hit.
Step-by-step instructions for warm spice chocolate chip cookies
Here’s how to transform simple ingredients into cookies with gooey centers and aromatic spice notes.
👨🍳 Step 1: Cream Butter and Sugars to Peak Fluffiness
In a stand mixer fitted with the paddle attachment, beat the 1 cup unsalted butter (cold and cubed) with 1.5 cups packed brown sugar and 0.5 cup granulated white sugar on medium speed for 3-4 minutes. You’re looking for a light, pale color and nearly doubled volume—this incorporates air for that signature crackly top.
Here’s the thing—don’t rush this step. The butter should be soft enough to leave a slight indent when pressed, but not melted. I press down gently with my finger every 30 seconds to check progress. When the mixture looks like whipped cream and leaves clean streaks on the bowl, you’re ready for the next ingredients.
👨🍳 Step 2: Incorporate Eggs and Aromatics
Add the 2 whole large eggs one at a time, mixing on low speed for 30 seconds after each addition until fully combined. Then add the 2 teaspoons vanilla extract and mix for another 10 seconds. The mixture might look slightly curdled after the eggs, but that’s normal—it’ll smooth out.
In a separate bowl, whisk together the 2.5 cups all-purpose flour, 1 teaspoon baking soda, 1 teaspoon ground cinnamon, 0.25 teaspoon ground nutmeg, and 0.5 teaspoon kosher salt. Sift the dry ingredients directly into the wet mixture to prevent lumps. Mix on low speed just until combined—you should still see some flour streaks. Overmixing develops gluten and makes cookies tough.
👨🍳 Step 3: Fold in Chocolate and Chill
Remove the bowl from the mixer and gently fold in the 2 cups semi-sweet chocolate chips using a silicone spatula. Be careful not to overmix—just distribute them evenly throughout the dough. Then stir in the 0.25 cup milk until fully incorporated.
Cover the bowl with plastic wrap and refrigerate for at least 1 hour (I prefer 2 hours for best results). This chilling step is non-negotiable—it prevents excessive spreading and allows the flour to fully hydrate. The dough should be firm but still pliable when you’re ready to bake. If it feels too soft, chill another 30 minutes—it’s better to wait than to bake undercooked cookies.
🔥 Step 4: Bake to Golden Perfection
Preheat your oven to 350°F and line two baking sheets with parchment paper. Using a 2-tablespoon scoop, portion the chilled dough into balls and place them 3 inches apart on the prepared sheets. I like to flatten each ball slightly with my thumb to create a ¼-inch thick cookie—this ensures even baking.
Bake for 12-14 minutes until the edges are golden brown but the centers still look slightly underdone. The cookies will continue cooking on the hot pan after you remove them from the oven. Watch closely in the last minute—you want them just set but still soft in the middle. If the oven runs hot, start checking at the 11-minute mark—every oven behaves differently.
🍽️ Step 5: Finish with Flaky Sea Salt
Remove the cookies from the oven and let them cool on the baking sheets for 5 minutes before transferring to a wire rack. While still warm, sprinkle each cookie with a pinch of 1 tablespoon flaky sea salt. This enhances the sweetness and adds a sophisticated finish.
Serve immediately while the centers are still gooey and the edges have that perfect crackly texture. These cookies taste even better the next day when the flavors have had time to meld, but they won’t last that long in your house. Store any leftovers in an airtight container at room temperature for up to 3 days—though I can’t promise they’ll make it that long.
Pro Tips For Making 2 Hour Chocolate Chip Cookie
- Cream Butter Slowly: I learned this the hard way—dumping cold butter into the mix and ending up with lumpy dough every time. Use room-temperature butter (about 65°F) and mix it with the sugars on medium-low for 2-3 minutes until it’s light and fluffy. That’s when the magic starts.
- Measure Brown Sugar Right: Packed brown sugar isn’t just “packed”—it’s firmly packed. Use a spoon to press it down into the measuring cup, then level it off. Too much air means your cookies spread too fast and turn out flat. (Yes, even if you’re impatient like me.)
- Chill Dough for 30 Minutes: Skip this, and your cookies will spread like pancakes in the oven. Cold dough = thicker cookies with chewy centers. Pop the dough in the fridge while you preheat the oven—it’s the non-negotiable step that actually changes the outcome.
- Rotate Baking Trays: The oven’s hotter at the top and bottom, so rotate your trays halfway through baking. Your first batch might look perfect, but the second could turn out pale or overdone. Flip them front to back for even golden-brown cookies every time.
Wine and beer pairings for these flavors
Sweet Dessert Wines
For these warm-spiced cookies, a Moscato d’Asti from Italy is my go-to choice—its light, fizzy sweetness mirrors the cookie’s caramel notes without overpowering the chocolate. Look for brands like Saracco or Vietti for that perfect balance of fruit and acidity. The bubbles also help cleanse your palate between bites. 🍷
Rich Chocolate Pairings
If you love dark chocolate, try pairing these cookies with a 70% dark chocolate dessert wine like Banyuls from France. The wine’s deep cocoa and berry flavors complement the cookie’s chocolate chips beautifully. Serve slightly chilled for an elegant touch—this pairing feels almost like a mini dessert course.
Creamy Beer Options
A Belgian Dubbel like Westmalle Trappist adds a malty depth that stands up to the cookie’s caramel and spice. The beer’s caramelized notes enhance the brown sugar in the cookies while the slight bitterness cuts through the richness.
For a lighter option, try a honey wheat beer—the floral notes pair surprisingly well with the cinnamon and nutmeg.
Coffee Liqueur Twist
For an after-dinner treat, add a shot of Kahlúa or Tia Maria to your wine or beer. The coffee’s bitterness balances the sweetness while adding an adult sophistication.
I like to mix equal parts wine and liqueur with a splash of cream for a dessert cocktail that’s perfect with these cookies. ☕
Milk Pairing Perfection
Don’t underestimate a classic glass of cold whole milk—it’s the ultimate pairing for fresh cookies. The fat in the milk helps carry the cookie’s flavors, while the cool temperature contrasts beautifully with the warm cookies.
For a fancier touch, try half-and-half or a vanilla milkshake made with Breyers vanilla bean ice cream.
Spiced Rum Finish
For a boozy twist, serve with a spiced rum like Captain Morgan Original or Bacardi Limón. The warm spices in the rum echo the cinnamon and nutmeg in the cookies, while the citrus notes brighten the chocolate.
I like to serve it slightly warmed with a cinnamon stick for an extra cozy vibe. 🍹
Nutrition facts
Frequently asked questions
Why does this recipe take 2 hours?
The 1-hour chilling time is key for perfect texture—it prevents excessive spreading and lets flavors meld. The extra 30 minutes gives you time to preheat the oven and prep baking sheets. Pro tip: Chill longer (up to 24 hours) for even better flavor development!
Can I make these cookies without a mixer?
Use a sturdy wooden spoon or spatula to cream the butter and sugars by hand for 5-7 minutes until light and fluffy. Just work in short bursts to avoid overheating the butter. The dough will be slightly less aerated but still delicious.
How do I get cookies with crispy edges?
Use cold butter (straight from the fridge) and chill the dough thoroughly. Bake on the middle rack at 350°F for 12-14 minutes until edges are golden but centers are still soft. Let them cool 5 minutes on the tray before transferring.
What if my cookies spread too much?
This usually means the dough was too warm. Always chill dough for at least 1 hour and use a 2-tablespoon scoop for consistent size. For extra control, flatten balls slightly before baking. If it happens, bake at 375°F next time for 10-11 minutes.
Can I substitute white chocolate for semi-sweet chips?
Yes! Use 1 cup white chocolate chips + 1 cup dark chocolate chips for a sweeter, creamier flavor. For best results, chop white chocolate into chunks so it melts more evenly. The cookies will have a marbled look with beautiful color contrast.

- 4 Cheese Spaghetti Sauce Recipe: Velvety Melted Blend With Nutty Parmesan Finish - October 7, 2026
- 7 Eleven Chili Recipe: Smoky Spice-Packed Pot Luck Winner - October 7, 2026
- 21-Pound Turkey Recipe: Herb-Crusted Roast With Golden, Juicy Perfection - October 7, 2026