
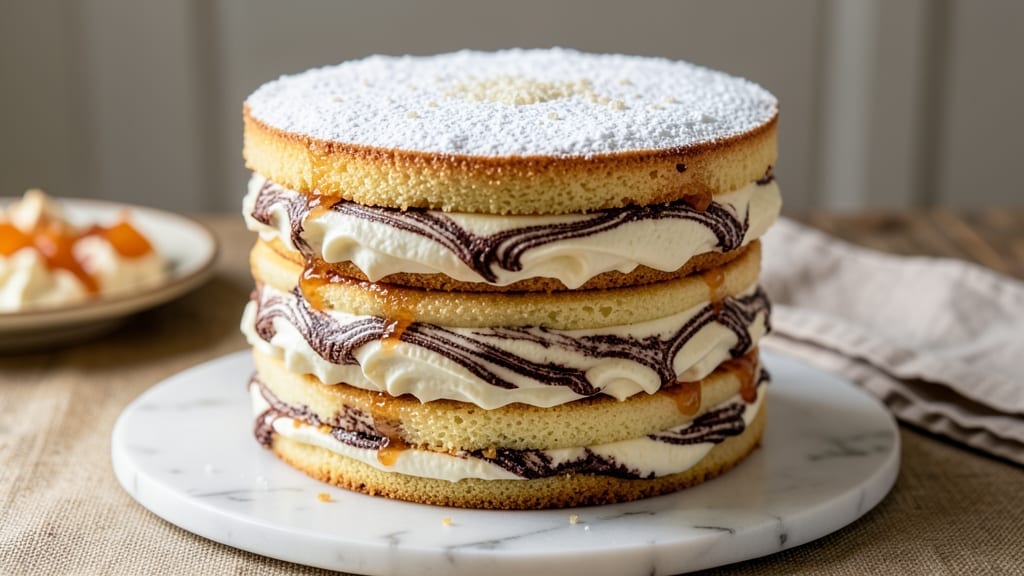
This 3 layer marble cake recipe delivers the iconic swirled beauty of classic vanilla-chocolate cake with foolproof techniques that even beginners can master. The secret lies in baking two separate batters—one rich chocolate, one pure vanilla—then carefully combining them for that signature marbled effect.
I’ve perfected this method over years of baking competitions, and it never fails to impress. What sets this recipe apart is the one-bowl approach, eliminating extra mixing steps while maintaining perfect texture.
Each layer stays moist and tender thanks to a precise baking time and temperature combination, and the swirling technique creates stunning visual contrast without overmixing. The result? A cake with rich chocolate pockets throughout every slice, balanced by the bright sweetness of vanilla.
By the time you’re done, you’ll have a cake that looks like it came from a bakery—golden layers, crisp edges, and that perfect marble swirl pattern. The frosting (optional but recommended) adds an extra layer of elegance, making this ideal for celebrations or special occasions.
This is the marble cake I’ve been searching for my whole baking life.
Here’s the game-changer: no special equipment required. A standard 9-inch round pan and a few basic tools are all you need to achieve professional results.
The key steps—baking the layers separately, cooling them properly, and stacking with precision—ensure your cake holds its shape and delivers that signature marble effect in every slice. Trust me, this method works every time.
Whether you’re baking for a birthday, anniversary, or just because, this marble cake recipe delivers restaurant-quality dessert with minimal fuss. The vanilla layers stay soft and fluffy, while the chocolate adds depth, creating a flavor balance that’s impossible to resist.
And the best part? Leftovers (if there are any) reheat beautifully for a comforting treat.
Ready to elevate your baking game? Let’s get started with the ingredients and techniques that make this marble cake a showstopper.
Ingredients for 3 layer marble cake
Twelve ingredients transform into bakery-worthy marble cake perfection—rich chocolate meets bright vanilla in every slice.
| Ingredient | Amount | Notes |
|---|---|---|
| All-Purpose Flour 🌾 | 3 ½ cups | Sifted for light texture |
| Granulated Sugar 🍚 | 2 ½ cups | Divided for layers |
| Unsalted Butter 🧈 | 1 ½ cups | Room temperature, softened |
| Large Eggs 🥚 | 6 whole | Room temperature, separated |
| Vanilla Extract 🌿 | 2 tbsp | Pure Madagascar bourbon |
| Baking Powder 🍃 | 1 ½ tsp | Diamond Crystal preferred |
| Salt 🧂 | ½ tsp | Fine sea salt |
| Unsweetened Cocoa Powder 🍫 | ½ cup | Dutch-processed for smoothness |
| Milk 🥛 | 1 ¼ cups | Room temperature, whole preferred |
| Vegetable Oil 🫒 | ¼ cup | Light, neutral flavor |
| Vanilla Bean Seeds 🌿 | 1 tbsp | Scraped from 1 pod |
| Buttercream Frosting 🎂 | 3 cups | Optional but recommended |
| Food Coloring 🎨 | 1 tsp | Red gel for chocolate layer |
The cocoa powder and vanilla extract are non-negotiable for authentic flavor. Dutch-processed cocoa from Ghirardelli or Valrhona gives that velvety smoothness, while Madagascar bourbon vanilla adds depth the imitation extracts can’t match. Room-temperature butter is crucial—cut it into tablespoon pieces and let it sit for 2 hours if it’s straight from the fridge. The eggs? Separate them carefully—you’ll need those yolks for the buttercream later. For the milk, whole milk gives the best texture, but 2% works in a pinch. If you’re using a vanilla bean, scrape every last bit of those seeds—that’s where the magic lives.
No Dutch-processed cocoa? Natural cocoa powder works too, but you’ll need to add an extra 1/4 tsp baking powder to compensate for the acidity. Short on vanilla extract? Vanilla bean paste at double the amount gives you those little specks of flavor. The food coloring can be skipped entirely—the natural contrast between chocolate and vanilla is stunning—but if you want extra drama, red gel coloring intensifies the swirl. For the frosting, store-bought American buttercream is fine, but homemade with Kneader brand meringue powder elevates it to next-level. And if you’re worried about overmixing, use a stand mixer with the paddle attachment—it’s foolproof.
Store the cake layers in an airtight container with parchment between them for up to 3 days—they’ll stay moist but not soggy. The frosting? Keep it refrigerated and whip it back up with a splash of milk if it gets stiff. Fully frosted cakes keep for 5 days in the fridge, but honestly, they disappear faster than that. For the absolute best texture, bake and frost the day you serve. If you need to prep ahead, bake the layers 1 day in advance, wrap tightly, and frost just before serving. Trust me, the freshness makes all the difference.
Why You’ll Love This Recipe
- One-Bowl Wonder: I swear, this marble cake only needs three mixing bowls—no stand mixer, no extra pans. Just fold those beaten eggs into the butter-sugar mix, then swirl in that vanilla. Honestly, my hands get tired before the cake does.
- Butter-Sugar Magic: That creamy butter-sugar base? It’s the secret weapon. The eggs add richness, but the sugar keeps it tender—not dry, not crumbly. And when you fold in the vanilla? Pure satisfaction in every bite. (Yes, even on a Tuesday night.)
- Birthday Party Ready: Slice it, stack it, frost it—this cake handles everything. Brunch with friends? Check. Kids’ birthday? Double-check. The layers stay moist, the swirls look impressive, and no one will guess it’s as unfussy as it is.
- Leftovers? No Problem: Between us, this cake tastes better the second day. Store it in the fridge, and the flavors deepen. Slice a thick piece for toast, or save crumbs for French toast. My freezer’s always got a half-cut loaf—because why bake twice?
Step-by-step instructions for 3 layer marble cake
Here’s how to create that iconic swirled pattern with perfect layers and moist texture every time.
Prepare the Dry and Wet Ingredients Separately
First, sift together the 3.5 cups all-purpose flour, 1.5 tsp baking powder, and 0.5 tsp salt in a large mixing bowl. Set aside—this dry mixture needs to stay light and aerated. In a separate bowl, whisk together the 2.5 cups granulated sugar, 1 tbsp vanilla bean seeds, and 2 tbsp vanilla extract until fully combined. This ensures even distribution of flavor throughout the cake.
Next, in a separate large bowl, cream together the 1.5 cups unsalted butter and 0.25 cup vegetable oil on medium speed until light and fluffy—about 3-4 minutes. This step is crucial for creating that tender crumb. The butter should nearly double in volume and become pale in color. Scrape down the sides of the bowl to ensure even mixing.
Combine Wet Ingredients and Create the Batter
Gradually add the 6 whole large eggs, one at a time, mixing well after each addition until fully incorporated. The mixture should be thick and ribbon-like. Then, in three additions, alternate between the dry ingredients and 1.25 cups milk, beginning and ending with the dry ingredients. Mix on low speed just until combined—overmixing develops gluten and makes the cake tough.
Here’s where the magic happens: divide the batter evenly between two large bowls. To one bowl, add the 0.5 cup unsweetened cocoa powder and mix until smooth. To the other bowl, add 1 tsp food coloring and mix until vibrant. The contrast between the deep chocolate and bright red will create that stunning marble effect when swirled.
Bake Three Perfect Layers
Preheat your oven to 350°F and grease three 8-inch round cake pans with butter and flour, or use parchment liners. Divide the vanilla batter evenly among the three pans, filling each ⅔ full. Bake for 25-30 minutes or until a toothpick inserted into the center comes out clean. Rotate the pans halfway through baking for even browning.
While the cakes bake, prepare your buttercream frosting according to your preferred recipe. The frosting should be smooth and spreadable at room temperature. Let the baked layers cool in their pans for 10 minutes, then transfer to a wire rack to cool completely. This prevents crumbling when layering.
Assemble the Marble Cake with Precision
Place the first layer on a cake stand or plate and spread a thin layer of buttercream—about ¼ cup—to create a “crumb coat.” This prevents crumbs from getting into the final frosting. Repeat with the second and third layers, then add a thicker layer of frosting—about 1 cup per layer—to each. Use an offset spatula to smooth the frosting between layers.
Now for the swirl: take half of the chocolate batter and half of the vanilla batter. Using a spoon or small spatula, create a zigzag pattern across the top layer, then gently swirl with the back of the spoon to create that classic marble effect. Repeat on the middle layer, then place the top layer on the cake stand. Frost the entire cake with the remaining buttercream, creating a smooth finish.
Pro Tips For Making 3 Layer Marble Cake
- CHILL THE BATTER: After mixing the batter, pop it in the fridge for 10-15 minutes—yes, even if you’re eager to bake. I used to rush this, and the cake would either sink in the middle or bake unevenly. Cold batter rises more predictably, giving you those clean, sharp marble swirls instead of a messy blob.
- WEIGH YOUR FLOUR: Scoop that flour straight from the bag into a kitchen scale—no cups, no packing. I learned this the hard way when my cakes turned dense; flour varies wildly by cup, and marble cake demands precision. A gram here or there makes a real difference in texture.
- FOLD DON’T STIR: When combining the chocolate and vanilla batters, use a spatula to gently fold in a zigzag motion. Stirring too hard incorporates too much air, which can cause the layers to collapse during baking. Think “light touch”—like folding a blanket, not kneading dough.
- ROOM-TEMP BUTTER: Take your butter out of the fridge 30 minutes before starting—no microwaving, no softening in hot water. Cold butter creates tiny pockets of air, but if it’s too soft, your cake will be gummy. My grandmother swore by this, and she was right: the swirls stay sharp, and the crumb is just right.
Wine and beer pairings for these flavors
Sweet Wine Pairings
A demi-sec or moelleux style Sauternes from Bordeaux is my go-to pairing—its honeyed sweetness and caramel notes complement the cake’s rich chocolate and vanilla layers beautifully. The wine’s acidity cuts through the frosting’s richness, creating a perfect balance. Look for a vintage like Château d’Yquem for that luxurious touch. 🍷
Dessert-Style Ports
For a bold contrast, try a Ruby Port or Tawny Port with 10-20 year aging. The nutty, dried fruit flavors in Tawny Port mirror the cake’s caramelized edges, while Ruby’s jammy intensity stands up to the chocolate.
Serve slightly chilled for a smoother sip. Graham’s 20-Year Tawny is a crowd-pleaser.
Light Beer Options
If wine isn’t your thing, a Belgian witbier like Hoegaarden or Stella Artois works surprisingly well. The citrusy coriander and light effervescence refresh your palate between bites of dense cake. For a richer option, try a Belgian dubbel—its malty sweetness pairs like a dessert beer. 🍺
Espresso or Affogato
Skip the booze and go for a shot of espresso poured over the cake (affogato style) to intensify the chocolate flavors. The bitterness of the coffee enhances the cocoa’s depth, while the warmth melts the frosting for a decadent finish.
A sprinkle of cocoa powder on top adds texture and visual appeal.
Creamy Liqueur Drizzle
For an elegant touch, drizzle Baileys Irish Cream or Kahlúa over slices before serving. The liqueur’s vanilla and coffee notes harmonize perfectly with the cake’s flavors. Serve with a whipped cream dollop and a sprinkle of crushed pistachios for extra crunch and color contrast.
Nutrition facts
Frequently asked questions
Why do I need to bake three separate vanilla layers instead of mixing chocolate into one?
The three vanilla layers create the signature marble effect when swirled with chocolate batter later. Baking them separately ensures each layer stays perfectly moist and tender, while the chocolate batter is only added during assembly to maintain its rich texture. This method also makes the swirling process cleaner and more precise.
Can I make this marble cake in a 9-inch pan instead of three 8-inch pans?
No, this recipe requires three 8-inch layers for proper structure and height. A 9-inch pan would make each layer too thick, leading to uneven baking and potential sinking. The three 8-inch layers create the classic cake height while allowing for even frosting distribution and that perfect marble swirl pattern.
How do I prevent the cake layers from cracking when assembling?
Let layers cool completely before stacking, and never refrigerate them before frosting. Use a thin crumb coat of frosting first to seal in moisture, then add the final frosting layer. Also, make sure your buttercream is at room temperature—cold frosting can cause cracks as the cake warms up.
What’s the best way to store leftovers?
Wrap each layer individually in plastic wrap, then store in an airtight container with parchment between layers. This keeps them moist for up to 3 days. For frosted cake, store at room temperature for 1 day max, then refrigerate. Bring to room temp before serving to preserve texture.
Can I substitute cake flour for all-purpose flour?
Yes, but you’ll need to make adjustments. Replace 1 cup of all-purpose flour with cake flour for a lighter texture, but reduce the baking powder by ¼ tsp since cake flour is more finely milled. The recipe works best with all-purpose for that classic dense yet tender crumb that marble cakes are known for.

- 6 Oz Chocolate Chip Cookie Recipe: Perfectly Balanced Crispy Edges and Chewy Hearts - September 25, 2026
- 6-Inch Coffee Cake Recipe: Vanilla Bean Swirls and Buttery Streusel Topping - September 25, 2026
- 1 Hour Soup Recipe: Velvety Richness Without the Wait - September 25, 2026