
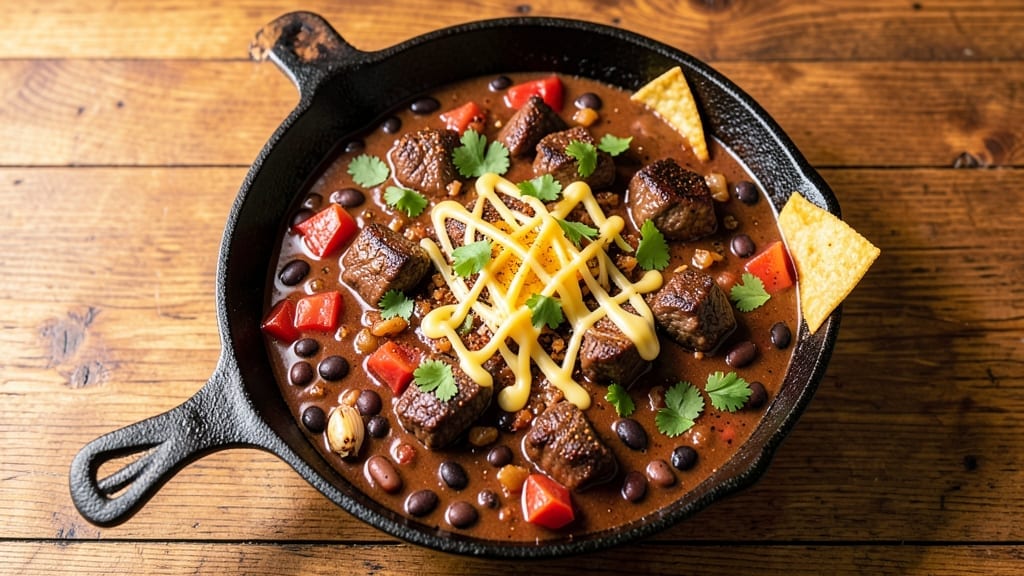
A 3 lb beef chili recipe that delivers Texas-style boldness in every spoonful transforms a simple weeknight into a hearty feast. The key lies in slow-browning the beef for deep, caramelized flavor and balancing spices to create that perfect harmony of heat and richness.
I’ve perfected this method over years of testing—where the meat becomes tender, the beans melt into the broth, and the spices develop layers of complexity that can’t be rushed.
This chili relies on a foolproof technique: searing the beef in batches to avoid crowding, then simmering everything together for hours to let flavors meld.
The result is a thick, velvety pot with chunks of tender beef, hearty beans, and a depth of smoky, spicy goodness that lingers long after the last bite. No shortcuts here—just time and patience paying off in a pot that feeds a crowd or satisfies a solo craving.
By the time you’re done, you’ll have a chili that’s rich enough to stand alone but still bright with the acidity of tomatoes and the warmth of spices. The texture is ideal—thick enough to coat a spoon, with tender beef that practically dissolves at the touch of a fork.
This is the kind of chili that makes people ask for seconds, then thirds, while you bask in the compliments.
Serve it with cornbread, shredded cheese, and sour cream for the full Texas experience, or keep it simple with a sprinkle of fresh cilantro. The beauty of this recipe is its versatility—adjust the spices to your taste, add more beans for heartiness, or stretch it into a meal-prep staple.
Let’s get cooking!
Ingredients for 3 lb beef chili
Pantry staples plus a few key ingredients for that Texas-style chili kick.
| Ingredient | Amount | Notes |
|---|---|---|
| Chuck Roast Beef 🥩 | 3 lb | Cut into 1-inch cubes |
| Yellow Onion 🧅 | 2 whole | Medium-sized, chopped |
| Garlic Cloves 🧄 | 6 cloves | Minced, fresh preferred |
| Canned Kidney Beans 🌿 | 2 cups | Drained and rinsed |
| Canned Black Beans 🌿 | 2 cups | Drained and rinsed |
| Canned Diced Tomatoes 🍅 | 2 cups | San Marzano preferred |
| Tomato Paste 🍅 | ½ cup | Smooth texture |
| Chili Powder 🌶️ | 2 tbsp | Smoked variety preferred |
| Ground Cumin 🌿 | 1 tbsp | Toasted for depth |
| Dried Oregano 🍃 | 1 tbsp | Mexican preferred |
| Cayenne Pepper 🔥 | ½ tsp | Adjust for heat |
| Salt 🧂 | 1 ½ tsp | Kosher or sea salt |
| Black Pepper 🌶️ | ½ tsp | Freshly ground |
| Beef Broth 💧 | 2 cups | Low-sodium preferred |
| Dark Brown Sugar 🍚 | 1 tbsp | Enhances depth |
The beef is non-negotiable here—chuck roast gives you that melt-in-your-mouth texture. Costco or Walmart usually have it pre-cubed, which saves time, but if you’re buying a whole roast, ask the butcher to cut it into 1-inch pieces. Look for good marbling—it’ll keep the meat juicy during that long simmer. The onions and garlic? Yellow onions have more sweetness than red, and fresh garlic always beats the jarred stuff. If you’re short on time, frozen chopped onions work just fine—no one will know.
No chili powder? Mix 1 tbsp smoked paprika + 1 tsp cumin + 1 tsp oregano as a quick swap. The beans can be any combination—kidney, black, pinto—whatever you’ve got. Trader Joe’s has great canned beans if you want to splurge, but store brands work too. For the tomatoes, San Marzano is ideal, but any good-quality canned tomatoes will do. The tomato paste? Squeeze tubes from Trader Joe’s are perfect—no waste, and they keep for ages. Want more depth? Add a dash of cocoa powder or a bay leaf while it simmers.
This chili tastes even better the next day—double batch if you can. Keeps in the fridge for 5-6 days and freezes beautifully for up to 3 months. I portion mine into containers with a sprinkle of cilantro on top—ready for lunches all week. The spices lose potency over time, so store them in airtight containers away from light. If you’re making this ahead, the flavors actually improve as they meld together over time.
Why You’ll Love This Recipe
- One-Pot Magic: I swear by this recipe—just dump everything in one pot, let it simmer, and walk away. The chuck roast practically melts into tender, flavorful chunks while the onions and garlic caramelize right into the sauce. No chopping, no fuss, no stress.
- Deep, Rich Taste: Between the slow-cooked beef and the smoky spices, this chili has layers of flavor that stick with you. The kidney and black beans soak up all the juices, making every bite hearty and satisfying—like a hug in a bowl.
- Meal Prep MVP: This recipe doubles as my lunch for days. The flavors actually get better after a night in the fridge, and reheating it is just as easy as making it. Pack it in containers for work, or freeze half for those nights when you just can’t.
- Budget-Friendly Feast: A 3 lb chuck roast stretches across multiple meals without breaking the bank, and canned beans keep the cost low. Honestly, it’s the kind of dish that makes me feel like I’m feeding a crowd without emptying my wallet.
Step-by-step instructions for Texas-style beef chili
Here’s how to build a rich, meaty chili that simmers down to perfect thickness and bold flavor.
Brown the Chuck Roast Beef for Deep Flavor
Heat a large Dutch oven over medium-high heat. Add the 3 lb chuck roast beef cut into 1-inch cubes in a single layer, leaving space between pieces. Let them sear undisturbed for 3-4 minutes until a deep brown crust forms on all sides.
This browning step is non-negotiable—it develops the Maillard reaction that creates that deep, meaty flavor. Once browned on one side, use tongs to flip the beef pieces and repeat. Work in batches if needed to avoid overcrowding the pan. Remove the beef and set it aside once all pieces are browned.
Sauté Onions and Garlic for Aromatic Base
In the same Dutch oven, add 2 whole yellow onions chopped into ½-inch pieces and cook for 5-6 minutes until softened and beginning to caramelize. Add the 6 cloves minced garlic and cook for another 30 seconds until fragrant.
Here’s where the flavor foundation gets built. The onions should be golden in spots but not burnt—if they start to brown too quickly, reduce heat slightly. The garlic should sizzle and fill your kitchen with that irresistible aroma. This step takes about 6 minutes total and sets up the chili’s depth of flavor.
Build the Chili Base with Tomatoes and Spices
Stir in the 2 cups canned diced tomatoes, 0.5 cup tomato paste, 2 tbsp chili powder, 1 tbsp ground cumin, 1 tbsp dried oregano, 0.5 tsp cayenne pepper, 1.5 tsp salt, and 0.5 tsp black pepper. Mix well to combine all ingredients thoroughly.
This is where the chili starts to come together. The tomato paste will thicken the mixture as it cooks, while the spices bloom and infuse the liquid. Let the mixture simmer for 5 minutes to allow the spices to develop their full flavor. You’ll notice the aroma becoming more complex and inviting.
Simmer the Chili to Perfect Thickness
Return the browned beef to the Dutch oven, add the 2 cups beef broth and 1 tbsp dark brown sugar, and bring to a gentle boil. Once boiling, reduce heat to low and let it simmer uncovered for 1.5 hours, stirring occasionally.
The chili should reduce until it reaches your desired thickness—it should coat the back of a spoon but still be spoonable. The beef should be fork-tender and easily pull apart. If it’s too thin, continue simmering uncovered. If it’s too thick, add ¼ cup water at a time until you reach the perfect consistency.
Finish with Beans and Rest Before Serving
Stir in the 2 cups drained kidney beans and 2 cups drained black beans. Let the chili simmer uncovered for another 15-20 minutes to heat through and allow the beans to absorb the flavors. Taste and adjust seasoning if needed—you might want to add a pinch more salt or cayenne.
Let the chili rest for 10-15 minutes before serving. This resting period allows all the flavors to meld together perfectly. Serve hot with your favorite toppings like shredded cheese, sour cream, or chopped green onions. Each bowl should be hearty, flavorful, and satisfying—just like Texas-style chili should be.
Pro Tips For Making 3 Lb Beef Chili
- SEAR THE BEEF FIRST: Cut that 3 lb chuck roast into 1.5-inch chunks and sear them in batches over medium-high heat—don’t overcrowd the pan. I learned this the hard way: skipping the sear means bland, gray beef instead of rich, caramelized chunks that hold up through hours of simmering.
- DICE ONIONS SMALL: Slice those yellow onions into 1/4-inch pieces—anything bigger stays tough after simmering. I used to chop them roughly, and they’d turn to mush, making the chili taste watery instead of deeply flavorful.
- ADD BEANS LATE: Hold off on tossing in the kidney and black beans until the last 15 minutes of cooking. They’ll absorb too much liquid too fast if you add them early, turning your chili into a sad, soupy mess.
- CRUSH GARLIC CLOVES: Instead of mincing, smash 3-4 garlic cloves with the flat side of your knife before adding them to the pot. This releases more flavor without burning—no more bitter garlic taste ruining an otherwise perfect chili.
Serving suggestions for this dish
Classic Texas Toppings
Start with a sprinkle of shredded sharp cheddar—about ¼ cup per bowl—to add a creamy, tangy contrast to the rich chili. I like Monterey Jack for its milder flavor or pepper jack for a subtle kick.
A dollop of sour cream or Mexican crema on top adds a cooling element that balances the heat. For extra crunch, toss 1 tbsp chopped green onions or thinly sliced jalapeños over each serving. 🧀
Crunchy Additions
For texture lovers, toast 1 tbsp crushed tortilla chips or Fritos in a dry skillet for 1-2 minutes until golden. Sprinkle them on top right before serving—they stay crisp and add a salty crunch.
Another favorite is diced avocado (about ¼ cup per bowl) for freshness, especially if your chili leans smoky. I also keep pickled red onions on hand for a tangy bite that cuts through the richness.
Bread Pairings
Serve with warm cornbread for the ultimate Texas combo—I make mine with Jiffy mix or a simple recipe using 1 cup cornmeal and 1 cup flour. For a gluten-free option, try crusty sourdough or cheesy garlic bread.
The bread soaks up any leftover chili, making it a perfect meal. If you’re serving a crowd, set out a basket of both—people will go back for seconds! 🍞
Spicy Kick Options
For heat lovers, add ½ tsp hot sauce (like Tabasco) or a dash of chipotle powder to each bowl. I also keep fresh cilantro and lime wedges on the table—squeeze a little lime over the top for brightness.
If you’re feeling adventurous, top with crumbled cotija cheese and a sprinkle of Tajín for a Mexican-inspired twist. Adjust heat to taste—this chili is forgiving!
Make-Ahead Serving
If prepping ahead, store chili in airtight containers with toppings on the side. Reheat gently on the stovetop with ¼ cup water** to prevent drying. Just before serving, add fresh toppings—this keeps everything crisp and vibrant.
For a crowd, set up a toppings bar with small bowls of cheese, sour cream, and jalapeños so everyone can customize their bowl. It’s a hit at parties! ✨
Nutrition facts
Frequently asked questions
Can I use ground beef instead of chuck roast for this recipe?
You can substitute 2 lbs of ground beef (80/20 lean-to-fat ratio) for the chuck roast, but the texture and flavor will differ. Ground beef will make the chili smoother and slightly less tender. For best results, brown the beef thoroughly and add 1 tbsp Worcestershire sauce to enhance depth. The cooking time reduces to 45-60 minutes since ground beef cooks faster than cubed roast.
How do I adjust the spice level for kids or sensitive eaters?
Reduce the cayenne pepper to ¼ tsp or omit it entirely, and cut chili powder to 1 tbsp. Add extra tomato paste (½ cup) and 1 tbsp cocoa powder for richness without heat. Serve with mild toppings like shredded cheddar and sour cream to balance flavors. Taste as you go—you can always add more spice later if needed!
What’s the best way to thicken chili that’s too thin?
Simmer uncovered for 10-15 extra minutes to reduce naturally. If still too thin, mix 1 tbsp cornstarch with 2 tbsp water, stir into the chili, and simmer 5 minutes more. For a heartier texture, mash ½ cup beans with a fork and stir back in. Avoid adding flour directly—it can make the chili gummy.
Can I make this chili in a slow cooker?
Brown the beef and sauté onions/garlic in a skillet first. Transfer everything to the slow cooker, add all remaining ingredients, and cook on low for 6-8 hours or high for 3-4 hours. The slow cooker method actually enhances flavor by allowing spices to meld gradually. Stir occasionally and add water if needed to maintain thickness.
Why did my chili turn out too acidic?
This usually happens from too much tomato paste or acidic ingredients. Balance it by adding 1 tbsp brown sugar or ½ tsp baking soda (a pinch at a time) to neutralize acidity. For future batches, reduce tomato paste to ¼ cup and add 1 extra cup beef broth to dilute acidity. Taste as you cook—acidity builds gradually during simmering.

- 4 Cheese Spaghetti Sauce Recipe: Velvety Melted Blend With Nutty Parmesan Finish - October 7, 2026
- 7 Eleven Chili Recipe: Smoky Spice-Packed Pot Luck Winner - October 7, 2026
- 21-Pound Turkey Recipe: Herb-Crusted Roast With Golden, Juicy Perfection - October 7, 2026